Struts2.3 + Spring3.1 + Hibernate3.6 + HTML5 + CSS3整合开发
Struts2.3 + Spring3.1 + Hibernate3.6 + HTML5 + CSS3整合开发
1 项目概述
1.1 必需的软件资源
| JAVA: JDK7 Server: Tomcat7 DB: MySQL5.5 Browser: Firefox3.5 IDE: MyEclispse9 |
1.2 HTML5的部分新特性
本项目采用Struts2的最新版本Struts2.3、Spring的最新版本Spring3.1和Hibernate3.6整合开发,另外在页面设计时采用了HTML5和CSS3技术
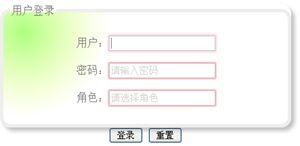
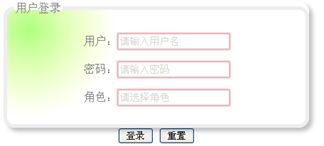
在HTML5中,增加了对表单数据的处理功能:如下所示:
-
当输入域为空且失去焦点时,出现提示信息,当输入域获得焦点后,提示信息自动消失
|
|
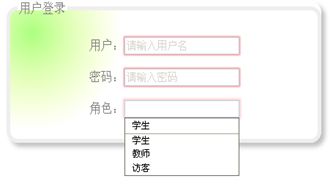
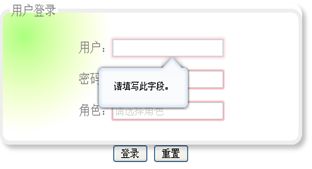
(2)在<input>标签中就可以验证输入的字段是否合法,不再需要javascript进行验证;另外,对以前的下拉列表也做了改进:
|
|
2 整合开发
2.1 搭建开发环境
2.1.1 安装JDK
在Oracle的官网(http://www.oracle.com)下载Java的最新版本jdk-7u5-windows-i586,下载链接:
安装完JDK7之后,配置JAVA_HOME
2.1.2 安装MySQL5
在MySQL的官网下下载MySQL5.5.25 网址为:http://www.mysql.com/downloads/installer/
在安装过程中,将MySQL的字符编码设置为gb2312 用户名密码均设为root
2.1.3 安装Tomcat7
在Apache官网(http://tomcat.apache.org/)下载apache-tomcat-7.0.29.gz, 解压之后得到apache-tomcat-7.0.29,将该软件安装到MyEclipse9上。
2.1.4 新建web项目
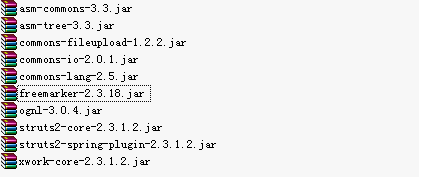
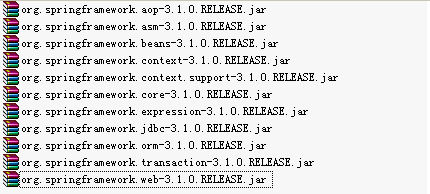
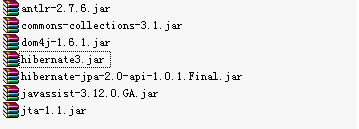
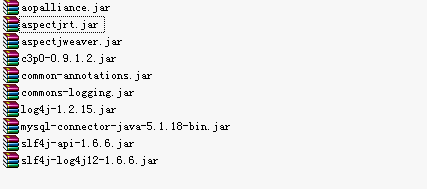
在MyEclipse9中新建WebProject 名为:SSH2 。 在WebRoot/WEN_INF/lib目录中添加如下38个jar文件
(1)在struts-2.3.1.2中 共需如下10个jar文件
|
|
(2)在spring-framework-3.1.0.RELEASE中 共需如下11个jar文件
|
|
(3)在hibernate3.6.10.Final中 共需如下7个jar文件
|
|
(4)所依赖的第三方jar包 共需如下10个jar文件
|
|
2.1.5 添加必需的配置文件
(1)在 /src下新建hibernate的配置文件:hibernate.model.xml
| <?xml version="1.0"?> <!DOCTYPE hibernate-configuration PUBLIC "-//Hibernate/Hibernate Configuration DTD 3.0//EN" "http://hibernate.sourceforge.net/hibernate-configuration-3.0.dtd"> <hibernate-configuration> <session-factory> </session-factory> </hibernate-configuration> |
(2) 在/src下新建spring的配置文件:applicationContext.xml
| <?xml version="1.0" encoding="UTF-8"?> <beans xmlns="http://www.springframework.org/schema/beans" xmlns:xsi="http://www.w3.org/2001/XMLSchema-instance" xmlns:context="http://www.springframework.org/schema/context" xmlns:tx="http://www.springframework.org/schema/tx" xmlns:aop="http://www.springframework.org/schema/aop" xsi:schemaLocation=" http://www.springframework.org/schema/beans http://www.springframework.org/schema/beans/spring-beans-3.0.xsd http://www.springframework.org/schema/context http://www.springframework.org/schema/context/spring-context-3.0.xsd http://www.springframework.org/schema/tx http://www.springframework.org/schema/tx/spring-tx-3.0.xsd http://www.springframework.org/schema/aop http://www.springframework.org/schema/aop/spring-aop-3.0.xsd"> </beans> |
(3)在/src下新建strtuts2的配置文件struts.xml
| <?xml version="1.0" encoding="UTF-8" ?> <!DOCTYPE struts PUBLIC "-//Apache Software Foundation//DTD Struts Configuration 2.0//EN" "http://struts.apache.org/dtds/struts-2.0.dtd"> <struts> <constant name="struts.devMode" value="true" /> <package name="default" namespace="/" extends="struts-default"> </package> </struts> |
(4)修改WebRoot/WEB-INF下的web.xml为如下内容:
| <?xml version="1.0" encoding="UTF-8"?> <web-app version="2.4" xmlns="http://java.sun.com/xml/ns/j2ee" xmlns:xsi="http://www.w3.org/2001/XMLSchema-instance" xsi:schemaLocation="http://java.sun.com/xml/ns/j2ee http://java.sun.com/xml/ns/j2ee/web-app_2_4.xsd"> <filter> <filter-name>struts2</filter-name> <filter-class> org.apache.struts2.dispatcher.ng.filter.StrutsPrepareAndExecuteFilter </filter-class> </filter>
<filter-mapping> <filter-name>struts2</filter-name> <url-pattern>/*</url-pattern> </filter-mapping>
<welcome-file-list> <welcome-file>index.jsp</welcome-file> </welcome-file-list>
<listener> <listener-class>org.springframework.web.context.ContextLoaderListener</listener-class> </listener>
<context-param> <param-name>contextConfigLocation</param-name> <param-value>classpath:applicationContext.xml</param-value> </context-param> </web-app> |
2.2 前台开发
2.2.1 页面设计
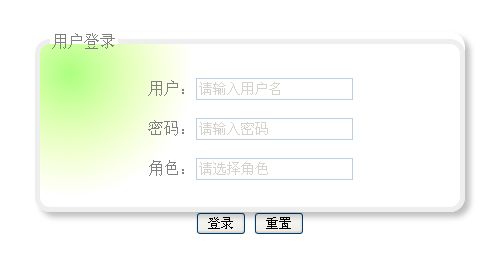
(1)index.jsp
|
|
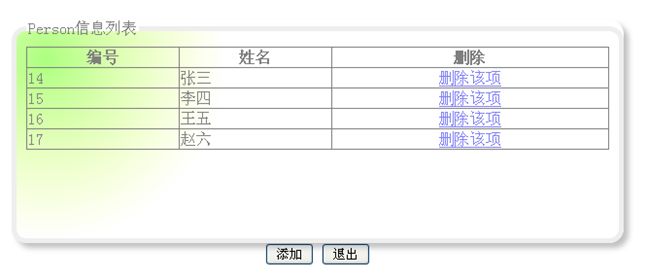
(2)person.jsp
|
|
(3)add.jsp
|
|
2.2.2 页面编写
(1)index.jsp
| <%@ page language="java" import="java.util.*" pageEncoding="UTF-8"%> <html> <head> <title>用户登录界面</title> <style type="text/css"> .login{ font-family: Arial; font-size: 14px; } </style> <link rel="stylesheet" href="CSS/css3.css" style="text/css"> </head> <body topmargin="150px"> <center> <p></p> <form action="person_login" method="post"> <fieldset id="inputs" style="width: 400; height: 150" class="newStyle"><br> <legend>用户登录</legend> 用户:<input type="text" class="login" name="user.username" placeholder="请输入用户名" autofocus required><br><br> 密码:<input type="password" class="login" name="user.password" placeholder="请输入密码" required><br><br> 角色:<input type="text" class="login" name="user.role" placeholder="请选择角色" list="searchlist" required/><br/><br> <datalist id="searchlist"> <option value="学生" label="学生"/> <option value="教师" label="教师"/> <option value="访客" label="访客"/> </datalist> </fieldset> <input type="submit" value="登录"> <input type="reset" value="重置"> </form> </center> </body> </html> |
(2)person.jsp
| <%@ page language="java" import="java.util.*" pageEncoding="UTF-8"%> <%@ taglib uri="/struts-tags" prefix="s"%> <html> <head> <title>个人信息列表</title> <link rel="stylesheet" href="CSS/css3.css" style="text/css"> </head> <body topmargin="100px"> <center> <p><p><p> <fieldset style="width: 600px; height:200px;" class="newStyle" > <legend>Person信息列表</legend> <table border="1" width="100%" align="center" style="border-collapse: collapse;" bordercolor="#000000"> <tr> <th>编号</th> <th>姓名</th> <th>删除</th> </tr> <s:iterator value="persons" id="person"> <tr> <td><s:property value="#person.personid"/></td> <td><s:property value="#person.name" /></td> <td align="center"><a href="person_del?personid=<s:property value='#person.personid'/>">删除该项</a> </tr> </s:iterator> </table> </fieldset> <input type="button" value="添加" onclick="window.location.href='add.jsp'"> <input type="button" value="退出" onclick="window.location.href='index.jsp'"> </center> </body> </html> |
(3)add.jsp
| <%@ page language="java" import="java.util.*" pageEncoding="UTF-8"%> <html> <head> <title>添加个人信息</title> <link rel="stylesheet" href="CSS/css3.css" style="text/css"> </head> <body topmargin="200px"> <center> <fieldset style="width: 400; height: 50" class="newStyle" > <legend>添加个人信息</legend> <form action="person_add" method="post"> <input type="text" name="name" placeholder="请输入姓名" autofocus required > <input type="submit" value="添加"> <input type="submit" value="返回" onclick="history.back()"> </form> </fieldset> </center> </body> </html> |
(4)success.jsp
| <%@ page language="java" import="java.util.*" pageEncoding="UTF-8"%> <html> <head> <script type="text/javascript"> window.location.href="person_get"; </script> </head> </html> |
(5)css3.css
| .newStyle { opacity: 0.5; box-shadow: 5px 5px 5px rgba(0, 0, 0, 0.5) ; padding:10px; width:300px; height:50px; border: 5px solid #dedede; -moz-border-radius: 15px; border-radius:15px; background: -moz-radial-gradient(30px 30px, circle farthest-corner, #58ff00 0%, rgba(222, 255, 0, 0) 30%); vertical-align: middle; } |
2.3 整合Spring+Hibertnate+c3p0
2.3.1 创建实体模型
本项目采用注解进行实体映射
Person.java
| import javax.persistence.Entity; import javax.persistence.GeneratedValue; import javax.persistence.GenerationType; import javax.persistence.Id; import javax.persistence.Table;
@Entity @Table(name="tb_person") public class Person {
private int personid;
private String name;
public Person(String name) { this.name = name; }
public Person(){}
@Id @GeneratedValue(strategy=GenerationType.AUTO) public int getPersonid() { return personid; } public void setPersonid(int personid) { this.personid = personid; } public String getName() { return name; } public void setName(String name) { this.name = name; } } |
User.java
| import javax.persistence.Entity; import javax.persistence.GeneratedValue; import javax.persistence.GenerationType; import javax.persistence.Id; import javax.persistence.Table;
@Entity @Table(name="tb_user") public class User { private int userid; private String username; private String password; private String role;
public User(){}
@Id @GeneratedValue(strategy=GenerationType.AUTO) public int getUserid() { return userid; } public void setUserid(int userid) { this.userid = userid; } public String getUsername() { return username; } public void setUsername(String username) { this.username = username; } public String getPassword() { return password; } public void setPassword(String password) { this.password = password; } public String getRole() { return role; } public void setRole(String role) { this.role = role; } } |
2.3.2 配置c3p0数据源
在applicationContext.xml中添加如下配置:
| <!-- 配置c3p0数据源 --> <bean id="dataSource" class="com.mchange.v2.c3p0.ComboPooledDataSource" destroy-method="close"> <property name="driverClass" value="com.mysql.jdbc.Driver"/> <property name="jdbcUrl" value="jdbc:mysql://localhost:3306/ssh2"/> <property name="user" value="root"/> <property name="password" value="root"/> <!--连接池中保留的最大连接数。Default: 15 --> <property name="maxPoolSize" value="15"/> <!--连接池中保留的最小连接数。--> <property name="minPoolSize" value="1"/> <!--初始化时获取三个连接,取值应在minPoolSize与maxPoolSize之间。Default: 3 --> <property name="initialPoolSize" value="3"/> <!--每60秒检查所有连接池中的空闲连接。Default: 0 --> <property name="idleConnectionTestPeriod" value="60"/> <!--最大空闲时间,60秒内未使用则连接被丢弃。若为0则永不丢弃。Default: 0 --> <property name="maxIdleTime" value="60"/> </bean> |
2.3.3 创建SessionFactory
在hibernate.model.xml中作如下配置:
| <mapping class="org.ay.domain.Person"/> <mapping class="org.ay.domain.User"/> |
在applicationContext.xml中添加如下配置:
| <!-- 配置SessionFactory --> <bean id="sessionFactory" class="org.springframework.orm.hibernate3.annotation.AnnotationSessionFactoryBean"> <property name="dataSource" ref="dataSource"/> <property name="configLocation" value="classpath:hibernate.model.xml"/> <property name="hibernateProperties"> <props> <prop key="hibernate.dialect">org.hibernate.dialect.MySQL5Dialect</prop> <prop key="hibernate.hbm2ddl.auto">update</prop> <prop key="hibernate.show_sql">true</prop> <prop key="hibernate.format_sql">false</prop> </props> </property> </bean> |
2.3.4 创建PersonDAO接口
| package org.ay.dao; import java.util.List; import org.ay.domain.Person; import org.ay.domain.User;
public interface PersonDAO { boolean login(User user);
void add(Person person);
void update(Person person);
void delete(int personid);
List<Person> getPersons(); } |
2.3.5 创建PersonDAOImpl实现类
| package org.ay.dao.impl;
import java.util.Iterator; import java.util.List;
import javax.annotation.Resource;
import org.ay.dao.PersonDAO; import org.ay.domain.Person; import org.ay.domain.User; import org.hibernate.Hibernate; import org.hibernate.Query; import org.hibernate.SessionFactory; import org.hibernate.type.Type; import org.springframework.stereotype.Repository;
@Repository public class PersonDAOImpl implements PersonDAO {
@Resource private SessionFactory sessionFactory;
public boolean login(User user){ String hql = "from User where username=? and password=? and role=?";
String[] params = new String[]{user.getUsername(), user.getPassword(),user.getRole()}; @SuppressWarnings("deprecation") Type[] types = new Type[]{Hibernate.STRING,Hibernate.STRING,Hibernate.STRING};
Query query = sessionFactory.getCurrentSession().createQuery(hql); query.setParameters(params,types); Iterator<?> iter = query.iterate(); if (iter.hasNext()) { return true; } return false; }
public void add(Person person) { sessionFactory.getCurrentSession().save(person); }
public void update(Person person) { Person old = (Person)sessionFactory.getCurrentSession().get(Person.class, person.getPersonid()); old.setName(person.getName()); }
public void delete(int personid) { Person person = (Person)sessionFactory.getCurrentSession().get(Person.class, personid); sessionFactory.getCurrentSession().delete(person); }
@SuppressWarnings("unchecked") public List<Person> getPersons() { return sessionFactory.getCurrentSession().createQuery("from Person").list(); } } |
2.3.6 使用Spring的扫描加注解功能
需要在applicationContext.xml中开启此功能
| <!--扫描加注解功能 --> <context:component-scan base-package="org.ay"/> |
2.3.7 基于XML的声明式事物管理
(1)配置Spring的事务管理器
| <bean id="trManager" class="org.springframework.orm.hibernate3.HibernateTransactionManager"> <property name="sessionFactory" ref="sessionFactory"/> </bean> |
(2)配置Advice
| <tx:advice id="advice" transaction-manager="trManager"> <tx:attributes> <tx:method name="add*" propagation="REQUIRED"/> <tx:method name="update*" propagation="REQUIRED"/> <tx:method name="del*" propagation="REQUIRED"/> <tx:method name="*" propagation="REQUIRED" read-only="true"/> </tx:attributes> </tx:advice> |
(3)配置PointCut
| <aop:config> <aop:pointcut expression="execution(* org.ay.dao.impl.*.*(..))" id="allMethod"/> <aop:advisor advice-ref="advice" pointcut-ref="allMethod"/> </aop:config> |
2.4 整合Spring+Struts2
2.4.1 在struts.xml中配置
| <global-results> <result name="error">/error.jsp</result> </global-results>
<action name="person_*" class="personAction" method="{1}"> <result name="success">/success.jsp</result> <result name="persons">/person.jsp</result> </action> |
2.4.2 创建PersonAction
| package org.ay.action;
import java.util.List; import javax.annotation.Resource; import org.ay.dao.PersonDAO; import org.ay.domain.Person; import org.ay.domain.User; import org.springframework.stereotype.Controller;
@Controller public class PersonAction {
@Resource private PersonDAO personDAOImpl;
private User user; private List<Person> persons; private String name; private int personid;
public int getPersonid() { return personid; }
public void setPersonid(int personid) { this.personid = personid; }
public String getName() { return name; }
public void setName(String name) { this.name = name; }
public List<Person> getPersons() { return persons; }
public User getUser() { return user; }
public void setUser(User user) { this.user = user; }
public String login(){ boolean ret = personDAOImpl.login(user); if (ret) { return "success"; } return "error"; }
public String add() { personDAOImpl.add(new Person(name)); return "success"; }
public String get() { persons = personDAOImpl.getPersons(); return "persons"; }
public String del() { personDAOImpl.delete(personid); return "success"; } } |
