Spark提交一个计算是调用spark-submit。
spark-submit 调用的是 bin目录下的spark-submit脚本,我们打开spark-submit脚本;
exec "${SPARK_HOME}"/bin/spark-class org.apache.spark.deploy.SparkSubmit "$@"
可以看到 spark-submit执行的是bin/spark-class文件。
CMD=("${CMD[@]:0:$LAST}")
exec "${CMD[@]}"
我们加一行打印命令:
......
CMD=("${CMD[@]:0:$LAST}")
echo "${CMD[@]}"
exec "${CMD[@]}"
我们提交一个计算:
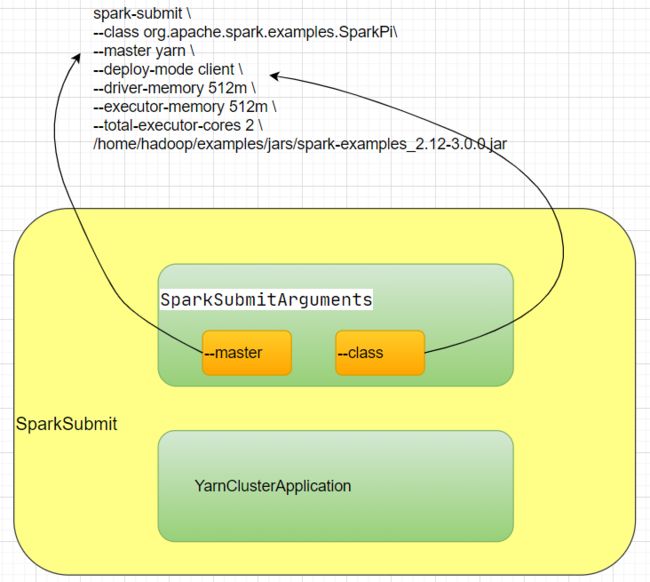
 spark-submit \
--class org.apache.spark.examples.SparkPi\
--master yarn \
--deploy-mode client \
--driver-memory 512m \
--executor-memory 512m \
--total-executor-cores 2 \
/home/hadoop/examples/jars/spark-examples_2.12-3.0.0.jar
打印出来的代码:
java -cp
......
-Xmx512m org.apache.spark.deploy.SparkSubmit
--master yarn --deploy-mode client
--conf spark.driver.memory=512m
--class MySpark --executor-memory 512m
--total-executor-cores 2 /
/home/hadoop/examples/jars/spark-examples_2.12-3.0.0.jar
java会启动一个SparkSubmit进程,执行SparkSubmit main 方法。
override def main(args: Array[String]): Unit = {
    val submit = new SparkSubmit() {
      self =>

      override protected def parseArguments(args: Array[String]): SparkSubmitArguments = {
        new SparkSubmitArguments(args) {
          override protected def logInfo(msg: => String): Unit = self.logInfo(msg)

          override protected def logWarning(msg: => String): Unit = self.logWarning(msg)

          override protected def logError(msg: => String): Unit = self.logError(msg)
        }
      }

      override protected def logInfo(msg: => String): Unit = printMessage(msg)

      override protected def logWarning(msg: => String): Unit = printMessage(s"Warning: $msg")

      override protected def logError(msg: => String): Unit = printMessage(s"Error: $msg")

      override def doSubmit(args: Array[String]): Unit = {
        try {
          super.doSubmit(args)
        } catch {
          case e: SparkUserAppException =>
            exitFn(e.exitCode)
        }
      }

    }

    submit.doSubmit(args)
  }
main方法会创建SparkSubmit对象,并且执行doSubmit方法;
def doSubmit(args: Array[String]): Unit = {
    // Initialize logging if it hasn't been done yet. Keep track of whether logging needs to
    // be reset before the application starts.
    val uninitLog = initializeLogIfNecessary(true, silent = true)

    val appArgs = parseArguments(args)
    if (appArgs.verbose) {
      logInfo(appArgs.toString)
    }
    appArgs.action match {
      case SparkSubmitAction.SUBMIT => submit(appArgs, uninitLog)
      case SparkSubmitAction.KILL => kill(appArgs)
      case SparkSubmitAction.REQUEST_STATUS => requestStatus(appArgs)
      case SparkSubmitAction.PRINT_VERSION => printVersion()
    }
  }
doSubmit方法首先进行参数解析;
val appArgs = parseArguments(args)
protected def parseArguments(args: Array[String]): SparkSubmitArguments = {
    new SparkSubmitArguments(args)
  }
打开SparkSubmitArguments类;
// Set parameters from command line arguments
  parse(args.asJava)
首先会从命令行参数里解析参数,使用正则表达式;
Pattern eqSeparatedOpt = Pattern.compile("(--[^=]+)=(.+)");
具体handle方法如下:
override protected def handle(opt: String, value: String): Boolean = {
    opt match {
      case NAME =>
        name = value

      case MASTER =>
        master = value

      case CLASS =>
        mainClass = value

      case DEPLOY_MODE =>
        if (value != "client" && value != "cluster") {
          error("--deploy-mode must be either \"client\" or \"cluster\"")
        }
        deployMode = value

      case NUM_EXECUTORS =>
        numExecutors = value

      case TOTAL_EXECUTOR_CORES =>
        totalExecutorCores = value

      case EXECUTOR_CORES =>
        executorCores = value

      case EXECUTOR_MEMORY =>
        executorMemory = value

      case DRIVER_MEMORY =>
        driverMemory = value

      case DRIVER_CORES =>
        driverCores = value
   ......
代码
case MASTER =>
        master = value
对应
protected final String MASTER = "--master";
//命令行代码
--master yarn
代码
case CLASS =>
        mainClass = value
对应
protected final String CLASS = "--class";
//命令行代码
--class org.apache.spark.examples.SparkPi
代码
case DEPLOY_MODE =>
  if (value != "client" && value != "cluster") {
    error("--deploy-mode must be either \"client\" or \"cluster\"")
  }
  deployMode = value
对应
protected final String DEPLOY_MODE = "--deploy-mode";
//命令行代码
--deploy-mode client
代码
case DRIVER_MEMORY =>
  driverMemory = value
对应
protected final String DRIVER_MEMORY = "--driver-memory";
//命令行代码
--driver-memory 512m
代码
case EXECUTOR_MEMORY =>
--executorMemory = value
对应
protected final String EXECUTOR_MEMORY = "--executor-memory";
//命令行代码
--executor-memory 512m
代码
case TOTAL_EXECUTOR_CORES =>
  totalExecutorCores = value
对应
protected final String TOTAL_EXECUTOR_CORES = "--total-executor-cores";
//命令行代码
--total-executor-cores 2
这样,我们就把 spark-submit提交的参数全部解析出来了。
SparkSubmitArguments类有个参数叫action
var action: SparkSubmitAction = null
默认值是null,默认被赋值为"SUBMIT"
appArgs.action match {
      case SparkSubmitAction.SUBMIT => submit(appArgs, uninitLog)
      case SparkSubmitAction.KILL => kill(appArgs)
      case SparkSubmitAction.REQUEST_STATUS => requestStatus(appArgs)
      case SparkSubmitAction.PRINT_VERSION => printVersion()
    }
深入submit方法,
private def submit(args: SparkSubmitArguments, uninitLog: Boolean): Unit = {

    def doRunMain(): Unit = {
      if (args.proxyUser != null) {
        val proxyUser = UserGroupInformation.createProxyUser(args.proxyUser,
          UserGroupInformation.getCurrentUser())
        try {
          proxyUser.doAs(new PrivilegedExceptionAction[Unit]() {
            override def run(): Unit = {
              runMain(args, uninitLog)
            }
          })
        } catch {
          case e: Exception =>
            // Hadoop's AuthorizationException suppresses the exception's stack trace, which
            // makes the message printed to the output by the JVM not very helpful. Instead,
            // detect exceptions with empty stack traces here, and treat them differently.
            if (e.getStackTrace().length == 0) {
              error(s"ERROR: ${e.getClass().getName()}: ${e.getMessage()}")
            } else {
              throw e
            }
        }
      } else {
        runMain(args, uninitLog)
      }
    }

    // In standalone cluster mode, there are two submission gateways:
    //   (1) The traditional RPC gateway using o.a.s.deploy.Client as a wrapper
    //   (2) The new REST-based gateway introduced in Spark 1.3
    // The latter is the default behavior as of Spark 1.3, but Spark submit will fail over
    // to use the legacy gateway if the master endpoint turns out to be not a REST server.
    if (args.isStandaloneCluster && args.useRest) {
      try {
        logInfo("Running Spark using the REST application submission protocol.")
        doRunMain()
      } catch {
        // Fail over to use the legacy submission gateway
        case e: SubmitRestConnectionException =>
          logWarning(s"Master endpoint ${args.master} was not a REST server. " +
            "Falling back to legacy submission gateway instead.")
          args.useRest = false
          submit(args, false)
      }
    // In all other modes, just run the main class as prepared
    } else {
      doRunMain()
    }
  }
submit方法首先会判断是不是standalone集群,我们提交的是yarn集群,那会执行doRunMain()方法。doRunMain方法有个判断是否使用代理用户,否则执行主程序。
深入runMain(),
runMain方法有个很重要的代码,准备提交环境;
val (childArgs, childClasspath, sparkConf, childMainClass) = prepareSubmitEnvironment(args)类加载器,
val loader = getSubmitClassLoader(sparkConf)
通过反射找出类的信息,
mainClass = Utils.classForName(childMainClass)
mainClass 有没有继承SparkApplication,如果有,则通过构造器直接创建实例
如果没有,直接new一个对象, new JavaMainApplication(mainClass)
val app: SparkApplication = if (classOf[SparkApplication].isAssignableFrom(mainClass)) {
  mainClass.getConstructor().newInstance().asInstanceOf[SparkApplication]
} else {
  new JavaMainApplication(mainClass)
}
调用SparkApplication的start方法。
try {
  app.start(childArgs.toArray, sparkConf)
} catch {
  case t: Throwable =>
    throw findCause(t)
}
我们深入 prepareSubmitEnvironment方法,
方法定义了四个变量,
// Return values
    val childArgs = new ArrayBuffer[String]()
    val childClasspath = new ArrayBuffer[String]()
    val sparkConf = args.toSparkConf()
    var childMainClass = ""
其中 childMainClass 是可变的,我们找到给childMainClass 赋值的地方,
 if (isYarnCluster) {
      childMainClass = YARN_CLUSTER_SUBMIT_CLASS
private[deploy] val YARN_CLUSTER_SUBMIT_CLASS =
"org.apache.spark.deploy.yarn.YarnClusterApplication"在Yarn框架下,childMainClass 赋值 "org.apache.spark.deploy.yarn.YarnClusterApplication"
private[spark] class YarnClusterApplication extends SparkApplication {

  override def start(args: Array[String], conf: SparkConf): Unit = {
    // SparkSubmit would use yarn cache to distribute files & jars in yarn mode,
    // so remove them from sparkConf here for yarn mode.
    conf.remove(JARS)
    conf.remove(FILES)

    new Client(new ClientArguments(args), conf, null).run()
  }
} 
深入Client
private[spark] class Client(
    val args: ClientArguments,
    val sparkConf: SparkConf,
    val rpcEnv: RpcEnv)
  extends Logging {

  import Client._
  import YarnSparkHadoopUtil._

  private val yarnClient = YarnClient.createYarnClient
  private val hadoopConf = new YarnConfiguration(SparkHadoopUtil.newConfiguration(sparkConf))

  private val isClusterMode = sparkConf.get(SUBMIT_DEPLOY_MODE) == "cluster"

  private val isClientUnmanagedAMEnabled = sparkConf.get(YARN_UNMANAGED_AM) && !isClusterMode
  private var appMaster: ApplicationMaster = _
  private var stagingDirPath: Path = _
Client会创建Yarn的客户端,
private val yarnClient = YarnClient.createYarnClient

深入YarnClient.createYarnClient,
public static YarnClient createYarnClient() {
    YarnClient client = new YarnClientImpl();
    return client;
}
createYarnClient创建一个对象 YarnClientImpl(),深入 YarnClientImpl(),
public class YarnClientImpl extends YarnClient {
    private static final Log LOG = LogFactory.getLog(YarnClientImpl.class);
    protected ApplicationClientProtocol rmClient;
....
rmClient就是resourcemanager的客户端。
我们回到YarnClusterApplication,进入run方法,
def run(): Unit = {
    this.appId = submitApplication()
......
submitApplication()方法就是提交应用程序,返回appId ,appId 是全局yarn的应用id,后续的状态、报告等都可以通过 appId 得到。
深入submitApplication(),
def submitApplication(): ApplicationId = {
    ResourceRequestHelper.validateResources(sparkConf)

    var appId: ApplicationId = null
    try {
      launcherBackend.connect()
      yarnClient.init(hadoopConf)
      yarnClient.start()

      logInfo("Requesting a new application from cluster with %d NodeManagers"
        .format(yarnClient.getYarnClusterMetrics.getNumNodeManagers))

      // Get a new application from our RM
      val newApp = yarnClient.createApplication()
      val newAppResponse = newApp.getNewApplicationResponse()
      appId = newAppResponse.getApplicationId()

      // The app staging dir based on the STAGING_DIR configuration if configured
      // otherwise based on the users home directory.
      val appStagingBaseDir = sparkConf.get(STAGING_DIR)
        .map { new Path(_, UserGroupInformation.getCurrentUser.getShortUserName) }
        .getOrElse(FileSystem.get(hadoopConf).getHomeDirectory())
      stagingDirPath = new Path(appStagingBaseDir, getAppStagingDir(appId))

      new CallerContext("CLIENT", sparkConf.get(APP_CALLER_CONTEXT),
        Option(appId.toString)).setCurrentContext()

      // Verify whether the cluster has enough resources for our AM
      verifyClusterResources(newAppResponse)

      // Set up the appropriate contexts to launch our AM
      val containerContext = createContainerLaunchContext(newAppResponse)
      val appContext = createApplicationSubmissionContext(newApp, containerContext)

      // Finally, submit and monitor the application
      logInfo(s"Submitting application $appId to ResourceManager")
      yarnClient.submitApplication(appContext)
      launcherBackend.setAppId(appId.toString)
      reportLauncherState(SparkAppHandle.State.SUBMITTED)
      ......
      ......
代码
try {
    launcherBackend.connect()
    yarnClient.init(hadoopConf)
    yarnClient.start()
表示连接Yarn成功,Yarn客户端开启;
// Get a new application from our RM
      val newApp = yarnClient.createApplication()
      val newAppResponse = newApp.getNewApplicationResponse()
      appId = newAppResponse.getApplicationId()
从我们的 resourcemanager开启一个应用,并且获得响应ID;
// Set up the appropriate contexts to launch our AM
//设置适当的上下文以启动我们的AM
val containerContext = createContainerLaunchContext(newAppResponse)
val appContext = createApplicationSubmissionContext(newApp, containerContext)
上面代码表示创建容器的启动环境和提交环境;
提交应用程序到ResourceManager
// Finally, submit and monitor the application
//最后,提交并监视应用程序
logInfo(s"Submitting application $appId to ResourceManager")
yarnClient.submitApplication(appContext)
launcherBackend.setAppId(appId.toString)
reportLauncherState(SparkAppHandle.State.SUBMITTED)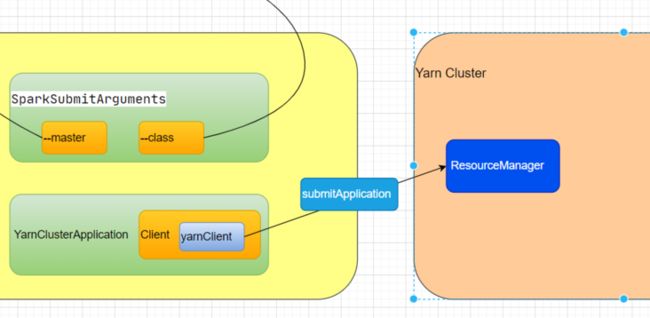
我们提交应用程序,也就是提交appContext,提交的是
val appContext = createApplicationSubmissionContext(newApp, containerContext)
先创建容器上下文,再准备应用提交上下文;
val containerContext = createContainerLaunchContext(newAppResponse)
深入createContainerLaunchContext,
val amClass =
      if (isClusterMode) {
        Utils.classForName("org.apache.spark.deploy.yarn.ApplicationMaster").getName
      } else {
        Utils.classForName("org.apache.spark.deploy.yarn.ExecutorLauncher").getName
      }
    if (args.primaryRFile != null &&
        (args.primaryRFile.endsWith(".R") || args.primaryRFile.endsWith(".r"))) {
      args.userArgs = ArrayBuffer(args.primaryRFile) ++ args.userArgs
    }
    val userArgs = args.userArgs.flatMap { arg =>
      Seq("--arg", YarnSparkHadoopUtil.escapeForShell(arg))
    }
    val amArgs =
      Seq(amClass) ++ userClass ++ userJar ++ primaryPyFile ++ primaryRFile ++ userArgs ++
      Seq("--properties-file",
        buildPath(Environment.PWD.$$(), LOCALIZED_CONF_DIR, SPARK_CONF_FILE)) ++
      Seq("--dist-cache-conf",
        buildPath(Environment.PWD.$$(), LOCALIZED_CONF_DIR, DIST_CACHE_CONF_FILE))

    // Command for the ApplicationMaster
    // AppMaster负责启动指令
    val commands = prefixEnv ++
      Seq(Environment.JAVA_HOME.$$() + "/bin/java", "-server") ++
      javaOpts ++ amArgs ++
      Seq(
        "1>", ApplicationConstants.LOG_DIR_EXPANSION_VAR + "/stdout",
        "2>", ApplicationConstants.LOG_DIR_EXPANSION_VAR + "/stderr")

    // TODO: it would be nicer to just make sure there are no null commands here
    val printableCommands = commands.map(s => if (s == null) "null" else s).toList
    amContainer.setCommands(printableCommands.asJava)
我们是集群环境,amClass 选择 "org.apache.spark.deploy.yarn.ApplicationMaster",然后组合成amArgs 启动一个JVM。commands 指令会包装一下,放到容器中,
// send the acl settings into YARN to control who has access via YARN interfaces
    val securityManager = new SecurityManager(sparkConf)
    amContainer.setApplicationACLs(
      YarnSparkHadoopUtil.getApplicationAclsForYarn(securityManager).asJava)
    setupSecurityToken(amContainer)
    amContainer
最后直接返回amContainer 容器。
RM会在NM的容器中启动AM 也就是在 容器中执行 "java org.apache.spark.deploy.yarn.ApplicationMaster",启动一个AM进程。
我们找到org.apache.spark.deploy.yarn.ApplicationMaster的 main 方法;
def main(args: Array[String]): Unit = {
    SignalUtils.registerLogger(log)
    val amArgs = new ApplicationMasterArguments(args)
    val sparkConf = new SparkConf()
    if (amArgs.propertiesFile != null) {
      Utils.getPropertiesFromFile(amArgs.propertiesFile).foreach { case (k, v) =>
        sparkConf.set(k, v)
      }
    }
    ......
main方法首先会new一个对象
val amArgs = new ApplicationMasterArguments(args)
该对象会把命令行参数进行封装成ApplicationMasterArguments(args) 对象。
 val yarnConf = new YarnConfiguration(SparkHadoopUtil.newConfiguration(sparkConf))
    master = new ApplicationMaster(amArgs, sparkConf, yarnConf)
传入 SparkConf和yarnConf创建AppMaster对象;
深入ApplicationMaster对象,对象里会创建YarnRMClient()对象
private val client = new YarnRMClient()

继续深入YarnRMClient;
private[spark] class YarnRMClient extends Logging {

  private var amClient: AMRMClient[ContainerRequest] = _
  private var uiHistoryAddress: String = _
  private var registered: Boolean = false
这个 AMRMClient 是 ApplicationMaster 连接 ResourceManager的客户端。
继续深入 org.apache.spark.deploy.yarn.ApplicationMaster 类。
ugi.doAs(new PrivilegedExceptionAction[Unit]() {
      override def run(): Unit = System.exit(master.run())
    })
这里master会执行run方法,我们深入run方法。
......
if (isClusterMode) {
        runDriver()
      } else {
        runExecutorLauncher()
      }
......
这里有个判断,如果是集群模式,则就运行runDriver(),否则运行runExecutorLauncher(),
我们是集群模式,执行runDriver();
private def runDriver(): Unit = {
    addAmIpFilter(None, System.getenv(ApplicationConstants.APPLICATION_WEB_PROXY_BASE_ENV))
    userClassThread = startUserApplication()
首先会开启用户应用线程,
 val totalWaitTime = sparkConf.get(AM_MAX_WAIT_TIME)
    try {
      val sc = ThreadUtils.awaitResult(sparkContextPromise.future,
        Duration(totalWaitTime, TimeUnit.MILLISECONDS))
      if (sc != null) {
        val rpcEnv = sc.env.rpcEnv
......
然后等待上下文环境对象;
我们深入 startUserApplication(),
val mainMethod = userClassLoader.loadClass(args.userClass)
      .getMethod("main", classOf[Array[String]])
这里会使用类加载器加载一个类,
case ("--class") :: value :: tail =>
          userClass = value
          args = tail
userClass 来自传入的参数 "--class",我们传入参数"--class org.apache.spark.examples.SparkPi"就在这里被用到,从指定的类当中找到"main"方法。
            sparkContextPromise.tryFailure(e.getCause())
        } finally {
          // Notify the thread waiting for the SparkContext, in case the application did not
          // instantiate one. This will do nothing when the user code instantiates a SparkContext
          // (with the correct master), or when the user code throws an exception (due to the
          // tryFailure above).
          sparkContextPromise.trySuccess(null)
初始化SparkContext。
    userThread.setContextClassLoader(userClassLoader)
    userThread.setName("Driver")
    userThread.start()
    userThread
随后启动线程,线程名字为"Driver";
我们回到 runDriver,启动线程,SparkContext对象初始化成功;
val totalWaitTime = sparkConf.get(AM_MAX_WAIT_TIME)
    try {
      val sc = ThreadUtils.awaitResult(sparkContextPromise.future,
        Duration(totalWaitTime, TimeUnit.MILLISECONDS))
      if (sc != null) {
        val rpcEnv = sc.env.rpcEnv

        val userConf = sc.getConf
        val host = userConf.get(DRIVER_HOST_ADDRESS)
        val port = userConf.get(DRIVER_PORT)
        //注册 ApplicationMaster
        //注册的目的是跟RM连接,申请资源
        registerAM(host, port, userConf, sc.ui.map(_.webUrl), appAttemptId)

        val driverRef = rpcEnv.setupEndpointRef(
          RpcAddress(host, port),
          YarnSchedulerBackend.ENDPOINT_NAME)
        createAllocator(driverRef, userConf, rpcEnv, appAttemptId, distCacheConf)

createAllocator创建分配器,我们深入代码,
 allocator = client.createAllocator(
      yarnConf,
      _sparkConf,
      appAttemptId,
      driverUrl,
      driverRef,
      securityMgr,
      localResources)

    // Initialize the AM endpoint *after* the allocator has been initialized. This ensures
    // that when the driver sends an initial executor request (e.g. after an AM restart),
    // the allocator is ready to service requests.
    rpcEnv.setupEndpoint("YarnAM", new AMEndpoint(rpcEnv, driverRef))

    allocator.allocateResources()
代码创建分配器,并且获得可分配资源。
深入allocateResources,
val allocateResponse = amClient.allocate(progressIndicator)
val allocatedContainers = allocateResponse.getAllocatedContainers()
表示拿到可分配的容器;
if (allocatedContainers.size > 0) {
      logDebug(("Allocated containers: %d. Current executor count: %d. " +
        "Launching executor count: %d. Cluster resources: %s.")
        .format(
          allocatedContainers.size,
          runningExecutors.size,
          numExecutorsStarting.get,
          allocateResponse.getAvailableResources))

      handleAllocatedContainers(allocatedContainers.asScala)
    }
如果容器容量大于0,就可以分配容器;深入handleAllocatedContainers;
def handleAllocatedContainers(allocatedContainers: Seq[Container]): Unit = {
    val containersToUse = new ArrayBuffer[Container](allocatedContainers.size)

    // Match incoming requests by host
    val remainingAfterHostMatches = new ArrayBuffer[Container]
    for (allocatedContainer <- allocatedContainers) {
      matchContainerToRequest(allocatedContainer, allocatedContainer.getNodeId.getHost,
        containersToUse, remainingAfterHostMatches)
    }

    // Match remaining by rack. Because YARN's RackResolver swallows thread interrupts
    // (see SPARK-27094), which can cause this code to miss interrupts from the AM, use
    // a separate thread to perform the operation.
    val remainingAfterRackMatches = new ArrayBuffer[Container]
    if (remainingAfterHostMatches.nonEmpty) {
      var exception: Option[Throwable] = None
      val thread = new Thread("spark-rack-resolver") {
        override def run(): Unit = {
          try {
            for (allocatedContainer <- remainingAfterHostMatches) {
              val rack = resolver.resolve(allocatedContainer.getNodeId.getHost)
              matchContainerToRequest(allocatedContainer, rack, containersToUse,
                remainingAfterRackMatches)
            }
          } catch {
            case e: Throwable =>
              exception = Some(e)
          }
        }
      }
      thread.setDaemon(true)
      thread.start()

      try {
        thread.join()
      } catch {
        case e: InterruptedException =>
          thread.interrupt()
          throw e
      }

      if (exception.isDefined) {
        throw exception.get
      }
    }

    // Assign remaining that are neither node-local nor rack-local
    val remainingAfterOffRackMatches = new ArrayBuffer[Container]
    for (allocatedContainer <- remainingAfterRackMatches) {
      matchContainerToRequest(allocatedContainer, ANY_HOST, containersToUse,
        remainingAfterOffRackMatches)
    }

    if (remainingAfterOffRackMatches.nonEmpty) {
      logDebug(s"Releasing ${remainingAfterOffRackMatches.size} unneeded containers that were " +
        s"allocated to us")
      for (container <- remainingAfterOffRackMatches) {
        internalReleaseContainer(container)
      }
    }

    runAllocatedContainers(containersToUse)
代码根据主机信息,机架信息来处理可分配信息。
处理完之后,执行
runAllocatedContainers(containersToUse)
深入runAllocatedContainers
private def runAllocatedContainers(containersToUse: ArrayBuffer[Container]): Unit = {
    for (container <- containersToUse) {
      executorIdCounter += 1
      val executorHostname = container.getNodeId.getHost
      val containerId = container.getId
      val executorId = executorIdCounter.toString
      assert(container.getResource.getMemory >= resource.getMemory)
      logInfo(s"Launching container $containerId on host $executorHostname " +
        s"for executor with ID $executorId")

      def updateInternalState(): Unit = synchronized {
        runningExecutors.add(executorId)
        numExecutorsStarting.decrementAndGet()
        executorIdToContainer(executorId) = container
        containerIdToExecutorId(container.getId) = executorId

        val containerSet = allocatedHostToContainersMap.getOrElseUpdate(executorHostname,
          new HashSet[ContainerId])
        containerSet += containerId
        allocatedContainerToHostMap.put(containerId, executorHostname)
      }

      if (runningExecutors.size() < targetNumExecutors) {
        numExecutorsStarting.incrementAndGet()
        if (launchContainers) {
          launcherPool.execute(() => {
            try {
              new ExecutorRunnable(
                Some(container),
                conf,
                sparkConf,
                driverUrl,
                executorId,
                executorHostname,
                executorMemory,
                executorCores,
                appAttemptId.getApplicationId.toString,
                securityMgr,
                localResources,
                ResourceProfile.DEFAULT_RESOURCE_PROFILE_ID // use until fully supported
              ).run()
代码会遍历可用的容器,判断正在运行的容器大小 ,是否小于目标容器大小。如果小于,则就创建容器。
launcherPool是线程池。线程池启动execute,我们点开run方法。
def run(): Unit = {
    logDebug("Starting Executor Container")
    nmClient = NMClient.createNMClient()
    nmClient.init(conf)
    nmClient.start()
    startContainer()
  }
执行run的时候会创建nmClient,然后初始化,建立连接,最后启动容器。
深入startContainer;
val commands = prepareCommand()
ctx.setCommands(commands.asJava)

// Send the start request to the ContainerManager
    try {
      nmClient.startContainer(container.get, ctx)
    } catch {
      case ex: Exception =>
        throw new SparkException(s"Exception while starting container ${container.get.getId}" +
          s" on host $hostname", ex)
    }
首先准备commands,上下文,然后让一个NM启动Container;
深入prepareCommand(),
val commands = prefixEnv ++
      Seq(Environment.JAVA_HOME.$$() + "/bin/java", "-server") ++
      javaOpts ++
      Seq("org.apache.spark.executor.YarnCoarseGrainedExecutorBackend",
        "--driver-url", masterAddress,
        "--executor-id", executorId,
        "--hostname", hostname,
        "--cores", executorCores.toString,
        "--app-id", appId,
        "--resourceProfileId", resourceProfileId.toString) ++
      userClassPath ++
      Seq(
        s"1>${ApplicationConstants.LOG_DIR_EXPANSION_VAR}/stdout",
        s"2>${ApplicationConstants.LOG_DIR_EXPANSION_VAR}/stderr")
代码启动一个进程YarnCoarseGrainedExecutorBackend,说到启动Executor。=,就是启动
"org.apache.spark.executor.YarnCoarseGrainedExecutorBackend";

深入 YarnCoarseGrainedExecutorBackend,
def main(args: Array[String]): Unit = {
    val createFn: (RpcEnv, CoarseGrainedExecutorBackend.Arguments, SparkEnv, ResourceProfile) =>
      CoarseGrainedExecutorBackend = { case (rpcEnv, arguments, env, resourceProfile) =>
      new YarnCoarseGrainedExecutorBackend(rpcEnv, arguments.driverUrl, arguments.executorId,
        arguments.bindAddress, arguments.hostname, arguments.cores, arguments.userClassPath, env,
        arguments.resourcesFileOpt, resourceProfile)
    }
    val backendArgs = CoarseGrainedExecutorBackend.parseArguments(args,
      this.getClass.getCanonicalName.stripSuffix("$"))
    CoarseGrainedExecutorBackend.run(backendArgs, createFn)
    System.exit(0)
  }
创建YarnCoarseGrainedExecutorBackend对象,然后执行run方法;
 var driver: RpcEndpointRef = null
      val nTries = 3
      for (i <- 0 until nTries if driver == null) {
        try {
          driver = fetcher.setupEndpointRefByURI(arguments.driverUrl)
        } catch {
          case e: Throwable => if (i == nTries - 1) {
            throw e
          }
        }
      }
run方法内部连接了driver,
 val driverConf = new SparkConf()
      for ((key, value) <- props) {
        // this is required for SSL in standalone mode
        if (SparkConf.isExecutorStartupConf(key)) {
          driverConf.setIfMissing(key, value)
        } else {
          driverConf.set(key, value)
        }
      }

      cfg.hadoopDelegationCreds.foreach { tokens =>
        SparkHadoopUtil.get.addDelegationTokens(tokens, driverConf)
      }

      driverConf.set(EXECUTOR_ID, arguments.executorId)
      val env = SparkEnv.createExecutorEnv(driverConf, arguments.executorId, arguments.bindAddress,
        arguments.hostname, arguments.cores, cfg.ioEncryptionKey, isLocal = false)
代码创建了执行环境 env ,
env.rpcEnv.setupEndpoint("Executor",
        backendCreateFn(env.rpcEnv, arguments, env, cfg.resourceProfile))
      arguments.workerUrl.foreach { url =>
        env.rpcEnv.setupEndpoint("WorkerWatcher", new WorkerWatcher(env.rpcEnv, url))
      }
      env.rpcEnv.awaitTermination()
代码的意思是,在整个环境中安装一个通信终端。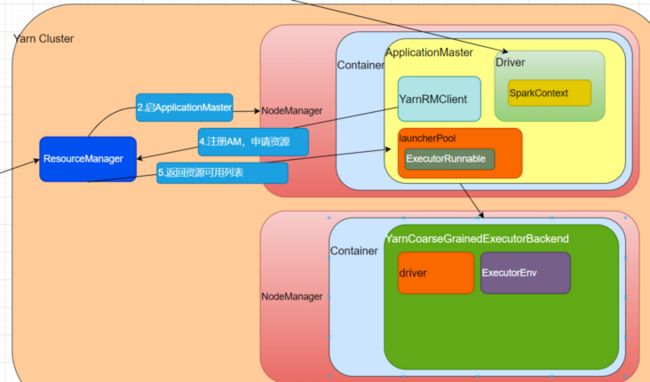
深入setupEndpoint,
override def setupEndpoint(name: String, endpoint: RpcEndpoint): RpcEndpointRef = {
    dispatcher.registerRpcEndpoint(name, endpoint)
  }
这里注册了RPC的通信终端,深入registerRpcEndpoint,
def registerRpcEndpoint(name: String, endpoint: RpcEndpoint): NettyRpcEndpointRef = {
    val addr = RpcEndpointAddress(nettyEnv.address, name)
    val endpointRef = new NettyRpcEndpointRef(nettyEnv.conf, addr, nettyEnv)
    synchronized {
      if (stopped) {
        throw new IllegalStateException("RpcEnv has been stopped")
      }
      if (endpoints.containsKey(name)) {
        throw new IllegalArgumentException(s"There is already an RpcEndpoint called $name")
      }

      // This must be done before assigning RpcEndpoint to MessageLoop, as MessageLoop sets Inbox be
      // active when registering, and endpointRef must be put into endpointRefs before onStart is
      // called.
      endpointRefs.put(endpoint, endpointRef)

      var messageLoop: MessageLoop = null
      try {
        messageLoop = endpoint match {
          case e: IsolatedRpcEndpoint =>
            new DedicatedMessageLoop(name, e, this)
          case _ =>
            sharedLoop.register(name, endpoint)
            sharedLoop
        }
        endpoints.put(name, messageLoop)
      } catch {
        case NonFatal(e) =>
          endpointRefs.remove(endpoint)
          throw e
      }
    }
    endpointRef
代码会定义一个消息循环器,进行模式匹配,匹配成功会创建DedicatedMessageLoop(name, e, this)对象。
深入DedicatedMessageLoop,
private class DedicatedMessageLoop(
    name: String,
    endpoint: IsolatedRpcEndpoint,
    dispatcher: Dispatcher)
  extends MessageLoop(dispatcher) {

  private val inbox = new Inbox(name, endpoint)

  override protected val threadpool = if (endpoint.threadCount() > 1) {
    ThreadUtils.newDaemonCachedThreadPool(s"dispatcher-$name", endpoint.threadCount())
  } else {
    ThreadUtils.newDaemonSingleThreadExecutor(s"dispatcher-$name")
  }
内部有创建Inbox和线程池threadpool,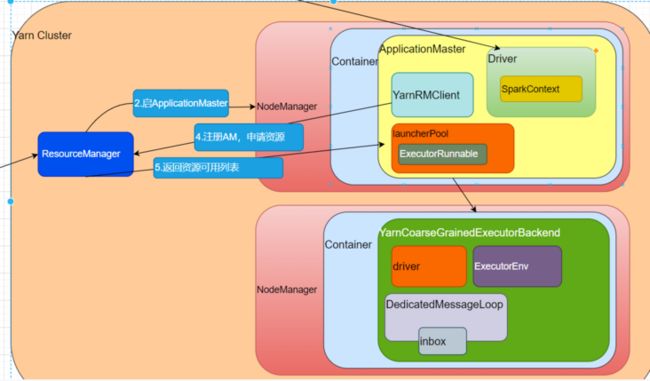
inbox是收件箱的意思,
private[netty] class Inbox(val endpointName: String, val endpoint: RpcEndpoint)
  extends Logging {

  inbox =>  // Give this an alias so we can use it more clearly in closures.

  @GuardedBy("this")
  protected val messages = new java.util.LinkedList[InboxMessage]()

  /** True if the inbox (and its associated endpoint) is stopped. */
  @GuardedBy("this")
  private var stopped = false

  /** Allow multiple threads to process messages at the same time. */
  @GuardedBy("this")
  private var enableConcurrent = false

  /** The number of threads processing messages for this inbox. */
  @GuardedBy("this")
  private var numActiveThreads = 0

  // OnStart should be the first message to process
  inbox.synchronized {
    messages.add(OnStart)
  }
通信环境有一个生命周期:
constructor -> onStart -> receive* -> onStop
我们当前节点有个收件箱,收件箱会发消息给自己,消息就叫OnStart。
当消息发送后,CoarseGrainedExecutorBackend会收到消息,会执行下面的OnStart代码,
override def onStart(): Unit = {
    logInfo("Connecting to driver: " + driverUrl)
    try {
      _resources = parseOrFindResources(resourcesFileOpt)
    } catch {
      case NonFatal(e) =>
        exitExecutor(1, "Unable to create executor due to " + e.getMessage, e)
    }
    rpcEnv.asyncSetupEndpointRefByURI(driverUrl).flatMap { ref =>
      // This is a very fast action so we can use "ThreadUtils.sameThread"
      driver = Some(ref)
      ref.ask[Boolean](RegisterExecutor(executorId, self, hostname, cores, extractLogUrls,
        extractAttributes, _resources, resourceProfile.id))
    }(ThreadUtils.sameThread).onComplete {
      case Success(_) =>
        self.send(RegisteredExecutor)
      case Failure(e) =>
        exitExecutor(1, s"Cannot register with driver: $driverUrl", e, notifyDriver = false)
    }(ThreadUtils.sameThread)
  }
代码连接driver,并且发送请求(ask),请求注册executor(RegisterExecutor)(向AppMaster注册)。注册executor会被ApplicationMaster的Driver的SparkContext收到。
SparkContext有个SchedulerBackend属性,
private var _schedulerBackend: SchedulerBackend = _private[spark] trait SchedulerBackend {
private val appId = "spark-application-" + System.currentTimeMillis
def start(): Unit
def stop(): Unit
def reviveOffers(): Unit
def defaultParallelism(): Int打开CoarseGrainedSchedulerBackend,这是一个通信终端。
onStart(),
override def onStart(): Unit = {
      // Periodically revive offers to allow delay scheduling to work
      val reviveIntervalMs = conf.get(SCHEDULER_REVIVE_INTERVAL).getOrElse(1000L)

      reviveThread.scheduleAtFixedRate(() => Utils.tryLogNonFatalError {
        Option(self).foreach(_.send(ReviveOffers))
      }, 0, reviveIntervalMs, TimeUnit.MILLISECONDS)
    }
receive(),
override def receive: PartialFunction[Any, Unit] = {
      case StatusUpdate(executorId, taskId, state, data, resources) =>
        scheduler.statusUpdate(taskId, state, data.value)
        if (TaskState.isFinished(state)) {
          executorDataMap.get(executorId) match {
            case Some(executorInfo) =>
              executorInfo.freeCores += scheduler.CPUS_PER_TASK
              resources.foreach { case (k, v) =>
                executorInfo.resourcesInfo.get(k).foreach { r =>
                  r.release(v.addresses)
                }
              }
              makeOffers(executorId)
            case None =>
              // Ignoring the update since we don't know about the executor.
              logWarning(s"Ignored task status update ($taskId state $state) " +
                s"from unknown executor with ID $executorId")
          }
        }

      case ReviveOffers =>
        makeOffers()
        ......
receiveAndReply,
override def receiveAndReply(context: RpcCallContext): PartialFunction[Any, Unit] = {

      case RegisterExecutor(executorId, executorRef, hostname, cores, logUrls,
          attributes, resources, resourceProfileId) =>
        if (executorDataMap.contains(executorId)) {
          context.sendFailure(new IllegalStateException(s"Duplicate executor ID: $executorId"))
        } else if (scheduler.nodeBlacklist.contains(hostname) ||
            isBlacklisted(executorId, hostname)) {
          // If the cluster manager gives us an executor on a blacklisted node (because it
          // already started allocating those resources before we informed it of our blacklist,
          // or if it ignored our blacklist), then we reject that executor immediately.
          logInfo(s"Rejecting $executorId as it has been blacklisted.")
          context.sendFailure(new IllegalStateException(s"Executor is blacklisted: $executorId"))
        } else {
......
在代码的 case RegisterExecutor处收到请求;
logInfo(s"Registered executor $executorRef ($executorAddress) with ID $executorId")
          addressToExecutorId(executorAddress) = executorId
          totalCoreCount.addAndGet(cores)
          totalRegisteredExecutors.addAndGet(1)
          val resourcesInfo = resources.map{ case (k, v) =>
            (v.name,
             new ExecutorResourceInfo(v.name, v.addresses,
               // tell the executor it can schedule resources up to numParts times,
               // as configured by the user, or set to 1 as that is the default (1 task/resource)
               taskResourceNumParts.getOrElse(v.name, 1)))
收到消息后,会在当前环境中做一次增加,totalRegisteredExecutors加1个;
 listenerBus.post(
            SparkListenerExecutorAdded(System.currentTimeMillis(), executorId, data))
          // Note: some tests expect the reply to come after we put the executor in the map
          context.reply(true)
        }
这里返回消息True,注册成功;
成功之后在CoarseGrainedExecutorBackend中,给自己发消息表示注册成功,
 }(ThreadUtils.sameThread).onComplete {
      case Success(_) =>
        self.send(RegisteredExecutor)
      case Failure(e) =>
        exitExecutor(1, s"Cannot register with driver: $driverUrl", e, notifyDriver = false)
    }(ThreadUtils.sameThread)
  }
自己给自己发消息"self.send(RegisteredExecutor)",自己会接收到,
override def receive: PartialFunction[Any, Unit] = {
    case RegisteredExecutor =>
      logInfo("Successfully registered with driver")
      try {
        executor = new Executor(executorId, hostname, env, userClassPath, isLocal = false,
          resources = _resources)
        driver.get.send(LaunchedExecutor(executorId))
      } catch {
        case NonFatal(e) =>
          exitExecutor(1, "Unable to create executor due to " + e.getMessage, e)
      }
这个对象就是货真价实的executor
executor = new Executor(executorId, hostname, env, userClassPath, isLocal = false,resources = _resources)启动成功driver后会发送消息"LaunchedExecutor"
driver.get.send(LaunchedExecutor(executorId))
CoarseGrainedSchedulerBackend会接收到,
 case LaunchedExecutor(executorId) =>
        executorDataMap.get(executorId).foreach { data =>
          data.freeCores = data.totalCores
        }
        makeOffers(executorId)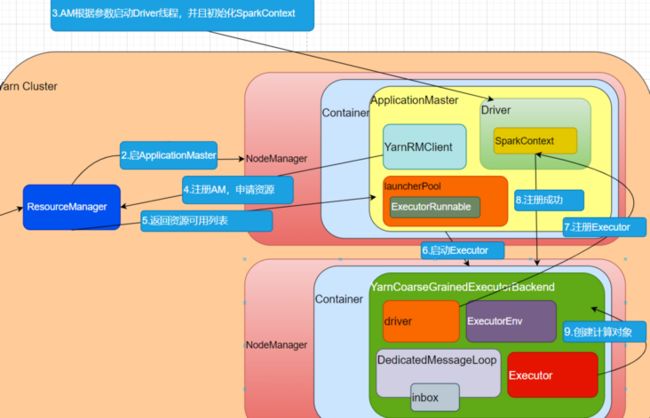
到这里,就成功了。