总体内容
1.推送通知的介绍
2.本地通知
3.远程通知
4.极光推送的使用
一、推送通知的介绍
-
1.1、推送通知的作用:让不在前台(后台或者关闭)的APP知道APP内部发生的事情,效果如下
 推送通知的效果
提示:这里说的推送通知跟
NSNotification有所区别-
NSNotification是抽象的,不可见的 - 推送通知是可见的(能用肉眼看到)
-
-
1.2、通知的分类
- (1)、本地通知
- 概念:由APP本身给应用程序推送消息,不需要服务器的支持
- 常见场景:记账软件定时提醒记账/番茄工作法中提醒你时间等等
- 注意:不是非常常用.
- (2)、远程通知
- 概念:由服务器推送消息给用户,需要服务器的支持
- 常见场景:微信提醒新消息/淘宝提醒有新活动/视频软件提供您有最新电影
- 注意:非常常用.但是如果仅仅是给用户提醒,客户端(你)做的事情就非常简单.
- (1)、本地通知
-
1.3、推送通知的呈现样式
-
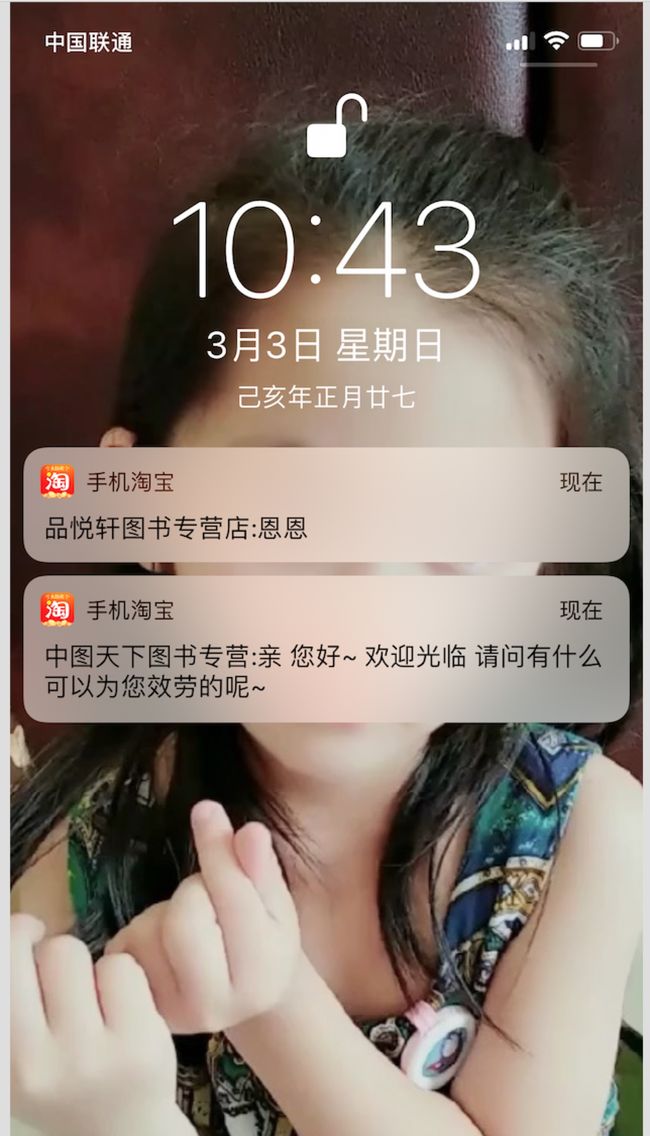
(1)、在屏幕顶部显示一块横幅
 在屏幕顶部显示一块横幅
 -
(2)、锁屏界面也可以显示
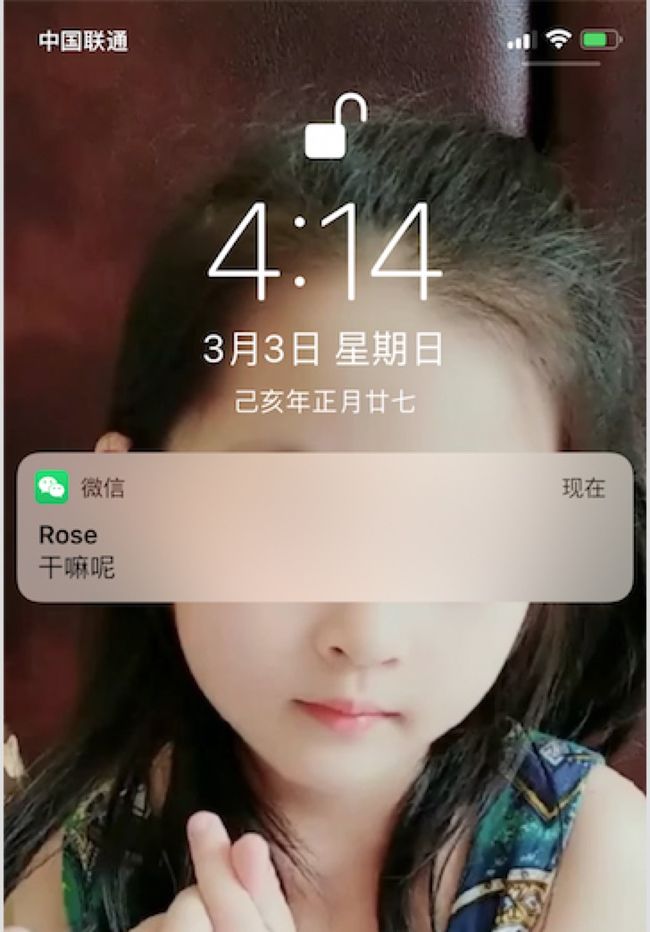 锁屏界面也可以显示
提示:收到通知还可以做如下操作
- 收到通知时,同时播放音效.(比如支付宝或者微信收账语音提示)
- 收到通知时,改变APP图标上的数字(app图标上的消息数量)
-
二、本地通知(不经常用),demo
-
2.1、本地通知的介绍
- 直接由应用程序(程序中写入对应代码)给用户发出通知
- 本地通知需要用到一个重要的类:
UILocalNotification - 本地通知的实现步骤:
- (1)、创建本地通知
- (2)、设置本地通知要发出的内容等信息
- 发出时间
- 发出内容
- 播放的音效
- (3)、调度本地通知
-
2.2、实现本地通知
-
(1)、注册通知
iOS8之后,如果想要发出通知(无论本地还是远程),必须先进行注册.(iOS8之前不需要)-
通常是在
AppDelegate的didFinishLaunchingWithOptions中进行注册,代码如下- (BOOL)application:(UIApplication *)application didFinishLaunchingWithOptions:(NSDictionary *)launchOptions { if (@available(iOS 10.0, *)) { //iOS10 UNUserNotificationCenter *center = [UNUserNotificationCenter currentNotificationCenter]; center.delegate = self; [center requestAuthorizationWithOptions:(UNAuthorizationOptionSound | UNAuthorizationOptionAlert | UNAuthorizationOptionBadge) completionHandler:^(BOOL granted, NSError * _Nullable error) { }]; }else{ /** // 不设置类型 UIUserNotificationTypeNone = 0, // 消息数量 UIUserNotificationTypeBadge = 1 << 0, // 声音 UIUserNotificationTypeSound = 1 << 1, // 弹出通知 UIUserNotificationTypeAlert = 1 << 2, */ UIUserNotificationSettings *notificationSettings = [UIUserNotificationSettings settingsForTypes:UIUserNotificationTypeBadge | UIUserNotificationTypeSound | UIUserNotificationTypeAlert categories:nil]; [application registerUserNotificationSettings:notificationSettings]; } return YES; }提示:
UIUserNotificationSettings在iOS10被废弃了,苹果推新的UNUserNotificationCenter,使用UNUserNotificationCenter需要导入#import,挂代理
-
(2)、创建并且发出通知
-
使用 UIUserNotificationSettings(iOS 8.0~
UNUserNotificationCenter((iOS 10.0及以后) if (@available(iOS 10.0, *)) { // 消息标识 NSString *identifier = @"request1"; // 获取通知中心用来激活新建的通知 UNUserNotificationCenter *center = [UNUserNotificationCenter currentNotificationCenter]; // 通知的内容 UNMutableNotificationContent *content = [[UNMutableNotificationContent alloc] init]; content.badge = [NSNumber numberWithInt:1]; content.title = @"测试"; content.body = @"干嘛呢"; content.sound = [UNNotificationSound defaultSound]; // 间隔多久推送一次 //UNTimeIntervalNotificationTrigger 延时推送 //UNCalendarNotificationTrigger 定时推送 //UNLocationNotificationTrigger 位置变化推送 // 当前时间之后的10s后推送一次(如果重复的话时间要大于等于60s) UNTimeIntervalNotificationTrigger *trigger = [UNTimeIntervalNotificationTrigger triggerWithTimeInterval:10 repeats:NO]; // 定时推送 //NSDateComponents *dateCom = [[NSDateComponents alloc] init]; // 每天下午3点10分推送 // dateCom.hour = 15; // dateCom.minute = 10; // UNCalendarNotificationTrigger *trigger = [UNCalendarNotificationTrigger triggerWithDateMatchingComponents:dateCom repeats:YES]; // 建立通知请求 UNNotificationRequest *notificationRequest = [UNNotificationRequest requestWithIdentifier:identifier content:content trigger:trigger]; // 将建立的通知请求添加到通知中心 [center addNotificationRequest:notificationRequest withCompletionHandler:^(NSError * _Nullable error) { if (error) { NSLog(@"%@本地推送 :( 报错 %@",identifier,error); }else{ NSLog(@"通知请求添加到通知中心 Success"); } }]; } else { // 1.创建本地通知 UILocalNotification *localNotification = [[UILocalNotification alloc]init]; // 2.设置通知显示的内容 // 2.1、设置通知弹出的时间 localNotification.fireDate = [NSDate dateWithTimeIntervalSinceNow:6]; // 2.2、设置通知中心的标题 localNotification.alertTitle = @"测试"; // 2.3、设置提示信息 localNotification.alertBody = @"干嘛呢"; // 2.4、设置滑块显示的文字 localNotification.alertAction = @"快点"; // 2.5、设置通知的声音 // 自定义声音 // localNotification.soundName = @"buyao.wav"; // 系统默认声音 localNotification.soundName = UILocalNotificationDefaultSoundName; // 2.6、设置应用程序图标右上角的数字 localNotification.applicationIconBadgeNumber = 1; // 3、调度本地通知(调度之后某个时刻会弹出通知) [[UIApplication sharedApplication]scheduleLocalNotification:localNotification]; }
提示:总体属性展示
// 设置通知弹出的时间
@property(nullable, nonatomic,copy) NSDate *fireDate;
// 时区,默认系统使用的时区
@property(nullable, nonatomic,copy) NSTimeZone *timeZone;
// 通知的重复间隔
@property(nonatomic) NSCalendarUnit repeatInterval;
// 重复日期
@property(nullable, nonatomic,copy) NSCalendar *repeatCalendar;
// 区域:当进入该区域时,就会发出一个通知
@property(nullable, nonatomic,copy) CLRegion *region NS_AVAILABLE_IOS(8_0);
// YES:进入某一个时区只会发出一次通知,NO:每次进入该区域都会发出通知
@property(nonatomic,assign) BOOL regionTriggersOnce NS_AVAILABLE_IOS(8_0);
// 提示信息
@property(nullable, nonatomic,copy) NSString *alertBody;
// 用于决定 alertAction 是否生效
@property(nonatomic) BOOL hasAction;
// 锁屏界面滑块下显示的文字
@property(nullable, nonatomic,copy) NSString *alertAction;
// 不需要设置
@property(nullable, nonatomic,copy) NSString *alertLaunchImage;
// 通知中心的标题
@property(nullable, nonatomic,copy) NSString *alertTitle NS_AVAILABLE_IOS(8_2);
// 设置通知发出时音效
@property(nullable, nonatomic,copy) NSString *soundName;
// 应用程序右上角的数字
@property(nonatomic) NSInteger applicationIconBadgeNumber;
// 额外信息
@property(nullable, nonatomic,copy) NSDictionary *userInfo; -
-
(3)、移除通知
// 移除所有的通知
[[UIApplication sharedApplication] cancelAllLocalNotifications];

// 移除某个通知
// [[UIApplication sharedApplication] cancelLocalNotification:@"某个通知对象"];
提示:如果在iOS 10之后
UNUserNotificationCenter可以如下移除通知, requestID 是标识符[center removePendingNotificationRequestsWithIdentifiers:@[requestID]]; [center removeAllDeliveredNotifications];
-
-
2.3、监听本地通知的点击
-
(1)、为什么要监听本地通知的点击?
- 通知点击之后会发生什么事情?
不管应用程序出于后台还是被杀死,点击通知都可以打开应用程序 - 什么情况下需要监听用户点击了通知(不常用)
比如:当用点击通知时,进入到某一个固定界面
- 通知点击之后会发生什么事情?
-
(2)、监听本地通知的点击,应用程序分很多种状态
在前台:如果在前台不需要进行页面跳转
在后台:点击应用时进行页面的跳转
被杀死:点击应用打开应用时,进行页面的跳转
-
应用程序在前台或者后台时的代码如下
// 应用在前台时,也会收到该通知,这时不应该进行页面的跳转 -(void)application:(UIApplication *)application didReceiveLocalNotification:(UILocalNotification *)notification{ NSLog(@"本地通知的点击"); /** UIApplicationStateActive, 前台 UIApplicationStateInactive, 进入前台 UIApplicationStateBackground 在后台 */ if (application.applicationState == UIApplicationStateActive) return; // 前台情况下 不做操作 // 进行页面的跳转 } -
应用程序被杀死时的情况下不会走上面的代码,但是不管是在任何情况下都会走下面的代码,通过
launchOptions的key来做出各种判断,代码如下- (BOOL)application:(UIApplication *)application didFinishLaunchingWithOptions:(NSDictionary *)launchOptions { if (@available(iOS 10.0, *)) { //iOS10 UNUserNotificationCenter *center = [UNUserNotificationCenter currentNotificationCenter]; center.delegate = self; [center requestAuthorizationWithOptions:(UNAuthorizationOptionSound | UNAuthorizationOptionAlert | UNAuthorizationOptionBadge) completionHandler:^(BOOL granted, NSError * _Nullable error) { }]; }else{ UIUserNotificationSettings *notificationSettings = [UIUserNotificationSettings settingsForTypes:UIUserNotificationTypeBadge | UIUserNotificationTypeSound | UIUserNotificationTypeAlert categories:nil]; [application registerUserNotificationSettings:notificationSettings]; } // 判断是否是通过点击通知打开了应用程序 if (launchOptions[UIApplicationLaunchOptionsLocalNotificationKey]) { // 在app杀死的情况下,本地通知的所走的地方 } return YES; }提示:对应
launchOptions的其他常用 key 如下- 对应的是启动应用程序的的远程通知信息userInfo(NSDictionary)
UIApplicationLaunchOptionsRemoteNotificationKey - 对应的是为启动应用程序的的本地通知对象(UILocalNotification)
UIApplicationLaunchOptionsLocalNotificationKey - 对应的对象为启动URL(NSURL)
UIApplicationLaunchOptionsURLKey - 从点击3D Touch iCon启动,对应的是点击的iCon的信息。
UIApplicationLaunchOptionsShortcutItemKey - 有关蓝牙的操作
UIApplicationLaunchOptionsBluetoothPeripheralsKey
UIApplicationLaunchOptionsBluetoothCentralsKey - 对应启动的源应用程序的bundle ID (NSString)
UIApplicationLaunchOptionsSourceApplicationKey
- 对应的是启动应用程序的的远程通知信息userInfo(NSDictionary)
-
三、远程通知,demo
-
3.1、什么是远程通知 ?
- 概念:由服务器发送消息给用户弹出消息的通知(需要联网)
- 远程推送服务,又称为
APNs(Apple Push Notification Services) -
APNs 通知:是指通过向 Apple APNs 服务器发送通知,到达 iOS 设备,由 iOS 系统提供展现的推送。用户可以通过 IOS 系统的 “设置” >> “通知” 进行设置,开启或者关闭某一个 App 的推送能力。
-
3.2、为什么需要远程通知 ?
- 例子:京东 搞活动,促销活动或者商品降价,想告知用户.但是该用户不经常打开京东APP.京东如何通知该用户有最新的活动呢?
- 传统方式:只有用户打开了京东客户端,客户端向服务器请求是否有最新的活动,才能在APP中告知用户活动.
- 局限性:只要用户关闭了app,就无法跟app的服务器沟通,无法从服务器上获得最新的数据内容
- 远程通知的好处:不管用户打开还是关闭app,只要联网了,都能接收到服务器推送的远程通知
-
3.3、远程通知的原理
-
(1)、原理图
 远程通知的原理图
 - (2)、为什么京东服务器不直接推消息给用户?
- 在通常情况下服务器端是不能主动向客户端推消息的.
- 如果想服务器端给客户端推消息,必须建立长连接
- 京东客户端在处于后台时(app杀死的情况下)不能和服务器端建立长连接
- (3)、为什么苹果服务器可以推消息给用户?
- 所有的苹果设备,在联网状态下,都会与苹果的服务器建立长连接
- 苹果建立长连接的作用: 时间校准、系统升级提示、查找我的iPhone、远程通知 等等
- 常见疑惑:苹果在推送消息时,如何准确的推送给某一个用户,并且知道是哪一个APP ?
- 在京东服务器把消息给苹果的APNs服务器时,必须告知苹果DeviceToken
- 什么是
DeviceToken?- DeviceToken是由用户手机的UDID和应用程序的BundleID共同生成的
- 通过DeviceToken可以找到唯一手机中的唯一应用程序
- 如何获得DeviceToken:客户端到苹果的APNs注册即可获得。
-
(4)、完整的流程图
 远程推送完整的流程图
-
-
3.4、如何做远程通知 ?
- 首先,BundleID对应的App ID必须是明确的(特殊功能)
- 该APPID必须配置两个证书
- 开发证书:用于调试远程推送
- 发布证书:用于发布后给用户推送消息
- 根据上面的App ID重新配置描述文件
- 安装对应的证书,即可开始测试远程推送
-
3.5、远程通知证书配置
-
(1)、我们先创建一个
CSR文件(又叫做:证书签名请求文件)(下面会用到,它是用来绑定电脑的)- 找到
Launchpad里面的 钥匙串访问
 钥匙串访问
钥匙串访问 - 打开
钥匙串访问->证书助理->从证书机构颁请求证书
 打开`钥匙串访问`->`证书助理`->`从证书机构颁请求证书`
 -
出现如下界面,选择存储到磁盘,点击继续
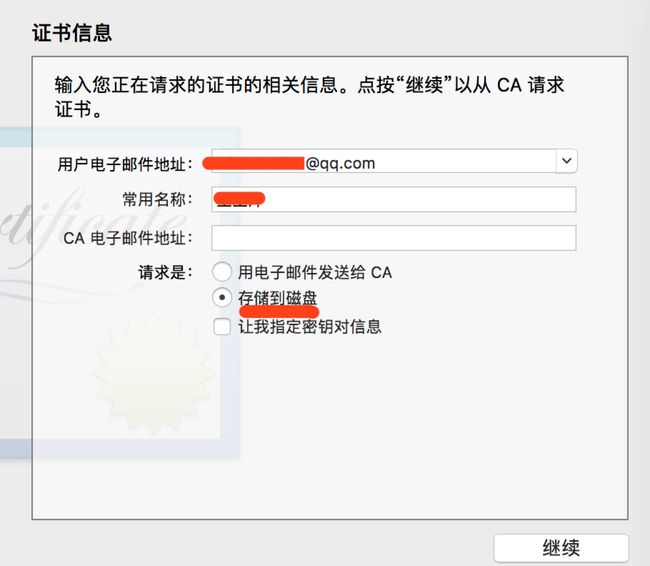 出现如下界面,选择存储到磁盘,点击继续
 -
选择存储到待会好找的地方(比如:桌面,自己建的文件夹等等),存储
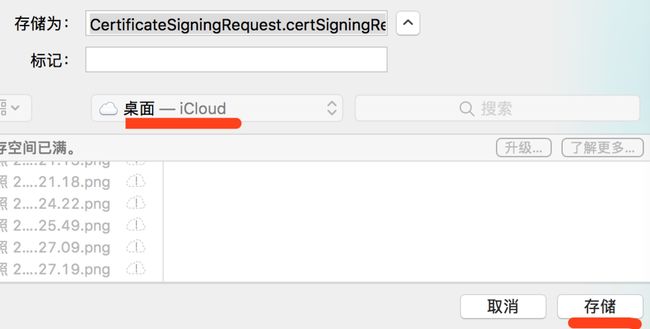 选择存储到待会好找的地方(比如:桌面,自己建的文件夹等等),存储
- 找到
-
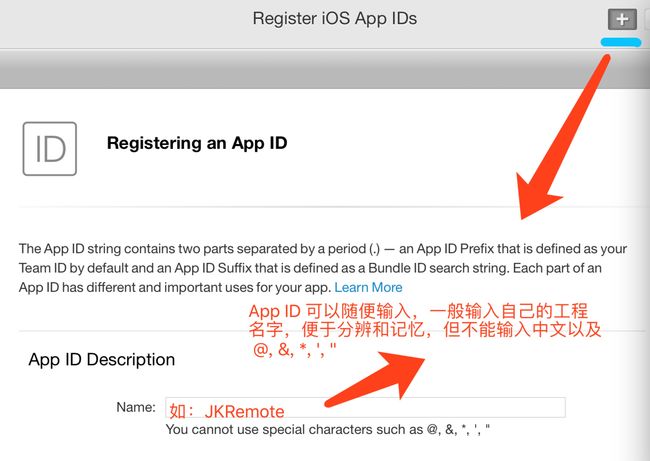
(2)、在
Identifiers里面创建一个明确的App ID,如下
 1
1
 2
2
 3
3- 提示:
Bundle ID一定要填写明确的
 4
4
 5
5 - 提示:
-
(3)、为
(2)中创建的App ID 配置推送 开发证书(测试证书)与推送发布证书
 配置推送 **开发证书**(测试证书)与推送**发布证书**
 点击上图的Edit之后滚动到下面
 选择我们上面创建的CSR文件
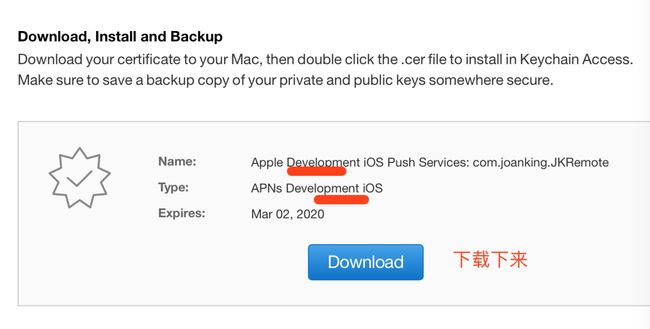 下载开发推送证书
提示:推送发布的证书也一样:点击
Create Certificate->选择 CSR 文件->下载发布推送证书
 开发证书和发布证书
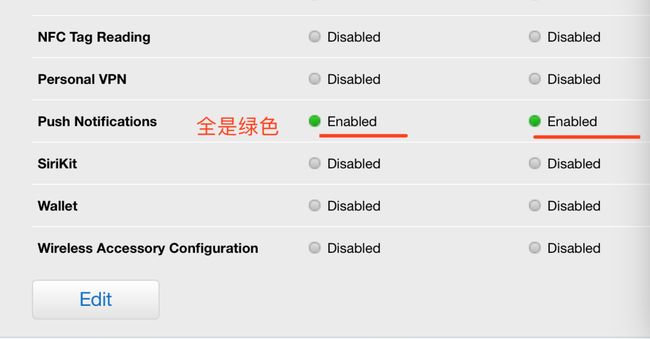 配置成功后的效果
- (4)、配置描述文件
-
iOS证书分2种,1种是开发证书,用来给你(开发人员)做真机测试的;1种是发布证书,发布证书又分发布到app store的(这里不提及)和发布测试的ad hoc证书。
 配置描述文件分类
 - 在此我们仅仅创建
iOS App Development来进行测试远程推送
 1
1
 2
2
 3
3
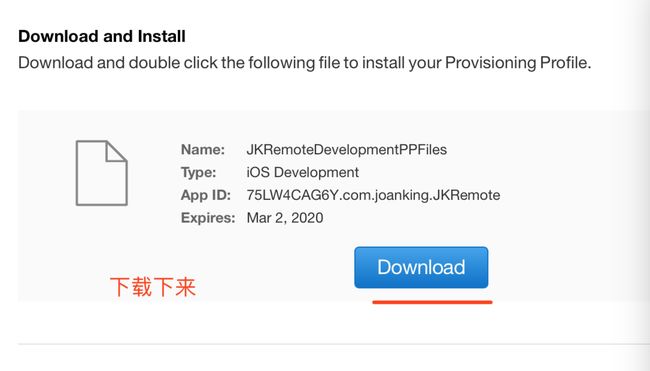 下载下来描述文件
- 提示:描述文件下载完后记得双击运行一下
-
-
-
3.6、获取远程推送要用的
DeviceToken-
(1)、工程的
Bundle identifier要与我们上面设置的App ID保持一致,并且打开下面的选项 WechatIMG39.jpeg
 -
(2)、在苹果的APNs服务器注册,以获取DeviceToken
-
通常在
AppDelegate里面的didFinishLaunchingWithOptions中添加如下代码进行注册- (BOOL)application:(UIApplication *)application didFinishLaunchingWithOptions:(NSDictionary *)launchOptions { if ([UIDevice currentDevice].systemVersion.doubleValue <= 8.0) { /** 向服务器发请求,要注册推送功能,以此获取到服务器返回的deviceToken type 用来说明 支持的通知形式 如 横幅 声音 角标 */ [application registerForRemoteNotificationTypes:UIRemoteNotificationTypeBadge|UIRemoteNotificationTypeSound|UIRemoteNotificationTypeAlert]; }else{ if (@available(iOS 10.0, *)) { //iOS10 // 1.向用户请求可以给用户推送消息 UNUserNotificationCenter *center = [UNUserNotificationCenter currentNotificationCenter]; center.delegate = self; [center requestAuthorizationWithOptions:(UNAuthorizationOptionSound | UNAuthorizationOptionAlert | UNAuthorizationOptionBadge) completionHandler:^(BOOL granted, NSError * _Nullable error) { }]; }else{ // 1.向用户请求可以给用户推送消息 UIUserNotificationSettings *notificationSettings = [UIUserNotificationSettings settingsForTypes:UIUserNotificationTypeBadge | UIUserNotificationTypeSound | UIUserNotificationTypeAlert categories:nil]; [application registerUserNotificationSettings:notificationSettings]; } // 2.注册远程通知(拿到用户的DeviceToken) [application registerForRemoteNotifications]; } return YES; } -
注册之后在另外一个代理方法中,拿到DeviceToken
- (void)application:(UIApplication *)application didRegisterForRemoteNotificationsWithDeviceToken:(NSData *)deviceToken { // 将用户的用户名和deviceToken发送给服务器,让服务器进行保存备份即可 NSLog(@"%@", deviceToken); // 例如:// 其中我们服务器要保存的 deviceToken 是不包括两边的尖括号的 } - (void)application:(UIApplication *)application didFailToRegisterForRemoteNotificationsWithError:(NSError *)error { NSLog(@"%@", error.userInfo); } - 提示:
- 获取到的
deviceToken发送给服务器,让服务器进行保存备份即可 - 我们服务器要保存的 deviceToken 是不包括两边的尖括号的
-
-
-
3.7、测试方式一: 远程通知
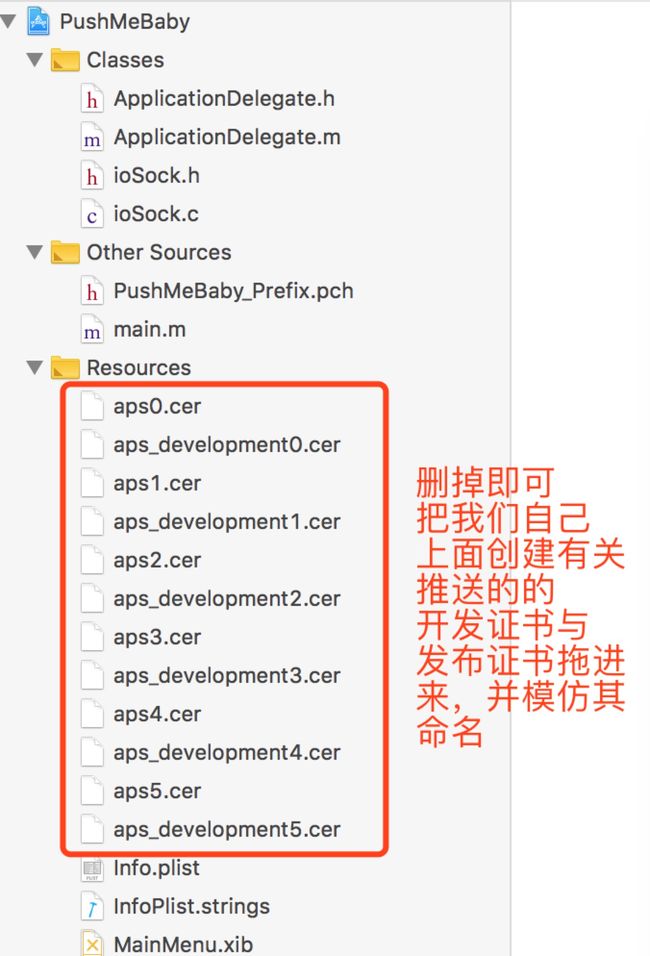
- (1)、使用一个第三方的Mac程序来测试:PushMeBaby,并删除里面的资源,把我们自己推送的开发证书与发布证书模仿其命名改名并拖进去
 WechatIMG3.jpeg
 修改后的工程
 - (2)、修改 PushMeBaby里面的
ApplicationDelegate.m,把self.deviceToken修改为我们上面3.6中运行后拿到的DeviceToken,切记DeviceToken不包含左右尖括号
 修改内容
修改内容- (3)、做完面操作,运行
PushMeBaby,选择相应的内容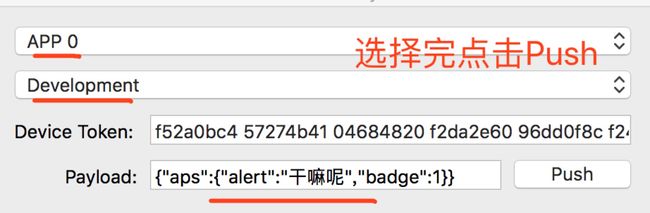 进行选择
进行选择
运行后的效果
- (1)、使用一个第三方的Mac程序来测试:PushMeBaby,并删除里面的资源,把我们自己推送的开发证书与发布证书模仿其命名改名并拖进去
-
3.8、测试方式二:使用SmartPush可以在电脑上方便的模拟APNs推送。运行程序,选择我们生成的证书和填上打印栏获得的DeviceToken,就能在我们的App中看到APNs推送来的带有3DTouch功能的通知。
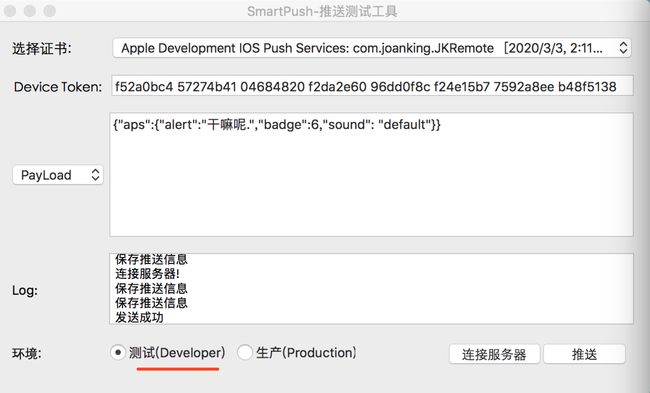 SmartPush
提示:推送的效果和上面的一样,但是体验更好,建议测试使用 SmartPush -
3.9、监听远程通知的点击事件,其实和本地通知的监听是一样的,一种是在前台和后台的监听,一种是在app杀死情况下的监听,代码如下
#import "AppDelegate.h" #import@interface AppDelegate () @end @implementation AppDelegate - (BOOL)application:(UIApplication *)application didFinishLaunchingWithOptions:(NSDictionary *)launchOptions { if ([UIDevice currentDevice].systemVersion.doubleValue <= 8.0) { //向服务器发请求,要注册推送功能,以此获取到服务器返回的deviceToken //type 用来说明 支持的通知形式 //如 横幅 声音 角标 [application registerForRemoteNotificationTypes:UIRemoteNotificationTypeBadge|UIRemoteNotificationTypeSound|UIRemoteNotificationTypeAlert]; }else{ if (@available(iOS 10.0, *)) { //iOS10 // 1.向用户请求可以给用户推送消息 UNUserNotificationCenter *center = [UNUserNotificationCenter currentNotificationCenter]; center.delegate = self; [center requestAuthorizationWithOptions:(UNAuthorizationOptionSound | UNAuthorizationOptionAlert | UNAuthorizationOptionBadge) completionHandler:^(BOOL granted, NSError * _Nullable error) { }]; }else{ // 1.向用户请求可以给用户推送消息 UIUserNotificationSettings *notificationSettings = [UIUserNotificationSettings settingsForTypes:UIUserNotificationTypeBadge | UIUserNotificationTypeSound | UIUserNotificationTypeAlert categories:nil]; [application registerUserNotificationSettings:notificationSettings]; } // 2.注册远程通知(拿到用户的DeviceToken) [application registerForRemoteNotifications]; } // 判断是否是通过点击通知打开了应用程序 if (launchOptions[UIApplicationLaunchOptionsRemoteNotificationKey]) { // 远程通知的监听 } return YES; } - (void)application:(UIApplication *)application didRegisterForRemoteNotificationsWithDeviceToken:(NSData *)deviceToken { // 将用户的用户名和deviceToken发送给服务器,让服务器进行保存备份即可 NSLog(@"%@", deviceToken); } - (void)application:(UIApplication *)application didFailToRegisterForRemoteNotificationsWithError:(NSError *)error { NSLog(@"%@", error); } #pragma mark 用户在后台状态或者前台状态收到远程通知的方法 -(void)application:(UIApplication *)application didReceiveRemoteNotification:(NSDictionary *)userInfo{ NSLog(@"收到远程通知"); // 应用在前台时,也会收到该通知,这时不应该进行页面的跳转 /** UIApplicationStateActive, 前台 UIApplicationStateInactive, 进入前台 UIApplicationStateBackground 在后台 */ if (application.applicationState == UIApplicationStateActive) return; // 前台情况下 不做操作 // 进行页面的跳转 } @end 提示:我们可以使用新的监听用户点击远程通知的方法,如下:(包含上面的两种监听方式)
/* 此方法是新的用于响应远程推送通知的方法 1.如果应用程序在后台,则通知到,点击查看,该方法自动执行 2.如果应用程序在前台,则通知到,该方法自动执行 3.如果应用程序被关闭,则通知到,点击查看,先执行didFinish方法,再执行该方法 4.可以开启后台刷新数据的功能 step1:点击target-->Capabilities-->Background Modes-->Remote Notification勾上 step2:在给APNs服务器发送的要推送的信息中,添加一组字符串如: {"aps":{"content-available":"999","alert":"bbbbb.","badge":1}} 其中content-availabel就是为了配合后台刷新而添加的内容,999可以随意定义 */ - (void)application:(UIApplication *)application didReceiveRemoteNotification:(NSDictionary *)userInfo fetchCompletionHandler:(void (^)(UIBackgroundFetchResult))completionHandler { // 前台情况下 不做操作 if (application.applicationState == UIApplicationStateActive) return; //NewData就是使用新的数据 更新界面,响应点击通知这个动作 completionHandler(UIBackgroundFetchResultNewData); }- 其中
content-availabel就是为了配合后台刷新而添加的内容,999可以随意定义
- 其中
四、极光推送 的使用,demo
-
4.1、极光推送 iOS 文档
APNs 通知:是指通过向 Apple APNs 服务器发送通知,到达 iOS 设备,由 iOS 系统提供展现的推送。用户可以通过 IOS 系统的 “设置” >> “通知” 进行设置,开启或者关闭某一个 App 的推送能力。
JPush iOS SDK 不负责 APNs 通知的展现,只是向 JPush 服务器端上传 Device Token 信息,JPush 服务器端代理开发者向 Apple APNs 推送通知。
-
APNs 通知与应用内消息对比
APNS 应用内消息 - 推送原则 由 JPush 服务器发送至 APNS 服务器,再下发到手机。 由 JPush 直接下发,每次推送都会尝试发送,如果用户在线则立即收到。否则保存为离线。 离线消息 离线消息由 APNS 服务器缓存按照 Apple 的逻辑处理。 用户不在线 JPush server 会保存离线消息,时长默认保留一天。离线消息保留 5 条。 推送与证书环境 应用证书和推送指定的 iOS 环境匹配才可以收到。 自定义消息与 APNS 证书环境无关。 接收方式 应用退出,后台以及打开状态都能收到 APNS。 需要应用打开,与 JPush 建立连接才能收到。 展示效果 如果应用后台或退出,会有系统的 APNS 提醒。如果应用处于打开状态,则不展示,iOS 10 开始可实现前台展示。 非 APNS,默认不展示。可通过获取接口自行编码处理。 处理函数 Apple 提供的接口:didReceiveRemoteNotification JPush 提供的接口:networkDidReceiveMessage -
JPush APNs 通知的意义
- OS 平台上推送通知,只有 APNs 这个官方的通道,是可以随时送达的。一般开发者都是自己部署应用服务器向 APNs Server 推送。
- JPush iOS 推送相比直接向 APNs 推送有什么好处呢?
- 减少开发及维护成本:
- 应用开发者不需要去开发维护自己的推送服务器与 APNs 对接。
- 集成了 JPush iOS SDK 后不必自己维护更新 device token。
- 通过 JPush 的 Web Portal 直接推送,也可以调用 JPush 的 HTTP 协议 API 来完成,开发工作量大大减少。
- 减少运营成本:
- 极光推送支持一次推送,同时向 Android, iOS, WinPhone 三个平台。支持统一的 API 与推送界面。
- 极光推送提供标签、别名绑定机制,以及提供了非常细分的用户分群方式,运营起来非常简单、直观。
- 提供应用内推送:
- 除了使得 APNs 推送更简单,也另外提供应用内消息推送。这在类似于聊天的场景里很有必要。
- 减少开发及维护成本:
-
4.2、在极光推送平台创建一个应用
 1
1
 2
2
 3
3 -
4.3、iOS SDK 集成,官网讲解的很详细,在此我们就简单的采用 Cocoapods 导入 极光推送的iOS SDK
-
通过 Cocoapods 下载地址:
pod 'JPush'提示:如果无法导入最新版本,请执行
pod repo update master这个命令来升级本机的 pod 库,然后重新pod 'JPush' -
如果需要安装指定版本则使用以下方式(以 3.1.0 版本为例):
pod 'JPush', '3.1.0'
提示:导入成功后还有一些工程的配置问题大家看官方文档即可
-
-
4.4、测试项目的
Bundle Identifier要与我们上面创建证书的Bundle ID保持一致,并且打开如下图所示
image
 静默推送的设置
静默推送(silent_push):如果只携带content-available: 1,不携带任何badge,sound 和消息内容等参数,则可以不打扰用户的情况下进行内容更新等操作即为“Silent Remote Notifications”。 -
4.5、在
AppDelegate.m导入极光推送的相应代码,在此我就不再导入了,说一下几个参数,在didFinishLaunchingWithOptions方法里面会使用到下面的参数-
appKey:选择 Web Portal 上 的应用 ,点击“设置”获取其 appkey 值。请确保应用内配置的 appkey 与 Portal 上创建应用后生成的 appkey 一致。
提示其实也就是我们上面创建应用成功后生成的key
channel:指明应用程序包的下载渠道,为方便分渠道统计,具体值由你自行定义,如:App Store。
-
apsForProduction:1.3.1 版本新增,用于标识当前应用所使用的 APNs 证书环境。
- 0(默认值)表示采用的是开发证书,1 表示采用生产证书发布应用。
注:此字段的值要与 Build Settings的Code Signing 配置的证书环境一致。
advertisingIdentifier: 详见关于 IDFA。
-
在demo里面我们写了一个来处理推送是跳转还是其他操作的方法
#pragma mark 对于推送的处理(可以把上面notificationUI的方法替换掉)
- (void)goToMessageViewControllerWithDic:(NSDictionary *)userInfo {

   if ([[userInfo objectForKey:@"go"] isEqualToString:@"update"]) {

       // 应用程序更新
       [[UIApplication sharedApplication]openURL:[NSURL URLWithString:@""]];
       return;
    }

   //将字段存入本地,因为要在你要跳转的页面用它来判断,这里我只介绍跳转一个页面,
   NSUserDefaults *pushJudge = [NSUserDefaults standardUserDefaults];
   [pushJudge setObject:@"push"forKey:@"push"];
   [pushJudge synchronize];
   // 这个是我要跳到的测试页面 (你的目标页面)
   TestViewController *testVC = [[TestViewController alloc]init];
   UINavigationController *nav = [[UINavigationController alloc]initWithRootViewController:testVC];//这里加导航栏是因为我跳转的页面带导航栏,如果跳转的页面不带导航,那这句话请省去。
   [self.window.rootViewController presentViewController:nav animated:YES completion:nil];

}
-
-
4.6、在极光推送后台进行推送,发送通知
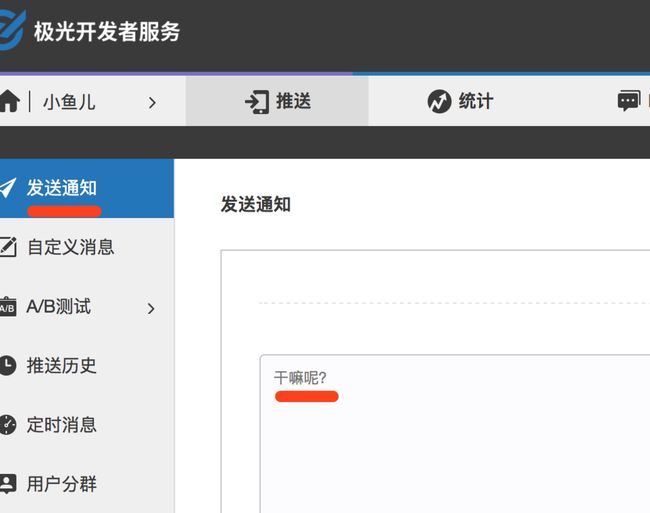 发送通知
发送通知
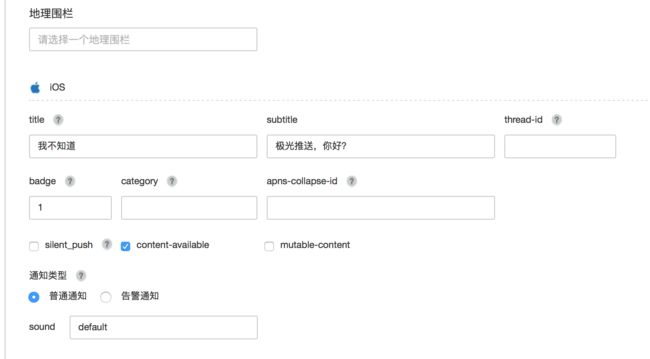 可选设置
可选设置-
在当我们点击推送后,我们在手机可以收到如下效果
 手机可以收到效果
 - 在app的
AppDelegate.m打印推送的内容,如下
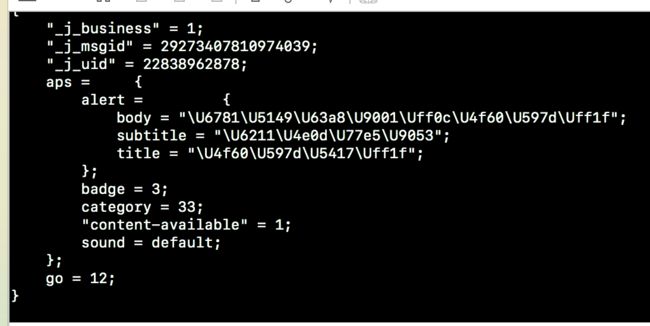 在app的 `AppDelegate.m` 打印推送的内容
-
到此,极光推送使用完毕,有兴趣还可以看看 个推 的推送
推荐本地通知与远程通知的博客:
iOS开发本地推送(iOS10)UNUserNotificationCenter
关于使用 UNUserNotificationCenter 的本地通知
iOS10 本地推送 UNUserNotificationCenter
iOS10 推送通知详解(UserNotifications)
iOS 远程推送通知
iOS10以前的本地通知和远程通知