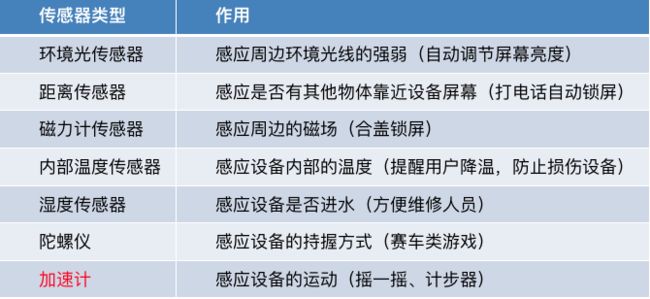
1、距离传感器
1738688-6633eebabdca7394.png
 // 1.开启距离传感器(注意: 默认情况距离传感器是关闭的)
//    [UIApplication sharedApplication].proximitySensingEnabled = YES;
    // 只要开启之后, 就开始实时监听
    [UIDevice currentDevice].proximityMonitoringEnabled = YES;

    // 2.当监听到有物体靠近设备时系统会发出通知
    [[NSNotificationCenter defaultCenter] addObserver:self selector:@selector(proximityStateDidChange:) name:UIDeviceProximityStateDidChangeNotification object:nil];

// 当监听到有物体靠近设备时调用
- (void)proximityStateDidChange:(NSNotification *)note
{
//    NSLog(@"%@", note);
   if( [UIDevice currentDevice].proximityState)
   {
       NSLog(@"有物体靠近");
   }else
   {
       NSLog(@"物体离开");
   }
}
2、加速计 CoreMotion
加速计的经典应用场景
- 摇一摇
- 计步器
方法1 push (一直在采集)
- (void)push
{
    // 1.创建coreMotion管理者
    //    CMMotionManager *mgr = [[CMMotionManager alloc] init];
    self.mgr = [[CMMotionManager alloc] init];

    // 2.判断加速计是否可用
    if (self.mgr.isAccelerometerAvailable) {
        /*
         isAccelerometerActive 是否正在采集
         accelerometerData 采集到得数据
         startAccelerometerUpdates  pull
         startAccelerometerUpdatesToQueue  push
         stopAccelerometerUpdates 停止采集
         accelerometerUpdateInterval 采样时间
         */
        // 3.设置采样时间
        self.mgr.accelerometerUpdateInterval = 1 / 30.0;
        // 4.开始采样

        [self.mgr startAccelerometerUpdatesToQueue:[NSOperationQueue mainQueue] withHandler:^(CMAccelerometerData *accelerometerData, NSError *error) {
            // 这个block是采集到数据时就会调用
            if (error) return ;
            CMAcceleration acceleration = accelerometerData.acceleration;
            NSLog(@"x = %f y = %f z = %f", acceleration.x, acceleration.y , acceleration.z);
        }];
    }else
    {
        NSLog(@"加速计不可用");
    }
}
方法2 pull (需要时才采集)
// 1.创建coreMotion管理者
    self.mgr = [[CMMotionManager alloc] init];

     if (self.mgr.isAccelerometerAvailable) {
          // 3.开始采样
         [self.mgr startAccelerometerUpdates]; // pull
     }else
     {
         NSLog(@"加速计不可用");
     }

- (void)touchesBegan:(NSSet *)touches withEvent:(UIEvent *)event
{
    CMAcceleration acceleration = self.mgr.accelerometerData.acceleration;

     NSLog(@"x = %f y = %f z = %f", acceleration.x, acceleration.y , acceleration.z);
}
3、蓝牙
iOS中提供了4个框架用于实现蓝牙连接
1、GameKit.framework(用法简单)
- 只能用于iOS设备之间的连接,多用于游戏(比如五子棋对战),从iOS7开始过期(仅限于沙盒)
- 只能用于iOS设备之间的连接
- 只能用于同一个应用程序之间的连接
- 最好别利用蓝牙发送比较大的数据
- (IBAction)connect {
    // 1.创建选择其他蓝牙设备的控制器
    GKPeerPickerController *peerPk = [[GKPeerPickerController alloc] init];
    // 2.成为该控制器的代理
    peerPk.delegate = self;
    // 3.显示蓝牙控制器
    [peerPk show];
}

#pragma mark - GKPeerPickerControllerDelegate
// 4.实现dialing方法
/**
 *  当蓝牙设备连接成功就会调用
 *
 *  @param picker  触发时间的控制器
 *  @param peerID  连接蓝牙设备的ID
 *  @param session 连接蓝牙的会话(可用通讯), 以后只要拿到session就可以传输数据
 */
- (void)peerPickerController:(GKPeerPickerController *)picker didConnectPeer:(NSString *)peerID toSession:(GKSession *)session
{
    NSLog(@"%@", peerID);
    // 1.保存会话
    self.session = session;

    // 2.设置监听接收传递过来的数据
    /*
     Handler: 谁来处理接收到得数据
     withContext: 传递数据
     */
    [self.session setDataReceiveHandler:self withContext:nil];


    // 2.关闭显示蓝牙设备控制器
    [picker dismiss];
}
/**
 *  接收到其它设备传递过来的数据就会调用
 *
 *  @param data    传递过来的数据
 *  @param peer    传递数据设备的ID
 *  @param session 会话
 *  @param context 注册监听时传递的数据
 */
- (void) receiveData:(NSData *)data fromPeer:(NSString *)peer inSession: (GKSession *)session context:(void *)context
{
//    NSLog(@"%s", __func__);
    // 1.将传递过来的数据转换为图片(注意: 因为发送的时图片, 所以才需要转换为图片)
    UIImage *image = [UIImage imageWithData:data];
    self.customIV.image = image;
}

- (void)peerPickerControllerDidCancel:(GKPeerPickerController *)picker
{

}

 #pragma mark —- 发送数据
- (IBAction)send {
    // 利用session发送图片数据即可
    // 1.取出customImageView上得图片, 转换为二进制
    UIImage *image =  self.customIV.image;
    NSData *data = UIImagePNGRepresentation(image);

    /*
     GKSendDataReliable, 数据安全的发送模式, 慢
     GKSendDataUnreliable, 数据不安全的发送模式, 快
     */

    /*
     data: 需要发送的数据
     DataReliable: 是否安全的发送数据(发送数据的模式)
     error: 是否监听发送错误
     */
    [self.session sendDataToAllPeers:data withDataMode:GKSendDataReliable error:nil];
}
2、MultipeerConnectivity.framework
只能用于iOS设备之间的连接,从iOS7开始引入,主要用于文件共享(仅限于沙盒的文件)用法跟GameKit类似
3、ExternalAccessory.framework
可用于第三方蓝牙设备交互,但是蓝牙设备必须经过苹果MFi认证(国内较少)
4、CoreBluetooth.framework(时下热门)
- 可用于第三方蓝牙设备交互,必须要支持蓝牙4.0
- 硬件至少是4s,系统至少是iOS6
- 蓝牙4.0以低功耗著称,一般也叫BLE(Bluetooth Low Energy)
- 目前应用比较多的案例:运动手坏、嵌入式设备、智能家居
每个蓝牙4.0设备都是通过服务(Service)和特征(Characteristic)来展示自己的
一个设备必然包含一个或多个服务,每个服务下面又包含若干个特征
特征是与外界交互的最小单位
比如说,一台蓝牙4.0设备,用特征A来描述自己的出厂信息,用特征B来收发数据
服务和特征都是用UUID来唯一标识的,通过UUID就能区别不同的服务和特征
设备里面各个服务(service)和特征(characteristic)的功能,均由蓝牙设备硬件厂商提供,比如哪些是用来交互(读写),哪些可获取模块信息(只读)等
Core Bluetooth的开发步骤:
- 建立中心设备
- 扫描外设(Discover Peripheral)
- 连接外设(Connect Peripheral)
- 扫描外设中的服务和特征(Discover Services And Characteristics)
- 利用特征与外设做数据交互(Explore And Interact)
断开连接(Disconnect)
#import "ViewController.h"
#import

@interface ViewController ()
/**
 *  外设
 */
@property (nonatomic, strong) NSMutableArray *peripherals;
/**
 *  中心管理者
 */
@property (nonatomic, strong) CBCentralManager *mgr;
@end

@implementation ViewController

- (NSMutableArray *)peripherals
{
    if (!_peripherals) {
        _peripherals = [NSMutableArray array];
    }
    return _peripherals;
}

- (void)viewDidLoad {
    [super viewDidLoad];
    // Do any additional setup after loading the view, typically from a nib.

    // 1.创建中心设备
    CBCentralManager *mgr = [[CBCentralManager alloc] init];
    self.mgr = mgr;


    // 设置代理
    mgr.delegate = self;

    // 2.利用中心设备扫描外部设备
    /*
     如果指定数组代表只扫描指定的设备
     */
    [mgr scanForPeripheralsWithServices:nil options:nil];
}
#pragma mark - CBCentralManagerDelegate
- (void)centralManager:(CBCentralManager *)central didDiscoverPeripheral:(CBPeripheral *)peripheral advertisementData:(NSDictionary *)advertisementData RSSI:(NSNumber *)RSSI
{

    // 保存扫描到得外部设备
    // 判断如果数组中不包含当前扫描到得外部设置才保存
    if (![self.peripherals containsObject:peripheral]) {

        peripheral.delegate = self;
        [self.peripherals addObject:peripheral];
    }
}

/**
 *  模拟点击, 然后连接所有的外设
 */
- (void)start
{
    for (CBPeripheral *peripheral in self.peripherals) {
        /**
         *  连接外设
         */
        [self.mgr connectPeripheral:peripheral options:nil];
    }
}
/**
 *  连接外设成功调用
 */
- (void)centralManager:(CBCentralManager *)central didConnectPeripheral:(CBPeripheral *)peripheral
{
    // 扫描外设中得服务
    [peripheral discoverServices:nil];
}
/**
 *  连接外设失败调用
 */
- (void)centralManager:(CBCentralManager *)central didDisconnectPeripheral:(CBPeripheral *)peripheral error:(NSError *)error
{

}

#pragma makr - CBPeripheralDelegate
/**
 *  只要扫描到服务就会调用
 *
 *  @param peripheral 服务所在的外设
 */
- (void)peripheral:(CBPeripheral *)peripheral didDiscoverServices:(NSError *)error
{

    // 获取外设中所有扫描到得服务
    NSArray *services = peripheral.services;
    for (CBService *service in services) {
        // 拿到需要的服务
        if ([service.UUID.UUIDString isEqualToString:@"123"])
        {
            // 从需要的服务中查找需要的特征
            // 从peripheral中得service中扫描特征
            [peripheral discoverCharacteristics:nil forService:service];
        }
    }
}

/**
 *  只要扫描到特征就会调用
 *
 *  @param peripheral 特征所属的外设
 *  @param service    特征所属的服务
 */
- (void)peripheral:(CBPeripheral *)peripheral didDiscoverCharacteristicsForService:(CBService *)service error:(NSError *)error
{

    // 拿到服务中所有的特征
    NSArray *characteristics =  service.characteristics;
    // 遍历特征, 拿到需要的特征处理
    for (CBCharacteristic * characteristic in characteristics) {
        if ([characteristic.UUID.UUIDString isEqualToString:@"8888"]) {
            NSLog(@"设置闹钟");

        }
    }
}
4、陀螺仪与方向感应器
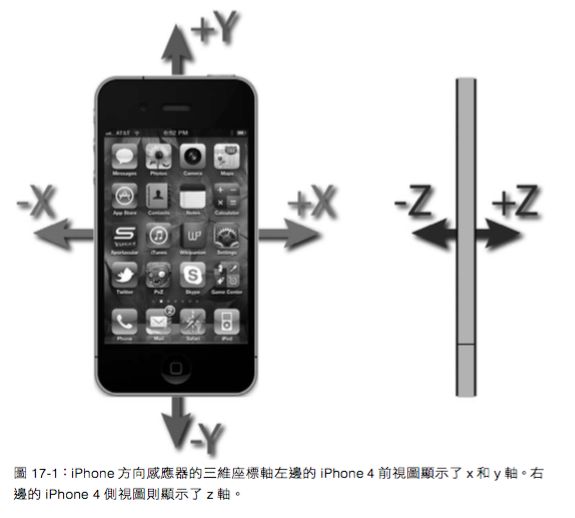
1738688-282c3f1bd6b4a7e1.png