首先、对UITableView进行讲解,下面有对它进行实际的应用
UITableView用处
显示大型内容的列表
单行
垂直滚动,没有水平滚动
大量的数据集
性能强大,而且普遍存在于iPhone的应用程序中
TableView Styles
UITableView有两个默认的内置风格:UITableViewStylePlain和UITableViewStyleGrouped
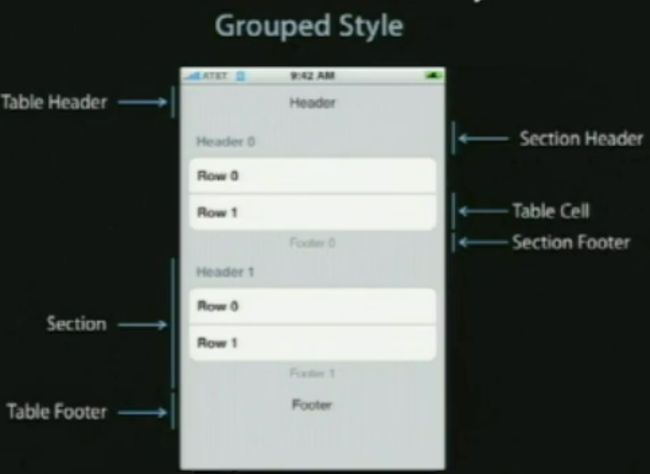
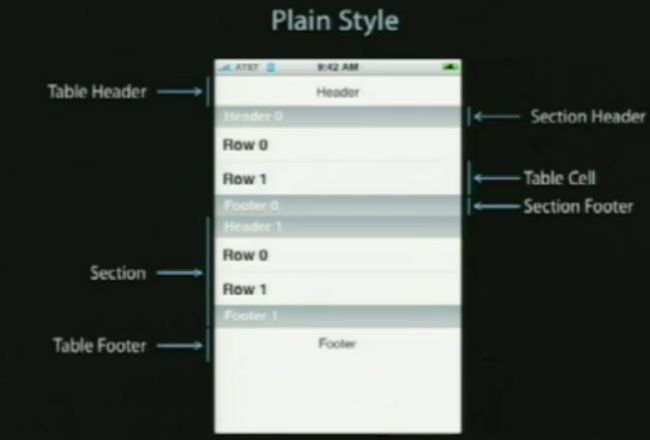
表格视图以及组成部分
在顶部,我们有表格header,它是UITableView上的一个可设置的属性,它只是个UIView,你能创建任何UIView子类或用UIImageView或UILable分配并设置它们为表格视图的tableheader view ,然后表格视图会安置它到你其余的内容之上,它会随着内容上下滚动。
在表格视图的内容底部,我们有表格footer,与header一样是UIView的任意子视图,它是你设置的UITableView的属性,然后表格视图会安置它到你其余的内容之下,在表格header和footer视图之间的是章节内容。
在章节中,有章节的header和章节的footer,在它们之间是所有的独立单元,就是Tablecell。如下图:
NSIndexPath
是Foundation框架中的一个普通的类,表格视图使用这个去表现在特定组中的特定行,UITableView用的所有索引路径正好有两个元素,第一个是组,第二个是行。
@interfaceNSIndexPath (UITableView) {
}
+(NSIndexPath*)indexPathForRow:(NSUInteger)row inSection:(NSUInteger)section;
@property(nonatomic,readonly)NSUIntegerrow;
@property(nonatomic,readonly)NSUIntegersection;
@end
单元复用(cellreuse)
当你轻滑屏幕,你必须一次滚动上百行的文字,很多很多的不同单元,它不会完成的很好,每次一个消失,你破坏呢个表格视图单元,然后为下一个创建新的,我们最终会做的是当一个表格视图单元从顶部消失,它会放在一个复用队列中,并且在你的TableViewCellforRowIndexPath方法中,你可以选择,当然你应该总是这样做,你有机会去在分配新的单元前,向表格视图询问复用队列其中的一个单元,如果一个单元已经从顶部滚轴消失,对于显示当前可视的东西,它不会必须的,你能取得它改变它的内容为你所需要显示的新行而它会被重新滚进底部。(有点像循环瀑布)
//取回可复用的一个单元
//-(UITableViewCell*)dequeueReusableCellWithindentifier:(NSString*)identifier;

-(UITableViewCell*)tableView:(UITableView*)tableView cellForRowAtIndexPath:(NSIndexPath*)indexPath
{
  UITableViewCell*cell = [tableView dequeueReusableCellWithIdentifier:@"MyIdentifier"];
  if(cell== nil){
  cell=[[[UITableViewCell alloc] initWithStyle:UITableViewCellStyleDefault reuseIdentifier:@"MyIdentifier"]autorelease];
  }
  cell.text= [myStringobjectAtIndex:indexPath.row];
  returncell;
}
UITableViewController
是UIViewController的子类,如果你想用全屏表格试图风格,它会是很便利的起点,表格试图会被自动创建,这包括控制器,表格视图,数据源和委派,它在你第一次出现时替你调用reloadData。
UITableViewCell
-(id)initWithStyle:(UITableviewCellStyle)style reuseIdentifier:(NSString *)reuseIdentifier ;
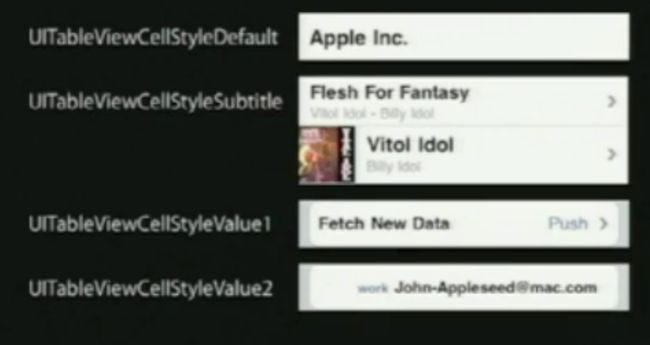
单元风格(cellstyle)
typedef NS_ENUM(NSInteger, UITableViewCellStyle) {
    UITableViewCellStyleDefault,    // Simple cell with text label and optional image view (behavior of UITableViewCell in iPhoneOS 2.x)
    UITableViewCellStyleValue1,     // Left aligned label on left and right aligned label on right with blue text (Used in Settings)
    UITableViewCellStyleValue2,     // Right aligned label on left with blue text and left aligned label on right (Used in Phone/Contacts)
    UITableViewCellStyleSubtitle    // Left aligned label on top and left aligned label on bottom with gray text (Used in iPod).
};             // available in iPhone OS 3.0
基本属性
UITableViewCell有一个图像视图和一到两个的文本标签
cell.imageView.image= [UIImage imageNamed:@”vitolidok.png”];
cell.textLabel.text= @”Vitol Idol”;
cell.detailTextLabel.text=@”Billy Idol”;
效果如图:
附件类型
//UITableView委托方法
-(UITableViewCellAccessoryType)tableView:(UITableView*)table accessoryTypeForRowWithIndexPath:(NSIndexPath *) indexPath;
代理
查看UITableView的帮助文档我们会注意到UITableView有两个Delegate分别为:dataSource和delegate。
dataSource是要实现UITableViewDataSource协议的对象,主要为UITableView提供显示用的数据(UITableViewCell),指定UITableViewCell支持的编辑操作类型(insert,delete和reordering),并根据用户的操作进行相应的数据更新操作,如果数据没有更具操作进行正确的更新,可能会导致显示异常,甚至crush。
delegate是实现UITableViewDelegate协议的对象,主要提供一些可选的方法,用来控制tableView的选择、指定section的头和尾的显示以及协助完成cell的删除和排序等功能。
示例:正常的使用方法
#import "TableViewViewController.h"

@implementation TableViewViewController

#pragma mark - View lifecycle
// Implement viewDidLoad to do additional setup after loading the view, typically from a nib.
- (void)viewDidLoad
{
    dataArray = [[NSMutableArray alloc] initWithObjects:@"1",@"2",@"3",@"4",@"5",nil];
    edit=NO;
    [super viewDidLoad];
    UIButton * button=[UIButton buttonWithType:UIButtonTypeCustom];
    button.frame=CGRectMake(10,10, 60,20);
    [button addTarget:self action:@selector(edit:) forControlEvents:UIControlEventTouchUpInside];
    [button setTitle:@"eidt" forState:UIControlStateNormal];
    [self.view addSubview:button];
    //创建一个tableview
    tableview=[[UITableView alloc] initWithFrame:CGRectMake(10, 40, 300, 400) style:UITableViewStylePlain];

    [self.view addSubview:tableview];
    tableview.delegate=self;
    tableview.dataSource=self;

    [tableview release];
}

-(void)edit:(id)sender
{
     [tableview setEditing:!tableview.editing animated:YES];
    if (edit) {
        edit=NO;
        [tableview setEditing:NO];
    }else
    {
        edit=YES;
        [tableview setEditing:YES];
    }
}

#pragma mark TableView Delegate
//对编辑的状态下提交的事件响应
-(void)tableView:(UITableView *)tableView commitEditingStyle:(UITableViewCellEditingStyle)editingStyle forRowAtIndexPath:(NSIndexPath *)indexPath
{
    NSLog(@"commond eidting style ");
    if (editingStyle == UITableViewCellEditingStyleDelete) {
        [dataArray removeObjectAtIndex:indexPath.row];
        // Delete the row from the data source.
        [tableview deleteRowsAtIndexPaths:[NSArray arrayWithObject:indexPath] withRowAnimation:UITableViewRowAnimationFade];
    }
    else if (editingStyle == UITableViewCellEditingStyleInsert) {
        // Create a new instance of the appropriate class, insert it into the array, and add a new row to the table view.
    }
}
//响应选中事件
-(void)tableView:(UITableView *)tableView didSelectRowAtIndexPath:(NSIndexPath *)indexPath{
    NSLog(@"did selectrow");
}
//行将显示的时候调用
-(void)tableView:(UITableView *)tableView willDisplayCell:(UITableViewCell *)cell forRowAtIndexPath:(NSIndexPath *)indexPath
{
    NSLog(@"will display cell");
}
//点击了附加图标时执行
-(void)tableView:(UITableView *)tableView accessoryButtonTappedForRowWithIndexPath:(NSIndexPath *)indexPath
{
    NSLog(@"accessoryButtonTappedForRowWithIndexPath");
}
//开始移动row时执行
-(void)tableView:(UITableView *)tableView moveRowAtIndexPath:(NSIndexPath *)sourceIndexPath toIndexPath:(NSIndexPath*)destinationIndexPath
{
    NSLog(@"moveRowAtIndexPath");
}
//开发可以编辑时执行
-(void)tableView:(UITableView *)tableView willBeginEditingRowAtIndexPath:(NSIndexPath *)indexPath
{
    NSLog(@"willBeginEditingRowAtIndexPath");
}
//选中之前执行
-(NSIndexPath*)tableView:(UITableView *)tableView willSelectRowAtIndexPath:(NSIndexPath *)indexPath
{
    NSLog(@"willSelectRowAtIndexPath");
    return indexPath;
}
//将取消选中时执行
-(NSIndexPath *)tableView:(UITableView *)tableView willDeselectRowAtIndexPath:(NSIndexPath *)indexPath
{
     NSLog(@"willDeselectRowAtIndexPath");
    return indexPath;
}
//移动row时执行
-(NSIndexPath *)tableView:(UITableView *)tableView targetIndexPathForMoveFromRowAtIndexPath:(NSIndexPath *)sourceIndexPath toProposedIndexPath:(NSIndexPath *)proposedDestinationIndexPath
{
     NSLog(@"targetIndexPathForMoveFromRowAtIndexPath");
    //用于限制只在当前section下面才可以移动
    if(sourceIndexPath.section != proposedDestinationIndexPath.section){
        return sourceIndexPath;
    }
    return proposedDestinationIndexPath;
}
//删除按钮的名字
-(NSString*)tableView:(UITableView *)tableView titleForDeleteConfirmationButtonForRowAtIndexPath:(NSIndexPath *)indexPath
{
    return @"删除按钮的名字";
}
//让表格可以修改,滑动可以修改
-(BOOL)tableView:(UITableView *)tableView canEditRowAtIndexPath:(NSIndexPath *)indexPath
{
    return YES;
}
//让行可以移动
-(BOOL)tableView:(UITableView *)tableView canMoveRowAtIndexPath:(NSIndexPath *)indexPath
{
    return YES;
}
-(UITableViewCellEditingStyle)tableView:(UITableView *)tableView editingStyleForRowAtIndexPath:(NSIndexPath *)indexPath
{
    NSLog(@"手指撮动了");
    return UITableViewCellEditingStyleDelete;
}

#pragma mark TableView DataSource
//组的数量
-(NSInteger)numberOfSectionsInTableView:(UITableView *)tableView{
    return 1;
}
//每组的cell行数
-(NSInteger)tableView:(UITableView *)tableView numberOfRowsInSection:(NSInteger)section{
    return [dataArray count];
}
//设置每个cell的显示内容
-(UITableViewCell *)tableView:(UITableView *)tableView cellForRowAtIndexPath:(NSIndexPath *)indexPath
{
    NSString * indetify=@"cell";
    UITableViewCell *cell=[tableView dequeueReusableCellWithIdentifier:indetify];
    if (cell==nil) {
        cell=[[UITableViewCell alloc] initWithStyle:UITableViewCellStyleDefault reuseIdentifier:indetify];
    }
    cell.textLabel.text=[dataArray objectAtIndex:indexPath.row];
    cell.accessoryType=UITableViewCellAccessoryCheckmark;//添加附加的样子
    return cell;
}

- (BOOL)shouldAutorotateToInterfaceOrientation:(UIInterfaceOrientation)interfaceOrientation
{
    // Return YES for supported orientations
    return (interfaceOrientation == UIInterfaceOrientationPortrait);
}

@end
自定义UITbaleViewCell
其实很简单,这方面例子很多,就不过多阐述了。只需要定义一个UItableViewCell的子类,然后在初始化cell的时候,使用自定义的cell生成cell就可以了。
//创建cell的子类
@interface CustomTableCell :UITableViewCell {

}
@end

... ...
//.m实现文件
- (id)initWithStyle:(UITableViewCellStyle)style reuseIdentifier:(NSString *)reuseIdentifier
{
    self = [super initWithStyle:style reuseIdentifier:reuseIdentifier];
    if (self) {
        //添加自定义的view
        [self.contentView addSubview:self.view_detail];
    }
    return self;
}

... ...
//设置每个cell的显示内容时 用自定义的cell类
-(UITableViewCell *)tableView:(UITableView *)tableView cellForRowAtIndexPath:(NSIndexPath *)indexPath
{
    NSString * indetify=@"cell";
    CustomTableCell *cell=[tableView dequeueReusableCellWithIdentifier:indetify];
    if (cell==nil) {
        cell=[[CustomTableCell alloc] initWithStyle:UITableViewCellStyleDefault reuseIdentifier:indetify];
    }
    //给自定义的view赋值显示的内容
   //。。。 。。。
    return cell;
}
其他注意事项
1、分割线
我们可以通过设置tableView的separatorStyle属性来设置有无分割线以及分割线的风格,其中style定义如下:
typedef enum {
UITableViewCellSeparatorStyleNone,
UITableViewCellSeparatorStyleSingleLine,
UITableViewCellSeparatorStyleSingleLineEtched
} UITableViewCellSeparatorStyle;
同时还可以通过tableView的separatorColor属性来设置分割线的颜色。
2、如何提高tableView的性能
a、重用cell
我们都知道申请内存是需要时间,特别是在一段时间内频繁的申请内存将会造成很大的开销,而且上tebleView中cell大部分情况下布局都是一样的,这个时候我们可以通过回收重用机制来提高性能。
b、避免content的重新布局
尽量避免在重用cell时候,对cell的重新布局,一般情况在在创建cell的时候就将cell布局好。
c、使用不透明的subView
在定制cell的时候,将要添加的subView设置成不透明的会大大减少多个view层叠加时渲染所需要的时间。
d、如果方便,直接重载subView的drawRect方法
如果定制cell的过程中需要多个小的元素的话,最好直接对要显示的多个项目进行绘制,而不是采用添加多个subView。
e、tableView的delegate的方法如非必要,尽量不要实现
tableView的delegate中的很多函数提供了对cell属性的进一步控制,比如每个cell的高度,cell是否可以编辑,支持的edit风格等,如非必要最好不要实现这些方法因为快速的调用这些方法也会影响性能。
以上是自己整理的一些资料和个人见解,欢迎提建议或改进,一起讨论学习。


