版本记录
| 版本号 | 时间 |
|---|---|
| V1.0 | 2018.10.13 星期六 |
前言
很多的app都有定位功能,比如说滴滴,美团等,他们都需要获取客户所在的位置,并且根据位置推送不同的模块数据以及服务,可以说,定位方便了我们的生活,接下来这几篇我们就说一下定位框架
CoreLocation。感兴趣的可以看我写的上面几篇。
1. CoreLocation框架详细解析 —— 基本概览(一)
2. CoreLocation框架详细解析 —— 选择定位服务的授权级别(二)
3. CoreLocation框架详细解析 —— 确定定位服务的可用性(三)
4. CoreLocation框架详细解析 —— 获取用户位置(四)
5. CoreLocation框架详细解析 —— 监控用户与地理区域的距离(五)
6. CoreLocation框架详细解析 —— 确定接近iBeacon(六)
7. CoreLocation框架详细解析 —— 将iOS设备转换为iBeacon(七)
8. CoreLocation框架详细解析 —— 获取指向和路线信息(八)
9. CoreLocation框架详细解析 —— 在坐标和用户友好的地名之间转换(九)
10. CoreLocation框架详细解析(十) —— 跟踪访问位置简单示例(一)
Persisting Location Data - 持久化位置数据
要保存访问过的位置,您将使用Swift的Codable协议将访问过的位置编码为JSON并将其写入文件。
1. Saving Records on Disk - 将记录保存在磁盘上
打开LocationsStorage.swift。 在类的底部,添加以下函数:
func saveLocationOnDisk(_ location: Location) {
  // 1
  let encoder = JSONEncoder()
  let timestamp = location.date.timeIntervalSince1970

  // 2
  let fileURL = documentsURL.appendingPathComponent("\(timestamp)")

  // 3
  let data = try! encoder.encode(location)

  // 4
  try! data.write(to: fileURL)

  // 5
  locations.append(location)
}
以下是您使用该代码执行的操作:
- 1) 创建编码器。
- 2) 获取文件的URL;对于文件名,您使用日期时间戳。
- 3) 将
location对象转换为原始数据。 - 4) 将数据写入文件。
- 5) 将保存的位置添加到本地阵列。
注意:为简单起见,本教程仅假定
JSON转换,并且写入文件将成功。 您应始终在生产代码中实施正确的错误处理策略。
现在,打开AppDelegate.swift并在newVisitReceived(_:description :)中,在此下面:
let location = Location(visit: visit, descriptionString: description)
添加
LocationsStorage.shared.saveLocationOnDisk(location)
现在,只要应用程序收到访问,它就会获取位置描述,创建一个Location对象并将其保存到磁盘。
要测试这一点,您需要执行以下两项操作:
- 1) 允许用户记录他或她当前的位置。
- 2) 在
UITableViewController中显示所有已保存的记录。
2. Saving a Current Location - 保存当前位置
要保存当前位置,请打开MapViewController.swift。 在addItemPressed(_ :)中,添加以下代码:
guard let currentLocation = mapView.userLocation.location else {
  return
}

LocationsStorage.shared.saveCLLocationToDisk(currentLocation)
如您所见,还没有saveCLLocationToDisk(_ :),所以打开LocationsStorage.swift并将此代码添加到类的底部:
func saveCLLocationToDisk(_ clLocation: CLLocation) {
  let currentDate = Date()
  AppDelegate.geoCoder.reverseGeocodeLocation(clLocation) { placemarks, _ in
    if let place = placemarks?.first {
      let location = Location(clLocation.coordinate, date: currentDate, descriptionString: "\(place)")
      self.saveLocationOnDisk(location)
    }
  }
}
在这里,您可以从clLocation创建Location对象,从geoCoder创建当前日期和位置描述。 您可以像以前一样保存此位置。
现在,在初始化程序内部,替换此行:
self.locations = []
用下面代码
let jsonDecoder = JSONDecoder()

// 1
let locationFilesURLs = try! fileManager
  .contentsOfDirectory(at: documentsURL, includingPropertiesForKeys: nil)
locations = locationFilesURLs.compactMap { url -> Location? in
  // 2
  guard !url.absoluteString.contains(".DS_Store") else {
    return nil
  }
  // 3
  guard let data = try? Data(contentsOf: url) else {
    return nil
  }
  // 4
  return try? jsonDecoder.decode(Location.self, from: data)
  // 5
  }.sorted(by: { $0.date < $1.date })
使用此代码,您:
- 1) 获取
Documents文件夹中所有文件的URL。 - 2) 跳过
.DS_Store文件。 - 3) 从文件中读取数据。
- 4) 将原始数据解码为
Location对象 - 感谢Codable。 - 5) 按日期对位置排序。
使用此代码,当应用程序启动时,LocationsStorage将从磁盘获取位置。
Setting up the App to Use Stored Data - 设置应用程序以使用存储的数据
1. Setting up a Table View - 设置表视图
现在,是时候看到结果了。
为此,打开PlacesTableViewController.swift。 用以下实现替换tableView(_:cellForRowAt :):
override func tableView(_ tableView: UITableView, cellForRowAt indexPath: IndexPath) -> UITableViewCell {
  let cell = tableView.dequeueReusableCell(withIdentifier: "PlaceCell", for: indexPath)
  let location = LocationsStorage.shared.locations[indexPath.row]
  cell.textLabel?.numberOfLines = 3
  cell.textLabel?.text = location.description
  cell.detailTextLabel?.text = location.dateString
  return cell
}
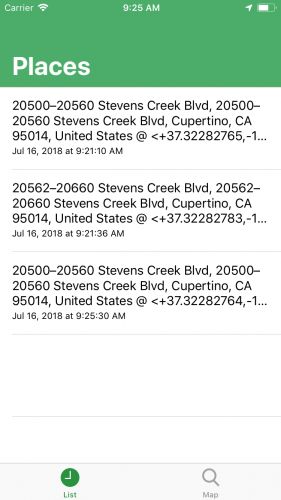
Build并运行应用程序。 你会看到类似的东西:

如果您没有任何记录的访问,请尝试在第二个tab上手动保存,然后再次运行应用程序。 如您所见,为了更新列表,您需要重新运行该应用程序。 你接下来会解决这个问题。
2. Updating the List When a Location is Logged - 记录位置时更新列表
要更新列表,您需要发布应用通知,以便知道记录了新位置。 但请注意,这不是UNNotification,而是Notification。 此通知用于应用程序的内部使用,而不是用于通知用户。
打开LocationsStorage.swift。 在文件的底部,添加以下扩展名:
extension Notification.Name {
  static let newLocationSaved = Notification.Name("newLocationSaved")
}
这是您要发布的通知。
现在,在saveLocationOnDisk(_ :)的末尾,添加以下代码:
NotificationCenter.default.post(name: .newLocationSaved, object: self, userInfo: ["location": location])
接下来,您需要在PlacesTableViewController中收听此通知。
导航到PlacesTableViewController.swift,并在类的顶部添加以下代码:
override func viewDidLoad() {
  super.viewDidLoad()

  // 1
  NotificationCenter.default.addObserver(
    self,
    selector: #selector(newLocationAdded(_:)),
    name: .newLocationSaved,
    object: nil)
}

// 2
@objc func newLocationAdded(_ notification: Notification) {
  // 3
  tableView.reloadData()
}
使用上面的代码,您:
- 1) 注册通知到达时要调用的方法。
- 2) 接收通知作为参数。
- 3) 重新加载列表。
Build并运行应用程序。 要保存当前位置,请点击第二个tab上的加号按钮。 打开第一个tab,您应该看到位置数量增加了:
3. Setting up MapView With All Logged Locations - 使用所有记录的位置设置MapView
本教程的最后一部分将向您展示如何使用pins在地图上显示位置。
要将pins添加到地图,您需要将位置locations转换为MKAnnotation,这是一种表示地图上对象的协议。
打开MapViewController.swift并将此方法添加到类的末尾:
func annotationForLocation(_ location: Location) -> MKAnnotation {
  let annotation = MKPointAnnotation()
  annotation.title = location.dateString
  annotation.coordinate = location.coordinates
  return annotation
}
这将创建带有标题和坐标的pin annotation。
现在,在viewDidLoad()的末尾,添加以下内容:
let annotations = LocationsStorage.shared.locations.map { annotationForLocation($0) }
mapView.addAnnotations(annotations)
此代码从您已创建的位置生成pins,并将它们添加到地图中。
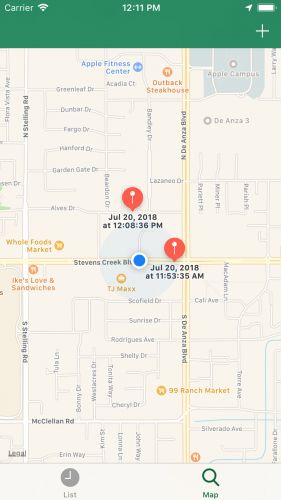
Build并运行应用程序。 你应该在地图上看到pins,如下所示:
剩下要做的唯一事情是在记录新位置时添加pins。
为此,请在MapViewController的末尾添加以下函数:
@objc func newLocationAdded(_ notification: Notification) {
  guard let location = notification.userInfo?["location"] as? Location else {
    return
  }

  let annotation = annotationForLocation(location)
  mapView.addAnnotation(annotation)
}
与第一个选项卡类似,您需要侦听通知,以便了解何时记录此新位置。
要订阅此通知,请将此代码添加到viewDidLoad的末尾:
NotificationCenter.default.addObserver(
  self,
  selector: #selector(newLocationAdded(_:)),
  name: .newLocationSaved,
  object: nil)
Build并运行应用程序。 在第二个tab上记录新位置。 一个pin应该出现在地图上:

这就是你的旅行记录器! 随意在城里走走,看看它记录的地方! 此功能使您可以查看用户所处的位置并做出反应,而不会耗尽太多电池。 请记住,您收集的数据是敏感数据,因此请负责任地收集数据。
要加深您对此主题的理解,请查看以下有用资源:
- WWDC 2014 session about location services
- Apple documentation about CLVisit
源码
首先看一下工程文件

接着看一下sb文件

1. Swift
1. AppDelegate.swift
import UIKit
import CoreLocation
import UserNotifications

@UIApplicationMain
class AppDelegate: UIResponder, UIApplicationDelegate {
  var window: UIWindow?

  static let geoCoder = CLGeocoder()
  let center = UNUserNotificationCenter.current()
  let locationManager = CLLocationManager()

  func application(_ application: UIApplication, didFinishLaunchingWithOptions launchOptions: [UIApplication.LaunchOptionsKey : Any]? = nil) -> Bool {
    let rayWenderlichColor = UIColor(red: 0/255, green: 104/255, blue: 55/255, alpha: 1)
    UITabBar.appearance().tintColor = rayWenderlichColor

    center.requestAuthorization(options: [.alert, .sound]) { granted, error in
    }
    locationManager.requestAlwaysAuthorization()

    locationManager.startMonitoringVisits()
    locationManager.delegate = self

    // Uncomment following code to enable fake visits
//    locationManager.distanceFilter = 35 // 0
//    locationManager.allowsBackgroundLocationUpdates = true // 1
//    locationManager.startUpdatingLocation()  // 2

    return true
  }
}

extension AppDelegate: CLLocationManagerDelegate {
  func locationManager(_ manager: CLLocationManager, didVisit visit: CLVisit) {
    // create CLLocation from the coordinates of CLVisit
    let clLocation = CLLocation(latitude: visit.coordinate.latitude, longitude: visit.coordinate.longitude)

    // Get location description
    AppDelegate.geoCoder.reverseGeocodeLocation(clLocation) { placemarks, _ in
      if let place = placemarks?.first {
        let description = "\(place)"
        self.newVisitReceived(visit, description: description)
      }
    }
  }

  func newVisitReceived(_ visit: CLVisit, description: String) {
    let location = Location(visit: visit, descriptionString: description)
    LocationsStorage.shared.saveLocationOnDisk(location)

    let content = UNMutableNotificationContent()
    content.title = "New Journal entry "
    content.body = location.description
    content.sound = UNNotificationSound.default

    let trigger = UNTimeIntervalNotificationTrigger(timeInterval: 1, repeats: false)
    let request = UNNotificationRequest(identifier: location.dateString, content: content, trigger: trigger)

    center.add(request, withCompletionHandler: nil)
  }

  func locationManager(_ manager: CLLocationManager, didUpdateLocations locations: [CLLocation]) {
    guard let location = locations.first else {
      return
    }

    AppDelegate.geoCoder.reverseGeocodeLocation(location) { placemarks, _ in
      if let place = placemarks?.first {
        let description = "Fake visit: \(place)"

        let fakeVisit = FakeVisit(coordinates: location.coordinate, arrivalDate: Date(), departureDate: Date())
        self.newVisitReceived(fakeVisit, description: description)
      }
    }
  }
}

final class FakeVisit: CLVisit {
  private let myCoordinates: CLLocationCoordinate2D
  private let myArrivalDate: Date
  private let myDepartureDate: Date

  override var coordinate: CLLocationCoordinate2D {
    return myCoordinates
  }

  override var arrivalDate: Date {
    return myArrivalDate
  }

  override var departureDate: Date {
    return myDepartureDate
  }

  init(coordinates: CLLocationCoordinate2D, arrivalDate: Date, departureDate: Date) {
    myCoordinates = coordinates
    myArrivalDate = arrivalDate
    myDepartureDate = departureDate
    super.init()
  }

  required init?(coder aDecoder: NSCoder) {
    fatalError("init(coder:) has not been implemented")
  }
}
2. PlacesTableViewController.swift
import UIKit
import UserNotifications

class PlacesTableViewController: UITableViewController {
  override func viewDidLoad() {
    super.viewDidLoad()

    NotificationCenter.default.addObserver(
      self,
      selector: #selector(newLocationAdded(_:)),
      name: .newLocationSaved,
      object: nil)
  }

  @objc func newLocationAdded(_ notification: Notification) {
    tableView.reloadData()
  }

  override func tableView(_ tableView: UITableView, numberOfRowsInSection section: Int) -> Int {
    return LocationsStorage.shared.locations.count
  }

  override func tableView(_ tableView: UITableView, cellForRowAt indexPath: IndexPath) -> UITableViewCell {
    let cell = tableView.dequeueReusableCell(withIdentifier: "PlaceCell", for: indexPath)
    let location = LocationsStorage.shared.locations[indexPath.row]
    cell.textLabel?.numberOfLines = 3
    cell.textLabel?.text = location.description
    cell.detailTextLabel?.text = location.dateString
    return cell
  }

  override func tableView(_ tableView: UITableView, heightForRowAt indexPath: IndexPath) -> CGFloat {
    return 110
  }
}
3. MapViewController.swift
import UIKit
import MapKit

class MapViewController: UIViewController {
  @IBOutlet weak var mapView: MKMapView!

  override func viewDidLoad() {
    super.viewDidLoad()
    mapView.userTrackingMode = .follow
    let annotations = LocationsStorage.shared.locations.map { annotationForLocation($0) }
    mapView.addAnnotations(annotations)
    NotificationCenter.default.addObserver(self, selector: #selector(newLocationAdded(_:)), name: .newLocationSaved, object: nil)
  }

  @IBAction func addItemPressed(_ sender: Any) {
    guard let currentLocation = mapView.userLocation.location else {
      return
    }
    LocationsStorage.shared.saveCLLocationToDisk(currentLocation)
  }

  func annotationForLocation(_ location: Location) -> MKAnnotation {
    let annotation = MKPointAnnotation()
    annotation.title = location.dateString
    annotation.coordinate = location.coordinates
    return annotation
  }

  @objc func newLocationAdded(_ notification: Notification) {
    guard let location = notification.userInfo?["location"] as? Location else {
      return
    }

    let annotation = annotationForLocation(location)
    mapView.addAnnotation(annotation)
  }
}
4. Location.swift
import Foundation
import CoreLocation

class Location: Codable {
  static let dateFormatter: DateFormatter = {
    let formatter = DateFormatter()
    formatter.dateStyle = .medium
    formatter.timeStyle = .medium
    return formatter
  }()

  var coordinates: CLLocationCoordinate2D {
    return CLLocationCoordinate2D(latitude: latitude, longitude: longitude)
  }

  let latitude: Double
  let longitude: Double
  let date: Date
  let dateString: String
  let description: String

  init(_ location: CLLocationCoordinate2D, date: Date, descriptionString: String) {
    latitude =  location.latitude
    longitude =  location.longitude
    self.date = date
    dateString = Location.dateFormatter.string(from: date)
    description = descriptionString
  }

  convenience init(visit: CLVisit, descriptionString: String) {
    self.init(visit.coordinate, date: visit.arrivalDate, descriptionString: descriptionString)
  }
}
5. LocationsStorage.swift
import Foundation
import CoreLocation

class LocationsStorage {
  static let shared = LocationsStorage()

  private(set) var locations: [Location]
  private let fileManager: FileManager
  private let documentsURL: URL

  init() {
    let fileManager = FileManager.default
    documentsURL = try! fileManager.url(for: .documentDirectory, in: .userDomainMask, appropriateFor: nil, create: false)
    self.fileManager = fileManager

    let jsonDecoder = JSONDecoder()

    let locationFilesURLs = try! fileManager.contentsOfDirectory(at: documentsURL,
                                                                 includingPropertiesForKeys: nil)
    locations = locationFilesURLs.compactMap { url -> Location? in
      guard !url.absoluteString.contains(".DS_Store") else {
        return nil
      }
      guard let data = try? Data(contentsOf: url) else {
        return nil
      }
      return try? jsonDecoder.decode(Location.self, from: data)
    }.sorted(by: { $0.date < $1.date })
  }

  func saveLocationOnDisk(_ location: Location) {
    let encoder = JSONEncoder()
    let timestamp = location.date.timeIntervalSince1970
    let fileURL = documentsURL.appendingPathComponent("\(timestamp)")

    let data = try! encoder.encode(location)
    try! data.write(to: fileURL)

    locations.append(location)

    NotificationCenter.default.post(name: .newLocationSaved, object: self, userInfo: ["location": location])
  }

  func saveCLLocationToDisk(_ clLocation: CLLocation) {
    let currentDate = Date()
    AppDelegate.geoCoder.reverseGeocodeLocation(clLocation) { placemarks, _ in
      if let place = placemarks?.first {
        let location = Location(clLocation.coordinate, date: currentDate, descriptionString: "\(place)")
        self.saveLocationOnDisk(location)
      }
    }
  }
}

extension Notification.Name {
  static let newLocationSaved = Notification.Name("newLocationSaved")
}
后记
本篇主要讲述了跟踪访问位置简单示例,感兴趣的给个赞或者关注~~~
