摘抄:https://blog.csdn.net/c406495762/article/details/75172850
1.1 k-近邻法简介
k近邻法(k-nearest neighbor, k-NN)是1967年由Cover T和Hart P提出的一种基本分类与回归方法。它的工作原理是:存在一个样本数据集合,也称作为训练样本集,并且样本集中每个数据都存在标签,即我们知道样本集中每一个数据与所属分类的对应关系。输入没有标签的新数据后,将新的数据的每个特征与样本集中数据对应的特征进行比较,然后算法提取样本最相似数据(最近邻)的分类标签。一般来说,我们只选择样本数据集中前k个最相似的数据,这就是k-近邻算法中k的出处,通常k是不大于20的整数。最后,选择k个最相似数据中出现次数最多的分类,作为新数据的分类。
1.2 距离度量
1.3 k-近邻算法步骤如下:
计算已知类别数据集中的点与当前点之间的距离;
按照距离递增次序排序;
选取与当前点距离最小的k个点;
确定前k个点所在类别的出现频率;
返回前k个点所出现频率最高的类别作为当前点的预测分类。
比如,现在我这个k值取3,取距离最近的3个点,看这三个点属于哪个分类的频率最高,就判定为哪类,这个判别过程就是k-近邻算法。
简单版代码:
# encoding=utf-8
'''
脚本说明:kNN算法,分类器
'''
import numpy as np
import operator as oper
import collections
import matplotlib.pyplot as plt

'''
函数说明:构造数据
'''
def createData():
    data = np.array([[1, 2], [2, 3], [7, 8], [9,8]])
    labels = [1, 1, 2, 2]
    return data, labels

'''
函数说明:特征缩放
最大值法:X/最大值,分布到[0, 1]之间
均值归一:(X-平均)/(最大值-最小值)
'''

'''
函数说明:kNN核心算法
'''
def classify(x, data, labels, k):
    # 求差
    diffM = data - x
    print("求差:",diffM)
    # 平方
    sqrtM = diffM**2
    print("平方:", sqrtM)
    # 求和 sum(0)列相加,sum(1)行相加
    sumM = sqrtM.sum(axis=1)
    print("求和:", sumM)
    # 开方
    distances = sumM**0.5
    print("开方求距离:", distances)
    # 精简
    # distances = np.sum((data-x)**2, axis=1)**0.5

    sortD = distances.argsort()
    print("排序取key排序:", sortD)

    classCount = {}
    for i in range(k):
        label = labels[sortD[i]]
        classCount[label] = classCount.get(label, 0) + 1
    print("分类统计数据:", classCount)
    # 分类字典,根据值排序 key=operator.itemgetter(1)根据字典的值进行排序 key=operator.itemgetter(0)根据字典的键进行排序
    sortClass = sorted(classCount.items(), key=oper.itemgetter(1),reverse=True)
    print("排序分类:", sortClass)

    return sortClass[0][0]

'''
函数说明:精简版kNN算法
'''
def classify_simple(x, data, labels, k):
    # 计算距离
    dist = np.sum((data - x)**2, axis=1)**0.5
    # k个最近的标签
    k_labels = [labels[index] for index in dist.argsort()[0 : k]]
    # 出现次数最多的标签即为最终类别
    label = collections.Counter(k_labels).most_common(1)[0][0]
    return label


if __name__ == '__main__':

    data, labels = createData()
    # print(data,labels)
    # plt.scatter(data[:,0], data[:,1])
    colors = ['black', 'red', 'green']
    plt.scatter(data[0, 0], data[0, 1], c=colors[labels[0]])
    plt.scatter(data[1, 0], data[1, 1], c=colors[labels[1]])
    plt.scatter(data[2, 0], data[2, 1], c=colors[labels[2]])
    plt.scatter(data[3, 0], data[3, 1], c=colors[labels[3]])
    # X轴坐标
    plt.xticks(range(0, np.amax(data[:,0])+1))
    # Y轴坐标
    plt.yticks(range(0, np.amax(data[:,1])+1))

    x = [6, 6]
    type = classify(x, data, labels, 3)
    plt.scatter(x[0], x[1], c=colors[type])

    x = [3, 3]
    type = classify(x, data, labels, 3)
    plt.scatter(x[0], x[1], c=colors[type])

    x = [5, 5]
    type = classify(x, data, labels, 3)
    plt.scatter(x[0], x[1], c=colors[type])

    x = [4, 4]
    type = classify_simple(x, data, labels, 3)
    plt.scatter(x[0], x[1], c=colors[type])
    plt.show()
2.1 海伦约会
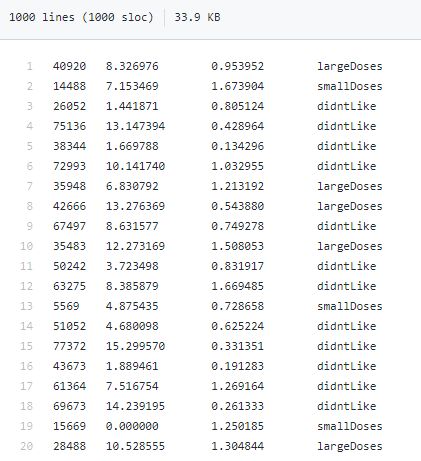
数据连接: https://github.com/playgamelxh/ML/blob/master/other/KNN/datingTestSet.txt
海伦女士一直使用在线约会网站寻找适合自己的约会对象。尽管约会网站会推荐不同的任选,但她并不是喜欢每一个人。经过一番总结,她发现自己交往过的人可以进行如下分类:不喜欢的人 didntLike、
魅力一般的人 smallDoses、极具魅力的人 largeDoses
海伦收集约会数据已经有了一段时间,她把这些数据存放在文本文件datingTestSet.txt中,每个样本数据占据一行,总共有1000行。
海伦收集的样本数据主要包含以下3种特征:每年获得的飞行常客里程数、玩视频游戏所消耗时间百分比、每周消费的冰淇淋公升数
代码如下:
#encoding=utf-8
'''
脚本说明:kNN实战,海伦约会
'''
import numpy as np
import operator as oper
import collections
import matplotlib.pyplot as plt
from mpl_toolkits.mplot3d import Axes3D

'''
函数说明:处理数据集
'''
def fileToMatrix(filename):
    # 打开文件
    fr = open(filename)
    # print(fr)
    # 读取文件内容
    lines = fr.readlines()
    # print(lines)
    # 获取行数
    row = len(lines)
    # print(row)
    # 返回数据
    returnMatrix = np.zeros((row, 3))
    # 返回标签
    returnLabels = []
    # 索引
    index = 0
    for line in lines:
        # s.strip(rm),当rm空时,默认删除空白符(包括'\n','\r','\t',' ')
        line = line.strip()
        # print(line)
        # break
        # 使用s.split(str="",num=string,cout(str))将字符串根据'\t'分隔符进行切片。
        listFromLine = line.split('\t')
        # print(listFromLine)
        # break
        # 保存数据
        returnMatrix[index,:] = listFromLine[0:3]
        # 保存标签
        if listFromLine[-1] == 'didntLike':
            returnLabels.append(1)
        elif listFromLine[-1] == 'smallDoses':
            returnLabels.append(2)
        elif listFromLine[-1] == 'largeDoses':
            returnLabels.append(3)
        index += 1

    return returnMatrix, returnLabels

'''
函数说明:画图,三维
'''
def show(data, labels):
    fig = plt.figure()
    ax = Axes3D(fig)

    colors = ['black', 'red', 'green', 'blue']
    key = 0;
    for item in data:
        ax.scatter(item[0], item[1], item[2], c=colors[labels[key]])
        key += 1
    # X轴坐标
    ax.set_xlabel('X', fontdict={'size': 12, 'color': 'red'})
    # Y轴坐标
    ax.set_ylabel('Y', fontdict={'size': 12, 'color': 'green'})
    # Z轴坐标
    ax.set_zlabel('Z', fontdict={'size': 12, 'color': 'blue'})
    plt.show()

'''
函数说明:画图,二维
'''
# def show_two(data, labels):
#     colors = ['black', 'red', 'green', 'yellow']
#
#     # 2x2
#     fig, axs = plt.subplots(nrows=2, ncols=2, sharex=False, sharey=False, figsize=(13, 8))
#
#     key = 0
#     for item in data:
#         axs[0][0].scatter(x=item[0], y=labels[key], color=colors[labels[key]])
#         axs[0][1].scatter(x=item[1], y=labels[key], color=colors[labels[key]])
#         axs[1][0].scatter(x=item[2], y=labels[key], color=colors[labels[key]])
#         key += 1;
#
#     # 设置标题,x轴label,y轴label
#     axs0_title_text = axs[0][0].set_title(u'每年飞行常客里程数与分类')
#     axs0_xlabel_text = axs[0][0].set_xlabel(u'每年获得的飞行常客里程数')
#     axs0_ylabel_text = axs[0][0].set_ylabel(u'玩视频游戏所消耗时间占')
#     plt.setp(axs0_title_text, size=1, weight='bold', color='red')
#     plt.setp(axs0_xlabel_text, size=1, weight='bold', color='black')
#     plt.setp(axs0_ylabel_text, size=1, weight='bold', color='black')
#     plt.show()

'''
函数说明:特征缩放 newValue = (oldValue - min) / (max - min)
最大值法:  newValue = oldValue/max
均值归一法:newValue = (oldValue-V平均)/(max-min)
'''
def autoNormal(data):
    # print(data)
    minV = data.min(0)
    maxV = data.max(0)
    # print("最小值",minV, '最大值',maxV)
    ranges = maxV - minV
    # print("差值", ranges)
    normalDataSet = np.zeros(np.shape(data))
    m = data.shape[0]
    normalDataSet = data - np.tile(minV, (m, 1))
    # print(np.tile(minV, (m, 1)))
    # print(normalDataSet)
    normalDataSet = normalDataSet/np.tile(ranges, (m, 1))
    return normalDataSet, minV, ranges

'''
函数说明:精简版kNN算法
'''
def classify_simple(x, data, labels, k):
    # 计算距离
    dist = np.sum((data - x) ** 2, axis=1) ** 0.5
    # k个最近的标签
    k_labels = [labels[index] for index in dist.argsort()[0: k]]
    # 出现次数最多的标签即为最终类别
    label = collections.Counter(k_labels).most_common(1)[0][0]
    return label


if __name__ == '__main__':
    filename = '/www/ML/other/KNN/datingTestSet.txt'
    data, labels = fileToMatrix(filename)

    # 画图
    # show(data, labels)
    # show_two(data, labels)
    # 特征缩放后 能提升准确率
    data, minV, ranges = autoNormal(data)
    # show(data, labels)

    # 取前四分之三数据用于学习  后四分之一数据用于测试
    # print(data)
    # print(data.shape[0], data.shape[1])
    num = 750
    data_learn = data[0:num]
    # print(data_learn, data_learn.shape[0])
    data_test = data[num:]
    # print(data_test, data_test.shape[0])
    labels_learn = labels[0:num]
    labels_test = labels[num:]
    # print(labels_learn)
    # print(labels_test)

    # 正确数量
    right = 0
    wrong = 0
    key = 0
    for item in data_test:
        # 获取分类标签
        label = classify_simple(item, data_learn, labels_learn, 3)
        # 统计正确、错误数量
        if (label == labels_test[key]):
            right += 1
        else:
            wrong += 1
        # 键值+1
        key += 1
    print("正确数量:%s;错误数量:%s,错误率:%s%%"%(right, wrong, wrong*100/(right+wrong)))
,因为这个里程数数据太大,而冰激凌桶数太小,计算距离的时候,里程数会显的很重要,而冰激凌桶数可以忽略。这显然有问题,三个特征应该处于同等重要的水平才好。进行特征缩放会很好避免个别参数太大导致的误差问题。
3.1手写字体识别
mnist官网 http://yann.lecun.com/exdb/mnist/ 可以下载相关数据
train-images-idx3-ubyte.gz: training set images (9912422 bytes) 训练图片
train-labels-idx1-ubyte.gz: training set labels (28881 bytes) 训练标签
t10k-images-idx3-ubyte.gz: test set images (1648877 bytes) 测试图片
t10k-labels-idx1-ubyte.gz: test set labels (4542 bytes) 测试标签
这个数据集,很多博客都采用过,不过我猜测有两个版本:
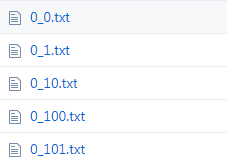
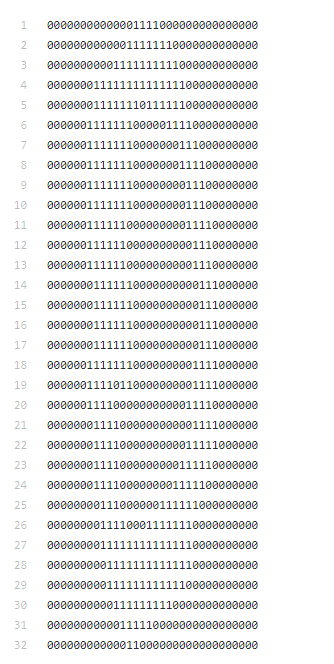
比较老的是每个训练样本都是单独一张图片,也有的图片的数据二值化处理为数据,如:这里
最新版就是官网现在的数据,把图片数据都打到一个包里了。处理稍麻烦点
代码如下:
#encoding=utf-8
'''
脚本说明:手写识别
'''
import numpy as np
import pandas as pd
from struct import unpack
from sklearn.neighbors import KNeighborsClassifier as kNN
''''
函数说明:读取图片文件
'''
def read_image(path):
    with open(path, 'rb') as f:
        magic, num, rows, cols = unpack('>4I', f.read(16))
        img = np.fromfile(f, dtype=np.uint8).reshape(num, 784)
    return img

'''
函数说明:读取标签
'''
def read_label(path):
    with open(path, 'rb') as f:
        magic, num = unpack('>2I', f.read(8))
        lab = np.fromfile(f, dtype=np.uint8)
    return lab

def normalize_image(image):
    img = image.astype(np.float32) / 255.0
    return img

def one_hot_label(label):
    lab = np.zeros((label.size, 10))
    for i, row in enumerate(lab):
        row[label[i]] = 1
    return lab


def load_mnist(train_image_path, train_label_path, test_image_path, test_label_path, normalize=True, one_hot=True):
    '''读入MNIST数据集 会导致报错
    Parameters
    ----------
    normalize : 将图像的像素值正规化为0.0~1.0
    one_hot_label :
        one_hot为True的情况下,标签作为one-hot数组返回
        one-hot数组是指[0,0,1,0,0,0,0,0,0,0]这样的数组
    Returns
    ----------
    (训练图像, 训练标签), (测试图像, 测试标签)
    '''
    image = {
        'train': read_image(train_image_path),
        'test': read_image(test_image_path)
    }

    label = {
        'train': read_label(train_label_path),
        'test': read_label(test_label_path)
    }

    # if normalize:
    #     for key in ('train', 'test'):
    #         image[key] = normalize_image(image[key])
    #
    # if one_hot:
    #     for key in ('train', 'test'):
    #         label[key] = one_hot_label(label[key])

    return (image['train'], label['train']), (image['test'], label['test'])
'''
函数说明:打印图像矩阵
'''
def print_num(data):
    key = 0
    str = ''
    for item in data:
        str += "%d\t" % (item)
        key += 1
        if (key == 28):
            print(str)
            str = ''
            key = 0

'''
函数说明:将图像像素二值化处理
'''
def pic_binary(data):
    for row in range(data.shape[0]):
        for key in range(data.shape[1]):
            if data[row][key] >= 128:
                data[row][key] = 1
            else:
                data[row][key] = 0
    return data

if __name__ == '__main__':

    train_image_path = '/www/ML/other/KNN/mnist/train-images-idx3-ubyte'
    train_label_path = '/www/ML/other/KNN/mnist/train-labels-idx1-ubyte'
    test_image_path = '/www/ML/other/KNN/mnist/t10k-images-idx3-ubyte'
    test_label_path = '/www/ML/other/KNN/mnist/t10k-labels-idx1-ubyte'

    # 此方法存在不兼容问题
    # image_train, label_train, image_test, label_test = load_mnist(train_image_path, train_label_path, test_image_path,
    #                                                               test_label_path)
    # print(image_test, label_test);

    image_test = read_image(test_image_path)
    label_test = read_label(test_label_path)

    image_train = read_image(train_image_path)
    label_train = read_label(train_label_path)
    # print_num(image_train[0])
    # print(label_train)

    # 将图像二值化处理,大于等于128设置为1 小于128为0 误差率会上升,通用性更强
    image_test = pic_binary(image_test)
    image_train = pic_binary(image_train)

    # print_num(image_train[0])

    knn = kNN(n_neighbors = 5, algorithm = 'auto')
    knn.fit(image_train, label_train)

    res = knn.predict(image_test[:100])
    #
    right = 0
    wrong = 0
    for i in range(len(res)):
        if (res[i] == label_test[i]):
            right += 1
            print("预测值:%s,真是值:%s" % (res[i], label_test[i]))
        else:
            wrong += 1
            print("\033预测值:%s,真是值:%s\033" % (res[i], label_test[i]))
    print("准确率:%2f%%" % (right*100/(right+wrong)))
这里用了sklearn框架的kNN算法,代替了自己造的轮子


