数据集
GTSRB dataset :
http://benchmark.ini.rub.de/?section=gtsrb&subsection=dataset#Downloads
该数据集包含43类交通标志,提供的资料中包含标注信息。
【0】 数据准备
- 根据标注裁剪图像
在每类的文件夹中,包含若干.ppm格式的图片及一个.csv文件,csv中包含每个ppm图像的标注信息,根据标注信息进行图片裁剪.
将43类放到同一文件夹Final_Training下,裁剪示例代码:
import os
import sys
from PIL import Image
path = 'C:/Users/Documents/Dataset/GTSRB/Final_Training'

csv_files = []
for dirpath, dirnames, filenames in os.walk(path, topdown=False):
    for filename in filenames:
        if filename.endswith('.csv'):
            csv_files.append(os.path.join(dirpath, filename))


class TrafficSign:
    trafficSign_name = ''
    left_top_x = 0,
    left_top_y = 0,
    right_bottom_x = 0,
    right_bottom_y = 0,
    width = 0,
    height = 0,
    label = ''

    def tostring(self):
        print([self.trafficSign_name,
               self.width, self.height,
               self.left_top_x, self.left_top_y,
               self.right_bottom_x, self.right_bottom_y,
               self.label])


for csv in csv_files:
    base_path = os.path.dirname(csv)
    # read csv data
    trafficSigns = []
    with open(csv) as file:
        for line in file:
            if line.find('.ppm') == -1:
                continue
            raw_data = line.split(';')
            trafficSign = TrafficSign()
            trafficSign.trafficSign_name = raw_data[0]
            trafficSign.width = int(raw_data[1])
            trafficSign.height = int(raw_data[2])
            trafficSign.left_top_x = int(raw_data[3])
            trafficSign.left_top_y = int(raw_data[4])
            trafficSign.right_bottom_x = int(raw_data[5])
            trafficSign.right_bottom_y = int(raw_data[6])
            # trafficSign.label = raw_data[7]
            trafficSigns.append(trafficSign)

    # crop each image according to the csv in this folder
    for dirpath, dirnames, filenames in os.walk(base_path, topdown=False):
        for filename in filenames:
            if not filename.endswith('.ppm'):
                continue
            fullPath = os.path.join(dirpath, filename)
            for sign in trafficSigns:
                if filename == sign.trafficSign_name:
                    image = Image.open(fullPath)
                    # start cropping according to this sign
                    region = (sign.left_top_x, sign.left_top_y, sign.right_bottom_x, sign.right_bottom_y)
                    image_crop = image.crop(region)
                    # update the new image path
                    newFullPath = fullPath.replace('GTSRB', 'GTSRB_img_Crop')
                    newFullPath = newFullPath.replace('.ppm', '.bmp')
                    if not os.path.exists(os.path.dirname(newFullPath)):
                        os.makedirs(os.path.dirname(newFullPath))
                    # save the images
                    image_crop.save(newFullPath)
                    break
裁剪后的图片如下所示:

image
- 划分训练集和测试集
观察可以发现,交通标志应该是由远至近的序列中标注裁剪出来的,所以会呈现由小到大的规律,所以在准备训练集和测试集时,随机选择一定比例的方式(我选择80%训练,20%测试),示例代码:
import os
import random
import shutil
path = 'C:/Users/Documents/Dataset/GTSRB_img_Crop/Final_Training'
dirs = []
split_percentage = 0.2
for dirpath, dirnames, filenames in os.walk(path, topdown=False):
   for dirname in dirnames:
       fullpath = os.path.join(dirpath, dirname)
       fileCount = len([name for name in os.listdir(fullpath) if os.path.isfile(os.path.join(fullpath, name))])
       files = os.listdir(fullpath)
       for index in range((int)(split_percentage * fileCount)):
           newIndex = random.randint(0, fileCount - 1)
           fullFilePath = os.path.join(fullpath, files[newIndex])
           newFullFilePath = fullFilePath.replace('Final_Training', 'Final_Validation')
           base_new_path = os.path.dirname(newFullFilePath)
           if not os.path.exists(base_new_path):
               os.makedirs(base_new_path)
           # move the file
           try:
               shutil.move(fullFilePath, newFullFilePath)
           except IOError as error:
               print('skip moving from %s => %s' % (fullFilePath, newFullFilePath))
【1】训练和验证
结构十分简单,四个卷积层加上全连接层输出即可。其中的个别的超参数选择,我是参照了GTSRB比赛中成绩最好的那篇文章中提到的一些配置:
CNN with 3 Spatial Transformers, DeepKnowledge Seville, Álvaro Arcos-García and Juan A. Álvarez-García and Luis M. Soria-Morillo, Neural Networks
link
在这篇文章中,提到使用48*48的归一化尺寸以及一些其他的建议,可以详细参阅。如下示例代码简单跑一下():
import shutil
import os
import matplotlib.pyplot as plt
train_set_base_dir = 'C:/Users/Documents/Dataset/GTSRB_img_Crop/Final_Training'
validation_set_base_dir = 'C:/Users/Documents/Dataset/GTSRB_img_Crop/Final_Validation'
# start image preprocess
from keras.preprocessing.image import ImageDataGenerator
train_datagen = ImageDataGenerator(
rescale=1. / 255
)
train_data_generator = train_datagen.flow_from_directory(
directory=train_set_base_dir,
target_size=(48, 48),
batch_size=32,
class_mode='categorical')
validation_datagen = ImageDataGenerator(
rescale=1. /255
)
validation_data_generator = validation_datagen.flow_from_directory(
directory=validation_set_base_dir,
target_size=(48, 48),
batch_size=32,
class_mode='categorical'
)
# define a simple CNN network
from keras.models import Sequential
from keras.layers import Conv2D, MaxPool2D, Flatten, Dense, Dropout
model = Sequential()
# add Con2D layers
model.add(Conv2D(filters=32, kernel_size=(3, 3), activation='relu', input_shape=(48, 48, 3)))
model.add(MaxPool2D(pool_size=(2, 2), padding='valid'))
model.add(Conv2D(filters=64, kernel_size=(3, 3), activation='relu'))
model.add(MaxPool2D(pool_size=(2, 2), padding='valid'))
model.add(Conv2D(filters=128, kernel_size=(3, 3), activation='relu'))
model.add(MaxPool2D(pool_size=(2, 2), padding='valid'))
model.add(Conv2D(filters=128, kernel_size=(3, 3), activation='relu'))
model.add(MaxPool2D(pool_size=(2, 2), padding='valid'))
# flatten
model.add(Flatten())
# dropOut layer
model.add(Dropout(0.2))
# add one simple layer for classification
model.add(Dense(units=512, activation='relu'))
# add output layer
model.add(Dense(units=43, activation='softmax'))
# compile model
model.compile(loss='categorical_crossentropy', optimizer='rmsprop', metrics=['acc'])
# print model info
model.summary()
json_str = model.to_json()
print(json_str)
# fit_generator to fill in the dataset
history = model.fit_generator(
generator=train_data_generator,
steps_per_epoch=100,
epochs=30,
validation_data=validation_data_generator,
validation_steps=50)
# train done, save the models
model.save('C:/test/WorkingLogs/20181214/traffic_signs.h5')
# plot the roc curve
acc = history.history['acc']
val_acc = history.history['val_acc']
loss = history.history['loss']
val_loss = history.history['val_loss']
epochs = range(1, len(acc) + 1)
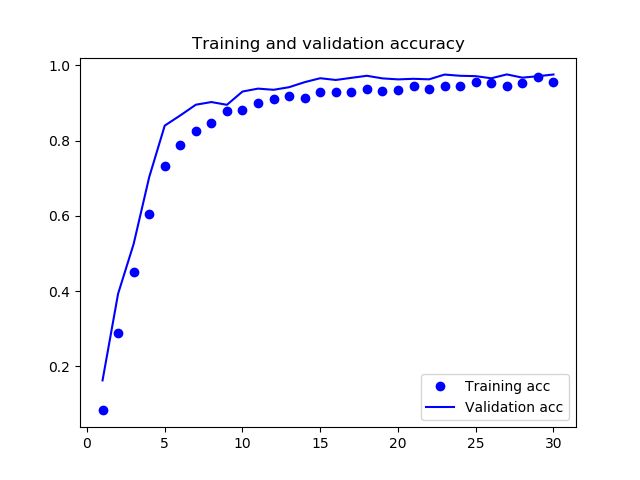
plt.plot(epochs, acc, 'bo', label='Training acc')
plt.plot(epochs, val_acc, 'b', label='Validation acc')
plt.title('Training and validation accuracy')
plt.legend()
plt.figure()
plt.plot(epochs, loss, 'bo', label='Training loss')
plt.plot(epochs, val_loss, 'b', label='Validation loss')
plt.title('Training and validation loss')
plt.legend()
plt.show()
简易的网络结构及参与训练测试的样本信息如下:
Found 32117 images belonging to 43 classes.
Found 7092 images belonging to 43 classes.
_________________________________________________________________
Layer (type)                 Output Shape              Param #
=================================================================
conv2d_1 (Conv2D)            (None, 46, 46, 32)        896
_________________________________________________________________
max_pooling2d_1 (MaxPooling2 (None, 23, 23, 32)        0
_________________________________________________________________
conv2d_2 (Conv2D)            (None, 21, 21, 64)        18496
_________________________________________________________________
max_pooling2d_2 (MaxPooling2 (None, 10, 10, 64)        0
_________________________________________________________________
conv2d_3 (Conv2D)            (None, 8, 8, 128)         73856
_________________________________________________________________
max_pooling2d_3 (MaxPooling2 (None, 4, 4, 128)         0
_________________________________________________________________
conv2d_4 (Conv2D)            (None, 2, 2, 128)         147584
_________________________________________________________________
max_pooling2d_4 (MaxPooling2 (None, 1, 1, 128)         0
_________________________________________________________________
flatten_1 (Flatten)          (None, 128)               0
_________________________________________________________________
dropout_1 (Dropout)          (None, 128)               0
_________________________________________________________________
dense_1 (Dense)              (None, 512)               66048
_________________________________________________________________
dense_2 (Dense)              (None, 43)                22059
=================================================================
Total params: 328,939
Trainable params: 328,939
Non-trainable params: 0
_________________________________________________________________
30 epochs的结果是:
100/100 [==============================] - 164s 2s/step - loss: 0.2009 - acc: 0.9556 - val_loss: 0.1103 - val_acc: 0.9755
image

image
【3】结论
从结果可以看出,即使是简单的网络结构,在精确标注的大量数据下可以获得很好的效果。同时还可以通过pre-trained模型如VGG-16等提取特征再加入某些层进行fine-tuned等。
在上面推荐的那片论文中,还提出使用spatial-transformer层进行优化,也很值得尝试。