// 只要添加了这个宏,就不用带mas_前缀
 #define MAS_SHORTHAND
 // 只要添加了这个宏,equalTo就等价于mas_equalTo
 #define MAS_SHORTHAND_GLOBALS
 // 这个头文件一定要放在上面两个宏的后面
 #import "Masonry.h"
1、等比排列,如图一所示。mas_makeConstraints。
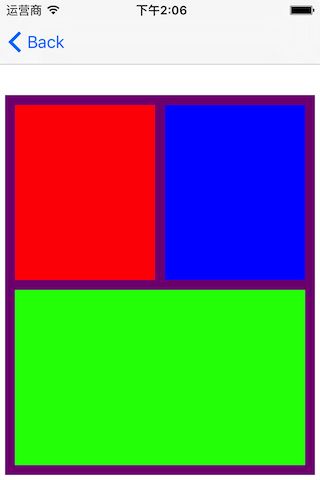
图一.png
- (void)viewDidLoad {
    [super viewDidLoad];
    self.view.backgroundColor = [UIColor whiteColor];
    TestView1 * view = [[TestView1 alloc] init];
    view.backgroundColor = [UIColor purpleColor];
    [self.view addSubview:view];
    [view mas_makeConstraints:^(MASConstraintMaker *make) {
          make.edges.mas_equalTo(self.view).insets(UIEdgeInsetsMake(95,5,5,5));
    }];
}
@interface TestView1()
@property (nonatomic, strong) UIView * redView;
@property (nonatomic, strong) UIView * blueView;
@property (nonatomic, strong) UIView * greenView;
@end
@implementation TestView1
- (instancetype)init{
    self = [super init];
    if (self) {
        self.redView = [[UIView alloc] init];
        self.redView.backgroundColor = [UIColor redColor];
        [self addSubview:self.redView];

        self.blueView = [[UIView alloc] init];
        self.blueView.backgroundColor = [UIColor blueColor];
        [self addSubview:self.blueView];

        self.greenView = [[UIView alloc] init];
        self.greenView.backgroundColor = [UIColor greenColor];
        [self addSubview:self.greenView];
    }
    return self;
}

- (void)layoutSubviews{
    [super layoutSubviews];
    CGFloat padding = 10;
    UIView * superView = self.redView.superview;
    [self.redView mas_makeConstraints:^(MASConstraintMaker *make) {
        make.top.mas_equalTo(superView.mas_top).offset(padding);
        make.left.mas_equalTo(superView.mas_left).offset(padding);
        make.bottom.mas_equalTo(self.greenView.mas_top).offset(-padding);
        make.right.mas_equalTo(self.blueView.mas_left).offset(-padding);
        make.width.mas_equalTo(self.blueView.mas_width);
        make.height.mas_equalTo(@[self.blueView,self.greenView]);

    }];
    [self.blueView mas_makeConstraints:^(MASConstraintMaker *make) {
        //with with
        make.top.mas_equalTo(superView.mas_top).with.offset(padding);
        ////without with
        make.left.mas_equalTo(self.redView.mas_right).offset(padding);
        make.bottom.mas_equalTo(self.greenView.mas_top).offset(-padding);
        make.right.mas_equalTo(superView.mas_right).offset(-padding);
        make.width.mas_equalTo(self.redView.mas_width);
        make.height.mas_equalTo(@[self.redView,self.greenView]);
    }];
    [self.greenView mas_makeConstraints:^(MASConstraintMaker *make) {
        make.top.mas_equalTo(self.redView.bottom).offset(padding);
        make.left.mas_equalTo(superView.left).offset(padding);
        make.bottom.mas_equalTo(superView.bottom).offset(-padding);
        make.right.mas_equalTo(superView.right).offset(-padding);
        //can pass array of attributes
        make.height.mas_equalTo(@[self.redView.height,self.blueView.height]);
    }];
}
@end
2、点击按钮,放大带动画效果。如图二所示。updateConstraints.

图二.png
@interface TestView2()
@property (nonatomic, strong) UIButton * myBtn;

@property (nonatomic, assign) CGSize btnSize;
@end

@implementation TestView2

- (instancetype)init{
    self = [super init];
    self.myBtn = [[UIButton alloc] init];
    self.myBtn.backgroundColor = [UIColor redColor];
    [self addSubview:self.myBtn];
    [self.myBtn addTarget:self action:@selector(myBtnClicked:) forControlEvents:UIControlEventTouchUpInside];
    self.btnSize = CGSizeMake(100, 100);
    return  self;
}
/*
 意思就是基于约束的布局是懒触发的,只有在添加了约束的情况下,系统才会自动调用 -updateConstraints 方法,如果把所有的约束放在 updateConstraints中,那么系统将会不知道你的布局方式是基于约束的,所以 重写+requiresConstraintBasedLayout 返回YES就是明确告诉系统:虽然我之前没有添加约束,但我确实是基于约束的布局!这样可以保证系统一定会调用 -updateConstraints 方法 从而正确添加约束.
 */
+ (BOOL)requiresConstraintBasedLayout{

    return YES;
}

- (void)updateConstraints{
    [self.myBtn updateConstraints:^(MASConstraintMaker *make) {
        make.center.equalTo(self);
        //必须设置优先级,不然当视图放大self大小后会报错。---》priorityHigh()也可以;
        make.size.equalTo(self.btnSize).priorityLow();
        make.size.lessThanOrEqualTo(self);
    }];
    [super updateConstraints];
}
-(void)myBtnClicked:(UIButton *)sender{
    self.btnSize = CGSizeMake(self.btnSize.width * 1.3, self.btnSize.height * 1.3);
    //告诉视图约束需要更新
    [self setNeedsUpdateConstraints];
    //告诉视图约束立即更新
    [self updateConstraintsIfNeeded];
    [UIView animateWithDuration:0.4 animations:^{
        [self layoutIfNeeded];
    }];
}
@end@interface TestView2()
@property (nonatomic, strong) UIButton * myBtn;

@property (nonatomic, assign) CGSize btnSize;
@end

@implementation TestView2

- (instancetype)init{
    self = [super init];
    self.myBtn = [[UIButton alloc] init];
    self.myBtn.backgroundColor = [UIColor redColor];
    [self addSubview:self.myBtn];
    [self.myBtn addTarget:self action:@selector(myBtnClicked:) forControlEvents:UIControlEventTouchUpInside];
    self.btnSize = CGSizeMake(100, 100);
    return  self;
}
/*
 意思就是基于约束的布局是懒触发的,只有在添加了约束的情况下,系统才会自动调用 -updateConstraints 方法,如果把所有的约束放在 updateConstraints中,那么系统将会不知道你的布局方式是基于约束的,所以 重写+requiresConstraintBasedLayout 返回YES就是明确告诉系统:虽然我之前没有添加约束,但我确实是基于约束的布局!这样可以保证系统一定会调用 -updateConstraints 方法 从而正确添加约束.
 */
+ (BOOL)requiresConstraintBasedLayout{

    return YES;
}
//https://www.jianshu.com/p/28dfe1d980e7  updateConstraints mas_makeConstraints remakeConstraints 区别
- (void)updateConstraints{
    [self.myBtn updateConstraints:^(MASConstraintMaker *make) {
        make.center.equalTo(self);
        //必须设置优先级,不然当视图放大self大小后会报错。---》priorityHigh()也可以;
        make.size.equalTo(self.btnSize).priorityLow();
        make.size.lessThanOrEqualTo(self);
    }];
    [super updateConstraints];
}
-(void)myBtnClicked:(UIButton *)sender{
    self.btnSize = CGSizeMake(self.btnSize.width * 1.3, self.btnSize.height * 1.3);
    //告诉视图约束需要更新
    [self setNeedsUpdateConstraints];
    //告诉视图约束立即更新
    [self updateConstraintsIfNeeded];
    [UIView animateWithDuration:0.4 animations:^{
        [self layoutIfNeeded];
    }];
}
@end
学习地址:
http://www.cocoachina.com/ios/20141219/10702.html
3、点击移动按钮。remakeConstraints。

图3.1.png

图3.2.png
#import "TestView3.h"
@interface TestView3()
@property (nonatomic,assign) BOOL flag;
@property (nonatomic,strong) UIButton * btn;
@end
@implementation TestView3

- (instancetype)init{
    self = [super init];
    if (self) {
        self.flag = YES;
        self.btn = [[UIButton alloc] init];
        self.btn.backgroundColor = [UIColor redColor];
        [self.btn addTarget:self action:@selector(btnClicked:) forControlEvents:UIControlEventTouchUpInside];
        [self addSubview:self.btn];
    }
    return self;
}
+ (BOOL)requiresConstraintBasedLayou{
    return YES;
}
- (void)updateConstraints{
    [self.btn remakeConstraints:^(MASConstraintMaker *make) {
        make.width.equalTo(100);
        make.height.equalTo(100);
        if (self.flag) {
            make.left.equalTo(10);
            make.top.equalTo(10);
        }else{
            make.right.equalTo(-10);
            make.bottom.equalTo(-10);
        }
    }];
    [super updateConstraints];
}

- (void)btnClicked:(UIButton *)sender{
    self.flag = !self.flag;
    [self setNeedsUpdateConstraints];

    [self updateConstraintsIfNeeded];

    [UIView animateWithDuration:0.4 animations:^{
        [self layoutIfNeeded];
    }];
}
@end
4、using constants,见图4.1

图4.1.png
- (id)init {
    self = [super init];
    if (!self) return nil;

    UIView *purpleView = UIView.new;
    purpleView.backgroundColor = UIColor.purpleColor;
    purpleView.layer.borderColor = UIColor.blackColor.CGColor;
    purpleView.layer.borderWidth = 2;
    [self addSubview:purpleView];

    UIView *orangeView = UIView.new;
    orangeView.backgroundColor = UIColor.orangeColor;
    orangeView.layer.borderColor = UIColor.blackColor.CGColor;
    orangeView.layer.borderWidth = 2;
    [self addSubview:orangeView];

    //example of using constants

    [purpleView mas_makeConstraints:^(MASConstraintMaker *make) {
        make.top.equalTo(@20);
        make.left.equalTo(@20);
        make.bottom.equalTo(@-20);
        make.right.equalTo(@-20);
    }];

    // auto-boxing macros allow you to simply use scalars and structs, they will be wrapped automatically

    [orangeView mas_makeConstraints:^(MASConstraintMaker *make) {
        make.center.equalTo(CGPointMake(0, 50));
//        make.center.equalTo(self.center).centerOffset(CGPointMake(0, 50));
        make.size.equalTo(CGSizeMake(200, 100));
    }];

    return self;
}
5、edges,如图

图5.1.png
- (id)init{
    self = [super init];
    if(self){
        UIView * lastView = self;
        for(int i = 0;i < 10;i ++){
            UIView * view = [[UIView alloc] init];
            view.backgroundColor = [UIColor colorWithRed:rand() % 255 / 255.0 green:rand() % 255 / 255.0  blue:rand() % 255 / 255.0  alpha:1];
            [lastView addSubview:view];
            [view makeConstraints:^(MASConstraintMaker *make) {
                make.edges.equalTo(lastView).insets(UIEdgeInsetsMake(8, 10, 12, 14));
            }];
            lastView = view;
        }
    }
    return  self;
}
6、宽高等比布局 multipliedBy,如图6.1。

图6.1.png
UIView * redView = [[UIView alloc] init];
        redView.backgroundColor = [UIColor redColor];
        [self addSubview:redView];
        UIView * redInnerView = UIView.new;
        redInnerView.backgroundColor = [UIColor purpleColor];
        [redView addSubview:redInnerView];


        UIView * greenView = [[UIView alloc] init];
        greenView.backgroundColor = [UIColor greenColor];
        [self addSubview:greenView];
        UIView * greenInnerView = UIView.new;
        greenInnerView.backgroundColor = [UIColor orangeColor];
        [greenView addSubview:greenInnerView];


        [redView updateConstraints:^(MASConstraintMaker *make) {
            make.top.left.right.equalTo(self);


        }];

        [redInnerView mas_makeConstraints:^(MASConstraintMaker *make) {

            make.width.equalTo(redInnerView.height).multipliedBy(3);
            make.width.and.height.lessThanOrEqualTo(redView);
            make.width.equalTo(redView);
            make.center.equalTo(redView);
            //思考下面代码
            /*
            make.width.equalTo(redInnerView.mas_height).multipliedBy(3);
            make.width.and.height.lessThanOrEqualTo(redView);
            make.width.and.height.equalTo(redView).with.priorityLow();
            make.center.equalTo(redView);
             */
        }];

        [greenView updateConstraints:^(MASConstraintMaker *make) {
            make.left.bottom.right.equalTo(self);
            make.top.equalTo(redView.bottom);
            make.height.equalTo(redView);
        }];

        [greenInnerView mas_makeConstraints:^(MASConstraintMaker *make) {
            make.center.equalTo(greenView.center);
            make.height.equalTo(greenView);
            make.height.equalTo(greenInnerView.width).multipliedBy(3);

        }];
7、tableView在有无导航栏和tabbar下的适配
make.top.equalTo(self.mas_topLayoutGuide)、make.top.equalTo(self.view.safeAreaLayoutGuideTop)和make.top.equalTo(self.view);
-
7.1、make.top.equalTo(self.view); 在有导航栏和tabbar的情况下.如7.1.1和7.1.2。tableView在任何系统下都会产生偏移。
 7.1.1 iOS9下的展示图.png
 7.1.2 iOS11下的展示图示.png
    UITableView * tableView = [[UITableView alloc] init];
    [self.view addSubview:tableView];
    tableView.backgroundColor = [UIColor purpleColor];
    [tableView makeConstraints:^(MASConstraintMaker *make) {
        make.top.equalTo(self.view);
        make.left.equalTo(self.view);
        make.right.equalTo(self.view);
        make.bottom.equalTo(self.view);
    }];
    tableView.delegate = self;
    tableView.dataSource = self;
    [tableView registerClass:[UITableViewCell class] forCellReuseIdentifier:@"cell"];
- 7.2、make.top.equalTo(self.mas_topLayoutGuide);不隐藏导航栏和tabbar。
1、topLayoutGuide是计算导航栏和状态兰的高度,会以导航栏底部为低开始计算。
2、在iOS11以下的系统,tableView会产生自动偏移。tableView在iOS11的系统下不会产生偏移量。

7.2.1 iOS11下的展示图.png

7.2.2 iOS9下的展示图.png
    self.view.backgroundColor = [UIColor whiteColor];
    UITableView * tableView = [[UITableView alloc] init];
    [self.view addSubview:tableView];
    if (@available(iOS 11.0,*)) {
        tableView.contentInsetAdjustmentBehavior = UIScrollViewContentInsetAdjustmentAutomatic;
    }else{
        self.automaticallyAdjustsScrollViewInsets = YES;
    }
    tableView.backgroundColor = [UIColor purpleColor];
    [tableView makeConstraints:^(MASConstraintMaker *make) {
        make.top.equalTo(self.mas_topLayoutGuide);
        make.left.equalTo(self.view);
        make.right.equalTo(self.view);
        make.bottom.equalTo(self.view);
    }];
    tableView.delegate = self;
    tableView.dataSource = self;
    [tableView registerClass:[UITableViewCell class] forCellReuseIdentifier:@"cell"];
-
7.3、make.top.equalTo(self.mas_topLayoutGuideTop);不隐藏导航栏和tabbar。如图7.3.1和7.3.2.
1、mas_topLayoutGuideTop:tableView以导航栏的顶部开始计算。
2、tableView在iOS11以下没问题。
 7.3.1 iOS11下的展示图.png
 7.3.2iOS9下的展示图.png
    self.view.backgroundColor = [UIColor whiteColor];
    UITableView * tableView = [[UITableView alloc] init];
    [self.view addSubview:tableView];
    if (@available(iOS 11.0,*)) {
        tableView.contentInsetAdjustmentBehavior = UIScrollViewContentInsetAdjustmentAutomatic;
    }else{
        self.automaticallyAdjustsScrollViewInsets = YES;
    }
    tableView.backgroundColor = [UIColor purpleColor];
    [tableView makeConstraints:^(MASConstraintMaker *make) {
        make.top.equalTo(self.mas_topLayoutGuideTop);
        make.left.equalTo(self.view);
        make.right.equalTo(self.view);
        make.bottom.equalTo(self.view);
    }];
    tableView.delegate = self;
    tableView.dataSource = self;
    [tableView registerClass:[UITableViewCell class] forCellReuseIdentifier:@"cell"];