继承
父类中默认构造,析构,拷贝构造operator=是不会被子类继承下去的
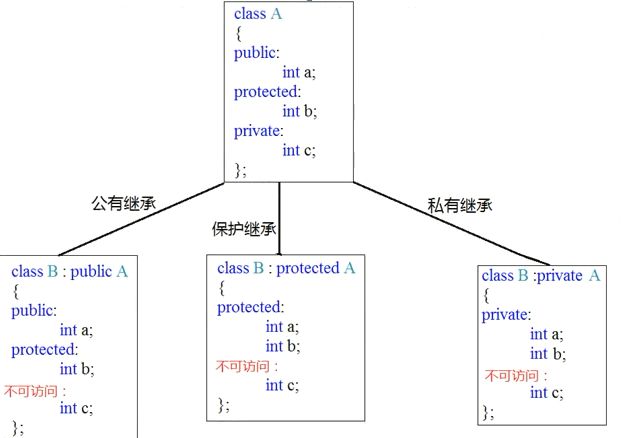
- 继承方式
- public:公有继承
- private:私有继承
- protected:保护继承
如图可知,继承方式会把父类的属性进行权限降级;public是不变,protected会把父类除了私有的全部变为protected,private会把全部变成private;而且父类私有的不论怎么继承字类都不能访问
class 派生类名:继承方式 基类名{

}
- 继承中的对象模型
#include
using namespace std;
#include
class Base
{
public:
    int m_A;

protected:
    int m_B;

private:
    int m_C;
};
class Son : public Base
{
public:
    int m_D;
};

main()
{
    //父类私有属性虽然子类访问不到,但是还是被继承下去了;只是编译器给隐藏了
cout< - 继承中的构造和析构顺序
#include
using namespace std;
#include
class Base
{
public:
    Base()
    {
        cout << "Base的构造函数" << endl;
    }
    ~Base()
    {
        cout << "Base的析构函数" << endl;
    }
};
class Son : public Base
{
public:
    Son()
    {
        cout << "Son的构造函数" << endl;
    }
    ~Son()
    {
        cout << "Son的析构函数" << endl;
    }
};

main()
{
    Son s;
    //调用顺序:
    // Base的构造函数
    // Son的构造函数
    // Son的析构函数
    // Base的析构函数
    return 0;
}
#include
using namespace std;
#include
class Base
{
public:
    Base()
    {
        cout << "Base的构造函数" << endl;
    }
    ~Base()
    {
        cout << "Base的析构函数" << endl;
    }
};
class Other
{
public:
    Other()
    {
        cout << "Other的构造函数" << endl;
    }
    ~Other()
    {
        cout << "Other的析构函数" << endl;
    }
};
class Son : public Base
{
public:
    Son()
    {
        cout << "Son的构造函数" << endl;
    }
    ~Son()
    {
        cout << "Son的析构函数" << endl;
    }
    Other other;
};

main()
{
    Son s;
    //调用顺序:
    // Base的构造函数
    // Other的构造函数
    // Son的构造函数
    // Son的析构函数
    // Other的析构函数
    // Base的析构函数
    return 0;
}
#include
using namespace std;
#include
class Base
{
public:
    Base(int a)
    {
        cout << "Base的构造函数" << endl;
    }
};
class Son : public Base
{
public:
    // Son(int a=100):Base(a)
    Son(int a):Base(a)//利用初始化列表语法,显示调用父类中的其他构造函数
    {
        cout << "Son的构造函数" << endl;
    }
};

main()
{
    // Son s;
    Son s(10);
    return 0;
}
继承中同名成员的处理
#include
using namespace std;
#include
class Base
{
public:
    Base()
    {
        this->m_A=10;
    }
    void func(){

    }
    void func(int a){

    }

    int m_A;
};
class Son : public Base
{
public:
    Son()
    {
        this->m_A=100;
    }
    void func(){

    }
    int m_A;
};

main()
{
    Son s;
    //同名就近
cout< - 继承中的同名静态成员
#include
using namespace std;
#include
class Base
{
public:
    Base()
    {
    }
    static void func()
    {
    }
    static int m_A;
};
int Base::m_A = 0;
class Son : public Base
{
public:
    Son()
    {
    }
    static void func()
    {
    }
    static int m_A;
};
int Son::m_A = 100;

main()
{
    Son s;
    //1. 通过对象访问
    cout << s.m_A << endl;       //100
    cout << s.Base::m_A << endl; //0

    //2. 通过类名访问
    cout << Son::m_A << endl;       //100
    cout << Son::Base::m_A << endl; //0


    //静态函数调用
    s.func();
    s.Base::func();

    Son::func();
    Son::Base::func();

    // /当子类重新定义了父类中的同名成员函数,子类的成员函数会
    //隐藏掉父类中的所有重载版本的同名成员,可以利用作用域显示的指定调用
    // Son::Base::func(1);//参考成员函数的处理,一摸一样
    return 0;
}
多继承
#include
using namespace std;
#include
class Base
{
public:
    Base()
    {
    }
};
class Base1
{
public:
    Base1()
    {
    }
};
class Son : public Base, public Base1
{
public:
    Son()
    {
    }
};
main()
{
    Son s;
    //多继承如果同名也是通过作用域去精确调用
    return 0;
}
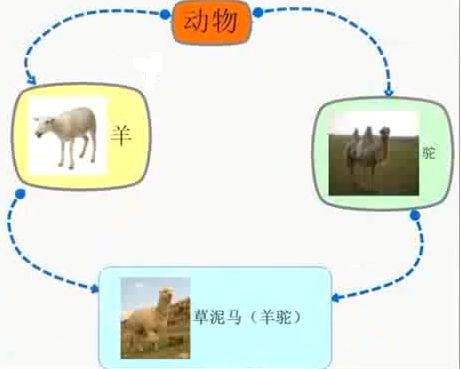
菱形继承
两个派生类继承同一个基类而又有某个类同时继承着两个派生类,这种继承被称为菱形继承,或者钻石型继承
- 虚继承(重要)
避免了内存浪费和定义不明确
#include
using namespace std;
#include
class Animal
{
public:
    int m_Age;
};
//Animal称为虚基类
class Sheep:virtual public Animal{};
class Tuo:virtual public Animal{};

class SheepTuo:public Sheep,public Tuo{};
main()
{
    SheepTuo s;
    s.Sheep::m_Age=10;
    s.Tuo::m_Age=20;
    cout<< s.Sheep::m_Age<
多态
c++支持编译时多态(静态多态)和运行时多态(动态多态),运算符重载和函数重载就是编译时多态,而派生类和虚函数实现是运行时多态
静态多态和动态多态的区别就是函数地址是早绑定(静态联编)还是晚绑定(动态联编)。如果函数的调用再编译阶段就能确定函数的调用地址,并产生代码就是静态多态。而如果函数的调用地址不能编译不能在编译期间确定,而需要在运行时才能决定,这就属于晚绑定(运行时多态)
- 动态多态产生条件
- 先有继承关系
- 父类有虚函数
- 子类重写父类虚函数
- 父类的指针或引用,指向子类对象
#include
using namespace std;
#include
class Animal
{
public:
    virtual void speak()
    {
        cout << "动物在说话" << endl;
    }
};
class Cat : public Animal
{
public:
    void speak()
    {
        cout << "小猫在说话" << endl;
    }
};
//对于有父子类关系的类,指针或者引用是可以直接转换的
void doSpeak(Animal &animal)
{
    // animal.speak();//动物在说话    地址早绑定,属于静态联编

    //如果想调用小猫说话,地址就不能早绑定;需要动态联编
    //只需要在Animal的speak函数前加 ,就成为虚函数就行了

    animal.speak();//小猫在说话
}
main()
{
    Cat cat;
    doSpeak(cat);
    return 0;
}
-
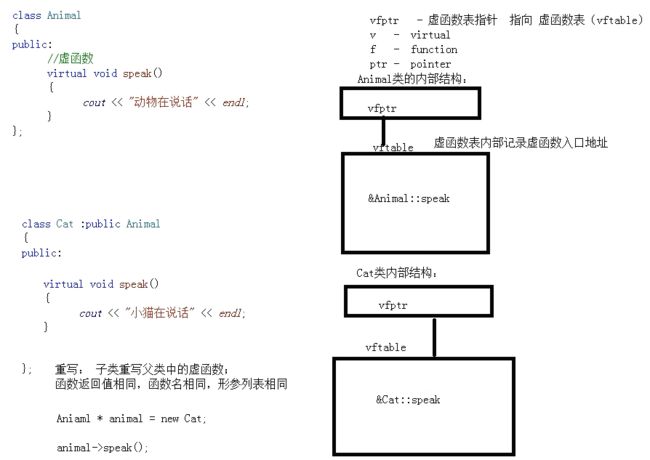
虚函数原理
父类有虚函数之后,本质发生了变化,当父类指向子类调用子类函数时候,
实际上通过虚函数表指针指针虚函数表,调用的就是实际的子类对象的函数
实际上就是通过偏移量去调用函数
- 纯虚函数和抽象类
抽象类无法实例化
class Animal
{
public:
    //纯虚函数
    //如果一个类中包含了纯虚函数,那么这个类就无法实例化对象了
    //这个类我们通常称为抽象类
    //抽象类的子类,必须重写父类中的纯虚函数,否则也属于抽象类
    virtual void getReuslt()=0;
};
- 虚析构和纯虚析构
- 纯虚函数是没有实现的,
纯虚析构类内声明类外实现 - 如果一个类有个
纯虚析构函数,那么也是抽象类,无法实例化对象;但是子类不需要重写(和纯虚函数的区别)
- 纯虚函数是没有实现的,
#include
using namespace std;
#include
class Animal
{
public:
    Animal()
    {
        cout << "Animal构造" << endl;
    }
    //虚析构
    //如果子类中有指向堆区的属性,那么要利用虚析构技术再delete的时候调用子类的析构函数
    virtual ~Animal()
    {
        cout << "Animal析构" << endl;
    }
    //析构不能重载不能有多个,一般只写一个
    //纯虚析构:需要有声明也需要有实现;类内声明,类外实现
    // virtual ~Animal() = 0;

    virtual void speak()
    {
        cout << "动物叫" << endl;
    }
};
// Animal::~Animal()
// {
//     cout << "Animal纯虚析构的调用" << endl;
// }

class Cat : public Animal
{
public:
    Cat(char *name)
    {
        cout << "Cat构造" << endl;
        this->m_Name = new char[strlen(name) + 1];
        strcpy(this->m_Name, name);
    }
    virtual void speak()
    {
        cout << this->m_Name << "猫叫" << endl;
    }
    ~Cat()
    {
        cout << "Cat析构" << endl;
        if (this->m_Name)
        {
            delete[] this->m_Name;
            this->m_Name = NULL;
        }
    }
    char *m_Name;
};

main()
{
    //多态形式把子类属性创建再堆区的
    //那么父类析构不会调用,需要把父类析构也加上virtual才会被调用
    Animal *a = new Cat("Tom");
    a->speak();
    delete a;

    //有纯虚析构,也是抽象类无法实例化
    // Animal aa;
    return 0;
}
// Animal构造
// Cat构造
// Tom猫叫
// Cat析构
// Animal析构
- 向上向下类型转换
- 因为子类可能有扩展属性/函数,所以内存指针范围更大;那么怎么转换才安全呢?
- 左边父右边子(子转父)
- 最开始new的就是子,最终怎么转都是正常的
重写,重载,重定义
- 重载:同一个作用域的同名函数
- 同一个作用域
- 参数个数,参数顺序,参数类型不同
- 和函数返回值无关
- const也可以作为重载条件 //do(const T t) do(T t)
- 重定义(隐藏)/c++中重定义类似java中重写
- 有继承
- 子类重新定义父类的同名成员(非virtual函数)
- 重写(覆盖)
- 有继承
- 子类重写父类的virtual函数
- 函数返回值,函数名字,函数参数,必须和基类中的虚函数一致
泛型编程
模板
c++提供两种模板机制:函数模板和类模板
函数模板
#include
using namespace std;
#include

//利用模板实现通用交换函数:而且紧跟着的函数/类才能使用当前模板,后面函数就需要重新书写模板了
template
void mySwap(T &a, T &b)
{
    T temp = a;
    a = b;
    b = temp;
}


//模板不能单独使用,必须指定出T才能使用
template
void mySwap2()
{
    T a;
}

int main()
{
    int a = 10;
    int b = 20;
    //1. 自动类型推导
    mySwap(a, b);
    cout << a << b << endl; //2010
    //2.显示指定类型
    mySwap(a, b);
    cout << a << b << endl; //1020

    //虽然没有参数,但是T在函数内部已经存在,没有指定类型也没有自动推导,所以内存怎么分配呢,所以不能这样使用
    // mySwap2();//错误
    //模板不能单独使用,必须指定出T才能使用
     mySwap2();//可以
    return 0;
}
- 通用排序函数,实现对char和int数组的排序
#include
using namespace std;
#include
template
void mySwap(T &a, T &b)
{
    T temp = a;
    a = b;
    b = temp;
}

//通用排序函数,实现对char和int数组的排序
template  //typename和class效果完全一样;
void mySort(T arr[], int len)
{
    for (int i = 0; i < len; i++)
    {
        int max = i;
        for (int j = i + 1; j < len; j++)
        {
            if (arr[max] < arr[j])
            {
                max = j;
            }
        }
        //判断算出的max和开始认定的i是否一致,如果不同则交换数据
        if (i != max)
        {
            mySwap(arr[i], arr[max]);
        }
    }
}

template
void printArray(T arr[], int len)
{
    for (int i = 0; i < len; i++)
    {
        cout << arr[i] << endl;
    }
}

void test01()
{
    // char charArray[] = "helloworld";
    // int len = strlen(charArray);
    // mySort(charArray, len);
    // printArray(charArray, len);

    int intArray[] = {5, 7, 1, 4, 2, 3};
    int len = sizeof(intArray)/sizeof(int);
    mySort(intArray, len);
    printArray(intArray, len);
}
int main()
{
    test01();
    return 0;
}
- 函数模板和普通函数的区别以及调用规则
#include
using namespace std;
#include
template
T myAdd(T a, T b)
{
    return a + b;
}

int myAdd2(int a, int b)
{
    return a + b;
}

void test01()
{
    int a = 10;
    int b = 20;

    char c = 'c';
    // myAdd(a,c);//如果使用自动类型推导,是不会发生隐式类型转换的,会报错
    myAdd2(a, b); //普通函数会发生普通类型转换

    myAdd(a, b); //指定类型,可以进行隐式类型转换
}
//2. 函数模板和普通函数的调用规则
template
void myPrint(T a, T b)
{
    cout << "函数模板调用" << endl;
}


template
void myPrint(T a, T b,T c)
{
    cout << "函数模板三个参数调用" << endl;
}

void myPrint(int a, int b)
{
    cout << "普通函数调用" << endl;
}
void test02()
{
    int a = 10;
    int b = 20;
    //1. 如果函数模板和普通函数都可以调用,优先调用普通函数,因为性能更高
    myPrint(a, b); //普通函数调用

    //2. 如果强制调用函数模板,可以使用空模板参数列表
    myPrint<>(a, b);//函数模板调用

    //3. 函数模板也可以发生函数重载
    myPrint<>(a, b,10);//函数模板三个参数调用

    //4. 如果函数模板能产生更好匹配,优先使用函数模板
    //例如:此时如果是普通函数,还要char转int,所以就不是更好的匹配,所以优先使用函数模板
    char c='c';
    char d='d';
    myPrint(c,d);//函数模板调用
}
int main()
{
    test02();
    return 0;
}
- 模板机制和模板局限性
- 模板机制
- 编译器并不是把函数模板处理成能够处理任何类型的函数,例如自定义类型
- 函数模板通过具体类型产生不同的函数,生成的函数成为模板函数
- 编译器会对函数模板进行二次编译,在声明的地方对模板代码本身进行编译,在调用的地方对参数替换后的代码进行编译
- 模板局限性
编写的模板函数很可能无法处理某些类型,例如T是Person怎么> =比较;另一方面,有时候通用化是有意义的,但C++语法不允许这样做。
为了解决这种问题,可以提供模板的重载,为这些特定的类型提供具体化的模板
- 模板机制
//利用具体换技术实现,或者也可以通过运算符重载实现
template <>bool myCompare(Person &a, Person &b)
{
    if (a.name==b.name) return true
}
类模板
- 基本语法
#include
using namespace std;
#include
template  //可以有默认值,则下面就可以不指定这个
class Person
{
public:
    Person(T name, D age)
    {
        this->name = name;
        this->age = age;
    }
    T name;
    D age;
};
void test01()
{
    //自动类型推导:类模板不可以使用类型推导
    // Person p1("John",100);//错误

    //正确:显示指定类型
    Person p1("John", 1);
}

int main()
{
    test01();
    return 0;
}
- 成员函数创建时机
#include
using namespace std;
#include
class Person1
{
public:
    void showPerson1()
    {
        cout << "person1 show 调用" << endl;
    }
};
class Person2
{
public:
    void showPerson2()
    {
        cout << "person2 show 调用" << endl;
    }
};

template
class MyClass
{
public:
    void func1()
    {
        obj.showPerson1();
    }
    void func2()
    {
        obj.showPerson2();
    }
    T obj;
};
void test01()
{
    MyClass p1;
    p1.func1();
    //类模板中的成员函数并不是一开始创建出来的,而是运行阶段确定出T的数据类型才创建的
    // p1.func2();//此处是调用失败的

    MyClass p1;
    p1.func2();
}

int main()
{
    test01();
    return 0;
}
- 类模板做函数参数
#include
using namespace std;
#include
template
class Person
{
public:
    Person(T1 name, T2 age)
    {
        this->name = name;
        this->age = age;
    }
    void shwoPerson()
    {
        cout << "姓名:" << this->name << "年龄:" << this->age << endl;
    }
    T1 name;
    T2 age;
};
//1. 指定传入的类型
void doWork(Person &p){
    p.shwoPerson();
}
//2. 参数模板化
template
void doWork2(Person &p){
    p.shwoPerson();
}
//3.整个类模板化
template
void doWork3(T &p){
    p.shwoPerson();
}

void test01()
{
    Person p("Hello",999);
    doWork(p);
    //因为Person会把类型传递到模板上template,则doWork2自然知道类型
    doWork2(p);
    doWork3(p);
}

int main()
{
    test01();
    return 0;
}
- 类模板的继承的写法
#include
using namespace std;
#include
//形式一:写死了,不推荐
template
class Base
{
public:
    T m_A;
};
//指定类型,父类才能知道T类型,然后才能给子类分配内存
class Son : public Base
{

};


//形式二
template
class Base1
{
public:
    T m_A;
};
template
class Son1 : public Base1
{
public:
    T1 m_B;
};

void test01()
{
    Son1s;
}

int main()
{
    test01();
    return 0;
}
- 类模板中成员函数类外实现
#include
using namespace std;
#include
template
class Person
{
public:
    Person(T1 name, T2 age);
    // {
    //     this->m_A=name;
    //     this->m_B=age;
    // }
    void showPerson();
    T1 m_A;
    T2 m_B;
};

template
Person::Person(T1 name, T2 age)
{
    this->m_A = name;
    this->m_B = age;
}

template
void Person::showPerson()
{
}

void test01()
{
    Person p("hello", 100);
}

int main()
{
    test01();
    return 0;
}
- 类模板中的友元
- 类内实现
#include
using namespace std;
#include

template
class Person
{
public:
    //友元函数,类内的实现;其实本质上还是全局函数,所以下面是直接调用
    friend void printPerson(Person &p)
    {
        cout << p.m_A << endl;
    }

    Person(T1 name, T2 age)
    {
        this->m_A = name;
        this->m_B = age;
    }
private:
    T1 m_A;
    T2 m_B;
};

void test01()
{
    Person p("John", 12);
    printPerson(p);
}

int main()
{
    test01();
    return 0;
}
- 类外实现(较复杂)
//方式一:略复杂
#include
using namespace std;
#include

//函数模板的声明
template
class Person;

//针对类外实现需要提前声明,又因为这里用到了Person,所以也需要把person声明提前告诉编译器
template
void printPerson1(Person &p);


template
class Person
{
public:
    //友元函数,类外实现;加上<>其实就是告诉编译器,是模板函数而不是普通函数,和外面对应起来,不然编译器当成普通函数是找不到类外的实现
    //因为类外是模板函数实现
    friend void printPerson1<>(Person &p);

    Person(T1 name, T2 age)
    {
        this->m_A = name;
        this->m_B = age;
    }
private:
    T1 m_A;
    T2 m_B;
};

template
void printPerson1(Person &p)
{
    cout <<"类外"<< p.m_A << endl;
}

void test01()
{
    Person p("John", 12);
    printPerson1(p);
}

int main()
{
    test01();
    return 0;
}
//方式二:简单一点
#include
using namespace std;
#include

template
class Person;

//声明实现在一起
template
void printPerson1(Person &p)
{
    cout << "类外" << p.m_A << endl;
}
template
class Person
{
public:
    friend void printPerson1<>(Person &p);
    Person(T1 name, T2 age)
    {
        this->m_A = name;
        this->m_B = age;
    }

private:
    T1 m_A;
    T2 m_B;
};

void test01()
{
    Person p("John", 12);
    printPerson1(p);
}

int main()
{
    test01();
    return 0;
}
类型转换
- 静态转换
#include
using namespace std;
#include
//1. 静态类型转换
void test01()
{
//允许内置数据类型之间的转换
char a = 'a';
double d = static_cast(a);
cout << d << endl; //97
}
class Base
{
};
class Son : public Base
{
};
class Other
{
};
void test02()
{
Base *base = NULL;
Son *son = NULL;
//将base转son,父转子,向下类型转换,不安全
Son *son2 = static_cast(base);
//子转父
Base *base2=static_cast(base);
}
int main()
{
test01();
return 0;
}
- 动态转换
具有类型检查的功能,比静态转换更安全
#include
using namespace std;
#include
void test01()
{
//不允许内置数据类型之间的转换;因为可能精度丢失
// char a = 'a';
// double d = dynamic_cast(a);
// cout << d << endl;
}
class Base
{
};
class Son : public Base
{
};
class Other
{
};
void test02()
{
Base *base = NULL;
Son *son = NULL;
// Son *son2 = dynamic_cast(base); //不安全不允许
Base *base2 = dynamic_cast(base); //无关系,不允许
}
//多态相关转换
class Base1
{
virtual void func() {}
};
class Son1 : public Base1
{
void func() {}
};
void test03()
{
//如果发生多态,那么转换总是安全的:如下写法
Base1 *base = new Son1;
Son1 *son = NULL;
Son1 *son1 = dynamic_cast(base);
}
int main()
{
test01();
return 0;
}
常量转换
不能直接对非指针和非引用的变量使用
const_cast操作符去直接移除它的const
void test01()
{
    const int *p=NULL;
    int *pp=const_cast(p);
    const int *ppp=const_cast(pp);
}
int main()
{
    test01();
    return 0;
}
重新解释转换
是最不安全的一种转换机制,主要用于将一种数据类型从一种类型转化为另一种类型。它可以将一个指针转换成一个整数,也可以将一个整数转换成指针
int a=10;
int *p=reinterpret_cast(a);
异常
如果多层捕获异常,默认是最里面的捕获,但是可以在子异常中直接写
throw来向上传递
异常必须有函数进行处理,如果不处理,程序会自动调用terminate函数,让程序崩溃中断
catch(...){
    throw;
}
#include
using namespace std;
#include
class MyException
{
public:
    void printError()
    {
        cout << "自定义异常" << endl;
    }
}

int
myDiv(int a, int b)
{
    if (b == 0)
    {
        // return -1;
        // throw -1; //返回int类型的异常,而不是-1
        // throw 'c'; //返回char类型异常


        //栈解旋:可通过p1,p2的构造析构去看
        //从try代码块开始,到throw抛出异常之前,所有栈上的数据都会被释放掉
        //释放的顺序和构造顺序是相反的,这个过程成为栈解旋
        Person p1;
        Person p2;

        throw new MyException(); //抛出MyException匿名对象
    }
    return a / b;
}
int main()
{
    try
    {
        myDiv(1, 0);
    }
    catch (int)
    {
        cout << "int类型异常捕获" << endl;
    }
    catch (char)
    {
        cout << "char类型异常捕获" << endl;
    }
    catch (MyException e)
    {
        e.printError();
    }
    catch (...)
    {
        cout << "其他类型异常捕获" << endl;
    }
    return 0;
}
异常的接口声明
qt和linux下是正确的,vs并没有提供这种机制
void func() throw(int)
// void func() throw(...)
{
    //只允许抛出int
    throw 1;
}

int main()
{
    try
    {
        func();
    }
    catch (int)
    {
    }
    return 0;
}
- 异常变量的生命周期
#include
using namespace std;
#include
class MyException
{
public:
    MyException()
    {
        cout << "MyException默认构造" << endl;
    }
    MyException(const MyException &e)
    {
        cout << "MyException拷贝构造" << endl;
    }
    ~MyException()
    {
        cout << "MyException析构函数" << endl;
    }
    void printError()
    {
        cout << "自定义异常" << endl;
    }
};

void doWork()
{
    //调用默认构造
    throw MyException();

    // throw new MyException();//只会调用默认构造,但是需要自己管理释放内存delete
}
int main()
{
    try
    {
        doWork();
    }
    catch (MyException e) //调用拷贝构造,效率低
    // catch (MyException &e)  //效率高一些,推荐
    {
        e.printError();
    }
    catch (...)
    {
        cout << "其他类型异常捕获" << endl;
    }
    return 0;
}
//打印结果
// MyException默认构造
// MyException拷贝构造
// 自定义异常
// MyException析构函数
// MyException析构函数


//如果:catch (MyException &e) 传入引用
// MyException默认构造
// 自定义异常
// MyException析构函数
- 异常的多态
#include
using namespace std;
#include
class BaseException
{
public:
    virtual void printError() = 0;
};

class NULLPointException : public BaseException
{
public:
    void printError()
    {
        cout << "NULLPointException异常" << endl;
    }
};

void doWork()
{
    throw NULLPointException();
}
int main()
{
    try
    {
        doWork();
    }
    catch (BaseException &e)
    {
        e.printError();
    }
    return 0;
}
- 系统标准异常使用
//注意
#include  //异常需要这个头文件

void doWork()
{
    //系统异常:还有很多其他内置系统异常
    throw out_of_range("越界异常");
}
int main()
{
    try
    {
        doWork();
    }
    catch (out_of_range &e)
    {
        cout<
标准输入输出流
- 输入流
int main()
{

    //利用cin.get取出数据时候,换行符会遗留在缓冲区中,例如get(buf,1024;之后再次cin.get()才可以取出换行符
    // cin.get();//一次只能读取一个字符
    // cin.get(一个参数);//读一个字符串
    // cin.get(两个参数);//可以读字符串  cin.get(buf,1024);
    // cin.getline();//不同于get,这个取出了换行符
    // cin.ignore(); //忽略,默认忽略一个字符
    // cin.ignore(2); //忽略,忽略前两个字符,同理参数x就代表忽略多少个字符
    // cin.peek();//偷窥,就是只是看看,如果之后继续get还是从上次get的开始读
    //cin.fail();//缓冲区状态  0代表正常,1代表异常
    // cin.putback();//放回,就是放回原来位置好像没有进行任何操作一样

    char c = cin.get();
    cin.putback(c);
    char buf[1024] = {0};
    cin.getline(buf, 1024);
    cout << buf << endl;//最终发现,输入什么输出什么,没有因为cin.get()产生任何影响
    return 0;
}
- 输出流
int main()
{

    //    cout.flush();//刷新缓冲区linux下有效
    //    cout.put('h');//向缓冲区写字符
    //    cout.write();//从buffer中写num个字节到当前输出流中
    cout.put('h').put('e');
    char buf[] = "hello world";
    cout.write(buf, strlen(buf));

    cout<<"hello world"<
    int num1=99;
    cout<
读写文件
有很多种形式,参考即可
#include
#include
using namespace std;

int main ()
{
   char data[100];
   // 以写模式打开文件
   ofstream outfile;
   outfile.open("afile.dat");
   cout << "Writing to the file" << endl;
   cout << "Enter your name: ";
   cin.getline(data, 100);
   // 向文件写入用户输入的数据
   outfile << data << endl;
   cout << "Enter your age: ";
   cin >> data;
   cin.ignore();
   // 再次向文件写入用户输入的数据
   outfile << data << endl;
   // 关闭打开的文件
   outfile.close();
   // 以读模式打开文件
   ifstream infile;
   infile.open("afile.dat");
   cout << "Reading from the file" << endl;
   infile >> data;
   // 在屏幕上写入数据
   cout << data << endl;
   // 再次从文件读取数据,并显示它
   infile >> data;
   cout << data << endl;
   // 关闭打开的文件
   infile.close();
   return 0;
}
- 文件位置指针
// 定位到 fileObject 的第 n 个字节(假设是 ios::beg)
fileObject.seekg( n );

// 把文件的读指针从 fileObject 当前位置向后移 n 个字节
fileObject.seekg( n, ios::cur );

// 把文件的读指针从 fileObject 末尾往回移 n 个字节
fileObject.seekg( n, ios::end );

// 定位到 fileObject 的末尾
fileObject.seekg( 0, ios::end );


