1、相对定位
相对定位是部件对于另一个位置的约束,这么说可能有点抽象,举个例子:
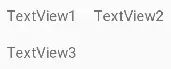
如图所示,TextView2在TextView1的右边,TextView3在TextView1的下面,这个时候在布局文件里面应该这样写:
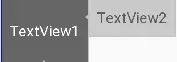
上面代码中在TextView2里用到了app:layout_constraintLeft_toRightOf="@+id/TextView1"这个属性,他的意思是把TextView2的左边约束到TextView1的右边,如下图所示:
同理TextView3在TextView1的下面,就需要用到app:layout_constraintTop_toBottomOf="@+id/TextView1",即把TextView3的上面约束到TextView1的下面。
下面来看看相对定位的常用属性:
layout_constraintLeft_toLeftOf
layout_constraintLeft_toRightOf
layout_constraintRight_toLeftOf
layout_constraintRight_toRightOf
layout_constraintTop_toTopOf
layout_constraintTop_toBottomOf
layout_constraintBottom_toTopOf
layout_constraintBottom_toBottomOf
layout_constraintBaseline_toBaselineOf
layout_constraintStart_toEndOf
layout_constraintStart_toStartOf
layout_constraintEnd_toStartOf
layout_constraintEnd_toEndOf
上面属性中有一个比较有趣的layout_constraintBaseline_toBaselineOf
Baseline指的是文本基线,举个例子:
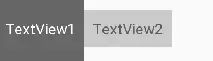
如图所示,两个TextView的高度不一致,但是又希望他们文本对齐,这个时候就可以使用layout_constraintBaseline_toBaselineOf,代码如下:
效果如下:
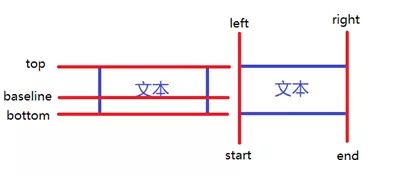
ConstraintLayout相对定位的用法跟RelativeLayout还是比较相似的,下面用一个图来总结相对定位:
3、边距
- 3.1 常用margin
onstraintLayout的边距常用属性如下:
android:layout_marginStart
android:layout_marginEnd
android:layout_marginLeft
android:layout_marginTop
android:layout_marginRight
android:layout_marginBottom
看起来跟别的布局没有什么差别,但实际上控件在ConstraintLayout里面要实现margin,必须先约束该控件在ConstraintLayout里的位置,举个例子:
如果在别的布局里,TextView1的位置应该是距离边框的左边和上面有一个10dp的边距,但是在ConstraintLayout里,是不生效的,因为没有约束TextView1在布局里的位置。正确的写法如下:
把TextView1的左边和上边约束到parent的左边和上边,这样margin就会生效,效果如下:
在使用margin的时候要注意两点:
控件必须在布局里约束一个相对位置
margin只能大于等于0
- 3.2 goneMargin
goneMargin主要用于约束的控件可见性被设置为gone的时候使用的margin值,属性如下:
layout_goneMarginStart
layout_goneMarginEnd
layout_goneMarginLeft
layout_goneMarginTop
layout_goneMarginRight
layout_goneMarginBottom
举个例子:
假设TextView2的左边约束在TextView1的右边,并给TextView2设一个app:layout_goneMarginLeft="10dp",代码如下:
效果如下,TextView2在TextView1的右边,且没有边距。
这个时候把TextView1的可见性设为gone,效果如下:
TextView1消失后,TextView2有一个距离左边10dp的边距。
4、居中和偏移
在RelativeLayout中,把控件放在布局中间的方法是把layout_centerInParent设为true,而在ConstraintLayout中的写法是:
app:layout_constraintBottom_toBottomOf="parent"
app:layout_constraintLeft_toLeftOf="parent"
app:layout_constraintRight_toRightOf="parent"
app:layout_constraintTop_toTopOf="parent"
意思是把控件的上下左右约束在布局的上下左右,这样就能把控件放在布局的中间了。同理RelativeLayout中的水平居中layout_centerHorizontal相当于在ConstraintLayout约束控件的左右为parent的左右;RelativeLayout中的垂直居中layout_centerVertical相当于在ConstraintLayout约束控件的上下为parent的上下。
由于ConstraintLayout中的居中已经为控件约束了一个相对位置,所以可以使用margin,如下所示:
效果如下:
上面TextView1在水平居中后使用layout_marginLeft="100dp"向右偏移了100dp。除了这种偏移外,ConstraintLayout还提供了另外一种偏移的属性:
layout_constraintHorizontal_bias 水平偏移
layout_constraintVertical_bias 垂直偏移
举个例子:
效果如下:
假如现在要实现水平偏移,给TextView1的layout_constraintHorizontal_bias赋一个范围为 0-1 的值,假如赋值为0,则TextView1在布局的最左侧,假如赋值为1,则TextView1在布局的最右侧,假如假如赋值为0.5,则水平居中,假如假如赋值为0.3,则更倾向于左侧。
垂直偏移同理。
5、尺寸约束
控件的尺寸可以通过四种不同方式指定:
- 使用指定的尺寸
- 使用wrap_content,让控件自己计算大小
当控件的高度或宽度为wrap_content时,可以使用下列属性来控制最大、最小的高度或宽度:
android:minWidth 最小的宽度
android:minHeight 最小的高度
android:maxWidth 最大的宽度
android:maxHeight 最大的高度
注意!当ConstraintLayout为1.1版本以下时,使用这些属性需要加上强制约束,如下所示:
app:constrainedWidth=”true”
app:constrainedHeight=”true” - 使用 0dp (MATCH_CONSTRAINT)
官方不推荐在ConstraintLayout中使用match_parent,可以设置 0dp (MATCH_CONSTRAINT) 配合约束代替match_parent,举个例子:
宽度设为0dp,左右两边约束parent的左右两边,并设置左边边距为50dp,效果如下:
- 宽高比
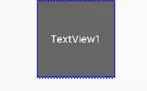
当宽或高至少有一个尺寸被设置为0dp时,可以通过属性layout_constraintDimensionRatio设置宽高比,举个例子:
宽设置为0dp,宽高比设置为1:1,这个时候TextView1是一个正方形,效果如下:
除此之外,在设置宽高比的值的时候,还可以在前面加W或H,分别指定宽度或高度限制。 例如:
app:layout_constraintDimensionRatio="H,2:3"指的是 高:宽=2:3
app:layout_constraintDimensionRatio="W,2:3"指的是 宽:高=2:3
6、链
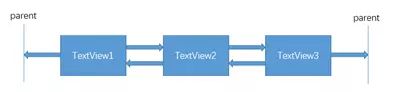
如果两个或以上控件通过下图的方式约束在一起,就可以认为是他们是一条链(图为横向的链,纵向同理)。
用代码表示:
3个TextView相互约束,两端两个TextView分别与parent约束,成为一条链,效果如下:
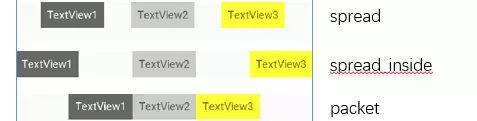
一条链的第一个控件是这条链的链头,我们可以在链头中设置 layout_constraintHorizontal_chainStyle来改变整条链的样式。chains提供了3种样式,分别是:
CHAIN_SPREAD —— 展开元素 (默认);
CHAIN_SPREAD_INSIDE —— 展开元素,但链的两端贴近parent;
CHAIN_PACKED —— 链的元素将被打包在一起。
如图所示:
上面的例子创建了一个样式链,除了样式链外,还可以创建一个权重链。
可以留意到上面所用到的3个TextView宽度都为wrap_content,如果我们把宽度都设为0dp,这个时候可以在每个TextView中设置横向权重layout_constraintHorizontal_weight(constraintVertical为纵向)来创建一个权重链,如下所示:
效果如下:
1、约束布局ConstraintLayout看这一篇就够了