前言
在工作中经常会发现很多同事连最常用的SSM框架使用起来也经常忘这忘那的,关于spring甚至只记得IOC、DI、AOP,然后就在网上找资料浪费大部分时间,所以本文重温了一遍帮大伙加深理解,同时做个整理,以后再忘来看这篇文章就好了。
我平时也会收集一些不错的spring学习书籍PDF,毕竟程序员的书都挺贵的,不可能每本都买实体,自己啃完也会梳理学习笔记,都在这了>>spring一网打尽,直接点击就可以无偿获取。
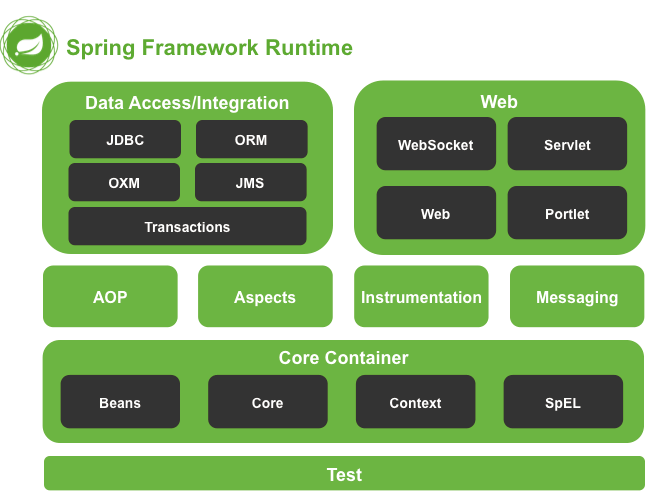
1. 体系结构
Spring是模块化的,可以选择合适的模块来使用,其体系结构分为5个部分,分别为:
Core Container
核心容器:Spring最主要的模块,主要提供了IOC、DI、BeanFactory、Context等,列出的这些学习过Spring的同学应该都认识
Data Access/Integration
数据访问/集成:即有JDBC的抽象层、ORM对象关系映射API、还有事务支持(重要)等
Web
Web:基础的Web功能如Servlet、http、Web-MVC、Web-Socket等
Test
测试:支持具有Junit或TestNG框架的Spring组件测试
其他
AOP、Aspects(面向切面编程框架)等
2. IOC
2.1 引入耦合概念
耦合:即是类间或方法间的依赖关系,编译时期的依赖会导致后期维护十分困难,一处的改动导致其他依赖的地方都需改动,所以要解耦
解耦:解除程序间的依赖关系,但在实际开发中我们只能做到编译时期不依赖,运行时期才依赖即可,没有依赖关系即没有必要存在了
解决思路:使用Java的反射机制来避免new关键字(通过读取配置文件来获取对象全限定类名)、使用工厂模式
2.2 IOC容器
Spring框架的核心,主要用来存放Bean对象,其中有个底层BeanFactory接口只提供最简单的容器功能(特点延迟加载),一般不使用。常用的是其子类接口ApplicationContext接口(创建容器时立即实例化对象,继承BeanFactory接口),提供了高级功能(访问资源,解析文件信息,载入多个继承关系的上下文,拦截器等)。
ApplicationContext接口有三个实现类:ClassPathXmlApplicationContext、FileSystemoXmlApplication、AnnotionalConfigApplication,从名字可以知道他们的区别,下面讲解都将围绕ApplicationContext接口。
容器为Map结构,键为id,值为Object对象。
2.2.1 Bean的创建方式
无参构造
只配了id、class标签属性(此时一定要有无参函数,添加有参构造时记得补回无参构造)
普通工厂创建
可能是别人写好的类或者jar包,我们无法修改其源码(只有字节码)来提供无参构造函数,eg:
// 这是别人的jar包是使用工厂来获取实例对象的
public class InstanceFactory {
    public User getUser() {
        return new User();
    }
}
静态工厂创建
2.2.2 Bean标签
该标签在applicationContext.xml中表示一个被管理的Bean对象,Spring读取xml配置文件后把内容放入Spring的Bean定义注册表,然后根据该注册表来实例化Bean对象将其放入Bean缓存池中,应用程序使用对象时从缓存池中获取
| 属性 | 描述 |
|---|---|
| class | 指定用来创建bean类 |
| id | 唯一的标识符,可用 ID 或 name 属性来指定 bean 标识符 |
| scope | 对象的作用域,singleton(默认)/prototype |
| lazy-init | 是否懒创建 true/false |
| init-method | 初始化调用的方法 |
| destroy-method | x销毁调用的方法 |
| autowire | 不建议使用,自动装配byType、byName、constructor |
| factory-bean | 指定工厂类 |
| factory-method | 指定工厂方法 |
| 元素 | 描述 |
| constructor-arg | 构造函数注入 |
| properties | 属性注入 |
| 元素的属性 | 描述 |
| type | 按照类型注入 |
| index | 按照下标注入 |
| name | 按照名字注入,最常用 |
| value | 给基本类型和String注入 |
| ref | 给其他bean类型注入 |
| 元素的标签 | 描述 |
|
|
|
|
|
|
|
2.2.3 使用
注意:默认使用无参构造函数的,若自己写了有参构造,记得补回无参构造
XML
ApplicationContext ac = new ClassPathXmlApplicationContext
("applicationContext.xml");
User user = (User) ac.getBean("User");
user.getName();
注解
前提在xml配置文件中开启bean扫描
// 默认是类名首字母小写
@Component(value="User")
public class User{
    int id;
    String name;
    String eamil;
}
2.2.4 生命周期
单例:与容器同生共死
多例: 使用时创建,GC回收时死亡
3. DI
Spring框架的核心功能之一就是通过依赖注入的方式来管理Bean之间的依赖关系,能注入的数据类型有三类:基本类型和String,其他Bean类型,集合类型。注入方式有:构造函数,set方法,注解
3.1 基于构造函数的注入
3.2 基于setter注入(常用)
被注入的bean一定要有setter函数才可注入,而且其不关心属性叫什么名字,只关心setter叫什么名字
3.3 注入集合
、
INDIA
USA
USA
INDIA
Pakistan
USA
USA
3.4 注解
@Autowired:自动按照类型注入(所以使用注解时setter方法不是必须的,可用在变量上,也可在方法上)。若容器中有唯一的一个bean对象类型和要注入的变量类型匹配就可以注入;若一个类型匹配都没有,则报错;若有多个类型匹配时:先匹配全部的类型,再继续匹配id是否有一致的,有则注入,没有则报错
@Qualifier:在按照类型注入基础上按id注入,给类成员变量注入时不能单独使用,给方法参数注入时可以单独使用
@Resource:上面二者的结合
注意:以上三个注入只能注入bean类型数据,不能注入基本类型和String,集合类型的注入只能通过XMl方式实现
@Value:注入基本类型和String数据
承接上面有个User类了
@Component(value = "oneUser")
@Scope(value = "singleton")
public class OneUser {

    @Autowired    // 按类型注入
    User user;

    @Value(value = "注入的String类型")
    String str;

    public void UserToString() {
        System.out.println(user + str);
    }
}
3.5 配置类(在SpringBoot中经常会遇到)
配置类等同于aplicationContext.xml,一般配置类要配置的是需要参数注入的bean对象,不需要参数配置的直接在类上加@Component
/**
 * 该类是个配置类,作用与applicationContext.xml相等
 * @Configuration表示配置类
 * @ComponentScan(value = {""})内容可以传多个,表示数组
 * @Bean 表示将返回值放入容器,默认方法名为id
 * @Import 导入其他配置类
 * @EnableAspectJAutoProxy 表示开启注解
 */
@Configuration
@Import(OtherConfiguration.class)
@EnableAspectJAutoProxy
@ComponentScan(value = {"com.howl.entity"})
public class SpringConfiguration {

    @Bean(value = "userFactory")
    @Scope(value = "prototype")
    public UserFactory createUserFactory(){

        // 这里的对象容器管理不到,即不能用@Autowired,要自己new出来
        User user = new User();

        // 这里是基于构造函数注入
        return new UserFactory(user);
    }
}
@Configuration
public class OtherConfiguration {

    @Bean("user")
    public User createUser(){
        User user = new User();

        // 这里是基于setter注入
        user.setId(1);
        user.setName("Howl");
        return user;
    }
}
4. AOP
4.1 动态代理
动态代理:基于接口(invoke)和基于子类(Enhancer的create方法),基于子类的需要第三方包cglib,这里只说明基于接口的动态代理,笔者 动态代理的博文
Object ob = Proxy.newProxyInstance(mydog.getClass().getClassLoader(), mydog.getClass().getInterfaces(),new InvocationHandler(){

    // 参数依次为:被代理类一般不使用、使用的方法、参数的数组
    // 返回值为创建的代理对象
    // 该方法会拦截类的所有方法,并在每个方法内注入invoke内容
    public Object invoke(Object proxy, Method method, Object[] args) throws Throwable {
            // 只增强eat方法
            if(method.getName().equals("eat")){
                System.out.println("吃肉前洗手");
                method.invoke(mydog, args);
            }else{
                method.invoke(mydog, args);
            }
            return proxy;
        }
})
4.2 AOP
相关术语:
连接点:这里指被拦截的方法(Spring只支持方法)
通知:拦截到连接点要执行的任务
切入点:拦截中要被增强的方法
织入:增强方法的过程
代理对象:增强功能后返回的对象
切面:整体的结合,什么时候,如何增强方法
xml配置
即环绕通知是手动配置切入方法的,且Spring框架提供了ProceedingJoinPoint,该接口有一个proceed()和getArgs()方法。此方法就明确相当于调用切入点方法和获取参数。在程序执行时,spring框架会为我们提供该接口的实现类供我们使用
// 抽取了公共的代码(日志)
public class Logger {

    public void beforeLog(){
        System.out.println("前置通知");
    }

    public void afterReturningLog(){
        System.out.println("后置通知");
    }

    public void afterThrowingLog(){
        System.out.println("异常通知");
    }

    public void afterLog(){
        System.out.println("最终通知");
    }

    // 这里就是环绕通知
    public Object aroundLog(ProceedingJoinPoint pjp){

        Object rtValue = null;

        try {

            // 获取方法参数
            Object[] args = pjp.getArgs();

            System.out.println("前置通知");

            // 调用业务层方法
            rtValue = pjp.proceed();

            System.out.println("后置通知");

        } catch (Throwable t) {
            System.out.println("异常通知");
            t.printStackTrace();
        } finally {
            System.out.println("最终通知");
        }
        return rtValue;
    }

}
基于注解的AOP
注意要在切面类上加上注解表示是个切面类,四个通知在注解中通知顺序是不能决定的且乱序,不建议使用,不过可用环绕通知代替 。即注解中建议使用环绕通知来代替其他四个通知
// 抽取了公共的日志
@Component(value = "logger")
@Aspect
public class Logger {

    @Pointcut("execution(* com.howl.interfaces..*(..))")
    private void pt1(){}

    @Before("pt1()")
    public void beforeLog(){
        System.out.println("前置通知");
    }

    @AfterReturning("pt1()")
    public void afterReturningLog(){
        System.out.println("后置通知");
    }

    @AfterThrowing("pt1()")
    public void afterThrowingLog(){
        System.out.println("异常通知");
    }

    @After("pt1()")
    public void afterLog(){
        System.out.println("最终通知");
    }

    @Around("pt1()")
    public Object aroundLog(ProceedingJoinPoint pjp){

        Object rtValue = null;

        try {

            // 获取方法参数
            Object[] args = pjp.getArgs();

            System.out.println("前置通知");

            // 调用业务层方法
            rtValue = pjp.proceed();

            System.out.println("后置通知");

        } catch (Throwable t) {
            System.out.println("异常通知");
            t.printStackTrace();
        } finally {
            System.out.println("最终通知");
        }
        return rtValue;
    }

}
5. 事务
Spring提供了声明式事务和编程式事务,后者难于使用而选择放弃,Spring提供的事务在业务层,是基于AOP的
5.1 声明式事务
从业务代码中分离事务管理,仅仅使用注释或 XML 配置来管理事务,Spring 把事务抽象成接口 org.springframework.transaction.PlatformTransactionManager ,其内容如下,重要的是其只是个接口,真正实现类是:org.springframework.jdbc.datasource.DataSourceTransactionManager
public interface PlatformTransactionManager {
    // 根据定义创建或获取当前事务
   TransactionStatus getTransaction(TransactionDefinition definition);
   void commit(TransactionStatus status);
   void rollback(TransactionStatus status);
}
TransactionDefinition事务定义信息
public interface TransactionDefinition {
   int getPropagationBehavior();
   int getIsolationLevel();
   String getName();
   int getTimeout();
   boolean isReadOnly();
}
因为不熟悉所以把过程全部贴下来
5.2 xml配置
建表
CREATE TABLE `account` (
  `id` int(11) NOT NULL AUTO_INCREMENT,
  `money` int(255) DEFAULT NULL,
  PRIMARY KEY (`id`)
) ENGINE=InnoDB AUTO_INCREMENT=3 DEFAULT CHARSET=utf8;
entity
public class Account {

    private int id;
    private int money;

    public int getId() {
        return id;
    }

    public void setId(int id) {
        this.id = id;
    }

    public int getMoney() {
        return money;
    }

    public void setMoney(int money) {
        this.money = money;
    }

    public Account(int id, int money) {
        this.id = id;
        this.money = money;
    }

    @Override
    public String toString() {
        return "Account{" +
                "id=" + id +
                ", money=" + money +
                '}';
    }
}
Dao层
public interface AccountDao {

    // 查找账户
    public Account selectAccountById(int id);

    // 更新账户
    public void updateAccountById(@Param(value = "id") int id, @Param(value = "money") int money);

}
Mapper层
UPDATE account SET money = #{money} WHERE id = #{id}
Service层
public interface AccountService {

    public Account selectAccountById(int id);

    public void transfer(int fid,int sid,int money);

}
Service层Impl
public class AccountServiceImpl implements AccountService {

    @Autowired
    private AccountDao accountDao;

    public Account selectAccountById(int id) {
        return accountDao.selectAccountById(id);
    }

    // 这里只考虑事务,不关心钱额是否充足
    public void transfer(int fid, int sid, int money) {

        Account sourceAccount = accountDao.selectAccountById(fid);
        Account targetAccount = accountDao.selectAccountById(sid);

        accountDao.updateAccountById(fid, sourceAccount.getMoney() - money);

        // 异常
         int i = 1 / 0;

        accountDao.updateAccountById(sid, targetAccount.getMoney() + money);
    }
}
applicationContext.xml配置
测试
public class UI {

    public static void main(String[] args) {

        ApplicationContext ac = new ClassPathXmlApplicationContext("applicationContext.xml");

        AccountService accountService = (AccountService) ac.getBean("accountServiceImpl");

        Account account = accountService.selectAccountById(1);
        System.out.println(account);

        accountService.transfer(1,2,100);
    }
}
正常或发生异常都完美运行
个人觉得重点在于配置事务管理器(而像数据源这样是日常需要)
事务管理器:管理获取的数据库连接
事务通知:根据事务管理器来配置所需要的通知(类似于前后置通知)
上面两个可以认为是合一起配一个通知,而下面的配置方法与通知的映射关系
AOP配置:用特有的
5.3 注解事务
- 配置事务管理器(和xml一样必须的)
- 开启Spring事务注解支持
- 在需要注解的地方使用@Transaction
- 不需要AOP,是因为@Transaction注解放在了哪个类上就说明哪个类需要切入,里面所有方法都是切入点,映射关系已经存在了
在AccountServiceImpl中简化成,xml中可以选择方法匹配,注解不可,只能这样配
@Service(value = "accountServiceImpl")
@Transactional(propagation = Propagation.SUPPORTS, readOnly = true)
public class AccountServiceImpl implements AccountService {

    // 这里为了获取Dao层
    @Autowired
    private AccountDao accountDao;

    // 业务正式开始

    public Account selectAccountById(int id) {
        return accountDao.selectAccountById(id);
    }

    // 这里只考虑事务,不关心钱额是否充足
    @Transactional(propagation = Propagation.REQUIRED,readOnly = false)
    public void transfer(int fid, int sid, int money) {

        Account sourceAccount = accountDao.selectAccountById(fid);
        Account targetAccount = accountDao.selectAccountById(sid);

        accountDao.updateAccountById(fid, sourceAccount.getMoney() - money);

        // 异常
        // int i = 1 / 0;

        accountDao.updateAccountById(sid, targetAccount.getMoney() + money);
    }
}
6. Test
应用程序的入口是main方法,而JUnit单元测试中,没有main方法也能执行,因为其内部集成了一个main方法,该方法会自动判断当前测试类哪些方法有@Test注解,有就执行。
JUnit不会知道我们是否用了Spring框架,所以在执行测试方法时,不会为我们读取Spring的配置文件来创建核心容器,所以不能使用@Autowired来注入依赖。
解决方法:
- 导入JUnit包
- 导入Spring整合JUnit的包
- 替换Running,@RunWith(SpringJUnit4ClassRunner.class)
- 加入配置文件,@ContextConfiguration
@RunWith(SpringJUnit4ClassRunner.class)
@ContextConfiguration(classes = SpringConfiguration.class)
//@ContextConfiguration(locations = "classpath:applicationContext.xml")
public class UITest {

    @Autowired
    UserFactory userFactory;

    @Test
    public void User(){
        System.out.println(userFactory.getUser().toString());
    }
}
7. 注解总览
@Component
@Controller
@Service
@Repository

@Autowired
@Qualifier
@Resource
@Value
@Scope

@Configuration
@ComponentScan
@Bean
@Import
@PropertySource()

@RunWith
@ContextConfiguration

@Transactional
8. 总结
学完Spring之后感觉有什么优势呢?
- IOC、DI:方便降耦
- AOP:重复的功能形成组件,在需要处切入,切入出只需关心自身业务甚至不知道有组件切入,也可把切入的组件放到开发的最后才完成
- 声明式事务的支持
- 最小侵入性:不用继承或实现他们的类和接口,没有绑定了编程,Spring尽可能不让自身API弄乱开发者代码
- 整合测试
方便集成其他框架
好了,本文就写到这里吧,我的学习秘籍都在这了>>spring一网打尽,直接点击就可以直接白嫖了!
