TNTWeb - 全称腾讯新闻中台前端团队,组内小伙伴在Web前端、NodeJS开发、UI设计、移动APP等大前端领域都有所实践和积累。
目前团队主要支持腾讯新闻各业务的前端开发,业务开发之余也积累沉淀了一些前端基础设施,赋能业务提效和产品创新。
团队倡导开源共建,拥有各种技术大牛,团队Github地址:https://github.com/tnfe
本文作者冷叶 项目地址: https://github.com/tnfe/clean-state
一、前言
React从设计之初到最新的v17版本,已经经历了近百次迭代。围绕着单向数据流的设计哲学出现了以Flux思想为主的Redux状态管理和以响应式监听为主的Mobx,一个强调理念上的统一而另一个强调性能体验上的极致。但是通过唯物辩证法我们知道,对立和统一才是所有事物发展的最终形态。于是自[email protected]后推出了Hooks函数,在不改变其心智模型的基础上补齐了对逻辑抽象的短板,借助这一能力我们就可以打开全新的状态管理视野。
二、背景
在目前以MVVM为核心的软件开发模式下,我们知道视图的本质就是对数据的表达,任何数据的突变都会带来视图上的反馈。当面临一个大型项目开发时,为了提高后续的维护迭代效率,我们首先要做的就是模块拆解,让每一个部分尽可能碎片化可复用,这也是微组件的初级概念。
而在整个拆解的过程中,我们碎片化的其实是UI层。比如一个弹窗,在特定的业务上有会统一的设计标准,变化的只是文案;亦或是一个大列表,每次更新的是元数据,卡片的轮廓保持了统一。那么数据该如何处理,试想如果跟随组件走,那当一个项目越来越大时,散落在各个地方的数据和逻辑会急剧增大该软件的熵,造成后面的需求迭代、错误排查、调试维护等难度指数级增大。所以,对数据一定程度上的中心化成为了前端正确的开发理念。
三、方案
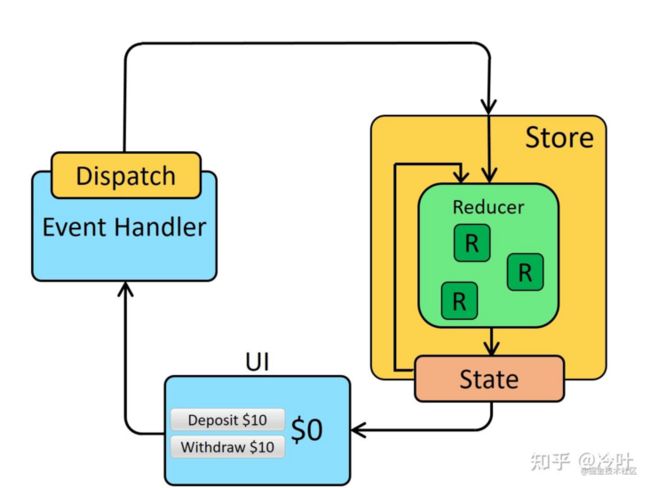
在React里我们把与视图相对应的数据称之为状态,关乎状态管理的方案也经历了一个刀耕火种的时代。最出名的是Redux,它虽然在性能上被人诟病但是奈何思想正确被最大程度的使用。它将数据中心化为State存储在store中,通过dispatch来发布一个action触发reducer来更新。
设计理念是很好,但是当真正用到项目中时我们就会发现几个问题:
- 架构层面如何组织?这里我们不得不引入很多第三方开发库,比如react-redux、redux-thunk、redux-saga等等,这无疑增加了很大的学习成本,同时在寸土寸金的移动端会引入过大的包。
- 性能上如何避免无效渲染?我们通过react-redux做桥接后,关注过源码的同学会发现redux在react里更新的本质是变量提升,通过将state提升每次dispatch后都会触发顶层的setState。根据React的更新机制,这会触发所有子节点的Render函数执行。
// Provider 注入
import React from 'react'
import ReactDOM from 'react-dom'

import { Provider } from 'react-redux'
import store from './store'
import App from './App'

const rootElement = document.getElementById('root')
ReactDOM.render(


  ,
  rootElement
)

// connect 使用
import { connect } from 'react-redux'
import { increment, decrement, reset } from './actionCreators'

// const Counter = ...
const mapStateToProps = (state /*, ownProps*/) => {
  return {
    counter: state.counter,
  }
}

const mapDispatchToProps = { increment, decrement, reset }
export default connect(mapStateToProps, mapDispatchToProps)(Counter)
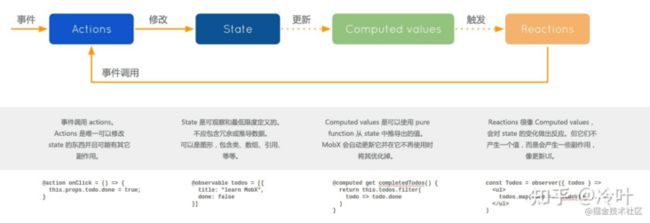
第二个方案是Mobx,它虽然能做到目标组件的精确更新,但是它走的是另一个流派, 当然也拥有一大帮拥簇但是不喜欢它的也大有人在。他的核心理念是:任何源自应用状态的东西都应该自动地获得。这句话就是说组件要不要更新不由父亲说了算,而是应该由绑定的数据通知,这种响应式监听方法终归与React的单项数据流理念相悖。
// 声明可观察状态
import { decorate, observable } from "mobx";
class TodoList {
@observable todos = [];
@computed get unfinishedTodoCount() {
return this.todos.filter(todo => !todo.finished).length;
}
}
// 声明观察组件
import React, {Component} from 'react';
import ReactDOM from 'react-dom';
import {observer} from 'mobx-react';
@observer
class TodoListView extends Component {
render() {
return
{this.props.todoList.todos.map(todo =>
Tasks left: {this.props.todoList.unfinishedTodoCount}
}
}
const TodoView = observer(({todo}) =>
todo.finished = !todo.finished}
/>{todo.title}
)
const store = new TodoList();
ReactDOM.render(四、轻巧又灵活的方案:Clean-State
也许你还可以有不一样的选择, 首先我们来看一下Hooks的设计动机是什么:
- 解决组件之间复用逻辑状态困难问题。
- 过多的生命周期导致组件难以理解。
- 消除class组件和函数组件分歧,简化模块定义。
从这几点我们就能发现,hooks本质上就是要简化React学习使用的心智曲线,并在逻辑抽象方面再往前走一步。而Clean-State就是站在这一思想的肩膀上产生的,它告别了ReactContext的概念用极其精简的方法提出了状态管理的新方式。通过CS我们没有了更多的学习负担,也不需要人为的的组织架构,它提供了统一的解决方案,在性能上我们不再去做变量提升,也抛弃了Provider注入的方式因此可以做到模块级别的精确更新,下图罗列出来了他的一些特点。
在CS中,我们最大程度的尊崇极简主义原则,让开发用最简单的方式来构建产品大厦。
1、模块如何划分
在模块划分上,推荐以路由入口或者数据模型来区分,这符合自然的思维方式。
每个状态管理的模块我们称之为module,统一管理在单个目录下,最后由index文件导出。
|--modules
|   |-- user.js
|   |-- project.js
|   |-- index.js
2、模块如何定义
在定义上,我们没有做更多的概念,沿袭了日常开发中最合理的方式。
state 作为模块状态;effect处理副作用;reducer返回更新后的状态。
// modules/user.js
const state = {
  name: 'test'
}

const user = {
  state,
  reducers: {
    setName({payload, state}) {
      return {...state, ...payload}
    }
  },
  effects: {
    async fetchNameAndSet({dispatch}) {
      const name = await Promise.resolve('fetch_name')
      dispatch.user.setName({name})
    }
  }
}

export default user;
3、模块如何注册
你只需要在模块入口文件调用bootstrap即可,他会自动串联多个模块,并返回useModule和dispatch方法。
// modules/index.js
import user from './user'
import bootstrap from 'clean-state'

const modules = { user }
export const {useModule, dispatch}  = bootstrap(modules);
4、如何使用模块
我们通过modules入口文件导出的useModule和dispatch来使用模块状态或者触发执行方法。
// page.js
import {useCallback} from 'react'
import { useModule, dispatch } from './modules'
function App() {
/**
* 这里你也能够传入数组同时返回多个模块状态
* const {user, project} = useModule(['user', 'project'])
*/
const { user } = useModule('user')
const onChange = useCallback((e)=> {
const { target } = e
dispatch.user.setName({name: target.value})
}, [])
const onClick = useCallback(()=> {
dispatch.user.fetchNameAndSet()
}, [])
return (
name: {user.name}
修改用户名:
);
}
export default App; 5、如何跨模块访问
每个reducer和effect我们都注入了rootState参数,可以访问其他模块属性;effect中同时注入了dispatch方法可以跨模块调用。
 async fetchNameAndSet({dispatch, rootState, state, payload}) {
      const name = await Promise.resolve('fetch_name')
      dispatch.user.setName({name})
 }
6、混入机制
在很多情况下,多个模块之间会存在公共的state、reducer或者effect,这里我们为了防止用户在每个模块里做重复声明,对外暴露了混入的方法。
// common.js
const common = {
  reducers: {
    setValue({payload, state}: {payload: Record, state: State}): State {
      return {...state, ...payload}
    }
  }
}
export default common;

// modules/index.js
import commont from './common'
import user from './user'
import { mixin } from 'clean-state';

// Mix Common's setValue method into the User module
const modules = mixin(common, { user })

// You can now call the dispatch.user.setValue method on other pages
export const {useModule, dispatch}  = bootstrap(modules);
7、如何调试
在开发过程中如何进行调试呢,CS提供了插件机制来友好的支持redux-devtool的调试。
/**
 * 安装: npm install cs-redux-devtool
 */

// modules/index.js
import user from './user'
import bootstrap from 'clean-state'
import devTool from 'cs-redux-devtool'

bootstrapfrom.addPlugin(devTool)

...
经过以上简短的配置,我们就能通过Redux DevTool来追踪状态的变化了!
五、技术实现
Module层划分为State、Reducer、Effect三部分,我们对公共的部分提供了混入机制。项目启动后会生成Store,同时会初始化Container与Store做数据同步。
当我们在page、component或者hooks中调用useModule时便会将对应的模块状态和对象方法做关联,更新函数加入到Container中。那么当A页面触发B模块方法时,我们就能精确的只执行B的依赖render函数。
下面我们给出在不做任何优化逻辑情况下redux和cs的代码执行情况,可以看到我们减少了所有的无用组件渲染。
下面这张图是我在实际落地项目中的打包依赖图,可以看到经过Gzip压缩后,CS整体的大小还不足1KB,希望能助力C端项目开发的用户体验和性能极致~
那么所有的这一切是如何实现呢?接下来我会循序渐进的详细讲解。
1、entry
// index.js
import bootstrap from './bootstrap';

export { default as mixin } from './mixin';
export default bootstrap;
首先来看下入口文件代码,我们仅仅导出了两个api,第一个是 mixin 用来处理对公共属性的模块混入,第二个是bootstrap用来启动状态管理器,我们看看启动的主流程实现。
2、bootstrap
// bootstrap.js
const bootstrap: Bootstrap = (modules: Modules) => {
  const container = new Container(modules);
  const pluginEmitter = new EventEmitter();
  ...
  return { useModule: useModule as any, dispatch };
};
bootstrap入参是modules的集合,紧接着我们会初始化一个container容器,做数据状态的缓存和更新器存储。pluginEmitter是cs插件机制的一部分,会对所有函数的执行会进行跟踪。最终我们导出了两个方法,一个是useModule用来读取模块状态,另外一个是dispatch用来分发事件。
这两个方法本质上是可以在index中统一导出,这样去做的原因是这里我们对多数据中心提供了支持。接下来我们围绕这两个api来详细看下具体实现。
3、useModule
// bootstrap.js
const bootstrap: Bootstrap = (modules: Modules) => {
  const container = new Container(modules);
  const pluginEmitter = new EventEmitter();
  ...
  return { useModule: useModule as any, dispatch };
};
首先是useModule的实现。我们看到入参namespace是一个字符串类型或者字符串数组类型的参数,紧接着我们声明了一个空状态,并提供setState代理来进行新对象的赋值,也是这一步操作触发了关联组件的更新。
最后我们将该方法和状态绑定到container对象中,以观察者模式来实现更新。最后返回的数据实际上也来自于container的缓存对象。这一段逻辑就非常的简单清晰,那接下来我们看下dispatch的实现。
4、dispatch
// bootstrap
const bootstrap: Bootstrap = (modules: Modules) => {
  ...
  // The only module method call that is exposed to the outside world
  const dispatch: any = (
    nameAndMethod: string,
    payload: Record,
  ) => {
    const [namespace, methodName] = nameAndMethod.split('/');
    const combineModule = container.getModule(namespace);

    const { state, reducers, effects } = combineModule[namespace];
    const rootState = container.getRootState();

    // The side effects take precedence over the reducer execution
    if (effects[methodName]) {
      return effects[methodName]({ state, payload, rootState, dispatch });
    } else if (reducers[methodName]) {
      const newState = reducers[methodName]({
        state,
        rootState,
        payload,
      });
      container.setState(namespace, newState);
    }
  };
  return { useModule: useModule as any, dispatch };
};
dispatch方法接受两个参数,第一个是调用的模块和方法名字符串具体格式类似moduleName/function,第二个是负载对象,我们会根据nameAndMethod在container中取出对应的模块和方法来调用执行。
在执行过程中effect优先于reducer,并传入各自需要的参数。在实际的项目开发中,考虑到开发效率和使用习惯,我们对dispatch进行了一层封装,支持dispatch.module.fun的形式。
5、dispatch 链式调用
// bootstrap
const bootstrap: Bootstrap = (modules: Modules) => {

  const injectFns = (reducersOrEffects) => {
    Object.keys(reducersOrEffects).forEach((key) => {
      if (!dispatch[key]) dispatch[key] = {};
      const originFns = reducersOrEffects[key];
      const fns = {};
      Object.keys(originFns).forEach((fnKey) => {
        fns[fnKey] = (payload: Record) =>
          dispatch(`${key}/${fnKey}`, payload);
      });
      Object.assign(dispatch[key], fns);
    });
  };

  // Inject each module's reducer and effect method into the Dispatch
  const rootReducers = container.getRootReducers();
  const rootEffects = container.getRootEffects();

  injectFns(rootReducers);
  injectFns(rootEffects);
  ...
};
在方法的最后我们从container中取出rootReducers和rootEffects集合,通过injectFns方法对其按照模块进行二次封装,并将包裹后的方法代理到dispatch自身,实现了级联的调用。包装后的方法入参只有payload负载,极大的提升了用户的开发效率,并且在TS语法上提供了完整的代码提示。
6、结合redux-devtool
在PC端使用Redux调试工具的核心点是,建立一个虚拟的Redux-Store来和我们的状态管理库做数据同步。这里我单独开发了 cs-redux-devtool 这样的一个库,我们看下实现原理。
首先在install方法里实例化一个redux store,它根据我们传入的modules自动生成了相应的reducer。紧接着调用window.__REDUX_DEVTOOLS_EXTENSION__方法来开启Chrome插件,这个方法是当我们的浏览器安装Redux-Devtools后,自动注入到当前页面上下文。最后,我们用传入的PluginEmitter来监听状态更新事件,同步到虚拟的redux-store上。
import { createStore, combineReducers } from 'redux'

var reduxStore = null;
var actionLen = 0

function createReducer(moduleName, initState) {
  return function (state, action) {
    if (state === undefined) state = initState;

    const {newState, type = ''} = action
    const [disPatchModule] = type.split('/')
    if (moduleName === disPatchModule && newState) {
      return newState
    } else {
      return state;
    }
  };
}

function createReducers(modules) {
  var moduleKeys = Object.keys(modules);
  var reducers = {};
  moduleKeys.forEach(function (key) {
    const {state} = modules[key]
    reducers[key] = createReducer(key, state);
  });
  return reducers;
}

function injectReduxDevTool(reducers) {
  reduxStore = createStore(
    combineReducers(reducers),
    window.__REDUX_DEVTOOLS_EXTENSION__ && window.__REDUX_DEVTOOLS_EXTENSION__()
  );
}

function dispatchAction(actionForRedux) {
  if (reduxStore) {
    actionLen++;
    reduxStore.dispatch(actionForRedux);
  }
}

function install(modules, pluginEmitter) {
  const reducers = createReducers(modules)

  injectReduxDevTool(reducers)
  pluginEmitter.on('CS_DISPATCH_TYPE', (action)=> {
    dispatchAction(action)
  })
}

export default install
那么,在Clean-State里我们就会将注册的插件加入到plugins数组里,当对应模块的effect或者reducer被触发时,我们会将处理后的结果发射到公共的发布器里面来实现监听同步。
const bootstrap: Bootstrap = (modules: Modules) => {
  const container = new Container(modules);
  const pluginEmitter = new EventEmitter();

  // The only module method call that is exposed to the outside world
  const dispatch: any = (
    nameAndMethod: string,
    payload: Record,
  ) => {
    ...

    // The side effects take precedence over the reducer execution
    if (effects[methodName]) {
      pluginEmitter.emit(DISPATCH_TYPE, {
        type: nameAndMethod,
        payload,
      });
      return effects[methodName]({ state, payload, rootState, dispatch });
    } else if (reducers[methodName]) {
      const newState = reducers[methodName]({
        state,
        rootState,
        payload,
      });
      container.setState(namespace, newState);

      // Sync state to plugin
      pluginEmitter.emit(DISPATCH_TYPE, {
        type: nameAndMethod,
        payload,
        newState,
      });
    }
  };

  ...

  plugins.forEach((plugin) => plugin(modules, pluginEmitter));

  ...
};
六、最后
Clean-State拥抱了React正确的设计模式和思想,通过精简的代码完成了架构层面的设计和视图层面的优化。如果你是新起的React项目,强烈推荐使用hooks纯函数的方式来编写构建你的应用,你会体验到更快的React开发姿势。无论是toB端逻辑复杂的项目还是toC端追求高性能都可以来了解使用CS。


