springboot 2.x整合mybatis实现增删查和批量处理
话不多说,直接上代码:
1.添加依赖
            org.mybatis.spring.boot
            mybatis-spring-boot-starter
            1.3.2


            mysql
            mysql-connector-java
            runtime


            com.alibaba
            druid
            1.1.6
2.添加配置文件
#---------------------
# mybatis配置
#---------------------

#设置数据源(默认数据源是com.zaxxer.hikari.HikariDataSource)
spring.datasource.type=com.alibaba.druid.pool.DruidDataSource
#数据库登录账号
spring.datasource.username=root
#数据库登录密码
spring.datasource.password=123456
#数据库连接
spring.datasource.url=jdbc:mysql://localhost:3306/customer?useUnicode=true&characterEncoding=utf-8
#驱动(会自动检测配置,可以注释掉)
spring.datasource.driver-class-name=com.mysql.jdbc.Driver
#设置需要被扫描的包
#mybatis.type-aliases-package=java.com.example.demo
#打印sql语句(一般用于本地开发测试)
mybatis.configuration.log-impl=org.apache.ibatis.logging.stdout.StdOutImpl
3.Application.class添加扫描
(路径为自己项目package的路径)
@SpringBootApplication
@ServletComponentScan
@MapperScan("com.example.mapper") //mybatis包扫描
public class DemoApplication {

    public static void main(String[] args) {
        SpringApplication.run(DemoApplication.class, args);
    }
}
4.创建Mapper
@Mapper
public interface DemoMapper {

    //增
    @Insert("INSERT INTO demo(name,age)VALUES(#{name},#{age})")
    @Options(useGeneratedKeys=true, keyProperty="id", keyColumn="id") //获取插入后自动生成的主键,keyProperty对应类属性名,keyColumn对应数据库字段名
    int add(Demo demo);

    //删
    @Delete("DELETE FROM demo WHERE id=#{id}")
    boolean deleteById(int id);

    //查
    @Select("SELECT * FROM demo WHERE id=#{id}")
    Demo findById(int id);
    @Select("SELECT * FROM demo WHERE login=#{login} AND password=#{password}")
    Demo findByObject(@Param("login") String login,@Param("password") String password);

    //改,注意:需要指定参数映射@Param,如不指定,可按下面的方法执行
    @Update("UPDATE demo SET name=#{name} WHERE id =#{id}")
    boolean updateById(@Param("name") String name,@Param("id") int id);
    @Update("UPDATE demo SET name=#{name} WHERE id =#{id}")
    boolean update_2ById(Demo demo);


    //批量增
    @InsertProvider(type = LoginProvider.class,method = "insert")
    int insert(@Param("demoList")List demoList);

    //批量删
    @DeleteProvider(type = LoginProvider.class,method = "delete")
    boolean delete(@Param("demoList")List demoList);

    //批量查
    @Select("SELECT * FROM demo")
    List find();
    @SelectProvider(type = LoginProvider.class,method = "find2")
    Listfind2(@Param("demoList")List demoList);


    //批量改
    @UpdateProvider(type = LoginProvider.class,method = "update")
    boolean update(@Param("demoList")List demoList);


}
5.创建provider实现类
为注解@UpdateProvider、@InsertProvider、@DeleteProvider、@SelectProvider返回可执行SQL语句,需注意:要添加@Param注解,指定映射参数
public class LoginProvider {

    public String insert(@Param("demoList")List demoList){
        StringBuilder builder=new StringBuilder();
        builder.append("INSERT INTO demo(name,age)VALUES");
        String message="(''{0}'',{1})";
        int i=1;
        for (Demo demo : demoList) {
            String s = MessageFormat.format(message, demo.getName(), demo.getAge());
            builder.append(s);
            if (i==demoList.size()){break;}
            builder.append(",");
            i++;
        }
        return builder.toString();
    }

    public String delete(@Param("demoList")List demoList){
        StringBuilder builder=new StringBuilder();
        builder.append("DELETE FROM demo WHERE id IN (");
        int i=1;
        for (Demo demo : demoList) {
            builder.append(demo.getId());
            if (i==demoList.size()){break;}
            builder.append(",");
            i++;
        }
        builder.append(")");
        return builder.toString();
    }

    public String find2(@Param("demoList")List demoList){
        StringBuilder builder=new StringBuilder();
        builder.append("SELECT * FROM demo WHERE id IN (");
        int i=1;
        for (Demo demo : demoList) {
            builder.append(demo.getId());
            if (i==demoList.size()){break;}
            builder.append(",");
            i++;
        }
        builder.append(")");
        return builder.toString();
    }

    public String update(@Param("demoList")List demoList){
        StringBuilder builder=new StringBuilder();
        builder.append("INSERT INTO demo(id,name,age)VALUES");
        String message="({0},''{1}'',{2})";
        int i=1;
        for (Demo demo : demoList) {
            String s = MessageFormat.format(message, demo.getId(), demo.getName(), demo.getAge());
            builder.append(s);
            if (i==demoList.size()){break;}
            builder.append(",");
            i++;
        }
        builder.append("on duplicate key update id=VALUES(id),age=values(age),name=VALUES(name)");
        return builder.toString();
    }
}
Springboot整合mybatis(注解而且能看明白版本)
Springboot整合Mybatis实现一个最基本的增删改查功能,整合的方式有两种一种是注解形式的,也就是没有Mapper.xml文件,还有一种是XML形式的,我推荐的是使用注解形式,为什么呢?因为更加的简介,减少不必要的错误。
1.环境配置
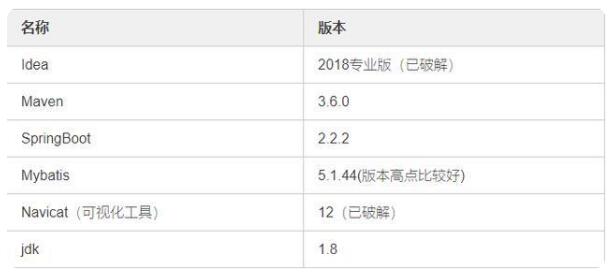
对于环境配置我是用了一张表来展示,版本之间差异不大,你可以基于其他版本进行测试。
这就是我的基本的环境。下一步我们一步一步来整合一波
2.整合Mybatis
第一步:数据库新建Person表
这个表结构很简单,也就是三个字段id、name、age。并以id为主键且递增。
第二步:新建Springboot项目
这个比较简单,这里先给出一个最终的目录结构:
第三步:导入相关依赖
OK,我们只需要加上这些依赖即可。在我们的pom文件。
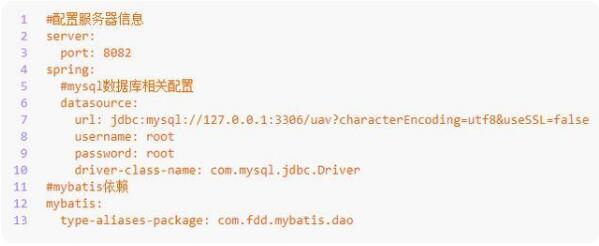
第四步:更改application.yml配置文件
我们只需要把application.properties文件改为yml格式即可。此时添加相关配置
这里的配置有点多,不过还是一个最基本的配置都在这。
第五步:新建dao包,在dao包下新建Person类
这个类是和我们数据库中的Person类一一对应的。
第六步:新建mapper包,在mapper新建PersonMapper类
在这个类中,我们实现基本的增删改查功能接口:
这就是最基本的一个增删改查操作的接口。
第七步:新建service包,在service包创建PersonService接口
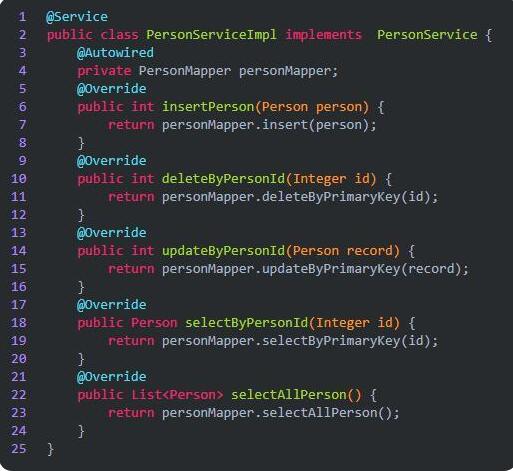
第八步:在service包下创建PersonServiceImpl接口实现类
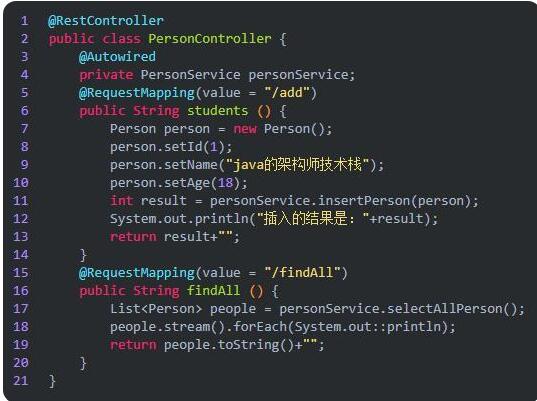
第九步:编写controller层
第十步:在启动主类添加扫描器
第十一步:测试
在浏览器输入相应的路径即可。OK。大功告成。只要你按照上面的步骤一步一步来,就一定OK。
以上为个人经验,希望能给大家一个参考,也希望大家多多支持脚本之家。


