【手写源码-设计模式10】-外观模式-基于多个微服务调用实现下单
1:主题拆解
①基本介绍
②多个微服务调用实现下单
③外观模式的优缺点
④适用场景
⑤应用实例
2:基本介绍
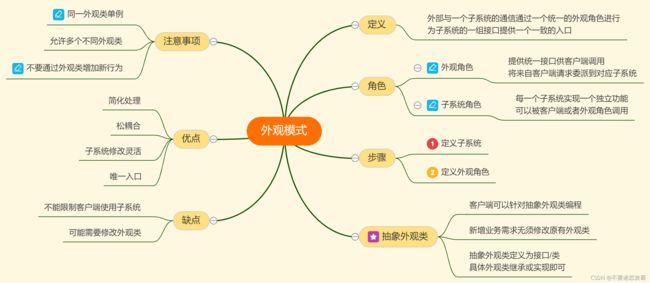
外观模式:外部与一个子系统的通信通过一个统一的外观角色进行,为子系统中的一组接口提供一个一致的入口。
外观模式定义了一个高层接口,这个接口使得这一子系统更加容易使用。
外观模式又叫门面模式,是一种对象结构型模式。
3:多个微服务调用实现下单
我司系统基于各个功能模块采用微服务的方式,整体实现了一套下单交易系统。现在模拟下单的各个环节。
1:基本版
①物流微服务
   public interface ILogisticsSystem
    {
        bool CheckLogistics(int productId, int cityId);
        void Newlogistics(int productId, int cityId);
    }
    public class LogisticsSystem:ILogisticsSystem
    {
        public bool CheckLogistics(int productId, int cityId)
        {
            return true;
        }
        public void Newlogistics(int productId, int cityId)
        {
            Console.WriteLine("商品[{0}]在城市[{1}]发货", productId,cityId);
        }
    }
②仓库微服务
    public interface IStorageSystem
    {
        bool CheckStorage(int productId);
    }
    public class StorageSystem:IStorageSystem
    {
        public bool CheckStorage(int productId)
        {
            return true;
        }
    }
③订单微服务
    public interface IOrderSystem
    {
        bool CheckOrder(int userId, int productId);
        void NewOrder(int userId, int productId);
    }
    public class OrderSystem : IOrderSystem
    {
        public bool CheckOrder(int userId, int productId)
        {
            return true;
        }
        public void NewOrder(int userId, int productId)
        {
            Console.WriteLine("{0}给商品{1}下订单", userId, productId);
        }
    }
④用户微服务
    public interface IUserSystem
    {
        bool CheckUser(int id);
    }
   public  class UserSystem : IUserSystem
    {
        public bool CheckUser(int id)
        {
            return id > 100;
        }
    }
⑤上端调用
IUserSystem userSystem = new UserSystem();
IStorageSystem storageSystem = new StorageSystem();
ILogisticsSystem logisticsSystem = new LogisticsSystem();
IOrderSystem orderSystem = new OrderSystem();
if (!userSystem.CheckUser(userId))
{
    Console.WriteLine("用户检测不通过");
}
else if (!storageSystem.CheckStorage(productId))
{
    Console.WriteLine("库存检测不通过");
}
else if (!logisticsSystem.CheckLogistics(productId, cityId))
{
    Console.WriteLine("物流检测不通过");
}
else if (!orderSystem.CheckOrder(userId, productId))
{
    Console.WriteLine("订单检测不通过");
}
else
{
    orderSystem.NewOrder(userId,productId);
    logisticsSystem.Newlogistics(productId,cityId);
}
分析:至此我们上端就实现了下单的功能,下订单流程:检查用户-->检查库存-->检查物流-->检测订单-->下订单-->增加物流订单。
我们可以看出上端处理程序结构比较复杂,多个子系统,上端使用成本很高,对子系统的依赖很强,再增加一个子系统,需要调整原有的逻辑,即不方便也不稳定。
2:中间层
没有什么技术问题是包一层不能解决的,如果有则再包一层。
①添加一个门面类
public class FacadeCenter
    {
        IUserSystem userSystem = new UserSystem();
        IStorageSystem storageSystem = new StorageSystem();
        ILogisticsSystem logisticsSystem = new LogisticsSystem();
        IOrderSystem orderSystem = new OrderSystem();
        public void CheckNewOrder(int userId, int productId, int cityId)
        {
            if (!userSystem.CheckUser(userId))
            {
                Console.WriteLine("用户检测不通过");
            }
            else if (!storageSystem.CheckStorage(productId))
            {
                Console.WriteLine("库存检测不通过");
            }
            else if (!logisticsSystem.CheckLogistics(productId, cityId))
            {
                Console.WriteLine("物流检测不通过");
            }
            else if (!orderSystem.CheckOrder(userId, productId))
            {
                Console.WriteLine("订单检测不通过");
            }
            else
            {
                orderSystem.NewOrder(userId, productId);
                logisticsSystem.Newlogistics(productId, cityId);
            }
        }
    }
②上端调用
FacadeCenter facaderCenter = new FacadeCenter();
facaderCenter.CheckNewOrder(userId,productId,cityId);
分析:上端使用变简单了,没有使用成本了。上端也变成的稳定,即使要调整逻辑关系也是在中间层中进行。对上端调用与下端的微服务没有任何改动。不过我们发现实际上矛盾没有消失,只是转移了。由上端转移到了中间层。
3:面向接口
基于面向接口编程的思想以及对象复用,我们可以将上面的中间层进行优化。
①中间层
public class FacadeCenter: IFacadeCenter
{
    private static IUserSystem userSystem = new UserSystem();
    private static IStorageSystem storageSystem = new StorageSystem();
    private static ILogisticsSystem logisticsSystem = new LogisticsSystem();
    private static IOrderSystem orderSystem = new OrderSystem();
    public void CheckNewOrder(int userId, int productId, int cityId)
    {


        if (!userSystem.CheckUser(userId))
        {
            Console.WriteLine("用户检测不通过");
        }
        else if (!storageSystem.CheckStorage(productId))
        {
            Console.WriteLine("库存检测不通过");
        }
        else if (!logisticsSystem.CheckLogistics(productId, cityId))
        {
            Console.WriteLine("物流检测不通过");
        }
        else if (!orderSystem.CheckOrder(userId, productId))
        {
            Console.WriteLine("订单检测不通过");
        }
        else
        {
            orderSystem.NewOrder(userId, productId);
            logisticsSystem.Newlogistics(productId, cityId);
        }
    }
}
②接口层
public interface IFacadeCenter
{
    void CheckNewOrder(int userId, int productId, int cityId);
}
③上端的调用
IFacadeCenter facaderCenter = new FacadeCenter();
facaderCenter.CheckNewOrder(userId,productId,cityId);
分析:此时已经采用面向接口编程的方式实现了系统的调整。
如果此时有新微服务加入,即添加了一个财务服务,系统如何体现出扩展性。
4:依赖注入
①引入财务微服务
    public class FinanceSystem : IFinanceSystem
    {
        public bool CheckFinance(int userid)
        {
            return true;
        }
    }
    public interface IFinanceSystem
    {
        bool CheckFinance(int userid);
    }
②添加财务门面实现,继承接口
public class FacadeCenteFinance:IFacadeCenter
{
    private static IUserSystem userSystem = new UserSystem();
    private static IStorageSystem storageSystem = new StorageSystem();
    private static ILogisticsSystem logisticsSystem = new LogisticsSystem();
    private static IOrderSystem orderSystem = new OrderSystem();
    private static IFinanceSystem financeSystem = new FinanceSystem();
    public void CheckNewOrder(int userId, int productId, int cityId)
    {


        if (!userSystem.CheckUser(userId))
        {
            Console.WriteLine("用户检测不通过");
        }
        else if (!storageSystem.CheckStorage(productId))
        {
            Console.WriteLine("库存检测不通过");
        }
        else if (!logisticsSystem.CheckLogistics(productId, cityId))
        {
            Console.WriteLine("物流检测不通过");
        }
        else if (!orderSystem.CheckOrder(userId, productId))
        {
            Console.WriteLine("订单检测不通过");
        }
        else if (!financeSystem.CheckFinance(userId))
        {
            Console.WriteLine("财务检测不通过");
        }
        else
        {
            orderSystem.NewOrder(userId, productId);
            logisticsSystem.Newlogistics(productId, cityId);
        }
    }
}
③上端的调用
IFacadeCenter facaderCenter = new FacadeCenteFinance();
facaderCenter.CheckNewOrder(userId, productId, cityId);
分析:在不更改原中间层实现逻辑的情况下,直接扩展新的功能。即满足了对修改关闭对扩展开发的原则,增加了程序的健壮性。
从版本3到版本4,我们引入依赖注入的方式,采用配置文件指定IFacadeCenter接口对应的实现类,这样上端代码可以不用修改,只能添加新的罗就,就能够实现新功能的扩展。
4:外观模式的优缺点
1:优点
简化处理:对客户端屏蔽了子系统组件,减少了客户端所需处理的对象数目并使得子系统使用起来更加容易,引入外观模式后客户端代码将简化。
松耦合:实现了子系统于客户端之间松耦合关系,使得子系统的变化不会影响到客户端,只需修改外观类。
子系统修改灵活:一个子系统的修改对其他子系统没有影响,而且子系统内部变化也不会影响外观对象。
唯一入口:只提供了一个访问子系统的唯一入口,但不会影响客户端直接使用子系统类。
2:缺点
不能限制客户端使用子系统:外观模式不能很好地限制客户端直接使用子系统,如果客户端对访问子系统做太多的限制就会减少可变性与灵活性。
可能需要修改外观类:如果设计不当,增加新的子系统可能需要外观类,违背OCP。
5:适用场景
为一个复杂的模块或子系统提供一个外界访问的接口。
子系统相对独立,外界对子系统的访问只要黑箱操作即可。
预防低水平人员带来的风险扩散,层次化结构中,可以使用外观模式定义系统中每一层的入口,层与层之间不直接产生联系,而通过外观类建立联系,降低层之间的耦合度。
6:应用实例
迪米特法则的体现
分层,单一职责的体现
三层架构
