springcloud+Oauth2+Alibaba +Gateway自定义登录授权 整合资源中心 Gateway网关转发 限流 feign传递请求头
springCloudGateway、springcloudOauth2 、feign等使用整合@TOC
# springCloudAlibaba系列文章目录
springcloudAlibaba系列
- # springCloudAlibaba系列文章目录
- 前言
- 一、springCloudGateWay使用
-
- 1 nacos下载使用
- 2 项目pom文件
- 3 nacos配置和路由转发配置
- 4 限流配置
- 5跨域配置
- 6完整项目目录
- 二、springcloudOauth2
-
- 1.引入库
- 2.自定义通过手机号密码获取token
- 3资源服务器配置
- 3效果
- 总结
前言
本文章使用Nacos注册中心 springcloudGateway网关 springOAuth认证中心
qq群如有问题或者不懂的可以探讨

一、springCloudGateWay使用
1 nacos下载使用
前往官网下载:https://nacos.io/zh-cn/docs/quick-start.html 由于学习使用就下载windows版本
查看官网使用说明
2 项目pom文件
<?xml version="1.0" encoding="UTF-8"?>
<project xmlns="http://maven.apache.org/POM/4.0.0" xmlns:xsi="http://www.w3.org/2001/XMLSchema-instance"
         xsi:schemaLocation="http://maven.apache.org/POM/4.0.0 https://maven.apache.org/xsd/maven-4.0.0.xsd">
    <modelVersion>4.0.0</modelVersion>
    <parent>
        <groupId>org.springframework.boot</groupId>
        <artifactId>spring-boot-starter-parent</artifactId>
        <version>2.2.2.RELEASE</version>
        <relativePath/> <!-- lookup parent from repository -->
    </parent>
    <groupId>com.szn</groupId>
    <artifactId>nacos-getway</artifactId>
    <version>0.0.1-SNAPSHOT</version>
    <name>nacos-getway</name>
    <description>Demo project for Spring Boot</description>

    <properties>
        <java.version>1.8</java.version>
        <!--spingcloud版本-->
        <spring-cloud.version>Hoxton.RELEASE</spring-cloud.version>
    </properties>
    <dependencies>
        <dependency>
            <groupId>org.springframework.boot</groupId>
            <artifactId>spring-boot-starter</artifactId>
        </dependency>
       <!-- <dependency>
            <groupId>org.springframework.boot</groupId>
            <artifactId>spring-boot-starter-web</artifactId>
        </dependency>-->
        <dependency>
            <groupId>org.mybatis.spring.boot</groupId>
            <artifactId>mybatis-spring-boot-starter</artifactId>
            <version>1.3.1</version>
        </dependency>
        <dependency>
            <groupId>tk.mybatis</groupId>
            <artifactId>mapper-spring-boot-starter</artifactId>
            <version>2.0.2</version>
            <exclusions>
                <exclusion>
                    <artifactId>mybatis</artifactId>
                    <groupId>org.mybatis</groupId>
                </exclusion>
                <exclusion>
                    <artifactId>mybatis-spring</artifactId>
                    <groupId>org.mybatis</groupId>
                </exclusion>
            </exclusions>
        </dependency>
        <dependency>
            <groupId>mysql</groupId>
            <artifactId>mysql-connector-java</artifactId>
            <version>6.0.6</version>
        </dependency>
        <dependency>
            <groupId>org.springframework.cloud</groupId>
            <artifactId>spring-cloud-starter-gateway</artifactId>
        </dependency>
        <dependency>
            <groupId>org.springframework.cloud</groupId>
            <artifactId>spring-cloud-starter-netflix-ribbon</artifactId>
        </dependency>
        <dependency>
            <groupId>org.springframework.cloud</groupId>
            <artifactId>spring-cloud-starter-netflix-hystrix</artifactId>
        </dependency>
        <dependency>
            <groupId>org.springframework.boot</groupId>
            <artifactId>spring-boot-starter-data-redis</artifactId>
        </dependency>
        <dependency>
            <groupId>org.apache.commons</groupId>
            <artifactId>commons-pool2</artifactId>
        </dependency>
        <dependency>
            <groupId>org.springframework.boot</groupId>
            <artifactId>spring-boot-starter-test</artifactId>
            <scope>test</scope>
            <exclusions>
                <exclusion>
                    <groupId>org.junit.vintage</groupId>
                    <artifactId>junit-vintage-engine</artifactId>
                </exclusion>
            </exclusions>
        </dependency>
        <dependency>
            <groupId>org.springframework.cloud</groupId>
            <artifactId>spring-cloud-starter-alibaba-nacos-config</artifactId>
        </dependency>
        <dependency>
            <groupId>org.springframework.cloud</groupId>
            <artifactId>spring-cloud-starter-alibaba-nacos-discovery</artifactId>
        </dependency>
        <!-- SpringBoot整合fegnin客户端 -->
        <dependency>
            <groupId>org.springframework.cloud</groupId>
            <artifactId>spring-cloud-starter-openfeign</artifactId>
        </dependency>
        <dependency>
            <groupId>io.github.openfeign</groupId>
            <artifactId>feign-httpclient</artifactId>
        </dependency>
    </dependencies>
    <dependencyManagement>
    <dependencies>
        <dependency>
            <groupId>org.springframework.cloud</groupId>
            <artifactId>spring-cloud-dependencies</artifactId>
            <version>${
     spring-cloud.version}</version>
            <type>pom</type>
            <scope>import</scope>
        </dependency>
        <dependency>
            <groupId>org.springframework.cloud</groupId>
            <artifactId>spring-cloud-alibaba-dependencies</artifactId>
            <version>0.9.0.RELEASE</version>
            <type>pom</type>
            <scope>import</scope>
        </dependency>


    </dependencies>
    </dependencyManagement>
    <build>
        <plugins>
            <plugin>
                <groupId>org.springframework.boot</groupId>
                <artifactId>spring-boot-maven-plugin</artifactId>
            </plugin>
        </plugins>
    </build>

</project>
3 nacos配置和路由转发配置
添加@EnableDiscoveryClient开启发现客户端
@SpringBootApplication
//开启发现客户端
@EnableDiscoveryClient
public class NacosGetwayApplication {


    public static void main(String[] args) {

        SpringApplication.run(NacosGetwayApplication.class, args);
    }

}
配置文件 添加Gateway和nacos以及redis配置 redis主要做限流配置 数据库配置可以忽略
spring:
  redis:
    database: 0
    host: 127.0.0.1
    port: 6379
    password:
    timeout: 2000
    lettuce:
      pool:
        max-active: 8
        max-idle: 8
        max-wait: 8ms
        min-idle: 0
      shutdown-timeout: 100ms
  #服务名称
  application:
    name: nacos-getway
  #连接池配置
  datasource:
    driver-class-name: com.mysql.cj.jdbc.Driver
    url: jdbc:mysql://127.0.0.1:3306/sharepark?useUnicode=true&characterEncoding=UTF-8&serverTimezone=GMT%2B8&zeroDateTimeBehavior=convertToNull&useSSL=false
    username: root
    password: ztkj@168
    type: com.zaxxer.hikari.HikariDataSource
    hikari:
      minimum-idle: 5
      # 空闲连接存活最大时间,默认600000(10分钟)
      idle-timeout: 180000
      # 连接池最大连接数,默认是10
      maximum-pool-size: 10
      # 此属性控制从池返回的连接的默认自动提交行为,默认值:true
      auto-commit: true
      # 连接池名称
      pool-name: MyHikariCP
      # 此属性控制池中连接的最长生命周期,值0表示无限生命周期,默认1800000即30分钟
      max-lifetime: 60000
      # 数据库连接超时时间,默认30秒,即30000
      connection-timeout: 30000
  cloud:
    nacos:
      #动态获取配置文件
      config:
        file-extension: yml
        server-addr: 127.0.0.1:8848
        prefix: nacos-getway

      #注册中心地址
      discovery:
        server-addr: 127.0.0.1:8848
    gateway:
      discovery:
        locator:
          enabled: false
          lowerCaseServiceId: true
      routes:
        #id不重复就行相当于唯一标识
        - id: nacos-admin
          #转发到相应的服务 lb:代表从注册中心获取对应的服务路径 使用负载均衡
          uri: lb://nacos-admin
          predicates:
          #要拦截的路径
          - Path=/admin/**
          filters:
            #去掉转发的前缀就是/admin
            - StripPrefix=1
            - name: RequestRateLimiter #名称必须是RequestRateLimiter
              args:
                key-resolver: "#{@ipResolver}"  #使用SpEL按名称引用bean
                redis-rate-limiter.replenishRate: 1 #令牌桶容量
                redis-rate-limiter.burstCapacity: 1 #令牌桶填充速度,允许在一秒钟内完成的最大请求数
            - name: Hystrix #断路器的配置
              args:
                name: fallbackcmd
                #降级的url地址
                fallbackUri: forward:/defaultFallback
          hystrix:
            command:
              default:
                execution:
                  isolation:
                    strategy: SEMAPHORE
                    thread:
                      #等待xxx毫秒后进入熔断
                      timeoutInMilliseconds: 5000
            shareSecurityContext: true
        #授权
        - id: nacos-oauth2
          uri: lb://nacos-oauth2
          predicates:
          - Path=/oauth2/**
          filters:
            - StripPrefix=1

  profiles:
    active: dev
4 限流配置
首先自定义限流策略 可以根据ip 用户 以及请求地址进行限流 原理就是根据你反回的值作为key 加上你配置文件的配置进行验证每秒最大请求多少次
/**
 * 限流策略
 */
@Component
public class IpResolver implements KeyResolver {

    @Override
    public Mono<String> resolve(ServerWebExchange exchange) {


        //String ip=exchange.getRequest().getRemoteAddress().getAddress().getHostAddress();

        //获取请求地址
        String ip= exchange.getRequest().getRemoteAddress().getAddress().getHostAddress();

        System.out.println("url:"+ip);

        return Mono.just(ip);
    }

}
配置文件配置引用自定义配置以及令牌桶容量最大填充数断路器以及降级后跳转的地址
 routes:
        #id不重复就行相当于唯一标识
        - id: nacos-admin
          #转发到相应的服务 lb:代表从注册中心获取对应的服务路径 使用负载均衡
          uri: lb://nacos-admin
          predicates:
          #要拦截的路径
          - Path=/admin/**
          filters:
            #去掉转发的前缀就是/admin
            - StripPrefix=1
            - name: RequestRateLimiter #名称必须是RequestRateLimiter
              args:
                key-resolver: "#{@ipResolver}"  #使用SpEL按名称引用bean
                redis-rate-limiter.replenishRate: 1 #令牌桶容量
                redis-rate-limiter.burstCapacity: 1 #令牌桶填充速度,允许在一秒钟内完成的最大请求数
            - name: Hystrix #断路器的配置
              args:
                name: fallbackcmd
                #降级的url地址
                fallbackUri: forward:/defaultFallback
             hystrix:
            command:
              default:
                execution:
                  isolation:
                    strategy: SEMAPHORE
                    thread:
                      #等待xxx毫秒后进入熔断
                      timeoutInMilliseconds: 5000
测试限流使用postman 每秒请求超过一次时返回429
控制台输出

熔断之后进入的方法 请求超时或者服务不可用时会进入熔断
/**
 * 熔断之后进入的方法
 */
@RestController
public class DefaultHystrixController {

    @RequestMapping("/defaultFallback")
    public Mono<Message> defaultFallback(){

        System.out.println("降级操作...");
        Message message=new Message();
        message.error("服务不可用");
        return Mono.just(message) ;
    }

}
当我停止了admin这个服务的时候请求会进入熔断


5跨域配置
由于Gateway的底层是用的webFlux所以配置和普通的有点不一样 直接上代码
@Configuration
public class CorsConfig implements WebFilter {

    @Override
    public Mono<Void> filter(ServerWebExchange ctx, WebFilterChain chain) {

        ServerHttpRequest request = ctx.getRequest();
        if (CorsUtils.isCorsRequest(request) ) {

            ServerHttpResponse response = ctx.getResponse();
            HttpHeaders headers = response.getHeaders();
            //headers.set(HttpHeaders.ACCESS_CONTROL_ALLOW_ORIGIN, ctx.getRequest().getHeaders().get("origin").toString());
            headers.set(HttpHeaders.ACCESS_CONTROL_ALLOW_ORIGIN,"*");
            headers.add(HttpHeaders.ACCESS_CONTROL_ALLOW_HEADERS, "*");
            headers.add(HttpHeaders.ACCESS_CONTROL_ALLOW_METHODS, "");
            headers.add(HttpHeaders.ACCESS_CONTROL_ALLOW_CREDENTIALS, "false");
            headers.add(HttpHeaders.ACCESS_CONTROL_EXPOSE_HEADERS, "*");
            headers.add(HttpHeaders.ACCESS_CONTROL_MAX_AGE, "3600");

            if (request.getMethod() == HttpMethod.OPTIONS) {

                response.setStatusCode(HttpStatus.OK);
                return Mono.empty();
            }
        }
        return chain.filter(ctx);
    }
}
6完整项目目录

用bootstrap.yml的原因是这里使用了nacos的动态配置文件
  cloud:
    nacos:
      #动态获取配置文件
      config:
        file-extension: yml
        server-addr: 127.0.0.1:8848
        prefix: nacos-getway

      #注册中心地址
      discovery:
        server-addr: 127.0.0.1:8848
   #指定配置文件后缀
   profiles:
    active: dev
就是 服务名称-后缀名表示引用的配置文件名
由于测试学习我只在这里面配置了端口号

二、springcloudOauth2
1.引入库
首先新建一个项目
pom文件和之前的pom文件一样 修改一下项目名称 去掉Gateway引入 增加 oauth2的引入
只需要引入这一个就好了 别听那些瞎几把说引入好几个
 <!--oauth2引入-->
        <dependency>
            <groupId>org.springframework.cloud</groupId>
            <artifactId>spring-cloud-starter-oauth2</artifactId>
        </dependency>
完整pom
<?xml version="1.0" encoding="UTF-8"?>
<project xmlns="http://maven.apache.org/POM/4.0.0" xmlns:xsi="http://www.w3.org/2001/XMLSchema-instance"
         xsi:schemaLocation="http://maven.apache.org/POM/4.0.0 https://maven.apache.org/xsd/maven-4.0.0.xsd">
    <modelVersion>4.0.0</modelVersion>
    <parent>
        <groupId>org.springframework.boot</groupId>
        <artifactId>spring-boot-starter-parent</artifactId>
        <version>2.2.1.RELEASE</version>
        <relativePath/> <!-- lookup parent from repository -->
    </parent>
    <groupId>com.szn</groupId>
    <artifactId>nacos-oauth2</artifactId>
    <version>0.0.1-SNAPSHOT</version>
    <name>nacos-oauth2</name>
    <description>Demo project for Spring Boot</description>

    <properties>
        <java.version>1.8</java.version>
        <spring-cloud.version>Hoxton.RELEASE</spring-cloud.version>
    </properties>

    <dependencies>

        <dependency>
            <groupId>org.springframework.boot</groupId>
            <artifactId>spring-boot-starter-web</artifactId>
        </dependency>
        <dependency>
            <groupId>org.springframework.boot</groupId>
            <artifactId>spring-boot-starter-test</artifactId>
            <scope>test</scope>
            <exclusions>
                <exclusion>
                    <groupId>org.junit.vintage</groupId>
                    <artifactId>junit-vintage-engine</artifactId>
                </exclusion>
            </exclusions>
        </dependency>
        <dependency>
            <groupId>org.springframework.cloud</groupId>
            <artifactId>spring-cloud-starter-alibaba-nacos-discovery</artifactId>
        </dependency>
         <!--oauth2引入-->
        <dependency>
            <groupId>org.springframework.cloud</groupId>
            <artifactId>spring-cloud-starter-oauth2</artifactId>
        </dependency>
        <dependency>
            <groupId>org.springframework.boot</groupId>
            <artifactId>spring-boot-starter-web</artifactId>
        </dependency>
        <dependency>
            <groupId>org.springframework.boot</groupId>
            <artifactId>spring-boot-starter-data-redis</artifactId>
        </dependency>
        <dependency>
            <groupId>org.apache.commons</groupId>
            <artifactId>commons-pool2</artifactId>
        </dependency>
        <dependency>
            <groupId>tk.mybatis</groupId>
            <artifactId>mapper-spring-boot-starter</artifactId>
            <version>2.0.2</version>
            <exclusions>
                <exclusion>
                    <artifactId>mybatis</artifactId>
                    <groupId>org.mybatis</groupId>
                </exclusion>
                <exclusion>
                    <artifactId>mybatis-spring</artifactId>
                    <groupId>org.mybatis</groupId>
                </exclusion>
            </exclusions>
        </dependency>
        <dependency>
            <groupId>mysql</groupId>
            <artifactId>mysql-connector-java</artifactId>
            <version>6.0.6</version>
        </dependency>
        <dependency>
            <groupId>com.alibaba</groupId>
            <artifactId>druid-spring-boot-starter</artifactId>
            <version>1.1.9</version>
        </dependency>
        <dependency>
            <groupId>org.mybatis.spring.boot</groupId>
            <artifactId>mybatis-spring-boot-starter</artifactId>
            <version>1.3.1</version>
        </dependency>
    </dependencies>

    <dependencyManagement>
        <dependencies>
            <dependency>
                <groupId>org.springframework.cloud</groupId>
                <artifactId>spring-cloud-dependencies</artifactId>
                <version>${
     spring-cloud.version}</version>
                <type>pom</type>
                <scope>import</scope>
            </dependency>
            <dependency>
                <groupId>org.springframework.cloud</groupId>
                <artifactId>spring-cloud-alibaba-dependencies</artifactId>
                <version>0.9.0.RELEASE</version>
                <type>pom</type>
                <scope>import</scope>
            </dependency>
        </dependencies>

    </dependencyManagement>

    <build>
        <plugins>
            <plugin>
                <groupId>org.springframework.boot</groupId>
                <artifactId>spring-boot-maven-plugin</artifactId>
            </plugin>
        </plugins>
    </build>

</project>
2.自定义通过手机号密码获取token
如果是入门的话可以网上搜一下那些直接开箱即用的例子很方便没什么可说的 但是用于实际需求没什么用途 比如要用手机号密码登录 手机号验证码 登录 微信小程序登录等等 所以要自定义
首先添加一个自定义登录抽象类
public abstract class AbstractCustomTokenGranter extends AbstractTokenGranter {


    private final OAuth2RequestFactory requestFactory;

    protected AbstractCustomTokenGranter(AuthorizationServerTokenServices tokenServices, ClientDetailsService clientDetailsService, OAuth2RequestFactory requestFactory, String grantType) {

        super(tokenServices, clientDetailsService, requestFactory, grantType);
        this.requestFactory = requestFactory;
    }

    @Override
    protected OAuth2Authentication getOAuth2Authentication(ClientDetails client, TokenRequest tokenRequest) {

        Map<String, String> parameters = tokenRequest.getRequestParameters();
        BLogin customUser = getUserDetails(parameters);
        if (customUser == null) {

            throw new InvalidGrantException("无法获取用户信息");
        }
        OAuth2Request storedOAuth2Request = this.requestFactory.createOAuth2Request(client, tokenRequest);
        PreAuthenticatedAuthenticationToken authentication = new PreAuthenticatedAuthenticationToken(customUser, null, customUser.getAuthorities());
        authentication.setDetails(customUser);
        OAuth2Authentication oAuth2Authentication = new OAuth2Authentication(storedOAuth2Request, authentication);
        return oAuth2Authentication;
    }

    protected abstract BLogin getUserDetails(Map<String, String> parameters);
}
在添加一个子类继承这个抽象类
package com.szn.nacosoauth2.oauth.granter;

import com.szn.nacosoauth2.entity.BLogin;
import com.szn.nacosoauth2.oauth.service.CustomUserDetailsService;
import org.springframework.security.core.userdetails.UserDetails;
import org.springframework.security.oauth2.provider.ClientDetailsService;
import org.springframework.security.oauth2.provider.OAuth2RequestFactory;
import org.springframework.security.oauth2.provider.token.AuthorizationServerTokenServices;

import java.util.Map;

public class PhonePasswordCustomTokenGranter extends AbstractCustomTokenGranter {


    private CustomUserDetailsService userDetailsService;

    public PhonePasswordCustomTokenGranter(AuthorizationServerTokenServices tokenServices, ClientDetailsService clientDetailsService, OAuth2RequestFactory requestFactory, CustomUserDetailsService userDetailsService) {

        super(tokenServices, clientDetailsService, requestFactory,"pwd");
        this.userDetailsService = userDetailsService;
    }

    @Override
    protected BLogin getUserDetails(Map<String, String> parameters) {

        String phone = parameters.get("phone");
        String password = parameters.get("password");
        return userDetailsService.loadUserByPhoneAndPassword(phone, password);
    }
}
auth2server配置文件
@Configuration
@EnableAuthorizationServer
public class AuthorizationConfig extends AuthorizationServerConfigurerAdapter {

    private static final String RESOURCE_IDS = "order";

    @Autowired
    AuthenticationManager authenticationManager;

    @Autowired
    RedisConnectionFactory redisConnectionFactory;

    @Autowired
    private UserDetailsServiceImpl userDetailsService;
    @Autowired
    private CustomUserDetailsService customUserDetailsService;
    @Autowired
    private AuthorizationServerEndpointsConfiguration configuration;
    @Autowired
    private CustomAuthenticationEntryPoint authenticationEntryPoint;
    @Override
    public void configure(ClientDetailsServiceConfigurer clients) throws Exception {


        String finalSecret = "{bcrypt}" + new BCryptPasswordEncoder().encode("123456");
        //配置客户端
        clients.inMemory()

                //client模式 adminClient
                .withClient("admin_client")
                .resourceIds(RESOURCE_IDS)
                .authorizedGrantTypes("client_credentials", "refresh_token","check_token")
                .scopes("all")
                .authorities("oauth2")
                .secret(finalSecret)
                .and()
                //client模式orderClient
                .withClient("order_client")
                .resourceIds(RESOURCE_IDS)
                .authorizedGrantTypes("client_credentials", "refresh_token","check_token")
                .scopes("all")
                .authorities("oauth2")
                .secret(finalSecret)
                //app用户使用密码模式登陆
                .and()
                .withClient("app")
                .secret(finalSecret)
                .authorizedGrantTypes("pwd","refresh_token")
                .scopes("all")
                .refreshTokenValiditySeconds(18000)
                .accessTokenValiditySeconds(6000);

    }

    @Override
    public void configure(AuthorizationServerSecurityConfigurer security) throws Exception {

        String path = "/oauth/token";
        try {

            // 获取自定义映射路径,比如 ((AuthorizationServerEndpointsConfigurer) endpoints).pathMapping("/oauth/token", "/my/token");
            path = configuration.oauth2EndpointHandlerMapping().getServletPath(path);
        } catch (Exception e) {

        }
        CustomClientCredentialsTokenEndpointFilter endpointFilter = new CustomClientCredentialsTokenEndpointFilter(security, path);
        endpointFilter.afterPropertiesSet();
        endpointFilter.setAuthenticationEntryPoint(authenticationEntryPoint);

        security.authenticationEntryPoint(authenticationEntryPoint);
        security.addTokenEndpointAuthenticationFilter(endpointFilter);
        security.allowFormAuthenticationForClients()
                .tokenKeyAccess("isAuthenticated()")
                .checkTokenAccess("permitAll()");
    }
    /**
     * 认证服务端点配置
     */
    /*@Override
    public void configure(AuthorizationServerEndpointsConfigurer endpoints) {
        endpoints
                //用户管理
                .userDetailsService(userDetailsService)
                //token存到redis
                .tokenStore(new RedisTokenStore(redisConnectionFactory))
                //启用oauth2管理
                .authenticationManager(authenticationManager)
                //接收GET和POST
                .allowedTokenEndpointRequestMethods(HttpMethod.GET, HttpMethod.POST);
    }*/
    //使用redis存储token
    @Bean
    TokenStore tokenStore(){

        return new RedisTokenStore(redisConnectionFactory);
    }
    @Override
    public void configure(AuthorizationServerEndpointsConfigurer endpoints) throws Exception {

        List<TokenGranter> tokenGranters = getTokenGranters(endpoints.getTokenServices(), endpoints.getClientDetailsService(), endpoints.getOAuth2RequestFactory());

        endpoints.tokenGranter(new CompositeTokenGranter(tokenGranters));
        endpoints.tokenEnhancer(new TokenEnhancer() {

            @Override
            public OAuth2AccessToken enhance(OAuth2AccessToken oAuth2AccessToken, OAuth2Authentication oAuth2Authentication) {

                DefaultOAuth2AccessToken token = (DefaultOAuth2AccessToken) oAuth2AccessToken;
                try {

                    //返回时添加自定义信息
                    BLogin user = (BLogin) oAuth2Authentication.getPrincipal();
                    Map<String, Object> map = new LinkedHashMap<>();
                    map.put("nickname", user.getUsername());
                    map.put("mobile", user.getUsername());
                    token.setAdditionalInformation(map);
                }catch (Exception e){

                    e.printStackTrace();
                }

                token.setValue(buildTokenValue());
                //是否刷新token
                if (token.getRefreshToken() != null) {

                    if (token.getRefreshToken() instanceof DefaultExpiringOAuth2RefreshToken) {

                        DefaultExpiringOAuth2RefreshToken refreshToken = (DefaultExpiringOAuth2RefreshToken) token.getRefreshToken();
                        token.setRefreshToken(new DefaultExpiringOAuth2RefreshToken(buildTokenValue(), refreshToken.getExpiration()));
                    } else {

                        token.setRefreshToken(new DefaultOAuth2RefreshToken(buildTokenValue()));
                    }
                }
                return token;
            }
        });

        endpoints

                //token存到redis
                .tokenStore(new RedisTokenStore(redisConnectionFactory))
                //接收GET和POST
                .allowedTokenEndpointRequestMethods(HttpMethod.GET, HttpMethod.POST);
    }
    public String buildTokenValue() {

        String tokenValue = UUID.randomUUID().toString() + UUID.randomUUID().toString();
        return tokenValue;
    }
    //添加自定义获取token方式
    private List<TokenGranter> getTokenGranters(AuthorizationServerTokenServices tokenServices, ClientDetailsService clientDetailsService, OAuth2RequestFactory requestFactory) {

        return new ArrayList<>(Arrays.asList(
                //自定义刷新token
                new CustomRefreshTokenGranter(tokenStore(), tokenServices, clientDetailsService, requestFactory),
                //原生client认证方式 因为用了自定义会把原来所有方式都覆盖掉 所以需要用原生的方式需要在这里添加进去
                new ClientCredentialsTokenGranter(tokenServices,clientDetailsService,requestFactory),
                //自定义密码手机号获取
                new PhonePasswordCustomTokenGranter(tokenServices, clientDetailsService, requestFactory, customUserDetailsService)
        ));
    }
}
resource资源服务器配置 由于我们要访问自定义退出登录接口所以要配置这个

```java
@Configuration
@EnableResourceServer
@EnableGlobalMethodSecurity(prePostEnabled = true)
public class ResourceServerConfiguration extends ResourceServerConfigurerAdapter {

    @Override
    public void configure(ResourceServerSecurityConfigurer resources) throws Exception {

    	//未认证和无权限自定义配置
        resources.accessDeniedHandler(new AccessDeniedHandler())
                .authenticationEntryPoint(new AuthExceptionEntryPoint());
    }
    @Override
    public void configure(HttpSecurity http) throws Exception {

        http
                .csrf().disable()
                .exceptionHandling()
                .and()
                .authorizeRequests()
                .antMatchers(HttpMethod.OPTIONS, "/**").permitAll()
                .antMatchers("/anon/**").permitAll()
                .antMatchers("/oauth/**").permitAll()
                .anyRequest().authenticated();

    }

}
scurity 配置
@Configuration
public class WebSecurityConfigurer extends WebSecurityConfigurerAdapter {

    @Autowired
    private UserDetailsServiceImpl userDetailsService;
    @Bean
    PasswordEncoder passwordEncoder() {

        return PasswordEncoderFactories.createDelegatingPasswordEncoder();
    }
    @Bean
    public BCryptPasswordEncoder bCryptPasswordEncoder() {

        return new BCryptPasswordEncoder();
    }
    @Override
    protected void configure(AuthenticationManagerBuilder auth) throws Exception {

        auth.userDetailsService(userDetailsService).passwordEncoder(bCryptPasswordEncoder());
    }
    /**
     * 注入AuthenticationManager接口,启用OAuth2密码模式
     *
     * @return
     * @throws Exception
     */
    @Bean
    @Override
    public AuthenticationManager authenticationManagerBean() throws Exception {

        AuthenticationManager manager = super.authenticationManagerBean();
        return manager;
    }

    /**
     * 通过HttpSecurity实现Security的自定义过滤配置 这个没用我试了所以才配置的资源服务器
     *
     * @param httpSecurity
     * @throws Exception
     */
    /*@Override
    protected void configure(HttpSecurity httpSecurity) throws Exception {
        httpSecurity
                .requestMatchers().anyRequest()
                .and()
                .authorizeRequests()
                .antMatchers("/oauth/**").permitAll()
                .antMatchers("/anon/**").permitAll();
    }*/

}
自定义userdetailService 这个不用继承security那个 因为前面自定义方式直接调用的这个类 所以这个类就是用户信息比较了 返回的信息就直接用了 不会再传递到下面去比对密码这些了 由于测试就只查询用户有没有并没有比对密码
@Service
public class CustomUserDetailsService {

    @Autowired
    private SpUserMapper userMapper;
    public BLogin loadUserByPhoneAndPassword(String phone, String password) {

        if (StringUtils.isEmpty(phone) || StringUtils.isEmpty(password)) {

            throw new InvalidGrantException("无效的手机号或短信验证码");
        }
        SpUser user=new SpUser();
        user.setUsername(phone);
       user = userMapper.selectOne(user);
        if (user == null) {

            throw new InvalidGrantException("用户不存在");
        }

        //用户权限列表
        //Collection authorities = userService.queryUserAuthorities(user.getId());

        BLogin bLogin=new BLogin();
        bLogin.setUsername(phone);
        bLogin.setPassword(new BCryptPasswordEncoder().encode("123456"));
        return bLogin;
    }

 /*   public UserDetails loadUserByPhoneAndSmsCode(String phone, String smsCode) {
      *//*  if (StringUtils.isEmpty(phone) || StringUtils.isEmpty(smsCode)) {
            throw new InvalidGrantException("无效的手机号或短信验证码");
        }
        // 判断成功后返回用户细节
        return new User(phone, "", AuthorityUtils.commaSeparatedStringToAuthorityList("admin,user,root"));*//*
    }*/

}
自定义token刷新
public class CustomRefreshTokenGranter extends RefreshTokenGranter {


    private TokenStore tokenStore;

    public CustomRefreshTokenGranter(TokenStore tokenStore, AuthorizationServerTokenServices tokenServices, ClientDetailsService clientDetailsService, OAuth2RequestFactory requestFactory) {

        super(tokenServices, clientDetailsService, requestFactory);
        this.tokenStore=tokenStore;
    }

    @Override
    protected OAuth2AccessToken getAccessToken(ClientDetails client, TokenRequest tokenRequest) {

        String refreshTokenValue = tokenRequest.getRequestParameters().get("refresh_token");
        OAuth2RefreshToken refreshToken = this.tokenStore.readRefreshToken(refreshTokenValue);
        if (refreshToken == null) {

            throw new InvalidTokenException("无效的刷新令牌: " + refreshTokenValue);
        }
        OAuth2Authentication authentication = this.tokenStore.readAuthenticationForRefreshToken(refreshToken);
        String clientId = authentication.getOAuth2Request().getClientId();
        if (clientId != null && clientId.equals(tokenRequest.getClientId())) {

            if (this.isExpired(refreshToken)) {

                tokenStore.removeRefreshToken(refreshToken);
                throw new InvalidTokenException("刷新令牌过期: " + refreshToken);
            } else {

                tokenStore.removeAccessTokenUsingRefreshToken(refreshToken);
                tokenStore.removeRefreshToken(refreshToken);
                OAuth2AccessToken accessToken = getTokenServices().createAccessToken(authentication);
                return accessToken;
            }
        } else {

            throw new InvalidGrantException("Wrong client for this refresh token: " + refreshTokenValue);
        }
    }

    private boolean isExpired(OAuth2RefreshToken refreshToken) {

        if (!(refreshToken instanceof ExpiringOAuth2RefreshToken)) {

            return false;
        } else {

            ExpiringOAuth2RefreshToken expiringToken = (ExpiringOAuth2RefreshToken)refreshToken;
            return expiringToken.getExpiration() == null || System.currentTimeMillis() > expiringToken.getExpiration().getTime();
        }
    }

}
自定义fileter返回自定义验证失败信息
public class CustomClientCredentialsTokenEndpointFilter extends ClientCredentialsTokenEndpointFilter {


    private AuthorizationServerSecurityConfigurer configurer;
    private AuthenticationEntryPoint authenticationEntryPoint;

    public CustomClientCredentialsTokenEndpointFilter(AuthorizationServerSecurityConfigurer configurer, String path) {

        this.configurer = configurer;
        setFilterProcessesUrl(path);
    }

    @Override
    public void setAuthenticationEntryPoint(AuthenticationEntryPoint authenticationEntryPoint) {

        // 把父类的干掉
        super.setAuthenticationEntryPoint(null);
        this.authenticationEntryPoint = authenticationEntryPoint;
    }

    @Override
    protected AuthenticationManager getAuthenticationManager() {

        return configurer.and().getSharedObject(AuthenticationManager.class);
    }

    @Override
    public void afterPropertiesSet() {

        setAuthenticationFailureHandler(new AuthenticationFailureHandler() {

            @Override
            public void onAuthenticationFailure(HttpServletRequest httpServletRequest, HttpServletResponse httpServletResponse, AuthenticationException e) throws IOException, ServletException {

                logger.error("qqq",e);
                logger.error(httpServletRequest.getMethod());
                logger.error(httpServletRequest.getRequestURL());
                logger.error(httpServletRequest.getHeader("Authorization"));
                authenticationEntryPoint.commence(httpServletRequest, httpServletResponse, e);
            }
        });
        setAuthenticationSuccessHandler(new AuthenticationSuccessHandler() {

            @Override
            public void onAuthenticationSuccess(HttpServletRequest httpServletRequest, HttpServletResponse httpServletResponse, Authentication authentication) throws IOException, ServletException {

                // 无操作-仅允许过滤器链继续到令牌端点
            }
        });
    }

}
自定义验证失败处理类
@Component
public class CustomAuthenticationEntryPoint implements AuthenticationEntryPoint {


    @Override
    public void commence(HttpServletRequest request, HttpServletResponse response, AuthenticationException e) throws IOException, ServletException {

        ResponseUtil.write(response, ResultUtil.errorMessage(e.getMessage()));
    }

}
退出登录以及自定义登录成功的代码
@RestController
@RequestMapping("/oauth")
public class OauthController {


    @Autowired
    private TokenEndpoint tokenEndpoint;
    @Autowired
    private TokenStore tokenStore;

    @GetMapping("/token")
    public Object getAccessToken(Principal principal, @RequestParam Map<String, String> parameters) throws HttpRequestMethodNotSupportedException {

        return custom(tokenEndpoint.getAccessToken(principal, parameters).getBody());
    }

    @PostMapping("/token")
    public Object postAccessToken(Principal principal, @RequestParam Map<String, String> parameters) throws HttpRequestMethodNotSupportedException {

        if(parameters.get("grant_type").equals("client_credentials"))
            return customClient(tokenEndpoint.postAccessToken(principal, parameters).getBody());
        else
            return custom(tokenEndpoint.postAccessToken(principal, parameters).getBody());
    }
    @PostMapping("/loginOut")
    public Message loginOut(@RequestParam String refreshToken){


        OAuth2RefreshToken oAuth2RefreshToken= this.tokenStore.readRefreshToken(refreshToken);
        tokenStore.removeAccessTokenUsingRefreshToken(oAuth2RefreshToken);
        tokenStore.removeRefreshToken(oAuth2RefreshToken);
        return ResultUtil.successMessageRow(null,"退出成功");
    }

    //定制申请返回实体
    private Message custom(OAuth2AccessToken accessToken) {

        DefaultOAuth2AccessToken token = (DefaultOAuth2AccessToken) accessToken;
        Map<String, Object> data = new LinkedHashMap(token.getAdditionalInformation());
        data.put("accessToken", token.getValue());
        if (token.getRefreshToken() != null) {

            data.put("refreshToken", token.getRefreshToken().getValue());
        }
        return ResultUtil.successMessageRow(data,"操作成功");
    }
    //定制申请返回实体
    private Map<String, Object> customClient(OAuth2AccessToken accessToken) {

        DefaultOAuth2AccessToken token = (DefaultOAuth2AccessToken) accessToken;
        Map<String, Object> data = new LinkedHashMap(token.getAdditionalInformation());
        data.put("access_token", token.getValue());
        if (token.getRefreshToken() != null) {

            data.put("refresh_token", token.getRefreshToken().getValue());
        }
        return data;
    }
以上就是认证服务器的配置 下面新建一个资源服务器的项目
3资源服务器配置
pom文件就不贴了就跟上面那个一样
启动类 开启注册中心 和 feign
@SpringBootApplication
@EnableDiscoveryClient
@EnableFeignClients
public class NacosAdminApplication {


    public static void main(String[] args) {

        SpringApplication.run(NacosAdminApplication.class, args);
    }

}
资源服务器配置文件
@Configuration
@EnableResourceServer
@EnableGlobalMethodSecurity(prePostEnabled = true)
public class ResourceServerConfiguration extends ResourceServerConfigurerAdapter {

    @Override
    public void configure(ResourceServerSecurityConfigurer resources) throws Exception {

        resources.resourceId("admin");
        resources.accessDeniedHandler(new AccessDeniedHandler())
                .authenticationEntryPoint(new AuthExceptionEntryPoint());//重点,设置资源id
    }
    @Override
    public void configure(HttpSecurity http) throws Exception {

        http
                .csrf().disable()
                .exceptionHandling()
                .accessDeniedHandler(new AccessDeniedHandler())
                .authenticationEntryPoint(new AuthExceptionEntryPoint())
                .and()
                .authorizeRequests()
                .antMatchers(HttpMethod.OPTIONS, "/**").permitAll()
                .antMatchers("/anon/**").permitAll()
                .anyRequest().authenticated();

    }

}
feign配置文件 携带请求头
@Configuration
public class FeignConfiguration implements RequestInterceptor {


    private final Logger logger = LoggerFactory.getLogger(getClass());

    @Override
    public void apply(RequestTemplate template) {

        ServletRequestAttributes attributes = (ServletRequestAttributes) RequestContextHolder
                .getRequestAttributes();
        HttpServletRequest request = attributes.getRequest();
        String authorization = request.getHeader("Authorization");
        if(authorization!=null){

            template.header("Authorization", authorization);
        }
    }
}
feign接口 和 异常处理类
@Service
@FeignClient(value = "nacos-order",fallbackFactory = OrderFallBack.class)
public interface OrderFeign {

    @RequestMapping(value = "/order/getOrderInfo",method = RequestMethod.GET)
    Message getOrderInfo();
}
/**
 * 降级处理
 */
@Service
public class OrderFallBack  implements FallbackFactory<OrderFeign> {

    Logger logger= LoggerFactory.getLogger(OrderFallBack.class);
    @Override
    public OrderFeign create(Throwable throwable) {

        return new OrderFeign() {

            @Override
            public Message getOrderInfo() {

                logger.error(throwable.getMessage());
                return ResultUtil.errorMessage("请求订单接口失败,服务降级操作");
            }
        };
    }


}
配置文件
spring:
  application:
    name: nacos-admin
  cloud:
    nacos:
      discovery:
        server-addr: 127.0.0.1:8848
  datasource:
    driver-class-name: com.mysql.cj.jdbc.Driver
    url: jdbc:mysql://127.0.0.1:3306/sharepark?useUnicode=true&characterEncoding=UTF-8&serverTimezone=GMT%2B8&zeroDateTimeBehavior=convertToNull&useSSL=false
    username: root
    password: ztkj@168
    type: com.alibaba.druid.pool.DruidDataSource
    druid:
      filters: stat,wall,log4j,config
      max-active: 100
      initial-size: 10
      max-wait: 60000
      min-idle: 1
      time-between-eviction-runs-millis: 60000
      min-evictable-idle-time-millis: 300000
      validation-query: select 'x'
      test-while-idle: true
      test-on-borrow: false
      test-on-return: false
      pool-prepared-statements: true
      max-open-prepared-statements: 50
      max-pool-prepared-statement-per-connection-size: 20

server:
    port: 8009


security:
  oauth2:
    resource:
    #获取用户信息以及验证token地址 这个不支持注册中心的服务名 要搞负载均衡就只有价加个nginx
      user-info-uri: http://127.0.0.1:8088/user/current
      token-info-uri: http://127.0.0.1:8088/oauth/check_token
    client:
      client-id: admin_client
      client-secret: 123456
      access-token-uri: http://127.0.0.1:8088/oauth/token
controller
@RestController
@RequestMapping("/admin")
public class SpAdminController {

    @Autowired
    private SpAdminMapper adminMapper;
    @Autowired
    private OrderFeign orderFeign;
    @GetMapping("/getAdminInfo")
    public Message getAdminInfo( HttpServletRequest request){

     /*   System.out.println(RequestUtil.getUserId(request));
        SpAdmin spAdmin=new SpAdmin();
        spAdmin.setId(RequestUtil.getUserId(request));
        spAdmin=adminMapper.selectOne(spAdmin);
        Message message=new Message();
        message.setRow(spAdmin);
        message.success("请求成功1");
        return message;*/
        return orderFeign.getOrderInfo();
    }


    Logger logger = LoggerFactory.getLogger(SpAdminController.class);

    @GetMapping("/product/{id}")
    public String getProduct(@PathVariable String id) {

        return "product id : " + id;
    }

    @GetMapping("/order/{id}")
    public String getOrder(@PathVariable String id) {

        return "order id : " + id;
    }

    @GetMapping("/getPrinciple")
    public Principal getPrinciple(OAuth2Authentication oAuth2Authentication, Principal principal, Authentication authentication) {

        logger.info(SecurityContextHolder.getContext().getAuthentication().getName());
        logger.info(oAuth2Authentication.getUserAuthentication().getAuthorities().toString());
        logger.info(oAuth2Authentication.toString());
        logger.info("principal.toString() " + principal.toString());
        logger.info("principal.getName() " + principal.getName());
        logger.info("authentication: " + authentication.getAuthorities().toString());
        return principal;
    }
}
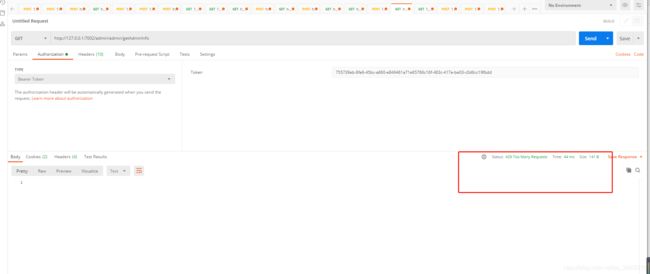
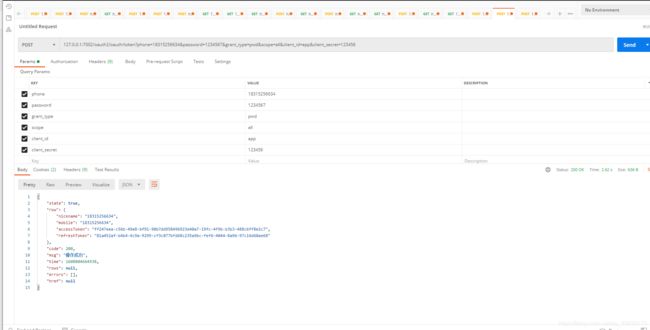
3效果
获取token
用token去资源服务器请求并用feign转发到order服务再获取用户信息

刷新token

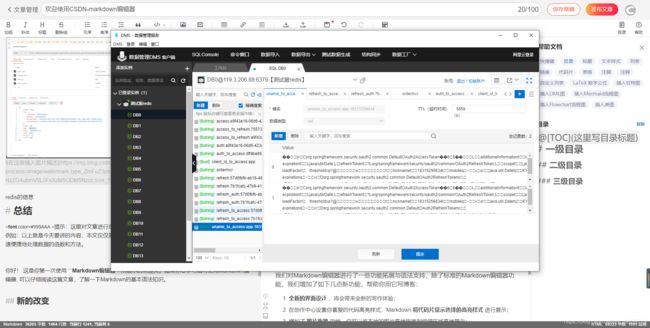
redis的信息
总结
以上就是大概内容 如有不对请指正 源码链接
https://gitee.com/javaszn/springcloud