Linux - nginx 搭建 Web服务器
前言
在之前,已经对 nginx 有过基本的介绍。
现在尝试利用 nginx 来 搭建一个 web服务器。
正文
1.什么是 Web 服务器?
Web服务器也称为WWW (WORLD WIDE WEB)服务器、HTTP服务器,其主要功能是提供网上信息浏览服务。
Unix和Linux平台下的常用Web服务器有Apache,Nginx,Lighttpd,Tomcat,IBM WebSphere、BEA Weblogic等,其中应用最广泛的是Apache。而WindowsNT/2000/2003平台下最常用的服务器则是微软公司的IIS C Internet Information Server )。
2.常见的Web服务器简介
2.1 Apache服务器
Apache仍然是世界上用得最多的Web服务器,市场占有率达60%左右。它源于NCSAhttpd服务器,在NCSA WWW服务器项目停止后,那些使用NCSA WWW服务器的人们开始交换用于此服务器的补丁,这也是Apache名称的由来(pache补丁)。世界上很多著名的网站都是Apache的用户,它的优势主要在于源代码开放、有一支开放的开发队伍、支持跨平台的应用(可以运行在几乎所有的Unix, Windows. Linux系统平台上),以及其可移植性等。Apache的模块支持非常丰富,虽在速度、性能上不及其他轻量级W eb服务器,但是属于重量级产品,所消耗的内存也比其他Web服务器要高。
官方网站:http://httpd.apache.org/
2.2 Nginx服务器
Nginx (“engine x”) 是一个高性能的 HTTP 和 反向代理 服务器,也是一个IMAP/POP3/SMTP 代理服务器。 Nginx 是由 Igor Sysoev 为俄罗斯访问量第二的 Rambler.ru 站点开发的,第一个公开版本0.1.0发布于2004年10月4日。其将源代码以类BSD许可证的形式发布,因它的稳定性、丰富的功能集、示例配置文件和低系统资源的消耗而闻名。2011年6月1日,nginx 1.0.4发布。
Nginx(发音同 engine x)是一款轻量级的Web 服务器/反向代理服务器及电子邮件(IMAP/POP3)代理服务器,并在一个BSD-like协议下发行。由俄罗斯的程序设计师Igor Sysoev所开发,供俄国大型的入口网站及搜索引擎Rambler(俄文:Рамблер)使用。其特点是占有内存少,并发能力强,是目前市面上唯一能和kangleweb server比拼的web server,事实上nginx的并发能力确实在同类型的网页服务器中表现较好,中国大陆使用nginx网站用户有:新浪、网易、腾讯等。
官方网站:http://nginx.org/
2.3 Tomcat服务器
Tomcat是一个开放源代码、运行servlet和JSP Web应用软件的基于Java的W eb应用软件容器。Tomcat Server是根据servlet和JSP规范执行的,因此也可以说Tomcat Server实行了Apache-Jakarta规范,且比绝大多数商业应用软件服务器要好。但是,Tomcat对静态文件、高并发的处理比较弱。
官方网站:http://tomcat.apache.org
2.4 Lighttpd服务器
Lighttpd是由一个德国人写的开源软件,其目标是提供一个专门针对高性能网站,安全、快速、兼容性好并且灵活的Web Server环境。它具有内存开销低、CPU占用率低、效能好,以及模块丰富等特点。支持FastCGI、CGI. Auth、输出压缩(output compress )、URL重写及Alias等重要功能。Lighttpd跟Nginx一样,也是一款轻量级Web服务器,是Nginx的竞争对手之一。
官方网站:http://www.lighttpd.net/
2.5 Microsoft IIS 服务器
Microsoft的W eb服务器产品为Internet Information Server C IIS ) . IIS是允许在公共Intranet或Internet上发布信息的Web服务器。它是目前最流行的Web服务器产品,很多著名的网站都是建立在IIS平台上的。IIS提供了一个图形界面的管理工具,称为Internet服务管理器,可用于监视配置和控制Internet服务。
IIS是一种Web服务组件,其中包括Web服务器、FTP服务器、NNTP服务器和SMTP服务器,分别用于网页浏览、文件传输、新闻服务和邮件发送等方面,它使得在网络(包括互联网和局域网)上发布信息成了一件很容易的事。它提供ISAPI ( Intranet Server API)作为扩展Web服务器功能的编程接口;同时,它还提供一个Internet数据库连接器,可以实现对数据库的查询和更新。
IIS只能运行在Microsoft Windows平台、LinuxNnix平台上,因此须要购买商业的Windows Server操作系统。
演示网站:http://www.yangyufei.com
总结
处理静态资源的服务:
- apache软件
- nginx软件
处理动态资源服务:
- tomcat
- php
3.nginx 搭建 Web服务器
nginx 在近几年大火,甚至有超过 apache的势头。作为开发者的我们,也理应学习。
为什么要使用 nginx 搭建Web服务器?
nginx 有许多有点
- 支持高并发,消耗内存资源少
- 具有多种功能
- 网站web服务功能
- 网站负载均衡功能
- 网站缓存服务
- 在多种系统平台都可以进行部署
- nginx实现网络通讯时使用的时异步网络IO模型
使用 yum 安装 nginx
3.1 nginx 搭建静态 Web 服务器
先了解一下 nginx 的主配置文件:/etc/nginx/nginx.conf
user  www;               	 --- 定义worker进程管理的用户(建议不要使用默认的,自己创建一个用户来管理)
补充: nginx的进程
master process:  主进程		---管理服务是否能够正常运行   boss
worker process:  工作进程	---处理用户的访问请求         员工
worker_processes  2;        ---定义有几个worker进程  == CPU核数 / 核数的2倍
error_log  /var/log/nginx/error.log warn;   --- 定义错误日志路径信息
pid        /var/run/nginx.pid;              --- 定义pid文件路径信息

第二个部分: 配置文件事件区域
events {

	worker_connections  1024;   --- 一个worker进程可以同时接收1024访问请求
}

第三个部分: 配置http区域
http {

	include       /etc/nginx/mime.types;      --- 加载一个配置文件(加载 nginx 支持的mime类型)
    default_type  application/octet-stream;   --- 指定默认识别文件类型
    log_format  oldboy  '$remote_addr - $remote_user [$time_local] "$request" '
                        '$status $body_bytes_sent "$http_referer" '
                        '"$http_user_agent" "$http_x_forwarded_for"';
  #  	$remote_addr   			显示用户访问源IP地址信息
  #  	$remote_user            显示认证的用户名信息
  #		[$time_local]           显示访问网站时间
  #		"$request"              请求报文的请求行信息
  #  	$status                 用户访问网站状态码信息
  #		$body_bytes_sent        显示响应的数据尺寸信息
  #		$http_referer           记录调用网站资源的连接地址信息(防止用户盗链)
  #		$http_user_agent        记录用户使用什么客户端软件进行访问页面的  (谷歌 火狐 IE 安卓 iphone)
  #		$http_x_forwarded_for   ??? 负载均衡
		                  --- 定义日志的格式
    access_log  /var/log/nginx/access.log  oldboy;
		                  --- 指定日志路径
    sendfile        on;   ???
    #tcp_nopush     on;   ???
    keepalive_timeout  65;   --- 超时时间
    #gzip  on;
    include /etc/nginx/conf.d/*.conf;        --- 加载虚拟主机配置文件,该目录下所有的文件内部会追加到该位置
}
再了解一下在主配置文件中加载的 虚拟主机配置文件
/etc/nginx/nginx.d/default — 扩展配置(虚拟主机配置文件)
server {

	listen       8080;                --- 指定监听的端口
	server_name  www.oldboy.com;      --- 指定网站域名
	root   /usr/share/nginx/html;     --- 定义站点目录的位置
	index  index.html index.htm;      --- 定义首页文件
	error_page   500 502 503 504  /50x.html;   --- 优雅显示页面信息
	location = /50x.html {

			root   /usr/share/nginx/html;
	}
}
1.编写虚拟主机配置文件
cd /etc/nginx/conf.d/
vim www.conf
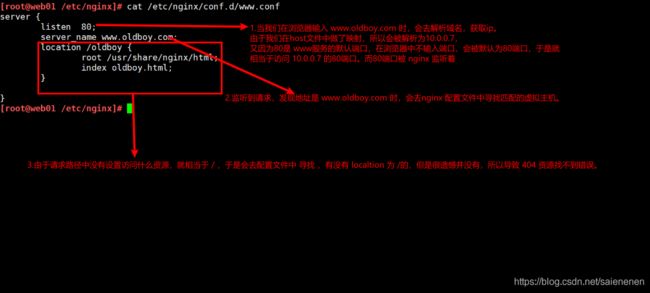
server {

	listen        80;  # 设置监听端口号
	server_name   www.oldboy.com; # 设置虚拟主机名
	location  /oldboy {

         root  /usr/share/nginx/html;  # 定义站点目录的位置
		index oldboy.html;				# 定义首页文件
	}
}
2.需要获取开发人员编写的网站代码
<html lang="en">
<head>
    <meta charset="UTF-8">
    <meta name="viewport" content="width=device-width, initial-scale=1.0">
    <title>Documenttitle>
head>
<body>
    测试nginx
body>
html>
~
将代码文件放置放置站点目录下。
[root@web01 /usr/share/nginx]# tree /usr/share/nginx/html/
/usr/share/nginx/html/
└── oldboy.html
3.重启nginx服务(平滑重启)
systemctl reload nginx
nginx -s reload

nginx命令参数
-t            : test configuration and exit
	                检查测试配置文件语法
-s            : send signal to a master process: stop, quit, reopen, reload
	                控制服务停止或者重新启动
4.编写DNS配置信息
真实域名: 在阿里云上进行DNS解析记录配置
模拟域名: 在windows主机的hosts文件中进行配置即可
C:\Windows\System32\drivers\etc\hosts
# 虚拟主机外网网卡 nginx配置的虚拟主机名
10.0.0.7 www.oldboy.com
5.进行测试访问
浏览器中: http://www.oldboy.com

出现 404 错误,代表资源未找到,那么我们来分析一下,哪里出了问题.
如何改正错误呢?
- 修改虚拟主机配置文件
vim /etc/nginx/conf.d/www.conf
server {

	listen        80;  # 设置监听端口号
	server_name   www.oldboy.com; # 设置虚拟主机名
	location  /{
     					# 去掉 oldboy
         root  /usr/share/nginx/html;  # 定义站点目录的位置
		index oldboy.html;				# 定义首页文件
	}
}

平滑重启nginx
systemctl reload nginx
- 将 oldboy.html 放置到
/usr/share/nginx/html/oldboy目录下
[root@web01 /usr/share/nginx]# cd /usr/share/nginx/html/
[root@web01 /usr/share/nginx/html]# mkdir oldboy
[root@web01 /usr/share/nginx/html]# mv oldboy.html ./oldboy
在 浏览器中 这样访问:http://www.oldboy.com/oldboy
 总结:因为我们location中 设置的是 /oldboy,所以是会去 /usr/share/nginx/html/oldboy 目录下查找 默认配置文件oldboy.html的
** PS: 服务配置文件中涉及到地址修改,必须重启nginx服务,不能平滑重启**
扩展:
- 根据用户访问的地址进行控制
10.0.0.0/24 www.oldboy.com/oldboy 不能访问
172.16.1.0/24 www.oldboy.com/oldboy 可以访问
nginx访问模块: ngx_http_access_module
vim www.conf
server {

	listen        80;
	server_name   www.oldboy.com;
	location / {

		root  /usr/share/nginx/html;
		index oldboy.html;
	}
	location /oldboy {

		deny  10.0.0.0/24;
		allow 172.16.1.0/24;
		root  /usr/share/nginx/html;
		index oldboy.html;
	}
}
补充:
location外面的信息, 全局配置信息
location里面的信息, 局部配置信息
- 根据用户访问进行认证
nginx认证模块: ngx_http_auth_basic_module
第一步:编写虚拟主机配置文件
server {

	listen        80;
	server_name   www.oldboy.com;
	location / {

		root   /usr/share/nginx/html;
		index index.html;
		auth_basic      "oldboy";
		auth_basic_user_file password/htpasswd; # 密码文件,建议使用相对路径
}
第二步:创建密码文件(文件中密码信息必须是密文的)
htpasswd 创建一个有密文信息的密码文件
[root@web01 conf.d]# rpm -qf `which htpasswd`
httpd-tools-2.4.6-89.el7.centos.x86_64
[root@web01 conf.d]# yum -y install httpd-tools
htpasswd命令参数说明:
 	  -c  Create a new file.  *****
	      创建一个密码文件
      -n  Don't update file; display results on stdout.
	      不会更新文件; 显示文件内容信息
      -b  Use the password from the command line rather than prompting for it. *****
	      免交互方式输入用户密码信息
      -i  Read password from stdin without verification (for script usage).
	      读取密码采用标准输入方式,并不做检查 ???
      -m  Force MD5 encryption of the password (default).
	      md5的加密算法
      -B  Force bcrypt encryption of the password (very secure).
	      使用bcrypt对密码进行加密
      -C  Set the computing time used for the bcrypt algorithm
          (higher is more secure but slower, default: 5, valid: 4 to 31).
		  使用bcrypt algorithm对密码进行加密
      -d  Force CRYPT encryption of the password (8 chars max, insecure).
	      密码加密方式
      -s  Force SHA encryption of the password (insecure).
	      加密方式
      -p  Do not encrypt the password (plaintext, insecure).
	      不进行加密
      -D  Delete the specified user.
	      删除指定用户
      -v  Verify password for the specified user.
touch .htpasswd
htpasswd -c password/.htpasswd ren5(用户名)

cat .passwd
ren5:$apr1$Lna.yg7m$n6g9180iZQP7GXJ447CE0/
第三步:修改密码文件权限,重启 nginx 服务
chmod 600 ./htpasswd

systemctl restart nginx
- 利用nginx服务搭建网站文件共享服务器
第一步:编写配置文件(www.conf)
nginx模块功能: ngx_http_autoindex_module
server {

	listen        80;
	server_name   www.oldboy.com;
	location /oldboy {

		root   /usr/share/nginx/html;
		#index oldboy.html; 需要注释这个
		autoindex on;    --- 开启nginx站点目录索引功能
		charset utf-8;   --- 修改目录结构中出现的中文乱码问题
    }
- 错误页面优雅显示
location /oldboy {

	root  /usr/share/nginx/html;
	-- 设置error_page ,出现404 错误 显示oldboy.jpg。oldboy.jpg,要在oldboy目录下
	error_page  404  oldboy.jpg;
}
location /oldgirl {

	root  /usr/share/nginx/html;
	error_page  404  oldgirl.jpg;
}
还有更多的功能和模块使用,在这里就不再介绍了。
3.2 nginx + PHP
1.什么是LNMP?
LNMP其实是一系列服务的简称:
- LAMP 的全称是 Linux + Apache + MySQL + PHP
- LNMP 的全称是 Linux + Nginx + MySQL + PHP
- LNAMP 的全称是 Linux + Nginx + Apache + MySQL + PHP
- Linux 是类 Unix 计算机操作系统的统称,是目前最流行的免费操作系统。代表版本有:debian、centos、ubuntu、fedora、gentoo 等。
- Nginx 是一个高性能的 HTTP 和反向代理服务器,也是一个 IMAP/POP3/SMTP 代理服务器。
- Apache 是世界使用排名第一的Web服务器软件。 它可以运行在几乎所有广泛使用的计算机平台上,由于其跨平台和安全性被广泛使用,是最流行的Web服务器端软件之一。
- PHP 是一种在服务器端执行的嵌入 HTML 文档的脚本语言。
- MySQL 是一个小型关系型数据库管理系统。
**1.部署mariadb(可以理解为mysql的孪生兄弟) **
# 1.yum 安装 mariadb
yum install mariadb-server mariadb -y

# 2.设置开机自启
systemctl start mariadb.service
systemctl enable mariadb.service

# 3.给mysql数据库服务设置密码
mysqladmin -u root  password 'oldboy123'

# 4.登录
mysql -u root -poldboy123
2.部署PHP服务
# 1.更新yum源/卸载系统自带的PHP软件
yum remove php-mysql php php-fpm php-common
rpm -Uvh https://dl.fedoraproject.org/pub/epel/epel-release-latest-7.noarch.rpm
rpm -Uvh https://mirror.webtatic.com/yum/el7/webtatic-release.rpm

# 2.安装php软件
yum install -y php71w php71w-cli php71w-common php71w-devel php71w-embedded  php71w-gd php71w-mcrypt php71w-mbstring php71w-pdo php71w-xml php71w-fpm php71w-mysqlnd php71w-opcache  php71w-pecl-memcached php71w-pecl-redis php71w-pecl-mongodb

# 3.编写配置文件
vim /etc/php-fpm.d/www.conf
user = www   -- PS: 保证nginx进程的管理用户和php服务进程的管理用户保持一致
group = www

# 4.启动php服务
systemctl start php-fpm
systemctl enable php-fpm
LNMP架构的原理:
用户访问网站—>nginx(fastcgi_pass) --FastCGI–>(php-fpm – wrapper) php (php解析器) —> mysql(读取或写入)
利用 FastCGI,将 nginx 请求转发给 php服务 处理。
3.实现LNMP之间建立关系
实现nginx + php 建立关系:
1.编写nginx文件
vim /etc/nginc/con.d/www.conf
location ~ \.php$ {

	root  /usr/share/nginx/html;
	fastcgi_index index.php;          url               uri
	fastcgi_param SCRIPT_FILENAME $document_root$fastcgi_script_name;
	fastcgi_pass  127.0.0.1:9000; -- php 服务监听 9000端口
	include fastcgi_params;   -- 变量配置文件
}

2.重启nginx 服务
systemctl restart nginx

3.编写动态资源文件
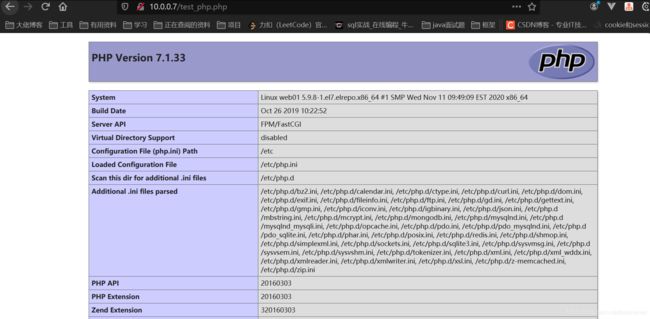
[root@web01 conf.d]# cat /usr/share/nginx/html/test_php.php
<?php
	phpinfo();
?>

4.进行访问测试
www.oldboy.com/test_php.php
1.编写php代码文件
[root@web01 blog]# vim test_mysql.php
<?php
	$servername = "localhost";
	$username = "root";
	$password = "oldboy123";
	//$link_id=mysql_connect('主机名','用户','密码');
	//mysql -u用户 -p密码 -h 主机
	$conn = mysqli_connect($servername, $username, $password);
	if ($conn) {

		echo "mysql successful by root !\n";
	}else{

		die("Connection failed: " . mysqli_connect_error());
	}
?>

然后访问www.oldboy.com/test_php.php,
出现 mysql successful by root !
表示成功!


