基于python以及AIUI WebSocket,WeChatPYAPI实现的微信聊天机器人
基于python以及AIUI WebSocket,WeChatPYAPI实现的微信聊天机器人
做此文的目的首先是学习Markdown的用法哈哈哈哈,其实也是记录自己学习的一个过程。
以后我也会将自己在图像处理,计算机视觉的所学以及实践实战的process上传到这个网站,不为一种做笔记的方式。
1.项目实施历程
首先寻找微信与python的接口API(实现python驱动微信),当初有个想法利用os模块直接驱动,但发现会占用外设,故不可行。于是google到了一个及其小众的微信接口,看着介绍文档感觉挺好入门的,于是用了起来,后续介绍不足。文档地址:点击进入,需要从github上下载zip然后本地浏览器打开。
其次,通过该文档的介绍,我们得到了我们能通过该API得到的信息:
1.微信消息类型(语音or文本or转账收账or好友申请)
2.微信消息来源ID
以上为最主要以及我们需要利用到的,其他get可自行查看文档
另外就是寻找处理信息的机器人,首先找到的是图灵机器人,毕竟网上大量的调用实例可供学习,但要钱,最后看中了科大讯飞的机器人。文档地址:点击进入
然后分别调用两者的API就可完成项目了,是不是很简单?
2.具体步骤
1.环境准备
environment:
python-version --3.7or3.8
packages:
1.psutil
2.ws4py
3.uuid
4.json
5.似乎还有个,到时你debug时如果有module_error的话应该有提示你缺哪个
应该差不多了,还有些内置库我就懒得写了,待会看代码你就知道怎么导入了。
或许你不会下载库?可以CSDN搜搜教程。啥都说这能写上万个字。
2.pyd导入
由于该微信API未开源,只是提供了免费版来吸引你充钱购买付费版。我们只能引入其pyd文件,从刚刚的zip包导入适应你py版本以及os版本的pyd文件(加密的py文件,我们需要调用其中的方法)。
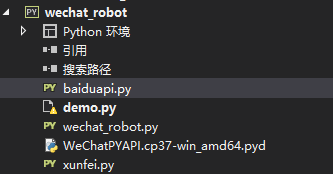
比如,我是64位windows,python3.7的环境,那么,我在我的项目文件中应该包含(我用的是vs):
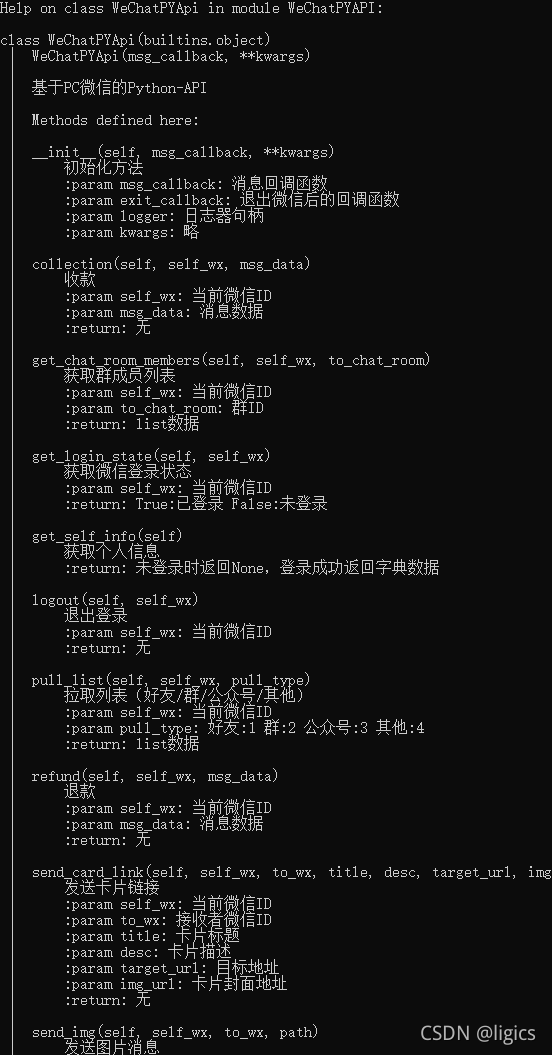
同时我们要搞清楚这个pyd文件中到底包含什么方法。
我们再demo中运行一下代码:
import pyd文件名
print(help(pyd文件名))
便可以了解所有封装好的方法了,但无法查看源代码哈!!!
运行后可以得到:
3.代码导入
接下来就是大家都想要的代码片段了,具体功能还未完全完善,但不是我的问题。总结再说。
首先是百度智能云语音识别api接口(百度的语音识别实在没办法,太强了,我的处理方式是准备设置一个pcm可覆盖式的存入语音信息然后传递给api进行百度语音识别然后接入科大讯飞的机器人语义识别进行消息回复的)。
baiduapi.py
import os
from aip import AipSpeech

APP_ID=''#自己填入百度智能云注册的app_id
API_KE=''#follow above
SECRET_KEY=''#follow above
client=AipSpeech(APP_ID,API_KE,SECRET_KEY)
def get_file_path(filepath):
    with open(filepath,'rb') as f:
        return f.read()


def write_srtxt(txtfile,line):
    with codecs.open(txtfile,'a','utf-8') as f:
        f.seek(0)#重定位
        f.write(line)


def dt_sr(srcfile):
    speechrate=16000
    speechsaccu=16
    buffer=get_file_path(srcfile)
    sizepersec=int((speechsaccu/8)*speechrate)
    timesec=int(len(buffer) / sizePerSec)
    timeMinute = int((timeSec + 59) / 60)
    print(timeMinute)

    for count in range(0, timeMinute):
        print(min((count + 1) * sizePerSec * 60, len(buffer)))
        speechBuffer = buffer[count * sizePerSec * 60: min((count + 1) * sizePerSec * 60, len(buffer))]
        result = client.asr(speechBuffer, 'pcm', 16000, {

            'lan': 'zh',
        })
        if (result['err_no'] == 0):
            print(result['result'])
            line = str(count)+':00'+"--"+str(count)+":59  " + result['result'][0] +'\n'
            #功能拓展输入到机器人中
            write_srtxt(txtFile, line)
            #导入传入方法
        else:
            # print(result)
            print("语音识别错误,错误码是: ", result['err_no'], " , 错误信息是:" + result['err_msg'])

pcmFile = 'd:\\workroom\\testroom\\sr.raw'
txtFile = 'd:\\workroom\\testroom\\srtxt.txt'
cmd = "ffmpeg -i " + pcmFile + " -f s16le -ar 16000 -acodec pcm_s16le -b:a 16 -ac 1 -y " + pcmFile
os.system(cmd)
dt_sr(pcmFile)
这里当初是准备wechat接好后再完善的,但那边不行了,就没有写。这里相当于一个demo,将本地文件语音识别。所以也就没有封装成方法进行调用了,需要的话大家可以自行改改,也不难。
另一个就是科大讯飞机器人websocket接口,用来处理消息的:
xunfei.py
from ws4py.client.threadedclient import WebSocketClient
from baiduapi import *
import base64
import hashlib
import json
import time
import uuid
class wsapiclient(WebSocketClient):
    def __init__(self,msgs,flag):
        #msgs是消息
        #flag=0代表文本消息,1代表语音消息
        super(wsapiclient,self).__init__()
        self.msgs=msgs
        self.flag=flag
    def opened(self):
        pass
    def closed(self,code,reason):
        if code==1000:
            print('link cancel')
        else:
            print('link close uncommonly:'+str(code)+",reason:"+str(reason))

    #就是处理消息以及反馈消息的过程
    def received_message(self, m):
        cjson=checkJSON()
        re_msg=''#初始化回复消息
        s=json.loads(str(m))#将交互语言作为传入数据
        if s['action']=="started":#建立通信阶段
            try:
                if self.flag==0:#接收到文本消息
                    self.send(self.msgs)
                    end_tag='--end--'
                    self.send(bytes(end_tag.encode("utf-8")))
                    print('结束标志已经发送')
                if self.flag==1:#接受到语音消息
                	#放入百度语音识别中进行解析得到msg
                	baidu_shibie(self.msgs)
                	self.send(self.msgs)
                    end_tag='--end--'
                    self.send(bytes(end_tag.encode("utf-8")))
                    print('结束标志已经发送')

        elif s['action']=="result":#说明消息已经接受到了,需要返回了
            data=s['data']
            #判断反馈消息的类型(我们只需要语义结果)
            try:
                if data['sub']=="nlp" :
                    if data['intent']['rc']==0:#理解话了
                        re_msg=data['intent']['answer']['text']
                    else:
                        re_msg='小汪很菜,没给我开发好,不知道怎么回答你'
            except:
                if data['rc']==0:
                    re_msg=data['text']
        else:
            pass
        return re_msg

def get_auth_id():
    mac=uuid.UUID(int=uuid.getnode()).hex[-12:]
    return hashlib.md5(":".jion([mac[e:e+2]for e in range(0,11,2)]).encode("utf-8")).hexdigest()

def get_conparam(flag):
    #构造握手参数(建立连接)
    url='ws://wsapi.xfy.cn/v1/aiui'#建立post连接
    app_id=''
    app_key=''
    curtime=int(time.time())
    auth_id=get_auth_id()
    param_0="""{
     {
    "auth_id":"{0}",
    "result_level":"plain",
    "data_type":"text",
    "scene":"main_box",
    "sample_rate":"16000",
    "ver_rate":"monitor"
    "clean_dialog_history":"user",
    "close_delay":"200",
    "context": "{
     {\\\"sdk_support\\\":[\\\"iat\\\",\\\"nlp\\\",\\\"tts\\\"]}}"
    """
    param_1="""{
     {
    "auth_id":"{0}",
    "result_level":"plain",
    "data_type":"audio",
    "scene":"main_box",
    "sample_rate":"16000",
    "ver_rate":"monitor"
    "clean_dialog_history":"user",
    "close_delay":"200",
    "context": "{
     {\\\"sdk_support\\\":[\\\"iat\\\",\\\"nlp\\\",\\\"tts\\\"]}}"
    """
    def get_param(param):
        param=param.format(auth_id).encode("utf-8")
        parambase64=base64.b64encode(param).decode()#转码,转为我们所需要传入参数的格式
        checksumpre=api_key+str(curtime)+parambase64
        checksum=hashlib.md5(checksumpre.encode("utf-8")).hexdigest()
        connparam="?appid="+aapp_id+"&""&checksum=" + checksum + "¶m=" + paramBase64 + "&curtime=" + str(
            curTime) + "&signtype=md5"
        return connparam
    if flag==0:
        connparam=get_param(param_0)
    elif flag==1:
        connparam=get_param(param_1)
    url=url+connparam
    return url
最后就是微信api了,我将其设置为启动文件(就是说他含有Mian函数)。
#encoding=utf-8
#负责与微信进行消息的通道交接
#作为主函数启用
from xunfei import *
import os
import psutil
from WeChatPYAPI import WeChatPYApi
from queue import Queue
import logging
import time
#导入微信的接口API
#定义消息栈
queue_message=Queue()
#设置日志
logging.basicConfig(level=logging.INFO)
#设置语音文件存入路径(可覆盖,解内存)
def save_audio():

    pass
#定义消息回调函数
def msg_callback(message):
    queue_message.put(message)
#退出事件回调
def on_exit(wx_id):
    print('已退出:{}'.format(wx_id))
#消息处理,分流
def thread_handle_message(wx,wx_id,ws_t,ws_a):
     while True:
         message=queue_message.get()
         print(message)
         tp=message['msg_type']
         sd=message['sender']
         content=message['content']#消息的内容
         id=message['wx_id']
         try: #首先判断是否为群消息还是个人消息
            if sd==None:
                if tp==1:
                    #文本消息0
                    infor=ws_t.received_message(content)
                    wx.send_text(wx_id.id,infor)
                elif tp==3:
                    #直接回答暂时不能回答
                    infor='我暂时还未被开发视觉系统哦'
                    wx.send_text(wx_id,id,infor)
                elif tp==34:
                    #语音消息
                    pass
            else:
                if tp==1:
                    infor=ws_t.received_message(content)
                    wx.send_text_and_at_number(wx_id,id,msg=infor)
                elif tp==3:
                    #直接回答暂时不能回答
                    infor='小汪很菜,未开发出视觉系统'
                    wx.send_text_and_at_number(wx_id,id,msg=infor)
                elif tp==34:
                    #利用科大讯飞进行语音转换
                    #然后同步三
                    pass
         except:
             pass
if __name__=='__main__':
    #创建机器人类,一个文字类,一个语音类
    ws_t=wsapiclient(url=get_conparam(0),protocols=['chat'],
                   msgs=msgs,flag=0)
    ws_a=wsapiclient(url=get_conparam(1),protocols=['chat'],
                   msgs=msgs,flag=1)
    ws_t.connect()
    ws_t.run_forever()
    ws_a.connect()
    ws_a.run_forever()
    #同时构造长连接,实现不断开
    #定义微信接口类
    wx=WeChatPYApi(msg_callback=msg_callback,exit_callback=on_exit,logger=logging)
    wx.start_wx()#驱动微信
    while not wx.get_self_info():
        time.sleep(5)
    print('login success')
    #登录成功后,进行后续操作
    #获取登录信息
    dict_1=wx.get_self_info()
    self_wx=dict_1['wx_id']
    threading.Thread(target=thread_handle_message,args=(wx,self_wx,ws_a,ws_t)).start()
    #进行信息的收发
在demo中运行过一次,应该是没有问题的,如果有,那就是你的问题了哈。
3.后期总结
1.这是个知识付费的时代,想要白嫖就得花费时间成本去找。
2.不要随意使用小众官方文档!!!描述及其不走心,很多东西需要自己去尝试才能找到解决方法,及其浪费时间!为了让你付费享受就将返回消息进行机密无法解析(可恶啊)。
3.也学到了很多东西。比如将Web与程序的结合(虽然之前的爬虫与自动化也类似,但完全自学的感觉不一样嘛),对信息的检索以及项目的分工。享受享受。
4.不要口嗨,不要口嗨,说自己两天就能完成任务!!!
4.后期可能的改进
我发现AIUI不仅有Websocket的接口,还有SDK的接入。后期可能会发布一个SDK接入的实例。
同时会将项目的漏洞以及功能更加完善,不过很有可能是摆烂丢项目
等项目最终完成会将工程上传github。

