Android初学之仿微信APP门户界面设计
实验环境:
在Android Studio中进行有关代码的编写和界面效果展示
图标来源于阿里矢量图标库
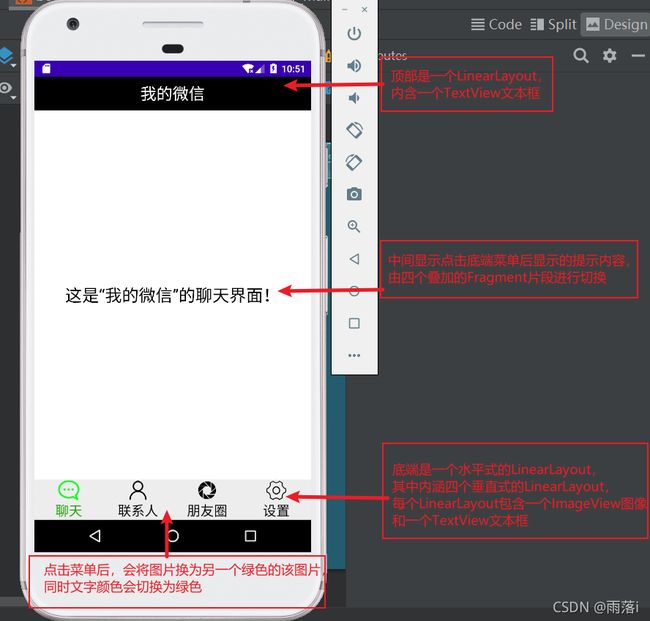
界面分析:
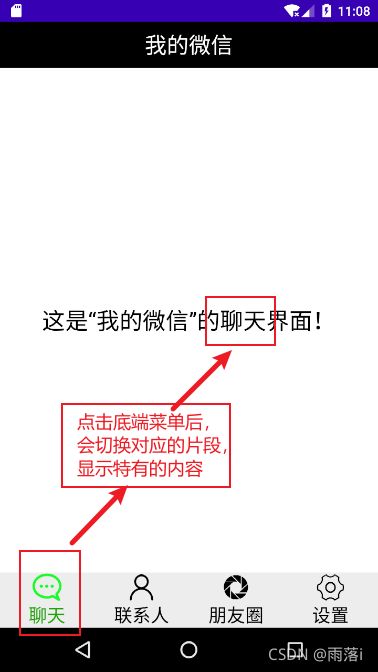
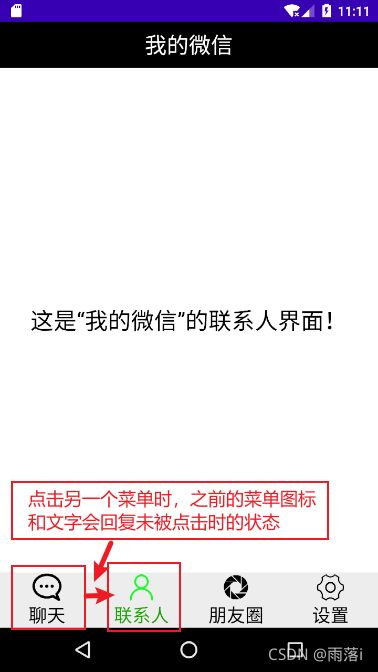
点击底端相应区域,中间内容会进行相应切换(将对应的Fragment显示,其余的Fragment隐藏),下面展示点击联系人后,中间内容的变化。
界面布局的代码实现:
- 顶部top.xml
- 底端bottom.xml
- 中间内容四个分段fragment.xml
- 窗体总布局的activity_main.xml
- 四个分段fragment.xml对应的.java文件
- 主函数文件MainActivity.java
顶部top.xml
(布局可以通过设置android:background属性改变背景颜色,文本可以通过设置android:textColor属性改变字体颜色。)
<?xml version="1.0" encoding="utf-8"?>
<LinearLayout xmlns:android="http://schemas.android.com/apk/res/android"
    android:layout_width="match_parent"
    android:layout_height="50dp"
    android:background="@color/black">

    <TextView
        android:id="@+id/textView"
        android:layout_width="wrap_content"
        android:layout_height="50dp"
        android:layout_weight="1"
        android:gravity="center"
        android:text="我的微信"
        android:textColor="@color/white"
        android:textSize="24sp" />

</LinearLayout>
底端bottom.xml
(为节省篇幅此处只给出了第一个垂直式的LinearLayout-聊天菜单)
android:gravity属性可以定义布局内控件的对齐方式,居中、水平居中和垂直居中
android:orientation属性可以定义布局内控件的排列方式,一般有水平式和垂直式
<?xml version="1.0" encoding="utf-8"?>
<LinearLayout xmlns:android="http://schemas.android.com/apk/res/android"
    xmlns:app="http://schemas.android.com/apk/res-auto"
    android:layout_width="match_parent"
    android:layout_height="60dp"
    android:background="@color/colorViewNormal"
    android:gravity="center">

    <LinearLayout
        android:id="@+id/chat"
        android:layout_width="match_parent"
        android:layout_height="match_parent"
        android:layout_weight="1"
        android:gravity="center"
        android:orientation="vertical">

        <ImageView
            android:id="@+id/imageView1"
            android:layout_width="match_parent"
            android:layout_height="wrap_content"
            android:layout_weight="1"
            app:srcCompat="@drawable/chat" />

        <TextView
            android:id="@+id/textView1"
            android:layout_width="match_parent"
            android:layout_height="wrap_content"
            android:layout_weight="1"
            android:gravity="center"
            android:textColor="@color/black"
            android:text="聊天"
            android:textSize="20sp" />
    </LinearLayout>

</LinearLayout>
中间内容区四个fragment.xml
(同样只给出了一个分段,其余三个分段类似)
<?xml version="1.0" encoding="utf-8"?>
<androidx.constraintlayout.widget.ConstraintLayout xmlns:android="http://schemas.android.com/apk/res/android"
    xmlns:app="http://schemas.android.com/apk/res-auto"
    xmlns:tools="http://schemas.android.com/tools"
    android:layout_width="match_parent"
    android:layout_height="match_parent"
    tools:context=".Fragment_chat">

    <TextView
        android:id="@+id/textView5"
        android:layout_width="wrap_content"
        android:layout_height="50dp"
        android:gravity="center"
        android:text="这是“我的微信”的聊天界面!"
        android:textColor="@color/black"
        android:textSize="25sp"
        app:layout_constraintBottom_toBottomOf="parent"
        app:layout_constraintEnd_toEndOf="parent"
        app:layout_constraintStart_toStartOf="parent"
        app:layout_constraintTop_toTopOf="parent" />

</androidx.constraintlayout.widget.ConstraintLayout>
activity_main.xml
(包含top、middle、bottom三个部分id,用 include 语句调用顶部和底部导航栏两个xml文件)
<?xml version="1.0" encoding="utf-8"?>
<LinearLayout xmlns:android="http://schemas.android.com/apk/res/android"
    xmlns:app="http://schemas.android.com/apk/res-auto"
    xmlns:tools="http://schemas.android.com/tools"
    android:layout_width="match_parent"
    android:layout_height="match_parent"
    android:orientation="vertical"
    tools:context=".MainActivity">

    <include layout="@layout/top"></include>


    <FrameLayout
        android:id="@+id/frame_content"
        android:layout_width="match_parent"
        android:layout_height="match_parent"
        android:layout_weight="1"></FrameLayout>


    <include layout="@layout/bottom"></include>


</LinearLayout>
fragment_chat.java
(同样只给出点击聊天菜单后显示的分段,其余三个类似)
package com.example.mywork;

import android.os.Bundle;
import android.view.LayoutInflater;
import android.view.View;
import android.view.ViewGroup;
import androidx.fragment.app.Fragment;

public class Fragment_chat extends Fragment {


    public Fragment_chat() {

    }

    @Override
    public View onCreateView(LayoutInflater inflater,
                             ViewGroup container, Bundle savedInstanceState) {

//        return super.onCreateView(inflater, container, savedInstanceState);
        return inflater.inflate(R.layout.fragment_chat,container,false);
    }
}
MainActivity.java
(各组件的初始化操作及点击各菜单的转换操作函数)
package com.example.mywork;

import androidx.appcompat.app.AppCompatActivity;
import androidx.fragment.app.Fragment;
import androidx.fragment.app.FragmentManager;
import androidx.fragment.app.FragmentTransaction;

import android.graphics.Color;
import android.os.Bundle;
import android.view.View;
import android.view.Window;
import android.widget.ImageView;
import android.widget.LinearLayout;
import android.widget.TextView;

public class MainActivity extends AppCompatActivity implements View.OnClickListener{


    //Fragment
    private Fragment fragment_first=new Fragment_chat();
    private Fragment fragment_second=new Fragment_contacts();
    private Fragment fragment_third=new Fragment_circle_friend();
    private Fragment fragment_fourth=new Fragment_settings();

    //底端菜单栏LinearLayout
    private LinearLayout linear_first;
    private LinearLayout linear_second;
    private LinearLayout linear_third;
    private LinearLayout linear_fourth;

    //底端菜单栏中的Imageview
    private ImageView imageView_first;
    private ImageView imageView_second;
    private ImageView imageView_third;
    private ImageView imageView_fourth;

    //底端菜单栏中的TextView
    private TextView textView_first;
    private TextView textView_second;
    private TextView textView_third;
    private TextView textView_fourth;


    //FragmentManager
    private FragmentManager fragmentManager;

    @Override
    protected void onCreate(Bundle savedInstanceState) {

        super.onCreate(savedInstanceState);
        requestWindowFeature(Window.FEATURE_NO_TITLE );
        setContentView(R.layout.activity_main);

        initView();
        initFragment();
        initEvent();
        selectFragment(0);
        //将第一个图标设为选中状态
        imageView_first.setImageResource(R.drawable.chat_green);
        textView_first.setTextColor(getResources().getColor(R.color.colorViewPress));
    }

    @Override
    public void onClick(View view) {

        //每次点击之后,将所有的ImageView和TextView设置为未选中
        restartButton();

        switch(view.getId())
        {

            case R.id.chat:
                //选择所点击的菜单对应的图层片段
                selectFragment(0);
                //将该菜单的点击状态置为点击态
                imageView_first.setImageResource(R.drawable.chat_green);
                textView_first.setTextColor(getResources().getColor(R.color.colorViewPress));
                break;
            case R.id.contacts:
                selectFragment(1);
                imageView_second.setImageResource(R.drawable.contacts_green);
                textView_second.setTextColor(getResources().getColor(R.color.colorViewPress));
                break;
            case R.id.circle_friend:
                selectFragment(2);
                imageView_third.setImageResource(R.drawable.circle_people_green);
                textView_third.setTextColor(getResources().getColor(R.color.colorViewPress));
                break;
            case R.id.settings:
                selectFragment(3);
                imageView_fourth.setImageResource(R.drawable.settings_green);
                textView_fourth.setTextColor(getResources().getColor(R.color.colorViewPress));
                break;
            default:
                break;
        }
    }

    //重置菜单的点击状态,设为未点击
    private void restartButton() {

        //设置为未点击状态
        //第一片段
        imageView_first.setImageResource(R.drawable.chat);
        textView_first.setTextColor(getResources().getColor(R.color.black));
        //第二片段
        imageView_second.setImageResource(R.drawable.contacts);
        textView_second.setTextColor(getResources().getColor(R.color.black));
        //第三片段
        imageView_third.setImageResource(R.drawable.circle_people);
        textView_third.setTextColor(getResources().getColor(R.color.black));
        //第四片段
        imageView_fourth.setImageResource(R.drawable.settings);
        textView_fourth.setTextColor(getResources().getColor(R.color.black));
    }

    //初始化中间的部分的图层片段
    private void initFragment(){

        fragmentManager=getSupportFragmentManager();
        FragmentTransaction transaction=fragmentManager.beginTransaction();
        transaction.add(R.id.frame_content,fragment_first);
        transaction.add(R.id.frame_content,fragment_second);
        transaction.add(R.id.frame_content,fragment_third);
        transaction.add(R.id.frame_content,fragment_fourth);
        //提交事务
        transaction.commit();
    }

    //初始化各底端的LinearLayout、ImageView和TextView组件
    private  void initView(){

        linear_first=findViewById(R.id.chat);
        linear_second=findViewById(R.id.contacts);
        linear_third=findViewById(R.id.circle_friend);
        linear_fourth=findViewById(R.id.settings);

        imageView_first=findViewById(R.id.imageView1);
        imageView_second=findViewById(R.id.imageView2);
        imageView_third=findViewById(R.id.imageView3);
        imageView_fourth=findViewById(R.id.imageView4);

        textView_first=findViewById(R.id.textView1);
        textView_second=findViewById(R.id.textView2);
        textView_third=findViewById(R.id.textView3);
        textView_fourth=findViewById(R.id.textView4);

    }

    //初始化点击监听事件
    private void initEvent(){

        linear_first.setOnClickListener(this);
        linear_second.setOnClickListener(this);
        linear_third.setOnClickListener(this);
        linear_fourth.setOnClickListener(this);
    }

    //隐藏所有图层分段
    private void hideView(FragmentTransaction transaction){

        transaction.hide(fragment_first);
        transaction.hide(fragment_second);
        transaction.hide(fragment_third);
        transaction.hide(fragment_fourth);
    }

    //选择相应的图层分段
    private void selectFragment(int i){

        FragmentTransaction transaction=fragmentManager.beginTransaction();
        //调用隐藏所有图层函数
        hideView(transaction);
        switch (i){

            case 0:
                transaction.show(fragment_first);

                break;
            case 1:
                transaction.show(fragment_second);

                break;
            case 2:
                transaction.show(fragment_third);

                break;
            case 3:
                transaction.show(fragment_fourth);

                break;
            default:
                break;
        }
        //提交转换事务
        transaction.commit();
    }

}
小结:在Android Studio中进行仿微信APP门户界面的初步设计,实现了top和bottom导航栏的设计,及中间片段图层之间的隐藏与切换,最后实现了点击菜单后的颜色切换问题。用到了TextView、ImageView、LinearLayout、Fragment组件,了解了点击事件onClick函数的编写。
具体代码已上传至gitee代码仓库
——2021.10.04


