NTP服务-集群时间同步原理-初识
前述:
在运维工作场景中,会将不同的服务程序安装配置在不同的主机之上,比如LAMP,LNMP等部署时,将Apache、Mysql、PHP、Nginx分别安装在不同的服务器上,但要求这些服务器协同工作运转,又或者搭建日志服务器,所以这些主机相互之间在文件传输时,数据流会因为各自时间的不同产生不同的结果,时间不一致会导致出现各种异常处理结果。
举个例子:
客户端向服务端发起请求访问www网页,客户端主机时间与服务器主机时间不同,会导致访问页面异常或无法访问;因为数据报文内有双方主机的时间;
例子二:
某台主机将日志发送给日志服务器,发送方主机日期是2015年,而日志服务器日期是2016年,那么接收到的日志就会出现日期错误,日志信息的日期发生错位,导致日志无法正确分析;
所以在多台主机之间协同工作时,需要将各自主机的时间进行精确同步,避免出现诸多错误;
主机系统时间是调用主板上的硬件时钟而生成的,随后根据CPU每秒的频率来同步秒数,从而记录时间.
在CPU的不断工作中,时间会出现偏差,不同的主机之间通过本机的系统时间即便手动调整一致,一段时间后还是会出现偏差无法同步;
想一想:如何才能够让多台主机之间的时间同步呢?
我们看一张图片
我们将所有电子设备与同一个设备的时间为准,全部向这个设备看齐,这样大家的时间就都一样了,这个设备就是时间服务器,生活中的设备通过连接internet与时间服务器实现连接,通过报文通信探索到时间服务器的时间后将自己的时间设定与其一致,并且定期发送数据报文进行比对,出现偏差再次将自己的时间设定为时间服务器的时间,这样我们生活中所有的设备只需要可以连接internet就可以实现时间同步了。而时间服务器的时间是来自于GPS卫星的授时信号,想象一下全地球那么多地区国家如何保证时间没有偏差呢?这里要感慨一下科学的伟大了,因为全球的时间服务器都是与卫星同步,而GPS卫星使用的是原子时钟,这个时钟非常厉害,可以达到几千年都不会误差一秒,这样就保证了地球internet网络中所有设备的时间同步;
在Llinux系统中,我们常用的时间服务器程序时NTP服务;
[root@192 ~]# yum info ntp
Loaded plugins: fastestmirror, langpacks
Repodata is over 2 weeks old. Install yum-cron? Or run: yum makecache fast
Determining fastest mirrors
 * base: mirrors.huaweicloud.com
 * extras: mirrors.huaweicloud.com
 * updates: mirrors.163.com
Available Packages
Name        : ntp
Arch        : x86_64
Version     : 4.2.6p5
Release     : 29.el7.centos.2
Size        : 549 k
Repo        : base/7/x86_64
Summary     : The NTP daemon and utilities
URL         : http://www.ntp.org
License     : (MIT and BSD and BSD with advertising) and GPLv2
Description : The Network Time Protocol (NTP) is used to synchronize a computer's
            : time with another reference time source. This package includes ntpd
            : (a daemon which continuously adjusts system time) and utilities used
            : to query and configure the ntpd daemon.
            :
            : Perl scripts ntp-wait and ntptrace are in the ntp-perl package,
            : ntpdate is in the ntpdate package and sntp is in the sntp package.
            : The documentation is in the ntp-doc package.
说明一下,这个服务也是C/S架构,但是NTP程序既是服务器程序又是客户端程序,无论在服务器还是客户端上,都要启动程序的守护进程,因为客户端要不断的与服务器之间进行时间的同步;
接下来我们来安装一下这个程序;
我的主机系统:
[root@192 ~]# cat /etc/redhat-release
CentOS Linux release 7.9.2009 (Core)
[root@192 ~]# yum install ntp
Loaded plugins: fastestmirror, langpacks
Loading mirror speeds from cached hostfile
 * base: mirrors.huaweicloud.com
 * extras: mirrors.huaweicloud.com
 * updates: mirrors.163.com
base                                                                                                                      | 3.6 kB  00:00:00
extras                                                                                                                    | 2.9 kB  00:00:00
updates                                                                                                                   | 2.9 kB  00:00:00
(1/2): extras/7/x86_64/primary_db                                                                                         | 243 kB  00:00:00
(2/2): updates/7/x86_64/primary_db                                                                                        |  11 MB  00:00:03
Resolving Dependencies
--> Running transaction check
---> Package ntp.x86_64 0:4.2.6p5-29.el7.centos.2 will be installed
--> Processing Dependency: libopts.so.25()(64bit) for package: ntp-4.2.6p5-29.el7.centos.2.x86_64
--> Running transaction check
---> Package autogen-libopts.x86_64 0:5.18-5.el7 will be installed
--> Finished Dependency Resolution

Dependencies Resolved

=================================================================================================================================================
 Package                              Arch                        Version                                        Repository                 Size
=================================================================================================================================================
Installing:
 ntp                                  x86_64                      4.2.6p5-29.el7.centos.2                        base                      549 k
Installing for dependencies:
 autogen-libopts                      x86_64                      5.18-5.el7                                     base                       66 k

Transaction Summary
=================================================================================================================================================
Install  1 Package (+1 Dependent package)

Total download size: 615 k
Installed size: 1.5 M
Is this ok [y/d/N]: y
Downloading packages:
(1/2): ntp-4.2.6p5-29.el7.centos.2.x86_64.rpm                                                                             | 549 kB  00:00:00
(2/2): autogen-libopts-5.18-5.el7.x86_64.rpm                                                                              |  66 kB  00:00:00
-------------------------------------------------------------------------------------------------------------------------------------------------
Total                                                                                                            1.3 MB/s | 615 kB  00:00:00
Running transaction check
Running transaction test
Transaction test succeeded
Running transaction
  Installing : autogen-libopts-5.18-5.el7.x86_64                                                                                             1/2
  Installing : ntp-4.2.6p5-29.el7.centos.2.x86_64                                                                                            2/2
  Verifying  : autogen-libopts-5.18-5.el7.x86_64                                                                                             1/2
  Verifying  : ntp-4.2.6p5-29.el7.centos.2.x86_64                                                                                            2/2

Installed:
  ntp.x86_64 0:4.2.6p5-29.el7.centos.2

Dependency Installed:
  autogen-libopts.x86_64 0:5.18-5.el7

Complete!
安装完成,接下来我们看一下程序生成了哪些文件:
[root@192 ~]# rpm -ql ntp
/etc/dhcp/dhclient.d
/etc/dhcp/dhclient.d/ntp.sh
/etc/ntp.conf
/etc/ntp/crypto
/etc/ntp/crypto/pw
/etc/sysconfig/ntpd
/usr/bin/ntpstat
/usr/lib/systemd/ntp-units.d/60-ntpd.list
/usr/lib/systemd/system/ntpd.service
/usr/sbin/ntp-keygen
/usr/sbin/ntpd
/usr/sbin/ntpdc
/usr/sbin/ntpq
/usr/sbin/ntptime
/usr/sbin/tickadj
/usr/share/doc/ntp-4.2.6p5
/usr/share/doc/ntp-4.2.6p5/COPYRIGHT
/usr/share/doc/ntp-4.2.6p5/ChangeLog
/usr/share/doc/ntp-4.2.6p5/NEWS
/usr/share/man/man1/ntpstat.1.gz
/usr/share/man/man5/ntp.conf.5.gz
/usr/share/man/man5/ntp_acc.5.gz
/usr/share/man/man5/ntp_auth.5.gz
/usr/share/man/man5/ntp_clock.5.gz
/usr/share/man/man5/ntp_decode.5.gz
/usr/share/man/man5/ntp_misc.5.gz
/usr/share/man/man5/ntp_mon.5.gz
/usr/share/man/man8/ntp-keygen.8.gz
/usr/share/man/man8/ntpd.8.gz
/usr/share/man/man8/ntpdc.8.gz
/usr/share/man/man8/ntpq.8.gz
/usr/share/man/man8/ntptime.8.gz
/usr/share/man/man8/tickadj.8.gz
/var/lib/ntp
/var/lib/ntp/drift
/var/log/ntpstats
配置文件的路径为/etc/ntp.conf这个文件;
我们打开看一下具体内容:
# For more information about this file, see the man pages
# ntp.conf(5), ntp_acc(5), ntp_auth(5), ntp_clock(5), ntp_misc(5), ntp_mon(5).

driftfile /var/lib/ntp/drift

# Permit time synchronization with our time source, but do not
# permit the source to query or modify the service on this system.
restrict default nomodify notrap nopeer noquery

# Permit all access over the loopback interface.  This could
# be tightened as well, but to do so would effect some of
# the administrative functions.
restrict 127.0.0.1 #这里表示接收哪些主机地址发来的同步请求
restrict ::1

# Hosts on local network are less restricted.
#restrict 192.168.1.0 mask 255.255.255.0 nomodify notrap

# Use public servers from the pool.ntp.org project.
# Please consider joining the pool (http://www.pool.ntp.org/join.html).
server 0.centos.pool.ntp.org iburst  #这里表示的是本机与哪些时间服务器进行同步
server 1.centos.pool.ntp.org iburst
server 2.centos.pool.ntp.org iburst
server 3.centos.pool.ntp.org iburst

# For more information about this file, see the man pages
# ntp.conf(5), ntp_acc(5), ntp_auth(5), ntp_clock(5), ntp_misc(5), ntp_mon(5).

driftfile /var/lib/ntp/drift

# Permit time synchronization with our time source, but do not
# permit the source to query or modify the service on this system.
restrict default nomodify notrap nopeer noquery

# Permit all access over the loopback interface.  This could
# be tightened as well, but to do so would effect some of
# the administrative functions.
restrict 127.0.0.1
restrict ::1

# Hosts on local network are less restricted.
#restrict 192.168.1.0 mask 255.255.255.0 nomodify notrap

# Use public servers from the pool.ntp.org project.
# Please consider joining the pool (http://www.pool.ntp.org/join.html).
server 0.centos.pool.ntp.org iburst
server 1.centos.pool.ntp.org iburst
server 2.centos.pool.ntp.org iburst
server 3.centos.pool.ntp.org iburst

#broadcast 192.168.1.255 autokey        # broadcast server
#broadcastclient                        # broadcast client
#broadcast 224.0.1.1 autokey            # multicast server
#multicastclient 224.0.1.1              # multicast client
#manycastserver 239.255.254.254         # manycast server
#manycastclient 239.255.254.254 autokey # manycast client

# Enable public key cryptography.
配置很简单,客户端按照这样配置就可以了,如果想作为时钟服务端只需要在允许的地址中加入你的客户端地址就可以了;
再看一张图片:

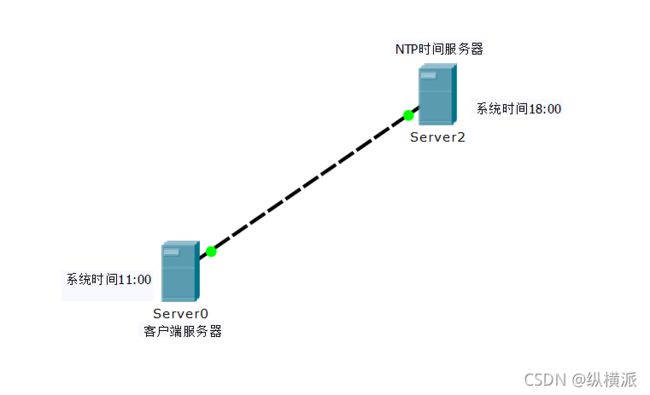
从此图上看,我们看到客户端的时间比时间服务器的时间慢了5个小时,所以客户端要讲自己的时间修改为18:00才可以,但是这里要注意:客户端在修改时在自己的系统中不是直接从11:00跳过5个小时直接到18:00,中间慢的这个时间过程需要在系统有时间经过的记录,而不是直接跳过这个5个小时,简单说就是慢的这个时间的过程也需要在主机的脑海中有记录,不能是空缺的,这里的说明可能难难理解。
我举个例子:
在生活中我们带的手表如果慢了,这里只拿指针表说明,我们是拧转表盘旁边的的圆形钮,这是随着我们的拧转,表面的指针也是一圈一圈的转动的,转动的时候也有时间的轨迹,而不是一下跳到另外一边的,就是想表达这个意思;

回到刚刚的话题,客户端比时间服务器时间慢了5个小时,因为不能直接跳过这5个小时,(你肯定想为什么不能?我理解的是因为跳过了会导致客户端的某些文件缺少时间轨迹出现异常),所以客户端只能将自己的时间加速运行,尽快追上时间服务器的时间,打个比方,“”比如将自己改为10秒就是1分钟“”,这样自己的时间就会快很多,但是这里是差5个小时,如果差了更多的时间,即便加快了自己的时间,也会很久才能追上服务器的时间;所以有时候传统的NTP服务可能需要几小时甚至几天才能完成时间同步,这个问题在生产环境中肯定是不行的;
所以就为了解决这个问题,在CentOS7以后就出现了Chrony,这个程序完美解决了同步慢的问题,只需要几毫秒或几秒钟就可以达到同步,而且也不会造成主机上时间轨迹的缺失;

“chrony有两个程序:chronyd是一个守护进程,可以在启动时启动,而chronyc是一个命令行界面程序,可以用来监控chronyd的性能,并改变各种运行参数。”
chrony服务是兼容ntp服务的,它监听在“323”和“123”端口上,'123’端口就是ntp服务的,而’323’端口既是chrony自己的端口号;所以在客户端主机上启用ntp或者chrony都可以,只要指向安装了chrony的服务端就可以;
下面我们看一下chrony程序并且安装一下:
[root@192 ~]# yum info chrony
Loaded plugins: fastestmirror, langpacks
Loading mirror speeds from cached hostfile
 * base: mirrors.huaweicloud.com
 * extras: mirrors.huaweicloud.com
 * updates: mirrors.163.com
Installed Packages
Name        : chrony
Arch        : x86_64
Version     : 3.4
Release     : 1.el7
Size        : 491 k
Repo        : installed
From repo   : anaconda
Summary     : An NTP client/server
URL         : https://chrony.tuxfamily.org
License     : GPLv2
Description : A client/server for the Network Time Protocol, this program keeps your
            : computer's clock accurate. It was specially designed to support
            : systems with intermittent internet connections, but it also works well
            : in permanently connected environments. It can use also hardware reference
            : clocks, system real-time clock or manual input as time references.
看一下安装了哪些文件:
[root@192 ~]# rpm -ql chrony
/etc/NetworkManager/dispatcher.d/20-chrony
/etc/chrony.conf
/etc/chrony.keys
/etc/dhcp/dhclient.d/chrony.sh
/etc/logrotate.d/chrony
/etc/sysconfig/chronyd
/usr/bin/chronyc
/usr/lib/systemd/ntp-units.d/50-chronyd.list
/usr/lib/systemd/system/[email protected]
/usr/lib/systemd/system/[email protected]
/usr/lib/systemd/system/chrony-wait.service
/usr/lib/systemd/system/chronyd.service
/usr/libexec/chrony-helper
/usr/sbin/chronyd
/usr/share/doc/chrony-3.4
/usr/share/doc/chrony-3.4/COPYING
/usr/share/doc/chrony-3.4/FAQ
/usr/share/doc/chrony-3.4/NEWS
/usr/share/doc/chrony-3.4/README
/usr/share/man/man1/chronyc.1.gz
/usr/share/man/man5/chrony.conf.5.gz
/usr/share/man/man8/chronyd.8.gz
/var/lib/chrony
/var/lib/chrony/drift
/var/lib/chrony/rtc
/var/log/chrony
主配置文件:
/etc/chrony.conf
查看一下:
# Use public servers from the pool.ntp.org project.
# Please consider joining the pool (http://www.pool.ntp.org/join.html).
server 0.centos.pool.ntp.org iburst
server 1.centos.pool.ntp.org iburst    #这里依然是配置本机向哪些服务器获取时间
server 2.centos.pool.ntp.org iburst
server 3.centos.pool.ntp.org iburst

# Record the rate at which the system clock gains/losses time.
driftfile /var/lib/chrony/drift

# Allow the system clock to be stepped in the first three updates
# if its offset is larger than 1 second.
makestep 1.0 3

# Enable kernel synchronization of the real-time clock (RTC).
rtcsync

# Enable hardware timestamping on all interfaces that support it.
#hwtimestamp *

# Increase the minimum number of selectable sources required to adjust
# the system clock.
#minsources 2

# Allow NTP client access from local network.
#allow 192.168.0.0/16      #这里是允许哪些地址或网段的主机可以向本机获取时间同步;

# Serve time even if not synchronized to a time source.
#local stratum 10

# Specify file containing keys for NTP authentication.
#keyfile /etc/chrony.keys
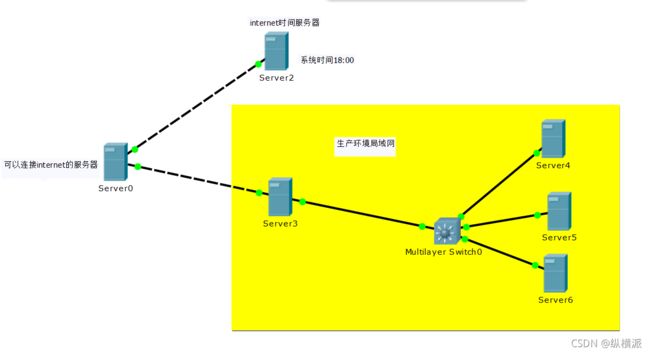
生产环境中,我们一个局域网络中可能有多台主机不能够连接至internet中,所以我们在局域网中找一台可以连接外网的主机当做时间服务器,
看一张简单拓扑:

此时server4,server5,server6与server3处在同一个局域网络中,server3可以连接server0,server0和server3都是时间服务器,所以server3是server0的客户端,server4-6这三台是server3的客户端,假设server3发生故障,导致server3无法连接server0了,那么持续一段时间后,server3的时间就会出现误差,chrony程序判断主机无法连接配置文件中定义的自己的时间服务器时,就会拒绝其他客户端向自己同步时间请求,因为程序自己的时间是错的,所以会拒绝server4-6这三台的同步请求,如果server4-6还配置了除server3之外的其他时间服务器,那么这三台就可以去找其他正确的服务器获取时间同步;
如果server3无法获取正确时间,仍然需要同步给自己的客户端,可以在配置文件中将此项开启:
# Serve time even if not synchronized to a time source.
#local stratum 10
下面我们演示一下:

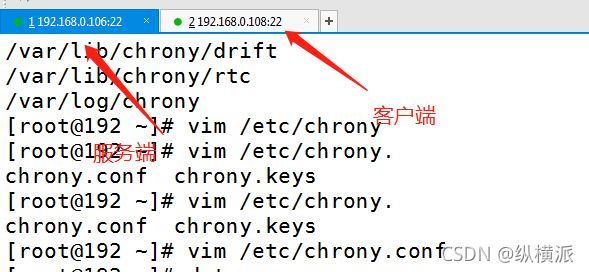
准备两台虚拟机:
时间服务器:192.168.0.106,安装了chrony服务
客户端服务器:192.168.0.108,安装了ntp服务
192.168.0.106上操作
vim /etc/chrony.conf 修改配置文件
# Allow NTP client access from local network.
allow 192.168.0.0/24   #在这里允许192.168.0.0网段访问自己
# Serve time even if not synchronized to a time source.
#local stratum 10
启动服务器chrony服务
[root@192 ~]# systemctl start chronyd.service
[root@192 ~]# systemctl status chronyd.service
● chronyd.service - NTP client/server
   Loaded: loaded (/usr/lib/systemd/system/chronyd.service; disabled; vendor preset: enabled)
   Active: active (running) since Fri 2021-10-01 00:52:43 CST; 8s ago
     Docs: man:chronyd(8)
           man:chrony.conf(5)
  Process: 3123 ExecStartPost=/usr/libexec/chrony-helper update-daemon (code=exited, status=0/SUCCESS)
  Process: 3119 ExecStart=/usr/sbin/chronyd $OPTIONS (code=exited, status=0/SUCCESS)
 Main PID: 3121 (chronyd)
   CGroup: /system.slice/chronyd.service
           └─3121 /usr/sbin/chronyd

Oct 01 00:52:43 192.168.0.106 systemd[1]: Starting NTP client/server...
Oct 01 00:52:43 192.168.0.106 chronyd[3121]: chronyd version 3.4 starting (+CMDMON +NTP +REFCLOCK +RTC +PRIVDROP +SCFILTER +SIGND +ASYN...+DEBUG)
Oct 01 00:52:43 192.168.0.106 systemd[1]: Started NTP client/server.
Oct 01 00:52:51 192.168.0.106 chronyd[3121]: Selected source 116.203.151.74
Hint: Some lines were ellipsized, use -l to show in full.
[root@192 ~]# systemctl enable chronyd #开机自启动
客户端在ntp配置文件中将时间服务器指向192.168.0.106
[root@192 yum.repos.d]# vim /etc/ntp.conf
# Use public servers from the pool.ntp.org project.
# Please consider joining the pool (http://www.pool.ntp.org/join.html).
#server 0.centos.pool.ntp.org iburst
#server 1.centos.pool.ntp.org iburst
#server 2.centos.pool.ntp.org iburst
#server 3.centos.pool.ntp.org iburst
server 192.168.0.106 iburst
#broadcast 192.168.1.255 autokey        # broadcast server
#broadcastclient                        # broadcast client
#broadcast 224.0.1.1 autokey            # multicast server
#multicastclient 224.0.1.1              # multicast client
#manycastserver 239.255.254.254         # manycast server
#manycastclient 239.255.254.254 autokey # manycast client
server 192.168.0.106 iburst 是标准格式
启动服务 service ntpd start  #我这台是centOS6


[root@192 ~]# ntpq -p
     remote           refid      st t when poll reach   delay   offset  jitter
==============================================================================
 192.168.0.106   .INIT.          16 u    -  512    0    0.000    0.000   0.000
客户端安装chrony也可以
[root@192 yum.repos.d]# yum install chrony
[root@192 yum.repos.d]# vim /etc/chrony.conf
# Use public servers from the pool.ntp.org project.
# Please consider joining the pool (http://www.pool.ntp.org/join.html).
#server 0.rhel.pool.ntp.org iburst
#server 1.rhel.pool.ntp.org iburst
#server 2.rhel.pool.ntp.org iburst
#server 3.rhel.pool.ntp.org iburst
server 192.168.0.108 ibutst
chronyc> sources
210 Number of sources = 1
MS Name/IP address         Stratum Poll Reach LastRx Last sample
===============================================================================
^? 192.168.0.108                 0   7     0   10y     +0ns[   +0ns] +/-    0ns
#?表示未同步 * 表示同步
[root@192 yum.repos.d]# chronyc tracking

[root@192 yum.repos.d]# chronyc sources
210 Number of sources = 1
MS Name/IP address         Stratum Poll Reach LastRx Last sample
===============================================================================
^* 192.168.0.108                 3   6    77    59    -44us[  -78us] +/-   29ms
