什么是fixture
根据pytest官方文档的说明,fixture可以简单的归纳为具有以下功能的函数:
- 配置测试前系统的初始状态;
- 定义传入测试中的数据集;
- 为批量测试提供数据源等
与xUnit风格的setup和teardown的对比
fixture的功能与setup和teardown类似,可以实现setup和teardown的功能,但是对这些功能进行了明显的改进,主要有以下方面:
- 调用灵活。可以在测试函数、模块、类或整个项目中声明fixture的名称来进行调用;
- 使用灵活。fixture即适用于简单的单元测试又适用于复杂的功能测试。根据测试的需求可对fixture进行参数化使用,并且可对fixture进行重复使用。
- fixture是以模块化方式实现的,因此允许fixture调用其他fixture函数;
- teardown的实现逻辑更加清晰明了,并且方便进行管理。
fixture运行报错后,pytest的处理方式
通过上面的说明,我们可以知道fixture函数本身是允许调用其他fixture函数的。在这种情况下,测试运行的时候,其中一个fixture函数报错了,pytest的会如何处理呢?
通过pytest官方文档的说明,我们可以知道:
- pytest以线性的方式顺序执行测试用例所调用的fixture函数;
- 当顺序较前的fixture函数执行报错后,pytest会停止执行该测试所调用的其他fixture,并且将测试标记出错;
- 测试标记错误,并不意味着测试未通过,只能说明测试无法尝试执行下去,因此我们需要尽可能的去为测试函数减少必要的依赖关系。
示例1:
1.在以下demo代码中,order()返回类型存在问题,正确的应该返回一个list,我们给其返回一个None:
import pytest
@pytest.fixture
def order():
    return None  #正确应该返回[],我们给返回一个None
@pytest.fixture
def append_first(order):
    order.append(1)
@pytest.fixture
def append_second(order, append_first):
    order.extend([2])
@pytest.fixture(autouse=True)
def append_third(order, append_second):
    order += [3]
def test_order(order):
    assert order == [1, 2,3]
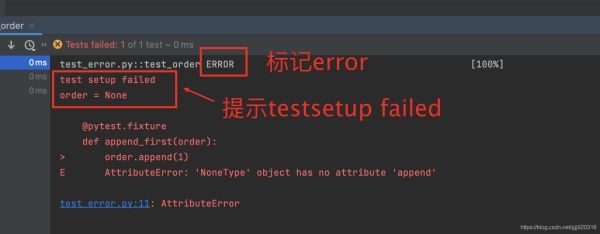
运行后结果如下:
test_order被标记Error,并且信息提示:test setup failed,说明是调用的fixture函数存在问题,且说明了错误原因。
2.如果是test_order运行未通,运行信息会怎么样提醒呢?我们按照以下demo修改测试代码,修改test_order的断言语句:
import pytest
@pytest.fixture
def order():
    return []   #返回一个list
@pytest.fixture
def append_first(order):
    order.append(1)
@pytest.fixture
def append_second(order, append_first):
    order.extend([2])
@pytest.fixture(autouse=True)
def append_third(order, append_second):
    order += [3]
def test_order(order):
    assert order == [1, 2]  #断言失败,正确应该是 order==[1,2,3]
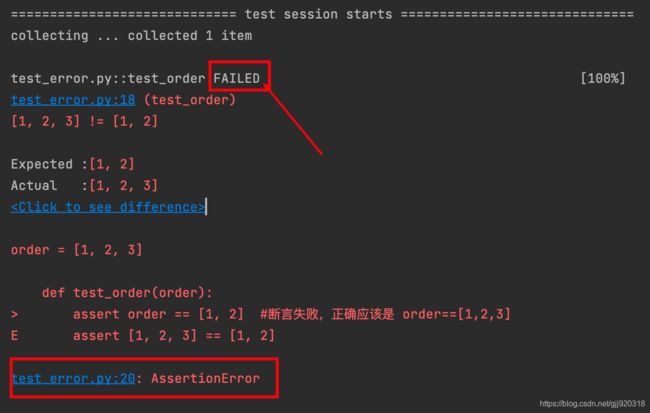
运行结果如下:
test_order被标记failed,且提醒是AssertionError,断言出错。这说明是test_order 本身运行未通过。
2.fixture API @pytest.fixture()说明
pytest使用@pytest.fixture()来声明fixture方法。具体如何使用,我会在文章后面进行详细说明。在此,主要来简单说明一下fixture()。
def fixture(
    fixture_function: Optional[_FixtureFunction] = None,
    *,
    scope: "Union[_Scope, Callable[[str, Config], _Scope]]" = "function",
    params: Optional[Iterable[object]] = None,
    autouse: bool = False,
    ids: Optional[
        Union[
            Iterable[Union[None, str, float, int, bool]],
            Callable[[Any], Optional[object]],
        ]
    ] = None,
    name: Optional[str] = None,
) -> Union[FixtureFunctionMarker, _FixtureFunction]:
参数说明:
2.1 scope
fixture函数的作用域。作用域从小到大依次为:function(默认)、class、module、package、session。
还可传入一个可调用对象,以实现动态修改fixture的作用域。
后面会单独写一篇文章,为大家详细介绍fixture的scope。
2.2 params
传入测试数据集,动态生成测试用例,每一条数据都单独生成一条测试用例。通过request.param,可以获取传入的这些数据。
后面会单独写一篇文章,为大家详细介绍fixture的参数化。
2.3 autouse
fixture自动应用标识。
如果是True,则在同作用域下的测试函数,会自动调用该fixture;如果是False,则测试函数需要主动去调用该fixture。
后面会在介绍fixture调用方法的文章给大家详细说明。
2.4 ids
测试用例ID标识,与parmas传入的参数一一对应。当未定义时,会自动生成id。
示例2:
1.传入ids参数,运行以下demo:
import pytest
@pytest.fixture(params=[1,2,3],ids=['A','B','C'])
def ids(request):
    data=request.param
    print(f'获取测试数据{data}')
    return data
def test_ids(ids):
    print(ids)
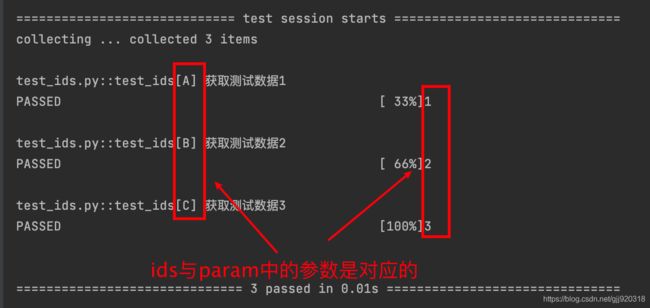
运行结果:
在执行信息中,我们可以发现ids的三个参数和params的三个参数一一对应显示,并且ids的参数作为测试用例id的一部分呈现出来。
2. 修改上面demo中的代码,不传入ids参数,运行一下:
import pytest
@pytest.fixture(params=[1,2,3]) #未传入ids
def ids(request):
    data=request.param
    print(f'获取测试数据{data}')
    return data
def test_ids(ids):
    print(ids)
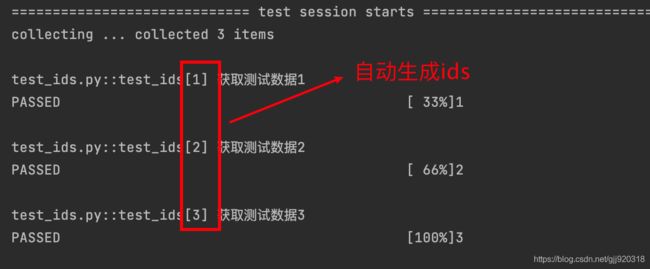
运行结果:
查看运行结果我们可以发现,虽然没有传入ids,但是却自动生成了ids。
测试结束后,我们常常以测试报告的形式来汇报测试结果,如结合allure呈现测试结果。通过ids传入的参数可以对测试用例进行说明,这样更方便我们查看测试结果。
2.5 name
fixture的别名。fixture的name默认是@pytest.fixture所装饰的函数的函数名。使用fixture的别名可以提高代码的阅读性。
示例3:
以下面的demo为例:
import pytest
@pytest.fixture()
def login():
    print('login')
class SubClass:
    def sub_login(self):
        print('subcalss_login')
class TestCase:
    def test_case1(self,login):  #调用fixture——login
        login=SubClass()  #定义一个login并实例化SubClass
        login.sub_login() #调用SubClass中的sub_login()
        print('这是testcase1')
我们定义了一个fixture函数——login(),同时在test_case1中实例化了一个Subclass类,并起名为login,然后调用了SubClass类中的sub_login()。如果代码复杂的情况,很容易将fixture函数的login与SubClass实例的login弄混淆,增加代码的阅读的复杂度。
当我们使用fixture别名的话,在阅读代码的时候就很容易进行区分。
@pytest.fixture(name='module_login')
def login():
    print('login')
class TestCase:
    def test_case1(self,module_login):  #使用fixture别名:module_login
        login=SubClass()  #定义一个login并实例化SubClass
        login.sub_login() #调用SubClass中的sub_login()
        print('这是testcase1')
注意:
当使用name参数后,则无法再通过@pytest.fixture所装饰的函数的函数名来进行调用,必须使用name所指定fixture别名来调用。
2.6 fixture_function
目前pytest官方文档未给出具体说明。
文末说明:
以上内容是我在阅读pytest官方文档后,依照个人理解进行整理。内容可能会有理解错误之处,欢迎大家留言指正。谢谢!
更多关于自动化测试pytest中fixtureAPI的资料请关注脚本之家其它相关文章!


