nuScenes 数据集
nuScenes数据集
- 1. nuScenes 简要介绍
-
- 1.1 A look at the dataset
-
- 1.1.0 标注之间的关系
- 1.1.1 scene
- 1.1.2 sample
- 1.1.3 sample_data
- 1.1.4 sample_annotation
- 1.1.5 instance
- 1.1.6 category
- 1.1.7 attribute
- 1.1.8 visibility
- 1.1.9 sensor
- 1.1.10 calibrated_sensor
- 1.1.11 ego_pose
- 1.1.12 log
- 1.1.13 map
- 2. nuScenes Basics
-
- 2.1 获取instance的所有sample_annotations
- 2.2 可视化
-
- 2.2.1 list methods
- 2.2.2 渲染
-
- ①`render_pointcloud_in_image()`
- ②`render_sample()`和`render_sample_data()`
- ③多帧聚合渲染点云数据
- ④`render_annotation()`
- ⑤渲染场景
- 3. 坐标变化相关
1. nuScenes 简要介绍
nuScenes官方的介绍链接:NuScenes
nuScenes是第一个提供 自动汽车 全套传感器数据的大型数据集,包括了6个相机、1个激光雷达、5个毫米波雷达、以及GPS和IMU。与kitti数据集相比,其包含的对象注释多了7倍多。
1.1 A look at the dataset
nuScenes数据集主要包含以下13个基本块:
为了观察这些基本块,可以在google colab或本地编译环境中下载v1.0-mini数据集(微型的nuScenes数据集),并安装nusecnes-devkit(nuscenes的库)。
# google colab
#!mkdir -p /data/sets/nuscenes  # Make the directory to store the nuScenes dataset in.
!mkdir -p data/sets/nuscenes # 最近发现上面那句命令无法成功创建文件夹,把前面的斜杠删掉就ok了

!wget https://www.nuscenes.org/data/v1.0-mini.tgz  # Download the nuScenes mini split.

#!tar -xf v1.0-mini.tgz -C /data/sets/nuscenes  # Uncompress the nuScenes mini split.
!tar -xf v1.0-mini.tgz -C data/sets/nuscenes  # 同上

!pip install nuscenes-devkit &> /dev/null  # Install nuScenes.
上述命令运行完成后会生成如下结构的文件夹:
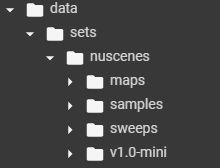
①samples:对keyframes(关键帧)的,各种sensor的数据,包括了相机、毫米波雷达和激光雷达。如下图。

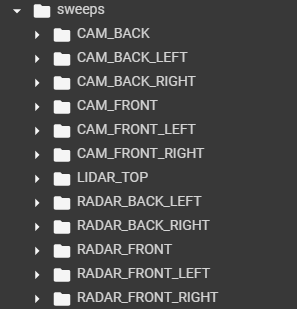
②sweeps:官方描述说是intermediate frames(过渡帧或中间帧)的sensor data。(待解决)应该是那些不是特别重要的帧吧。里面结构如下:
③maps:存放着所有的map files,包括栅格化后的png图片和向量化后的json文件。(也不太懂,待解决)
④v1.0-*:存放着所有meta data和annotations的JSON table。

接下来就需要初始化,以便调用nuscenes-devkit的方法:
%matplotlib inline # 这是在colab内绘图需要的,将matplotlib内嵌。在本地运行的话就正常导入即可
from nuscenes.nuscenes import NuScenes

nusc = NuScenes(version='v1.0-mini', dataroot='/data/sets/nuscenes', verbose=True)
# NuScenes()方法
运行后,有以下输出:

如输出所示,该数据集(这么少内容是因为这是mini版本的,正常版本就很多东西)里共有23个类别的物体,8种属性,911个instance,等等。
1.1.0 标注之间的关系
最近在看代码的时候发现从nuscenes数据集中加载数据的时候因为太多信息了,读着读着自己都懵了。所以,增加这一节,简单陈述一些以下某些重要blocks之间的关系。我想带着这些关系去读会比较形象。
①scenes可以说是数据集的标注基础,所有的标注都是基于某个scene的,但是对于深度学习训练,这个东西用不到,不用特别在意。
②scene和sample:sample是存在于scene里的,关系就是一个scene里有很多的samples。而sample其实就是某个时间点的scene。这么说吧,车会在一个scene中持续走一段时间然后获取数据,而在这一段时间内,会每隔0.5秒对此时的scene进行标注,此时的这个scene就叫sample。而深度学习训练就是用sample里面的数据。
③sample和sample_data以及sample_annotation:从上我们已经知道sample其实就是某个时间点的scene,那么可以知道sample里面肯定包含很多目标,这些目标就是sample_annotation。车的传感器一直都是运作的,而这个时间点的传感器获取的数据就是sample_data。
这个数据集很大,数据也相当的多,但是官方已经提供了丰富的接口给我们使用,而且谨记token是唯一标识的,想要取什么数据只要知道数据属于什么信息,然后用相应的接口去获取就可以。当然,刚开始接触的时候会非常痛苦,觉得好麻烦啊。但是做事情哪有简单的,慢慢熟悉就可以了。以下内容当然不可能覆盖的很全面,而且可能还欠缺点逻辑,有什么问题都可以评论私信问,我会的都会尽量回答,然后补充。祝大家科研愉快。(2021.07.15补充)
1.1.1 scene
nuScenes是一个大型的数据库,大约有1000个带有注释样本的场景(大约每个场景20秒)。调用list_scenes()可以查看使用的nuscenes数据集中包含的场景信息。
nusc.list_scenes()
输出结果如下图。共10个场景(因为是mini版本,所以只有10个),并罗列了场景的相关信息,如id、描述、时间、持续时间、地点以及注释的数量。

scene的metadata格式如下。
scene {

   "token":                   // -- Unique record identifier.
   "name":                    // -- Short string identifier.
   "description":             // -- Longer description of the scene.
   "log_token":               // -- 外键,指向一个log,scene中的data都是从该log提取出来的.
   "nbr_samples":             // -- scene中的sample的数量.
   "first_sample_token":      // -- 外键,指向场景中第一个sample.
   "last_sample_token":       // -- 外键,指向场景中最后一个sample.
}
可以用[]索引的方式查看scene的metadata:
my_scene = nusc.scene[0]
my_scene # 这是在colab里运行的语句,如果在本地请使用print()
输出如下图。可以看到有很多"token",这些token与相关信息是一一对应,且独一无二的。

1.1.2 sample
在nuScenes数据集里,每半秒就会对scenes进行标注(2Hz)。官方对sample定义如下:an annotated keyframe of a scene at a given timestamp. 一个在给定的时间戳下,场景中被标注的关键帧。
官方对keyframe的定义如下:A keyframe is a frame where the timestamps of data from all the sensors should be very close to the timestamp of the sample it points to.
first_sample_token = my_scene['first_sample_token']
# 获取第一个sample的token,后续用此token获取first_sample的相关信息

# The rendering command below is commented out because it tends to crash in notebooks
# nusc.render_sample(first_sample_token)

# check its metadata ===========================
my_sample = nusc.get('sample', first_sample_token)
my_smaple # 同上,这是在colab运行的。本地请用print()
输出结果如下图。
可以利用list_sample()方法列出sample相关的sample_data和sample_annotation。
nusc.list_sample(my_sample['token']) # 传入的参数为sample的token(必需的)
输出结果如下图。可以看到所有与sample相关的sample_data和sample_annotation的token和其他信息。

1.1.3 sample_data
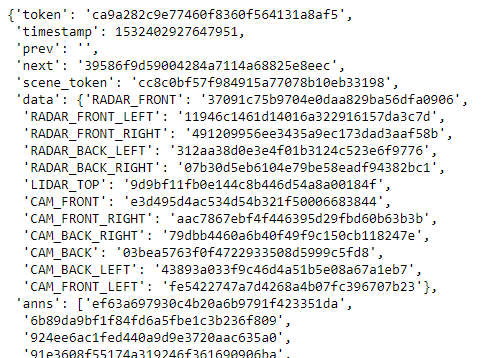
nuScenes数据集包含了来自全套传感器的数据。对于场景的每一张snapshot,都提供了获取相应传感器数据的reference。
my_sample['data'] # 就是字典索引而已
输出结果如下图。输出信息包括了各种传感器的data。

sensor data,如image, point cloud和radar。其格式如下:
sample_data {

   "token":                   // -- Unique record identifier.
   "sample_token":            // -- 外键,指向该sample_data关联的sample.
   "ego_pose_token":          // -- Foreign key.
   "calibrated_sensor_token": // -- Foreign key.
   "filename":                // -- 文件存放的相对路径.
   "fileformat":              // -- data文件的格式.
   "width":                   // -- 如果sample data是图片,则表示宽度(像素).
   "height":                  // -- 如果sample data是图片,则表示高度(像素).
   "timestamp":               // -- Unix 时间戳.
   "is_key_frame":            // -- 标识是否为keyframes的部分
   "next":                    // -- 外键,时间上,相同传感器下该sample data的下一个sample data. Empty if end of scene.
   "prev":                    // -- 外键,时间上,相同传感器下该sample data的前一个sample data. Empty if start of scene.
}
可以通过更进一步索引获取sensor信息。
sensor = 'CAM_FRONT'
cam_front_data = nusc.get('sample_data', my_sample['data'][sensor])
cam_front_data
输出结果如下图。

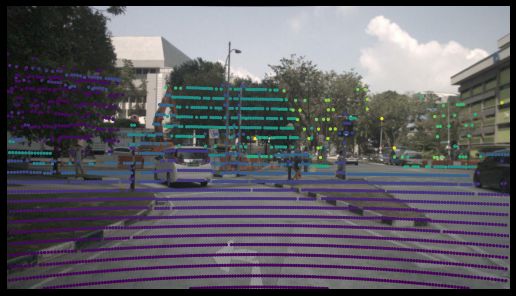
利用render_sample_data可以渲染指定的sample_data。
nusc.render_sample_data(cam_front_data['token']) # 传入参数为sample_data的token
渲染结果如下图。可以看到图片里包含了标注的信息(即框)。

1.1.4 sample_annotation
一个bounding box标识着在一个sample里可以看到的object的位置。所有的location data都是基于全局坐标系的。其metadata的格式如下:
sample_annotation {

   "token":                   // -- Unique record identifier.
   "sample_token":            // -- 外键,指向其所属的sample,而非sample_data。
   "instance_token":          // -- 外键,指向该annotation的instance. 一个instance可以有多个annotations.
   "attribute_tokens":        // [n] -- 一个list,存放着该annotation的attributes.
   "visibility_token":        // -- Foreign key. Visibility may also change over time. If no visibility is annotated, the token is an empty string.
   "translation":             // [3] -- Bounding box location in meters as center_x, center_y, center_z.
   "size":                    // [3] -- Bounding box size in meters as width, length, height.
   "rotation":                // [4] -- 旋转角?不懂咋用。Bounding box orientation as quaternion: w, x, y, z.
   "num_lidar_pts":           // -- 在box里的激光雷达点的数量。
   "num_radar_pts":           // -- 在box里的毫米波雷达点的数量。This number is summed across all radar sensors without any invalid point filtering.
   "next":                    // -- Foreign key. Sample annotation from the same object instance that follows this in time. Empty if this is the last annotation for this object.
   "prev":                    // -- Foreign key. Sample annotation from the same object instance that precedes this in time. Empty if this is the first annotation for this object.
}
同样,对sample进行字典索引可以获取sample所有annotations的数据,sample['anns']返回的是一个list,对list用[]下标索引可以获取某一个annotation。
my_annotation_token = my_sample['anns'][18] # 取某个annotation的token
my_annotation_metadata =  nusc.get('sample_annotation', my_annotation_token) # 根据token所属类别以及token,get到metadata
my_annotation_metadata # 本地请使用print()
输出结果如下图所示。

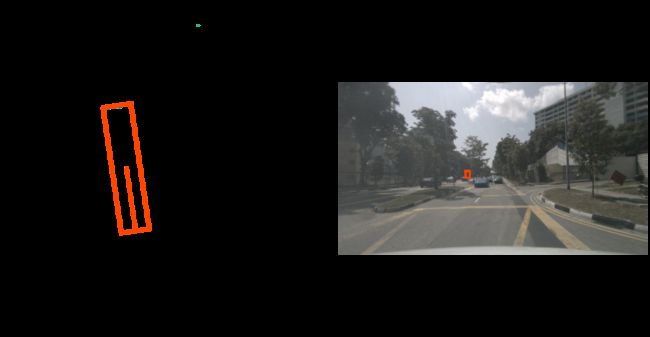
可以利用render_annotation()对annotation进行渲染。
nusc.render_annotation(my_annotation_token) # 传入参数为annotation token

1.1.5 instance
object instance是需要被检测或追踪到的instance。其metadata的格式如下:
instance {

   "token":                   // -- Unique record identifier.
   "category_token":          // -- 指向物体所属类别的token
   "nbr_annotations":         // -- 对该物体的标注的数量。
   "first_annotation_token":  // -- 对该物体的第一个annotation的token.
   "last_annotation_token":   // -- 最后一个annotation的token.
}
nusc.instance包含了该数据集中所有的instance。可以利用[]对instance进行索引。
my_instance = nusc.instance[599]
my_instance
输出结果如下图。对于instance,nuScenes数据集会追踪其在一个场景的不同帧中的出现情况,但是不会跨越scenes对同一个instance进行追踪。从输出结果可以看到,对该instance,共进行了16次annotate。

可以利用render_instance()对instance进行渲染。
instance_token = my_instance['token']
nusc.render_instance(instance_token)

可以渲染该instance的first和last annotation看一下。
print("First annotated sample of this instance:")
nusc.render_annotation(my_instance['first_annotation_token'])

print("Last annotated sample of this instance")
nusc.render_annotation(my_instance['last_annotation_token'])

1.1.6 category
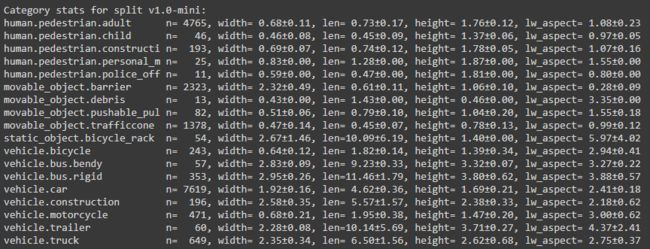
A category is the object assignment of an annotation. 注意是对annotation的分类。利用list_categories()方法可以看到使用的数据集包含的所有类别信息。
nusc.list_categories()
输出结果如下图。使用的数据集版本为v1.0-mini,共有这么多类,n代表着该数据集中该类的annotations数量,width, len, height应该是该annotation的bounding box的标准尺寸吧。
可以利用[]索引查看某个category的metadata.
nusc.category[9]
输出结果如下图所示。

1.1.7 attribute
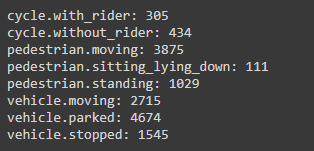
attribute是一个instance的属性。在场景的不同部分中instance的attribute可能会发生改变,但是category会保持不变。利用list_attributes()可以看到数据集中instance的属性,以及该属性下annotations的数量。
nusc.list_attributes()
输出结果如下。
可以通过以下代码查看到子啊同一个场景中attribute的变化。
my_instance = nusc.instance[27]
first_token = my_instance['first_annotation_token']
last_token = my_instance['last_annotation_token']
nbr_samples = my_instance['nbr_annotations']
current_token = first_token

i = 0
found_change = False
while current_token != last_token:
    current_ann = nusc.get('sample_annotation', current_token)
    current_attr = nusc.get('attribute', current_ann['attribute_tokens'][0])['name']

    if i == 0:
        pass
    elif current_attr != last_attr:
        print("Changed from `{}` to `{}` at timestamp {} out of {} annotated timestamps".format(last_attr, current_attr, i, nbr_samples))
        found_change = True

    next_token = current_ann['next']
    current_token = next_token
    last_attr = current_attr
    i += 1
输出结果如下。在总共39个标注的时间戳的第21个时间戳,attribute由pedestrian.moving 转变为 pedestrain.standing 。
![]()
1.1.8 visibility
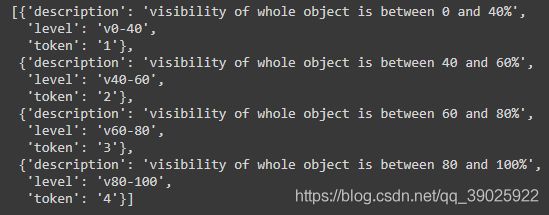
visibility用于定义某个annotation在相机拍摄的照片中的可见程度,分成四组。可用visibility查看。
nusc.visibility
信息及分组如下。
visibility 80-100%的例子:
anntoken = 'a7d0722bce164f88adf03ada491ea0ba'
visibility_token = nusc.get('sample_annotation', anntoken)['visibility_token']

print("Visibility: {}".format(nusc.get('visibility', visibility_token)))
nusc.render_annotation(anntoken)
输出结果:
![]()

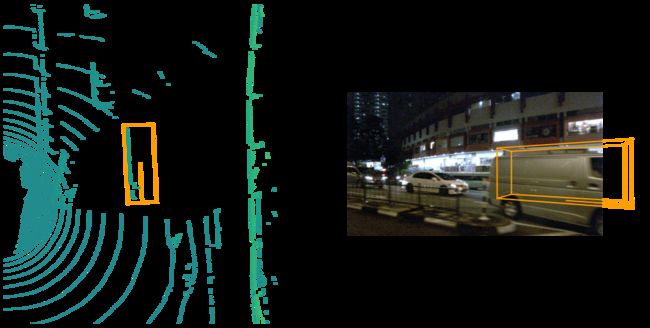
visibili 0-40%的例子:
anntoken = '9f450bf6b7454551bbbc9a4c6e74ef2e'
visibility_token = nusc.get('sample_annotation', anntoken)['visibility_token']

print("Visibility: {}".format(nusc.get('visibility', visibility_token)))
nusc.render_annotation(anntoken)
![]()
1.1.9 sensor
nuScenes数据集包含了来自全套传感器的data,传感器包括1个激光雷达,5个毫米波雷达,以及6个摄像机。可以通过sensor属性来查看相关信息。
nusc.sensor
输出结果如下。
每一个sample_data都包含了一条channel的信息,标识着该数据来自哪个传感器。
nusc.sample_data[10]

1.1.10 calibrated_sensor
calibrated_sensor定义为在特定的车辆上校准的特定传感器(激光雷达/毫米波雷达/相机),所有的外部参数均是基于车辆自身坐标系。metadata的格式如下所示。
calibrated_sensor {

   "token":                   // -- Unique record identifier.
   "sensor_token":            // -- Foreign key pointing to the sensor type.
   "translation":             // [3] -- Coordinate system origin in meters: x, y, z.
   "rotation":                // [4] -- Coordinate system orientation as quaternion: w, x, y, z.
   "camera_intrinsic":        // [3, 3] -- Intrinsic camera calibration. Empty for sensors that are not cameras.
}
translation应该是矫正后的sensor相对于车辆的xyz偏移。rotation则是一组四元数,表示sensor的旋转。
1.1.11 ego_pose
ego_pose包含了车辆自身基于全局坐标系的位置(编码在translation)和旋转信息(编码在rotation)。其metadata的格式如下。location信息在xy平面上是二维的,即只有xy坐标,z坐标始终为0.
ego_pose {

   "token":                   <str> -- Unique record identifier.
   "translation":             <float> [3] -- Coordinate system origin in meters: x, y, z. Note that z is always 0.
   "rotation":                <float> [4] -- Coordinate system orientation as quaternion: w, x, y, z.
   "timestamp":               <int> -- Unix time stamp.
}
nusc.ego_pose[0]
输出结果如下。

Note:在加载的数据集中,ego_pose的数量跟sample_data的数量是一直的,这两者是一对一对应的关系。
1.1.12 log
Information about the log from which the data was extracted. 一份log相应地记录了自主车辆沿着预计的路线进行的一次旅程。其metadata的格式如下:
log {

   "token":                   // -- Unique record identifier.
   "logfile":                 // -- Log file name.
   "vehicle":                 // -- Vehicle name.
   "date_captured":           // -- Date (YYYY-MM-DD).
   "location":                // -- Area where log was captured, e.g. singapore-onenorth.
}
可以查看加载的数据集的log的数量。利用[]索引查看某一个log的metadata。
print("Number of `logs` in our loaded database: {}".format(len(nusc.log)))
nusc.log[0]
输出结果如下。从metadata可以看到,一份log包含了数据来自于哪个map等信息。而且,一份log会包含多个不重叠的scenes。

1.1.13 map
map信息在从上到下的视图中被存储为二进制语义掩码。
print("There are {} maps masks in the loaded dataset".format(len(nusc.map)))
nusc.map[0]

2. nuScenes Basics
如第一部分介绍所示,NuScenes类有几个tables,如category,log,sample_annotataions等。每一个table都是一系列records组成的list,每一条records都是一个字典。
nusc.category[0] # 输出第一个category的metadata

cat_token = nusc.category[0]['token']
nusc.get('category', cat_token)
# 如果知道token以及其所属的类,可以利用get()方法获取其metadata
2.1 获取instance的所有sample_annotations
从instance的meatadata格式可以看到,其记录着第一个和最后一个sample_annotation的token。而从数据集的架构可以看到,每一个sample_annotation都指向一个instance,但是instance却不会指向属于其的全部sample_annotations。
可以通过以下两个方式获取instance的所有sample_annotation的token。
①利用nusc.field2token()方法:
one_instance = nusc.get('instance', nusc.sample_annotation[0]['instance_token']) # 获取某个instance的token

ann_tokens = nusc.field2token('sample_annotation', 'instance_token', one_instance['token'])

ann_tokens_field2token = set(ann_tokens)
nusc.field2token('sample_annotation', 'instance_token', one_instance['token'])该语句将返回所有满足instance_token == one_instance['token']的sample_annotations构成的list。
②遍历sample_annotation的token
ann_record = nusc.get('sample_annotation', one_instance['first_annotation_token'])

ann_tokens_traverse = set()
ann_tokens_traverse.add(ann_record['token'])
while not ann_record['next'] == "":
    ann_record = nusc.get('sample_annotation', ann_record['next'])
    ann_tokens_traverse.add(ann_record['token'])
2.2 可视化
2.2.1 list methods
NuScenes开发工具提供了三种list方法,利用list方法可以列举加载的数据集中相应的信息清单。
①list_categories,列举所有的categories,数量以及以米为单位的长宽高和比例。
②list_attributes
③list_scenes
2.2.2 渲染
①render_pointcloud_in_image()
将激光雷达点云绘制在图片上。
my_sample = nusc.sample[10]
nusc.render_pointcloud_in_image(sample_token=my_sample['token'], pointsensor_channel='LIDAR_TOP')
# 将该sample的lidar点云绘制在图片上,图片是摄像机拍摄的
可视化结果如下图。图片中的颜色代表着激光雷达点距离自主车辆的距离。
也可以将激光雷达点的反射强度体现在图片上。
nusc.render_pointcloud_in_image(my_sample['token'], pointsensor_channel='LIDAR_TOP', render_intensity=True)
输出结果如下图。在车辆前方的交通灯具有比较高的反射强度(黄色),而右边的黑色汽车的反射强度比较低(紫色)。

更换参数可以将毫米波雷达的点云也绘制在同一张图片上。
nusc.render_pointcloud_in_image(my_sample['token'], pointsensor_channel='RADAR_FRONT')
# 更换传感器为车辆前方的毫米波雷达
输出结果如下图所示。相较于激光雷达点云数据,毫米波雷达的点更少,但是它辐射的范围更广一点。

②render_sample()和render_sample_data()
之前没有仔细查看nusc工具包,最近发现render_sample()和render_sample_data()都能够接受一个参数out_path,该参数指定渲染后生成的图片保存的位置,并不需要手动修改源码,造成误导,对不住啦!!!!
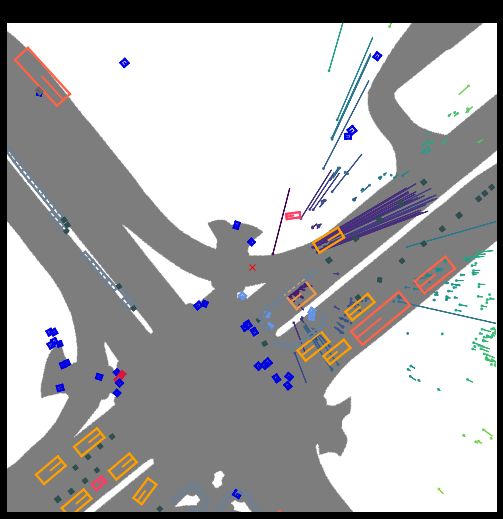
对某个sample,可以利用render_sample()将其所有的annotations全部绘制出来。
my_sample = nusc.sample[20]

# The rendering command below is commented out because it may crash in notebooks
nusc.render_sample(my_sample['token'])
输出结果如下。输出结果包含了annotations在所有传感器上的显示效果。对于毫米波雷达的信息,是经过融合后的结果。
可以指定特定的传感器。
nusc.render_sample_data(my_sample['data']['CAM_FRONT'])
③多帧聚合渲染点云数据
通过传入nsweep参数指定要聚合的帧数。
nusc.render_sample_data(my_sample['data']['LIDAR_TOP'], nsweeps=5, underlay_map=True)
nusc.render_sample_data(my_sample['data']['RADAR_FRONT'], nsweeps=5, underlay_map=True)
# 聚合帧数为5
输出结果如下。毫米波雷达图中只能看到了置信度比较高的雷达返回点。这是因为在nuscenes/utils/data_classes.py中进行了过滤的设定。


如果想要取消过滤设定,可以使用disable_filters()函数。
from nuscenes.utils.data_classes import RadarPointCloud
RadarPointCloud.disable_filters() # 取消过滤设定
nusc.render_sample_data(my_sample['data']['RADAR_FRONT'], nsweeps=5, underlay_map=True)
RadarPointCloud.default_filters() # 恢复默认过滤设定
没有过滤的渲染结果。对比上面的毫米波雷达图,可以发现下图中点云数据更多了。
④render_annotation()
nusc.render_annotation(my_sample['anns'][22])

⑤渲染场景
可以将scene渲染成video,有以下两种方法:
nusc.render_scene_channel(),该方法将按照指定channel将场景渲染成video。
my_scene_token = nusc.field2token('scene', 'name', 'scene-0061')[0] # 找到所有满足name==scene-0061的scene,并返回所有的token

# The rendering command below is commented out because it may crash in notebooks
nusc.render_scene_channel(my_scene_token, 'CAM_FRONT')
# 将前面的相机拍摄的场景渲染成video
nusc.render_scene(),利用全部channels的信息渲染成video。
# The rendering command below is commented out because it may crash in notebooks
# nusc.render_scene(my_scene_token)
⑥指定位置,在map上可视化所有场景。
nusc.render_egoposes_on_map(log_location='singapore-onenorth')
输出结果如下图。额…我也看不懂这图是什么意思。

3. 坐标变化相关
后续将从渲染的源码看下各个坐标系之间的变换关系。