python学习——matplotlib基本操作
小白自用笔记如有错误,还请指正
文章目录
-
- 【1】折线图
-
- 1.绘制sin曲线
- 2.绘制温度随时间变化图像
- 【2】绘制散点图
- 【3】绘制条形图
-
- 1.绘制正常的条形图
- 2.绘制竖着的条形图
- 3.分组条形图
- 【4】绘制直方图
-
- 1.电影时长统计
折线图:反应数据变化趋势
散点图:显示x/y之间的关系,展示离群点
条形图:统计离散性数据
直方图:统计连续性数据
【1】折线图
1.绘制sin曲线
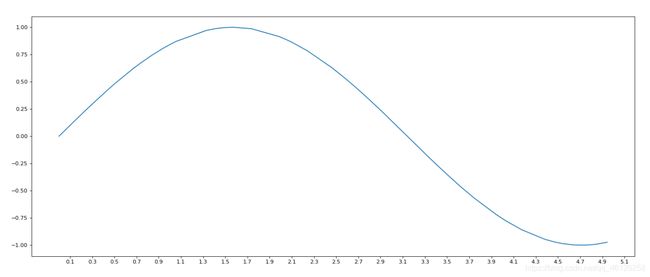
【注意】:
rng = np.random.RandomState(1)
rng.rand(80)
生成80个0-1之间的数
5 * rng.rand(80)
生成0-5之间的随机数
x = np.sort(5 * rng.rand(80))
排序后每个随机数才能作为横坐标
import matplotlib.pyplot as plt
import numpy as np


rng = np.random.RandomState(1)
x = np.sort(5 * rng.rand(80))

x_change = []
j = 0.1
for i in range(80):
    x_change.append(j)
    j += 0.1

#生成0~5之间随机的x的取值
y = np.sin(x)
plt.plot(x,y) #绘图
fig = plt.figure(figsize=(20,8),dpi=80)
#figsize=(宽,高) ,dpi像素点的大小,越大越清晰

plt.xticks(x_change[::2])
#按照x_change的列表元素显示横轴,选取的步长=2,不写步长默认为1
plt.savefig("./t.png") #保存图片
plt.show() #显示图形
一定要在plt.show()前写plt.savefig("./t.png"),否则保存的是空白,至于是为啥,还不懂
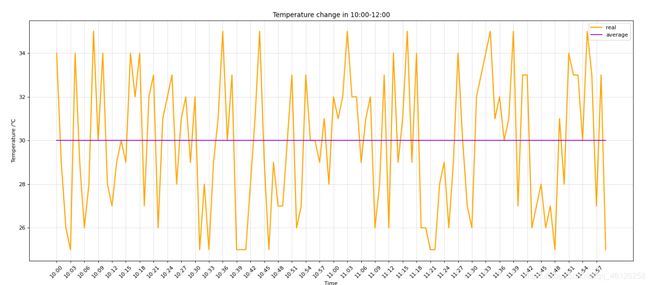
2.绘制温度随时间变化图像
import matplotlib.pyplot as plt
import random


x = range(0,120)
y = [random.randint(25,35) for i in range(120)]
y2 = []
for i in range(120):
    y2.append(30)


fig = plt.figure(figsize=(20,8),dpi=80)
plt.plot(x,y,label='real',color='orange',linewidth=2)
plt.plot(x,y2,label='average',color='#9400D3')
#绘制线条,颜色可以查找输入十六进制

#绘制字符串横坐标
_xname = ['10:0{}'.format(i) for i in range(0,10)]
_xname += ['10:{}'.format(i) for i in range(10,60)]
_xname += ['11:0{}'.format(i) for i in range(0,10)]
_xname += ['11:{}'.format(i) for i in range(10,60)]
plt.xticks(x[::3],_xname[::3],rotation = 45)
#字符串步幅和长度与原数字列表相同,rotation逆时针旋转角度

plt.xlabel('Time')
plt.ylabel('Temperature /℃')
plt.title('Temperature change in 10:00-12:00')
plt.grid(alpha=0.4)
#绘制网格 alpha越大越透明,默认为1
plt.legend()
#打印设置的lable标注
plt.show()
颜色与十六进制数字的对应点击链接
https://www.sioe.cn/yingyong/yanse-rgb-16/
除折线图以外的图的画法,参考官网
https://matplotlib.org/3.2.2/gallery/index.html
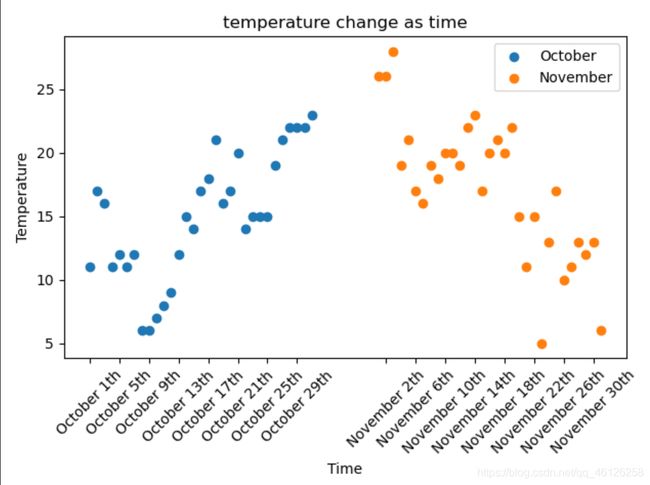
【2】绘制散点图
import matplotlib.pyplot as plt
from matplotlib import font_manager


y3 = [11,17,16,11,12,11,12,6,6,7,8,9,12,15,14,17,18,21,16,17,20,14,15,15,15,19,21,22,22,22,23]
y10 = [26,26,28,19,21,17,16,19,18,20,20,19,22,23,17,20,21,20,22,15,11,15,5,13,17,10,11,13,12,13,6]

x3 = range(1,32)
x10 = range(40,71)

x = list(x3) + list(x10)
x_name = ['October {}th'.format(i) for i in x3]
x_name += ['November {}th'.format(i-39) for i in x10]

plt.xticks(x[::4],x_name[::4],rotation=45)
plt.scatter(x3,y3,label='October')
plt.scatter(x10,y10,label='November')
plt.title('temperature change as time')
plt.xlabel('Time')
plt.ylabel('Temperature')
plt.legend()
plt.show()
【3】绘制条形图
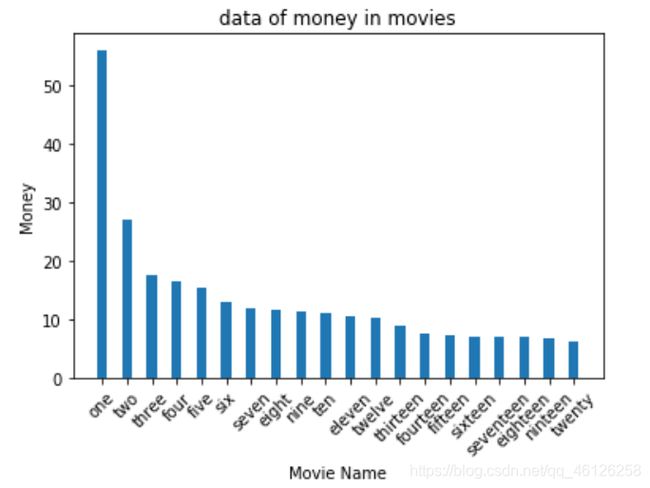
1.绘制正常的条形图
import matplotlib.pyplot as plt
from matplotlib import font_manager


x_name = [
"one","two","three","four","five","six","seven","eight"
,"nine","ten","eleven","twelve","thirteen","fourteen"
,"fifteen","sixteen","seventeen","eighteen","ninteen","twenty"
]

y =[56.01,26.94,17.53,16.49,15.45,12.96,11.8,11.61,11.28
,11.12,10.49,10.3,8.75,7.55,7.32,6.99,6.88,6.86,6.58,6.23]
x= range(len(x_name))
plt.xticks(x,x_name,rotation=45)
plt.bar(x_name,y,width=0.4)
plt.title('data of money in movies')
plt.xlabel('Movie Name')
plt.ylabel('Money')
plt.show()
2.绘制竖着的条形图
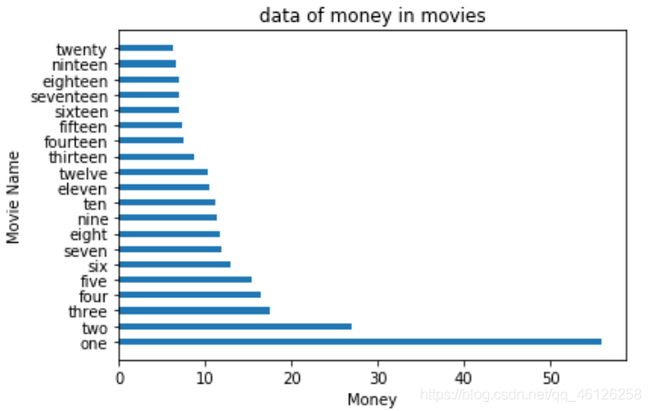
和横着的相比,使用了barh,调整粗细使用height,x、y的坐标轴和label发生变化
import matplotlib.pyplot as plt
from matplotlib import font_manager


x_name = [
"one","two","three","four","five","six","seven","eight"
,"nine","ten","eleven","twelve","thirteen","fourteen"
,"fifteen","sixteen","seventeen","eighteen","ninteen","twenty"
]

y =[56.01,26.94,17.53,16.49,15.45,12.96,11.8,11.61,11.28
,11.12,10.49,10.3,8.75,7.55,7.32,6.99,6.88,6.86,6.58,6.23]
x= range(len(x_name))
plt.yticks(x,x_name)
plt.barh(x_name,y,height=0.4)
plt.title('data of money in movies')
plt.ylabel('Movie Name')
plt.xlabel('Money')

plt.show()
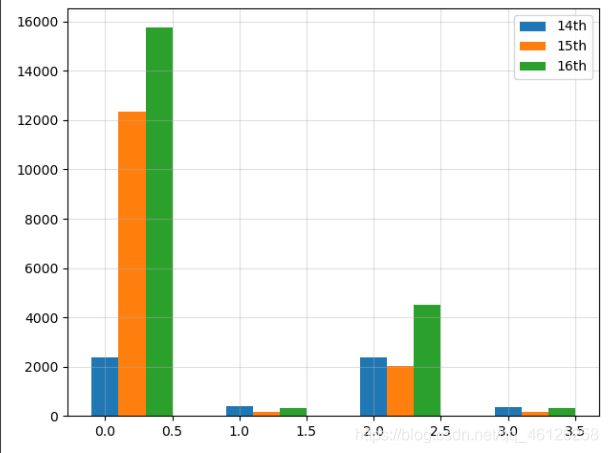
3.分组条形图
import matplotlib.pyplot as plt
from matplotlib import font_manager

bar_width = 0.2
x_name = ["one","two","three","four"]
y_16 = [15746,312,4497,319]
y_15 = [12357,156,2045,168]
y_14 = [2358,399,2358,362]

x_14 = list(range(len(x_name)))
x_15 = [i+bar_width for i in x_14]
x_16 = [i+2*bar_width for i in x_14]

plt.bar(x_14,y_14,width=bar_width,label='14th')
plt.bar(x_15,y_15,width=bar_width,label='15th')
plt.bar(x_16,y_16,width=bar_width,label='16th')

plt.legend()
plt.grid(alpha=0.4)
plt.show()
【4】绘制直方图
1.电影时长统计
将不同的电影时长做统计
import matplotlib.pyplot as plt
from matplotlib import font_manager

a=[131,  98, 125, 131, 124, 139, 131, 117, 128, 108, 135, 138
    , 131, 102, 107, 114, 119, 128, 121, 142, 127, 130, 124, 101
    , 110, 116, 117, 110, 128, 128, 115,  99, 136, 126, 134,  95
    , 138, 117, 111,78, 132, 124, 113, 150, 110, 117,  86,  95, 144
    , 105, 126, 130,126, 130, 126, 116, 123, 106, 112, 138, 123,  86
    , 101,  99, 136,123, 117, 119, 105, 137, 123, 128, 125, 104, 109
    , 134, 125, 127,105, 120, 107, 129, 116, 108, 132, 103, 136, 118
    , 102, 120, 114,105, 115, 132, 145, 119, 121, 112, 139, 125, 138
    , 109, 132, 134,156, 106, 117, 127, 144, 139, 139, 119, 140,  83
    , 110, 102,123,107, 143, 115, 136, 118, 139, 123, 112, 118, 125
    , 109, 119, 133,112, 114, 122, 109, 106, 123, 116, 131, 127, 115
    , 118, 112, 135,115, 146, 137, 116, 103, 144,  83, 123, 111, 110
    , 111, 100, 154,136, 100, 118, 119, 133, 134, 106, 129, 126, 110
    , 111, 109, 141,120, 117, 106, 149, 122, 122, 110, 118, 127, 121
    , 114, 125, 126,114, 140, 103, 130, 141, 117, 106, 114, 121, 114
    , 133, 137,  92,121, 112, 146,  97, 137, 105,  98, 117, 112,  81
    ,  97, 139, 113,134, 106, 144, 110, 137, 137, 111, 104, 117, 100
    , 111, 101, 110,105, 129, 137, 112, 120, 113, 133, 112,  83,  94
    , 146, 133, 101,131, 116, 111,  84, 137, 115, 122, 106, 144, 109
    , 123, 116, 111,111, 133, 150]
d = 3 #间隔
num_bins = (max(a)-min(a)) // d #总份数
plt.hist(a,num_bins) #根据数据和份数绘制图片
plt.xticks(range(min(a),max(a)+d,d),rotation=45)
plt.grid()
plt.show()
