你好,我是悦创。
前面我写了:
- Python 万能代码模版:爬虫代码篇:https://mp.weixin.qq.com/s/jj8srwUPF9wJOHG7YrQvcA
- Python 万能代码模版:数据可视化篇:https://mp.weixin.qq.com/s/I3vGziMTRTi7yNJAVmr8Mw
- Python 万能代码模版:自动办公,提升 X10 倍工作效率:https://mp.weixin.qq.com/s/jhSiOimrNpbhIUpNyoR6TQ
- Python 万能代码模版:批量搞图,秀翻全场(上):https://mp.weixin.qq.com/s/yYpOAt1G9CA43djTN0JOsA
文章都会在公众号首发噢:公众号:AI悦创。博客:https://www.aiyc.top/ 也会同步发送。
最近在准备拍摄编程类的短视频,所以耽搁了。接下来还是和之前一样,争取一周一篇,每一篇都对你们有所帮助。
1. 批量给照片加水印
需要首先安装 opencv、pillow:
pip3 install opencv-python
pip3 install pillow
如果手中有非常多的图片,想保护自己版权,或者申明来源,我们可以在图片上加水印。那如何用 Python 给非常多的图片批量加上文字水印呢?
还是以我们在爬虫示例的 3 小节中批量下载的图片文件夹为例。
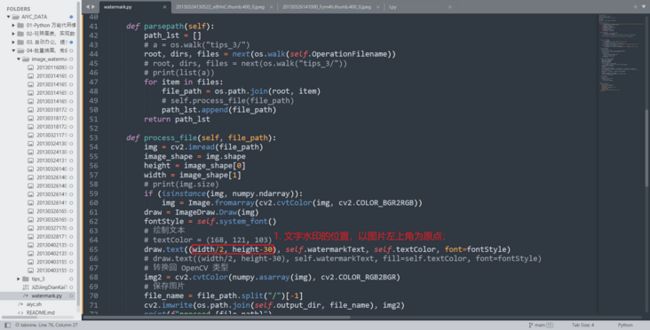
下述代码会给该文件夹下所有图片的 (width/2, height-30) 这个坐标点加上 “@黄家宝|www.aiyc.top” 这个中文加个人网址。坐标点是以图片左上角为基准的。具体的水印大小和位置可以自行调整,不过调错,有可能打不上水印噢。
# -*- coding: utf-8 -*-
# @Author: AI悦创
# @Date:   2021-10-02 10:26:52
# @Last Modified by:   aiyc
# @Last Modified time: 2021-10-04 20:15:13
import cv2
import numpy
from PIL import Image, ImageDraw, ImageFont
import os

class WaterMark(object):
    def __init__(self, OperationFilename=".", output_dir="watermark", textSize=10, watermarkText="水印", textColor="#ffffff", system=False, winfontfile=r"C:\Windows\Fonts\STZHONGS.ttf", macfontfile="/System/Library/Fonts/PingFang.ttc"):
        self.OperationFilename = OperationFilename
        self.output_dir = output_dir
        self.textSize = textSize
        self.watermarkText = watermarkText
        self.textColor = textColor
        self.system = system
        self.winfontfile = winfontfile
        self.macfontfile = macfontfile

    def mkdirs(self):
        if not os.path.exists(self.output_dir):
            os.makedirs(self.output_dir)
            print(f"文件夹 {self.output_dir} 已经自动为你创建,图片将保存到:{self.output_dir}")
        else:
            print(f"文件夹 {self.output_dir} 已经存在,图片将保存到:{self.output_dir}")


    def system_font(self):
        if not self.system:
            return ImageFont.truetype(self.textSize, encoding="utf-8")
        if self.system.upper() == "MAC":
            # FontFilePath = "/System/Library/Fonts/PingFang.ttc"
            return ImageFont.truetype(font=self.macfontfile, size=self.textSize, encoding="utf-8")
        elif self.system.upper() == "WINDOWS":
            # FontFilePath = r"C:\Windows\Fonts\STZHONGS.ttf"
            return ImageFont.truetype(font=self.winfontfile, size=self.textSize, encoding="utf-8")

    def parsepath(self):
        path_lst = []
        # a = os.walk("tips_3/")
        root, dirs, files = next(os.walk(self.OperationFilename))
        # root, dirs, files = next(os.walk("tips_3/"))
        # print(list(a))
        for item in files:
            file_path = os.path.join(root, item)
            # self.process_file(file_path)
            path_lst.append(file_path)
        return path_lst

    def process_file(self, file_path):
        img = cv2.imread(file_path)
        image_shape = img.shape
        height = image_shape[0]
        width = image_shape[1]
        # print(img.size)
        if (isinstance(img, numpy.ndarray)):
            img = Image.fromarray(cv2.cvtColor(img, cv2.COLOR_BGR2RGB))
        draw = ImageDraw.Draw(img)
        fontStyle = self.system_font()
        # 绘制文本
        # textColor = (168, 121, 103)
        draw.text((width/2, height-30), self.watermarkText, self.textColor, font=fontStyle)
        # draw.text((width/2, height-30), self.watermarkText, fill=self.textColor, font=fontStyle)
        # 转换回 OpenCV 类型
        img2 = cv2.cvtColor(numpy.asarray(img), cv2.COLOR_RGB2BGR)
        # 保存图片
        file_name = file_path.split("/")[-1]
        cv2.imwrite(os.path.join(self.output_dir, file_name), img2)
        print(f"proceed {file_path}")

    def main(self):
        self.mkdirs()
        path_lst = self.parsepath()
        # print(path_lst)
        for path in path_lst:
            self.process_file(path)


if __name__ == '__main__':
    run = WaterMark(
        OperationFilename="tips_3/",
        output_dir="image_watermark",
        textSize=10,
        watermarkText="@黄家宝|www.aiyc.top",
        textColor="gray",
        system="Windows",
        winfontfile="JiZiJingDianKaiTiJianFan-.ttf")
    run.main()
代码执行完后,可以去 image_watermark 这个文件夹中查看图片,可以看到这里的所有图片都已经被打上了文字水印。
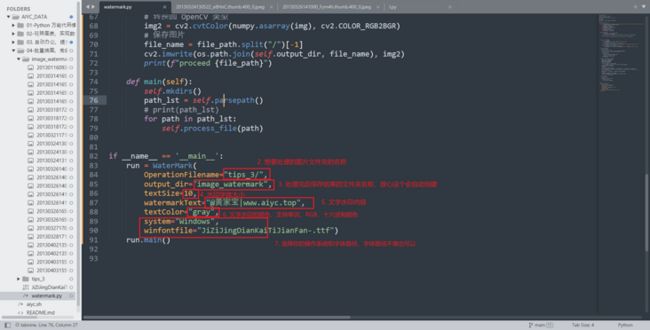
替换说明:

- 文字水印的位置,以图片左上角为原点;
- 想要处理的图片文件夹名称
- 处理完后保存结果的文件夹名称,放心这个会自动创建
- 水印字体大小
- 文字水印的内容
- 文字水印的颜色,支持颜色单词、RGB、十六进制颜色
- 选择你的操作系统和字体路径,字体路径不写也可以,添加这个接口主要是为了方便修改自己下载的字体路径。
代码连接:https://github.com/AndersonHJB/AIYC_DATA/tree/main/04-批量搞图,秀翻全场/1.%20批量给照片加水印
AI悦创·推出辅导班啦,包括「Python 语言辅导班、C++辅导班、算法/数据结构辅导班、少儿编程、pygame 游戏开发」,全部都是一对一教学:一对一辅导 + 一对一答疑 + 布置作业 + 项目实践等。QQ、微信在线,随时响应!V:Jiabcdefh
