Linux下使用GitLab的runner来自动部署Go项目
在项目开发过程中,我们经常会使用GitLab的CI/CD来自动部署项目,今天就让我们来实现一个在Linux下启用GItLab的CI/CD来实现Go项目的自动部署。
我们需要在GitLab上有一个项目,这里就不做演示了,我们直接开始先安装runners。
1 安装runners
GitLab有三种Runner,分别是:
- Shared runners are available to all groups and projects in a GitLab instance.
- Group runners are available to all projects and subgroups in a group.
- Specific runners are associated with specific projects. Typically, specific runners are used for one project at a time.
理解来说的话,就是:
- Shared runners是所有组和项目都可以使用共享流道,管理员来操作,通常只用在小团队中,GitLab中,默认是没有的。
- Group runners比较常用,可以支持团队内多个项目共享。 可复用的Runner,可以同时支持一类项目的CI,提高资源复用率。
- Specific runners则是与特定的项目关联,不能共享。 而且,对个人项目来说,没有Group这一层,使用Specific runners是比较合适的。
Runner是由运行在服务器上的守护进程来管理,一个守护进程可以管理多个runner,多个runner之间是根据token和url,注册到指定的GitLab上。
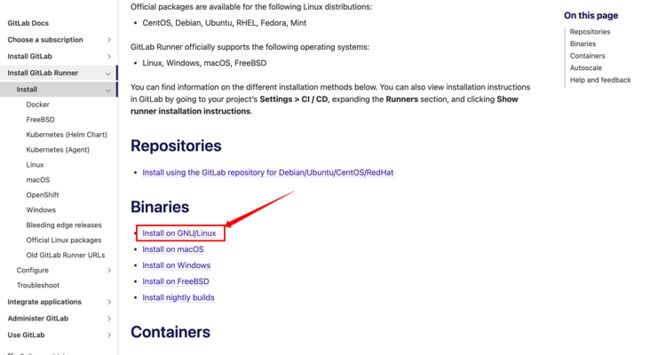
下面的教程也是基于Specific runners来做演示,首先我们先下载GitLab的runner,我们先进入GitLab的runner下载页面:https://docs.gitlab.com/runne...,可以看到官方的安装教程。
我现在使用的机器是一台腾讯云的Linux服务器,因此我需要选择Install on GNU/Linux,如下图所示:
如果大家使用的是别的系统,可以选择对应的下载方式即可。
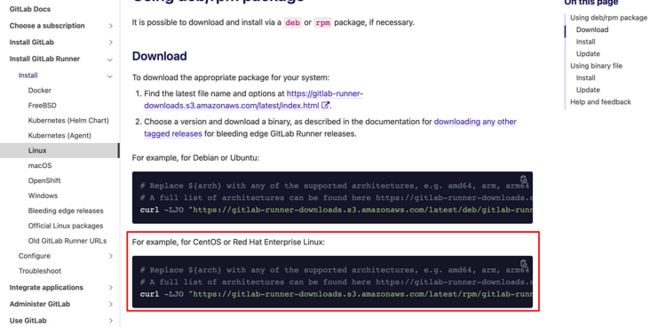
然后可以根据提示进入下载页面,也可直接看下面的例子,下载对应的安装包,演示的机器使用的是Centos,选择下面的例子即可。
这时候会发现,这个命令里有一个${arch}的参数,我们看注释:
# Replace ${arch} with any of the supported architectures, e.g. amd64, arm, arm64
# A full list of architectures can be found here https://gitlab-runner-downloads.s3.amazonaws.com/latest/index.html
curl -LJO "https://gitlab-runner-downloads.s3.amazonaws.com/latest/rpm/gitlab-runner_${arch}.rpm"
${arch}可以替换为任何支持的体系架构,也就是我们需要改成这个样子:
curl -LJO "https://gitlab-runner-downloads.s3.amazonaws.com/latest/rpm/gitlab-runner_amd64.rpm"
curl -LJO "https://gitlab-runner-downloads.s3.amazonaws.com/latest/rpm/gitlab-runner_arm64.rpm"
curl -LJO "https://gitlab-runner-downloads.s3.amazonaws.com/latest/rpm/gitlab-runner_arm.rpm"
这个也要根据自己实际的机器的情况来做选择,我当前使用的是amd64。我们也可以使用uname -m 命令来查看机器的架构,如:
我的服务器是x86架构的,用m1的Mac查询,返回如下:
然后我们也可以使用自己的电脑直接使用浏览器访问curl的地址,查看链接是否正常,能否正常下载。
测试过后,直接在服务器上的终端里使用上面列出的curl命令来下载对应的rpm包。
由于服务器上下载较慢,我直接使用浏览器下载的,截图里做个示范。
然后使用rpm命令安装即可
rpm -ivh gitlab-runner_.rpm 安装gitlab-runner需要有git的环境,如果没有需要自行安装一下,Centos可以直接使用yum安装。
安装完成后,使用命令
gitlab-runner -v查看版本,显示如下,说明安装成功。
2 在GitLab里获取token
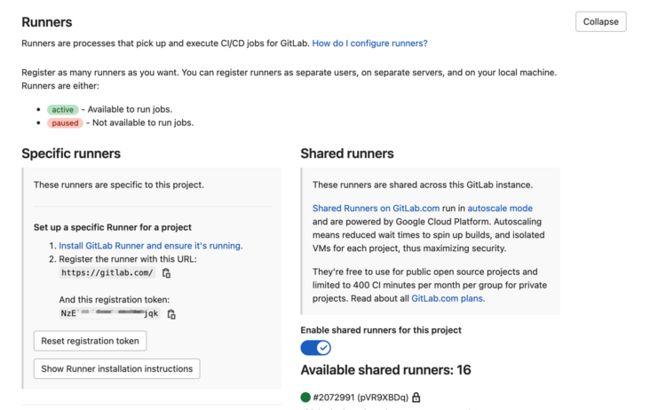
在runner安装完成之后,我们回到GitLab的项目的Settings页面,进入CI/CD后,点开Runners里的Expand按钮,如图所示: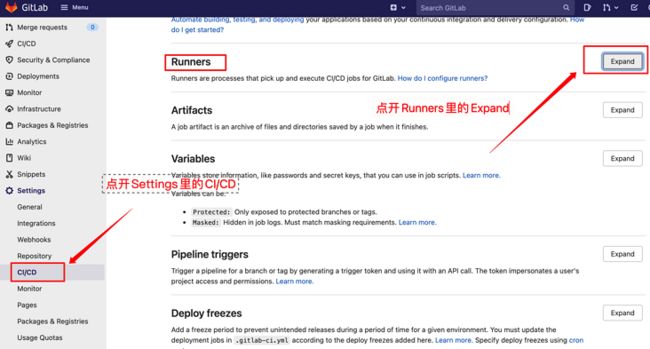
点开后会看到 Specific runners用来注册的URL和token,这个我们在注册runners的时候需要填写。
继续回到服务器里,使用gitlab-runner开始注册
[root@centos software]# gitlab-runner register
Runtime platform                                    arch=amd64 os=linux pid=2502549 revision=e0218c92 version=14.3.2
Running in system-mode.

Enter the GitLab instance URL (for example, https://gitlab.com/):
https://gitlab.com/
Enter the registration token:
NzE3jDif-xxxxxxx
Enter a description for the runner:
[centos]: runner1
Enter tags for the runner (comma-separated):

Registering runner... succeeded                     runner=NzE3jDif
Enter an executor: custom, docker, parallels, docker+machine, docker-ssh+machine, kubernetes, docker-ssh, shell, ssh, virtualbox:
shell
Runner registered successfully. Feel free to start it, but if it's running already the config should be automatically reloaded!
几个参数说明:
- GitLab instance URL:写上面截图里CI/CD里注册用的那个地址;
- token:写上面截图里CI/CD里注册用的那个token
- description:填写相关描述
- tags:选填,也可在GitLab的网页上修改,和gitlab的.gitlab-ci.yml文件里配置的tags有关;比如对一个runner设置了某个标签后,对应的Job必须要设置这个标签,才能在这个runner上执行。
- executor:直接就选shell吧,使用shell命令,简单有效。
当我们注册成功后,就可以在GitLab的界面看到这个runner。
这样,一个runner就注册成功了。
3 写.gitlab-ci.yml文件,实现自动部署
到目前为止,我们已经成功安装了runner和完成了runner的注册,接写来,模拟一个简单的.gitlab-ci.yml文件,来实现Go项目的自动部署。
在job运行时,我们重新打包的进程,需要重启,这时候我们可以考虑使用守护进程来启动项目,需要如何操作呢,首先在/etc/systemd/system目录下新建一个配置文件,
vim /etc/systemd/system/runner1.service然后粘贴如下代码
[Unit]
After=network.target
[Service]
User=root
Group=root
ExecStart=/opt/project/runner1/runner1
Type=simple
[Install]
WantedBy=multi-user.target- User和Group要填写对应的用户和组;
- ExecStart,是打包后的可执行文件的目录
.gitlab-ci.yml文件我给出了一个示例,具体的语法可以去参考GitLab的官方文档。
image: golang

stages:
  - main

main:
  stage: main
  script:
    - echo "Start to deploy!"
    - echo ${CI_PROJECT_DIR}
    - cd ${CI_PROJECT_DIR}
    # 设置go代理
    - go env -w GO111MODULE=on
    - go env -w GOPROXY=https://goproxy.cn,direct
    # 打包到指定目录
    - go build -o /opt/project/runner1/runner1 main.go
    # 重启进程
    - systemctl restart runner1.service
  tags:
    - master

  only:
    - main
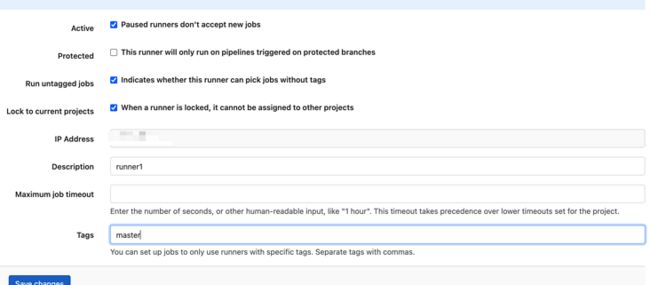
yml文件里的tags就是在注册runner的时候填写的tags,刚才我们留空了,是因为可以在GitLab的网页端进行修改,在网页端对应的runner处,点击编辑,进去后就可以修改了。
然后修改成在yml文件里配置的就可以了。
4 补充:gitlab-runner权限的问题
其实我们使用了systemctl来守护进程,也会遇到一个问题就是,gitlab-runner在执行的时候,使用的是gitlab-runner用户,因此会导致权限不足,而们可以修改gitlab-runner的默认用户来解决这个问题,
vim /etc/systemd/system/gitlab-runner.service然后将--user的参数从gitlab-runner改成root即可。
/usr/bin/gitlab-runner "run" "--working-directory" "/home/gitlab-runner" "--config" "/etc/gitlab-runner/config.toml" "--service" "gitlab-runner" "--user" "root"最后代码push上去之后,就可以在GitLab网页端的CI/CD里的jobs里看到job的状态了。
这样就实现了一个基础的CI/CD的流水线部署了。
如有问题,欢迎留言,祝大家工作顺利~
