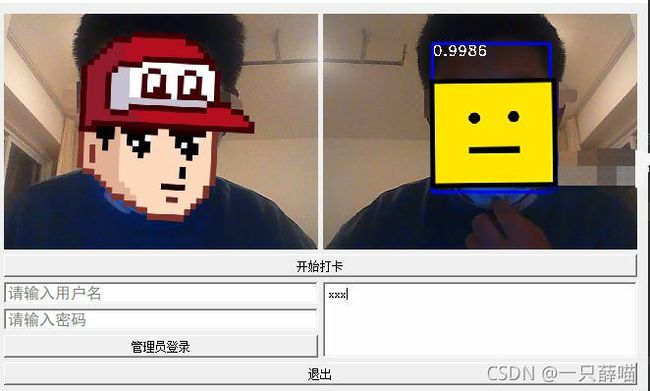
首先感谢大佬的博客对我的指点,主要功能是能实时从摄像头采集图片,实时进行人脸检验和人脸对比,并且能将已经打卡人的名字保存到txt文本中,另外还有一个管理员系统,登录后能录入人脸,录入姓名,效果如图:

 我的运行环境为:tensorflow=2.2.0,pyside2=5.15.2,python=3.8,numpy=1.19.3

 人脸打卡界面主要包括了三个重要部分:
1.人脸检测和人脸对比部分
第一个是人脸检测和人脸对比部分,该部分是主要作用是找到摄像头中的人脸并与数据库里的人脸对比,如果存在相应的人脸,则将人脸名字和人脸的概率放在同一个界面上,话不多说直接上图:
 左边图片是博主我的脸,右边图的左上方是人脸的概率,右下方是名字(当然是xxx了,手动滑稽),人脸框绘制以及概率名字这部分代码为:
  def detect_image(self, image):

        image = np.array(image, np.float32)
        old_image = np.array(image.copy(), np.uint8)
        #---------------------------------------------------#
        #   Retinaface检测部分-开始
        #---------------------------------------------------#
        # 数据的预处理
        im_height, im_width, _ = np.shape(image)

        scale = [np.shape(image)[1], np.shape(image)[0], np.shape(image)[1], np.shape(image)[0]]
        scale_for_landmarks = [np.shape(image)[1], np.shape(image)[0], np.shape(image)[1], np.shape(image)[0],
                                            np.shape(image)[1], np.shape(image)[0], np.shape(image)[1], np.shape(image)[0],
                                            np.shape(image)[1], np.shape(image)[0]]

        if self.letterbox_image:
            image = letterbox_image(image,[self.retinaface_input_shape[1], self.retinaface_input_shape[0]])
            anchors = self.anchors
        else:
            anchors = Anchors(self.cfg, image_size=(im_height, im_width)).get_anchors()

        #---------------------------------------------------#
        #   图片预处理,归一化
        #---------------------------------------------------#
        photo = np.expand_dims(preprocess_input(image),0)

        #---------------------------------------------------#
        #   将处理完的图片传入Retinaface网络当中进行预测
        #---------------------------------------------------#
        preds = self.retinaface.predict(photo)

        #---------------------------------------------------#
        #   Retinaface网络的解码,最终我们会获得预测框
        #   将预测结果进行解码和非极大抑制
        #---------------------------------------------------#
        results = self.bbox_util.detection_out(preds,anchors,confidence_threshold=self.confidence)

        #---------------------------------------------------#
        #   如果没有预测框则返回原图
        #---------------------------------------------------#
        if len(results)<=0:
            return old_image

        results = np.array(results)
        if self.letterbox_image:
            results = retinaface_correct_boxes(results, np.array((self.retinaface_input_shape[0], self.retinaface_input_shape[1])), np.array([im_height, im_width]))

        #---------------------------------------------------#
        #   4人脸框置信度
        #   :4是框的坐标
        #   5:是人脸关键点的坐标
        #---------------------------------------------------#
        results[:,:4] = results[:,:4]*scale
        results[:,5:] = results[:,5:]*scale_for_landmarks
        #---------------------------------------------------#
        #   Retinaface检测部分-结束
        #---------------------------------------------------#

        #-----------------------------------------------#
        #   Facenet编码部分-开始
        #-----------------------------------------------#
        face_encodings = []
        for result in results:
            #----------------------#
            #   图像截取,人脸矫正
            #----------------------#
            result      = np.maximum(result, 0)
            crop_img    = np.array(old_image)[int(result[1]):int(result[3]), int(result[0]):int(result[2])]
            landmark    = np.reshape(result[5:],(5,2)) - np.array([int(result[0]),int(result[1])])
            crop_img, _ = Alignment_1(crop_img,landmark)

            #----------------------#
            #   人脸编码
            #----------------------#
            # 不失真的resize,然后进行归一化
            crop_img = np.array(letterbox_image(np.uint8(crop_img),(self.facenet_input_shape[1],self.facenet_input_shape[0])))/255
            crop_img = np.expand_dims(crop_img,0)
            # 利用图像算取长度为128的特征向量
            face_encoding = self.facenet.predict(crop_img)[0]
            face_encodings.append(face_encoding)
        #-----------------------------------------------#
        #   Facenet编码部分-结束
        #-----------------------------------------------#

        #-----------------------------------------------#
        #   人脸特征比对-开始
        #-----------------------------------------------#
        face_names = []
        P=Pinyin()
        for face_encoding in face_encodings:
            # 取出一张脸并与数据库中所有的人脸进行对比,计算得分
            matches, face_distances = compare_faces(self.known_face_encodings, face_encoding, tolerance = self.facenet_threhold)
            name = "Unknown"
            #print(face_distances)
            # 找到已知最贴近当前人脸的人脸序号
            best_match_index = np.argmin(face_distances)
            if matches[best_match_index]:
                name = self.known_face_names[best_match_index]
            face_names.append(name)
        #-----------------------------------------------#
        #   人脸特征比对-结束
        #-----------------------------------------------#
        def chinese(strs):
            if '\u4e00' <= strs[0] <= '\u9fa5':
                 return True
            else:
                 return True

        for i, b in enumerate(results):
            text = "{:.4f}".format(b[4])
            b = list(map(int, b))
            cv2.rectangle(old_image, (b[0], b[1]), (b[2], b[3]), (0, 0, 255), 2)
            cx = b[0]
            cy = b[1] + 12
           # print(text)
            cv2.putText(old_image, text, (cx, cy),
                        cv2.FONT_HERSHEY_DUPLEX, 0.5, (255, 255, 255))

            # landms
            cv2.circle(old_image, (b[5], b[6]), 1, (0, 0, 255), 4)
            cv2.circle(old_image, (b[7], b[8]), 1, (0, 255, 255), 4)
            cv2.circle(old_image, (b[9], b[10]), 1, (255, 0, 255), 4)
            cv2.circle(old_image, (b[11], b[12]), 1, (0, 255, 0), 4)
            cv2.circle(old_image, (b[13], b[14]), 1, (255, 0, 0), 4)

            name = face_names[i]
            name = "".join(name.split(".jpg"))
            panduan=chinese(name)
            if panduan==True:
                name1 = name
                name = P.get_pinyin(name)
            else:
                name1 = name
                name=name
            font = cv2.FONT_HERSHEY_SIMPLEX
            cv2.putText(old_image, name, (b[0] , b[3] - 15), font, 0.75, (255, 255, 255), 2)
            #--------------------------------------------------------------#
            #   cv2不能写中文,加上这段可以,但是检测速度会有一定的下降。
            #   如果不是必须,可以换成cv2只显示英文。
            #--------------------------------------------------------------#
            #old_image = cv2ImgAddText(old_image, name, b[0]+5 , b[3] - 25)
        return old_image,name1
2.UI界面设计
第二部分是打卡界面的设计,调用pyside2的库设计界面,进行了相应的排版。代码有点多,要是想看下篇博客我会写出来,对咯排版后的图也就是一开始的图咯。
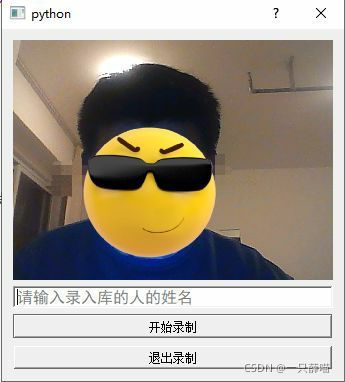
3.人脸录入界面的设计
也就是在人脸打卡界面的管理员登录口输入正确的账号和密码后进入录入人脸界面,主要涉及了建立第二窗口,将输入姓名存储到一个txt文件中,界面如下:


