Oauth2自定义认证(短信验证码)
Oauth2自定义认证(短信验证码)
思路分析
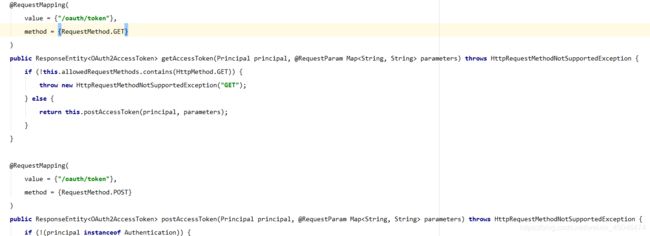
在Oauth2的EndPoints类可以看到登录请求的入口,如下图:
从个类可以看出来最后的逻辑都会带postAccessToken里面去,所以我们就着重分析这个方法吧!看到底是在哪里加载的认证模式的.
图中标记的方法就是在确定方式以及创建token的过程,具体来看这个这行代码到底干了什么吧!
首先getTokenGranter()方法是获取token的授权方式,比如password密码模式等Oauth2内定的一种认证模式,既然TokenGranter是一种token的授权类型,那么是不是只要继承或者实现这个类就可以达到我们自定义认证方式的目的呢?等着这个疑问我们接着往下面看.
从图中可以看出AbstractTokenGranter这个抽象类是实现了TokenGranter的,然后再看看AbstractTokenGranter这个类的实现类吧.
我们发现有五个类又实现了AbstractTokenGranter这个类,name这五个类是干嘛的呢?其实点进去看一下就知道了,我们就拿AuthorzationCodeTokenGranter这个类来句例子吧!
看到这个大家有没有一种很熟悉的感觉呢?没错,这个不就是授权码模式么.既然这个样子,那么证明我们之前的猜想是没有问题的.接下来就好做了,我们只需要些一个自定义的授权类去实现AbstractTokenGranter这个类就够了.下面我们来实现一下吧:
package com.so.young.authcenter.customAuth;

import org.apache.commons.lang3.StringUtils;
import org.springframework.security.authentication.*;
import org.springframework.security.core.Authentication;
import org.springframework.security.oauth2.common.exceptions.InvalidGrantException;
import org.springframework.security.oauth2.provider.*;
import org.springframework.security.oauth2.provider.token.AbstractTokenGranter;
import org.springframework.security.oauth2.provider.token.AuthorizationServerTokenServices;

import java.util.LinkedHashMap;
import java.util.Map;

public class SMSAuth extends AbstractTokenGranter {

    private static final String GRANT_TYPE = "sms";
    private final AuthenticationManager authenticationManager;
    public SMSAuth(AuthenticationManager authenticationManager, AuthorizationServerTokenServices tokenServices, ClientDetailsService clientDetailsService, OAuth2RequestFactory requestFactory) {

        this(authenticationManager, tokenServices, clientDetailsService, requestFactory, SMSAuth.GRANT_TYPE);
    }

    protected SMSAuth(AuthenticationManager authenticationManager, AuthorizationServerTokenServices tokenServices, ClientDetailsService clientDetailsService, OAuth2RequestFactory requestFactory, String grantType) {

        super(tokenServices, clientDetailsService, requestFactory, grantType);
        this.authenticationManager = authenticationManager;
    }

    protected OAuth2Authentication getOAuth2Authentication(ClientDetails client, TokenRequest tokenRequest) {

        Map<String, String> parameters = new LinkedHashMap(tokenRequest.getRequestParameters());
        checkCode(parameters);
        String username = (String)parameters.get("username");
        String password = (String)parameters.get("password");
        parameters.remove("password");
        Authentication userAuth = new UsernamePasswordAuthenticationToken(username, password);
        ((AbstractAuthenticationToken)userAuth).setDetails(parameters);
        try {

            userAuth = this.authenticationManager.authenticate(userAuth);
        } catch (AccountStatusException var8) {

            throw new InvalidGrantException(var8.getMessage());
        } catch (BadCredentialsException var9) {

            throw new InvalidGrantException(var9.getMessage());
        }

        if (userAuth != null && userAuth.isAuthenticated()) {

            OAuth2Request storedOAuth2Request = this.getRequestFactory().createOAuth2Request(client, tokenRequest);
            return new OAuth2Authentication(storedOAuth2Request, userAuth);
        } else {

            throw new InvalidGrantException("Could not authenticate user: " + username);
        }
    }

    //这里做具体的短信验证码逻辑处理,这里为了演示就只写了伪代码
    private void checkCode(Map<String, String> parameters) {

        String phone = parameters.get("username");
        String code = parameters.get("code");
        if (StringUtils.isBlank(phone)){

            throw new InvalidGrantException("手机号不能为空");
        }
        if (StringUtils.isBlank(code)){

            throw new InvalidGrantException("验证码不能为空");
        }
        //此处改成自己验证码的逻辑
        if (!"123".equals(code)){

            throw new InvalidGrantException("验证码错误");
        }
        parameters.put("username","user");
        //这个地方密码一定不要加密,不然验证无法通过.
        parameters.put("password","123456");
    }

}
这个可是仿照着密码模式来写的,也就是ResourceOwnerPasswordTokenGranter这个类.其中关键的部分就是checkCode这个方法,这个是验证短信验证码的主要逻辑.
到这里工作基本完成了一大半,在就是让Oauth2能接受并使用我们这个自定义的认证模式,在这里我们需要继承AuthorizationServerConfigurerAdapter这个类,来讲我们的自定义认证类给配合进去.由于框架本身是支持四种认证模式外加一个刷新token的模式,现在我们要将自己的认证模式加入进去就需要从新去定义token的授权模式了.
  /**
     * 创建授权模式,由于有自定义模式所以只能定义授权模式
     * @param endpoints
     * @return
     */
    private TokenGranter tokenGranter(AuthorizationServerEndpointsConfigurer endpoints) {

        List<TokenGranter> list = new ArrayList<>();
        //添加自定义验证码模式
        list.add(new SMSAuth(authenticationManager,tokenService,clientDetails(), endpoints.getOAuth2RequestFactory()));
        //添加密码模式
        list.add(new ResourceOwnerPasswordTokenGranter(authenticationManager,tokenService,clientDetails(), endpoints.getOAuth2RequestFactory()));
        //刷新模式
        list.add(new RefreshTokenGranter(tokenService,clientDetails(), endpoints.getOAuth2RequestFactory()));
        //简易模式
        list.add(new ImplicitTokenGranter(tokenService,clientDetails(), endpoints.getOAuth2RequestFactory()));
        //客户端模式
        list.add(new ClientCredentialsTokenGranter(tokenService,clientDetails(), endpoints.getOAuth2RequestFactory()));
        //授权码模式
        list.add(new AuthorizationCodeTokenGranter(tokenService,authorizationCodeServices,clientDetails(), endpoints.getOAuth2RequestFactory()));
        return new CompositeTokenGranter(list);
    }

    /**
     * 令牌访问端点
     */
    @Override
    public void configure(AuthorizationServerEndpointsConfigurer endpoints) {

        endpoints
//                .authenticationManager(authenticationManager) //密码模式必须要配置
//                .authorizationCodeServices(authorizationCodeServices) //设置授权码获取方式
//                .tokenServices(tokenService)
                .allowedTokenEndpointRequestMethods(HttpMethod.POST);
//                .exceptionTranslator(new WebResponseTranslator());
        endpoints .userDetailsService(userDetailsService); //一定要设置这个不然刷新token的会报错  报错内容:o.s.s.o.provider.endpoint.TokenEndpoint  : Handling error: IllegalStateException, UserDetailsService is required.
        endpoints.tokenGranter(tokenGranter(endpoints));
    }
配置完成这个,不要忘记在数据库中给客户端的人生类型加上"sms"不然的话会报不支持sms授权的方式的,都配置好了就可以启动项目去验证一下了.
下面是验证的截图
可以看到,使用手机验证码也能够获取到access_token了.


