Golang 常见面试题目解析
return true
6、请说明下面代码书写是否正确。
var value int32

func SetValue(delta int32) {
	for {
		v := value
		if atomic.CompareAndSwapInt32(&value, v, (v+delta)) {
			break
		}
	}
}
解析:
atomic.CompareAndSwapInt32 函数不需要循环调用。
7、下面的程序运行后为什么会爆异常。
type Project struct{}

func (p *Project) deferError() {
	if err := recover(); err != nil {
		fmt.Println("recover: ", err)
	}
}

func (p *Project) exec(msgchan chan interface{}) {
	for msg := range msgchan {
		m := msg.(int)
		fmt.Println("msg: ", m)
	}
}

func (p *Project) run(msgchan chan interface{}) {
	for {
		defer p.deferError()
		go p.exec(msgchan)
		time.Sleep(time.Second * 2)
	}
}

func (p *Project) Main() {
	a := make(chan interface{}, 100)
	go p.run(a)
	go func() {
		for {
			a <- "1"
			time.Sleep(time.Second)
		}
	}()
	time.Sleep(time.Second * 100000000000000)
}

func main() {
	p := new(Project)
	p.Main()
}
解析:
有一下几个问题:
time.Sleep的参数数值太大,超过了1<<63 - 1的限制。defer p.deferError()需要在协程开始出调用,否则无法捕获panic。
8、请说出下面代码哪里写错了
func main() {
	abc := make(chan int, 1000)
	for i := 0; i < 10; i++ {
		abc <- i
	}
	go func() {
		for  a := range abc  {
			fmt.Println("a: ", a)
		}
	}()
	close(abc)
	fmt.Println("close")
	time.Sleep(time.Second * 100)
}
解析:
协程可能还未启动,管道就关闭了。
9、请说出下面代码,执行时为什么会报错
type Student struct {
	name string
}

func main() {
	m := map[string]Student{"people": {"zhoujielun"}}
	m["people"].name = "wuyanzu"
}
解析:
map的value本身是不可寻址的,因为map中的值会在内存中移动,并且旧的指针地址在map改变时会变得无效。故如果需要修改map值,可以将map中的非指针类型value,修改为指针类型,比如使用map[string]*Student.
10、请说出下面的代码存在什么问题?
type query func(string) string

func exec(name string, vs ...query) string {
	ch := make(chan string)
	fn := func(i int) {
		ch <- vs[i](name)
	}
	for i, _ := range vs {
		go fn(i)
	}
	return <-ch
}

func main() {
	ret := exec("111", func(n string) string {
		return n + "func1"
	}, func(n string) string {
		return n + "func2"
	}, func(n string) string {
		return n + "func3"
	}, func(n string) string {
		return n + "func4"
	})
	fmt.Println(ret)
}
解析:
依据4个goroutine的启动后执行效率,很可能打印111func4,但其他的111func*也可能先执行,exec只会返回一条信息。
11、下面这段代码为什么会卡死?
package main

import (
    "fmt"
    "runtime"
)

func main() {
    var i byte
    go func() {
        for i = 0; i <= 255; i++ {
        }
    }()
    fmt.Println("Dropping mic")
    // Yield execution to force executing other goroutines
    runtime.Gosched()
    runtime.GC()
    fmt.Println("Done")
}
解析:
Golang 中,byte 其实被 alias 到 uint8 上了。所以上面的 for 循环会始终成立,因为 i++ 到 i=255 的时候会溢出,i <= 255 一定成立。
也即是, for 循环永远无法退出,所以上面的代码其实可以等价于这样:
go func() {
    for {}
}
正在被执行的 goroutine 发生以下情况时让出当前 goroutine 的执行权,并调度后面的 goroutine 执行:
- IO 操作
- Channel 阻塞
- system call
- 运行较长时间
如果一个 goroutine 执行时间太长,scheduler 会在其 G 对象上打上一个标志( preempt),当这个 goroutine 内部发生函数调用的时候,会先主动检查这个标志,如果为 true 则会让出执行权。
main 函数里启动的 goroutine 其实是一个没有 IO 阻塞、没有 Channel 阻塞、没有 system call、没有函数调用的死循环。
也就是,它无法主动让出自己的执行权,即使已经执行很长时间,scheduler 已经标志了 preempt。
而 golang 的 GC 动作是需要所有正在运行 goroutine 都停止后进行的。因此,程序会卡在 runtime.GC() 等待所有协程退出。
常见语法题目 二
1、写出下面代码输出内容。
package main

import (
	"fmt"
)

func main() {
	defer_call()
}

func defer_call() {
	defer func() { fmt.Println("打印前") }()
	defer func() { fmt.Println("打印中") }()
	defer func() { fmt.Println("打印后") }()

	panic("触发异常")
}
解析:
defer 关键字的实现跟go关键字很类似,不同的是它调用的是runtime.deferproc而不是runtime.newproc。
在defer出现的地方,插入了指令call runtime.deferproc,然后在函数返回之前的地方,插入指令call runtime.deferreturn。
goroutine的控制结构中,有一张表记录defer,调用runtime.deferproc时会将需要defer的表达式记录在表中,而在调用runtime.deferreturn的时候,则会依次从defer表中出栈并执行。
因此,题目最后输出顺序应该是defer 定义顺序的倒序。panic 错误并不能终止 defer 的执行。
2、 以下代码有什么问题,说明原因
type student struct {
	Name string
	Age  int
}

func pase_student() {
	m := make(map[string]*student)
	stus := []student{
		{Name: "zhou", Age: 24},
		{Name: "li", Age: 23},
		{Name: "wang", Age: 22},
	}
	for _, stu := range stus {
		m[stu.Name] = &stu
	}
}
解析:
golang 的 for ... range 语法中,stu 变量会被复用,每次循环会将集合中的值复制给这个变量,因此,会导致最后m中的map中储存的都是stus最后一个student的值。
3、下面的代码会输出什么,并说明原因
func main() {
	runtime.GOMAXPROCS(1)
	wg := sync.WaitGroup{}
	wg.Add(20)
	for i := 0; i < 10; i++ {
		go func() {
			fmt.Println("i: ", i)
			wg.Done()
		}()
	}
	for i := 0; i < 10; i++ {
		go func(i int) {
			fmt.Println("i: ", i)
			wg.Done()
		}(i)
	}
	wg.Wait()
}
解析:
这个输出结果决定来自于调度器优先调度哪个G。从runtime的源码可以看到,当创建一个G时,会优先放入到下一个调度的runnext字段上作为下一次优先调度的G。因此,最先输出的是最后创建的G,也就是9.
func newproc(siz int32, fn *funcval) {
	argp := add(unsafe.Pointer(&fn), sys.PtrSize)
	gp := getg()
	pc := getcallerpc()
	systemstack(func() {
		newg := newproc1(fn, argp, siz, gp, pc)

		_p_ := getg().m.p.ptr()
        //新创建的G会调用这个方法来决定如何调度
		runqput(_p_, newg, true)

		if mainStarted {
			wakep()
		}
	})
}
...

	if next {
	retryNext:
		oldnext := _p_.runnext
        //当next是true时总会将新进来的G放入下一次调度字段中
		if !_p_.runnext.cas(oldnext, guintptr(unsafe.Pointer(gp))) {
			goto retryNext
		}
		if oldnext == 0 {
			return
		}
		// Kick the old runnext out to the regular run queue.
		gp = oldnext.ptr()
	}
4、下面代码会输出什么?
type People struct{}

func (p *People) ShowA() {
	fmt.Println("showA")
	p.ShowB()
}
func (p *People) ShowB() {
	fmt.Println("showB")
}

type Teacher struct {
	People
}

func (t *Teacher) ShowB() {
	fmt.Println("teacher showB")
}

func main() {
	t := Teacher{}
	t.ShowA()
}
解析:
输出结果为showA、showB。golang 语言中没有继承概念,只有组合,也没有虚方法,更没有重载。因此,*Teacher 的 ShowB 不会覆写被组合的 People 的方法。
5、下面代码会触发异常吗?请详细说明
func main() {
	runtime.GOMAXPROCS(1)
	int_chan := make(chan int, 1)
	string_chan := make(chan string, 1)
	int_chan <- 1
	string_chan <- "hello"
	select {
	case value := <-int_chan:
		fmt.Println(value)
	case value := <-string_chan:
		panic(value)
	}
}
解析:
结果是随机执行。golang 在多个case 可读的时候会公平的选中一个执行。
6、下面代码输出什么?
func calc(index string, a, b int) int {
	ret := a + b
	fmt.Println(index, a, b, ret)
	return ret
}

func main() {
	a := 1
	b := 2
	defer calc("1", a, calc("10", a, b))
	a = 0
	defer calc("2", a, calc("20", a, b))
	b = 1
}
解析:
输出结果为:
10 1 2 3
20 0 2 2
2 0 2 2
1 1 3 4
defer 在定义的时候会计算好调用函数的参数,所以会优先输出10、20 两个参数。然后根据定义的顺序倒序执行。
7、请写出以下输入内容
func main() {
	s := make([]int, 5)
	s = append(s, 1, 2, 3)
	fmt.Println(s)
}
解析:
输出为 0 0 0 0 0 1 2 3。
make 在初始化切片时指定了长度,所以追加数据时会从len(s) 位置开始填充数据。
8、下面的代码有什么问题?
type UserAges struct {
	ages map[string]int
	sync.Mutex
}

func (ua *UserAges) Add(name string, age int) {
	ua.Lock()
	defer ua.Unlock()
	ua.ages[name] = age
}

func (ua *UserAges) Get(name string) int {
	if age, ok := ua.ages[name]; ok {
		return age
	}
	return -1
}
解析:
在执行 Get方法时可能被panic。
虽然有使用sync.Mutex做写锁,但是map是并发读写不安全的。map属于引用类型,并发读写时多个协程见是通过指针访问同一个地址,即访问共享变量,此时同时读写资源存在竞争关系。会报错误信息:“fatal error: concurrent map read and map write”。
因此,在 Get 中也需要加锁,因为这里只是读,建议使用读写锁 sync.RWMutex。
9、下面的迭代会有什么问题?
func (set *threadSafeSet) Iter() <-chan interface{} {
	ch := make(chan interface{})
	go func() {
		set.RLock()

		for elem := range set.s {
			ch <- elem
		}

		close(ch)
		set.RUnlock()

	}()
	return ch
}
解析:
默认情况下 make 初始化的 channel 是无缓冲的,也就是在迭代写时会阻塞。
10、以下代码能编译过去吗?为什么?
package main

import (
	"fmt"
)

type People interface {
	Speak(string) string
}

type Student struct{}

func (stu *Student) Speak(think string) (talk string) {
	if think == "bitch" {
		talk = "You are a good boy"
	} else {
		talk = "hi"
	}
	return
}

func main() {
	var peo People = Student{}
	think := "bitch"
	fmt.Println(peo.Speak(think))
}
解析:
编译失败,值类型 Student{} 未实现接口People的方法,不能定义为 People类型。
在 golang 语言中,Student 和 *Student 是两种类型,第一个是表示 Student 本身,第二个是指向 Student 的指针。
11、以下代码打印出来什么内容,说出为什么。。。
package main

import (
	"fmt"
)

type People interface {
	Show()
}

type Student struct{}

func (stu *Student) Show() {

}

func live() People {
	var stu *Student
	return stu
}

func main() {
	if live() == nil {
		fmt.Println("AAAAAAA")
	} else {
		fmt.Println("BBBBBBB")
	}
}
解析:
跟上一题一样,不同的是*Student 的定义后本身没有初始化值,所以 *Student 是 nil的,但是*Student 实现了 People 接口,接口不为 nil。
在 golang 协程和channel配合使用
写代码实现两个 goroutine,其中一个产生随机数并写入到 go channel 中,另外一个从 channel 中读取数字并打印到标准输出。最终输出五个随机数。
解析
这是一道很简单的golang基础题目,实现方法也有很多种,一般想答让面试官满意的答案还是有几点注意的地方。
goroutine在golang中式非阻塞的channel无缓冲情况下,读写都是阻塞的,且可以用for循环来读取数据,当管道关闭后,for退出。- golang 中有专用的
select case语法从管道读取数据。
示例代码如下:
func main() {
out := make(chan int)
wg := wait.WaitGroup{}
wg.Add(2)
go func() {
defer wg.Done()
for i := 0; i < 5; i++ {
out <- rand.Intn(5)
}
close(out)
}()
go func() {
defer wg.Done()
for i := range out {
fmt.Println(i)
}
}()
wg.Wait()
}
实现阻塞读且并发安全的map
GO里面MAP如何实现key不存在 get操作等待 直到key存在或者超时,保证并发安全,且需要实现以下接口:
type sp interface {
    Out(key string, val interface{})  //存入key /val,如果该key读取的goroutine挂起,则唤醒。此方法不会阻塞,时刻都可以立即执行并返回
    Rd(key string, timeout time.Duration) interface{}  //读取一个key,如果key不存在阻塞,等待key存在或者超时
}
解析:
看到阻塞协程第一个想到的就是channel,题目中要求并发安全,那么必须用锁,还要实现多个goroutine读的时候如果值不存在则阻塞,直到写入值,那么每个键值需要有一个阻塞goroutine 的 channel。
type Map struct {
c map[string] *entry
rmx *sync.RWMutex
}
type entry struct {
ch chan struct{}
value interface{}
isExist bool
}
func (m *Map) Out(key string, val interface{}) {
m.rmx.Lock()
defer m.rmx.Unlock()
item, ok := m.c[key]
if !ok {
m.c[key] = &entry{
value: val,
isExist:true,
}
return
}
item.value = val
if !item.isExist {
if item.ch != nil {
close(item.ch)
item.ch = nil
}
}
return
}
高并发下的锁与map的读写
场景:在一个高并发的web服务器中,要限制IP的频繁访问。现模拟100个IP同时并发访问服务器,每个IP要重复访问1000次。
每个IP三分钟之内只能访问一次。修改以下代码完成该过程,要求能成功输出 success:100
package main

import (
	"fmt"
	"time"
)

type Ban struct {
	visitIPs map[string]time.Time
}

func NewBan() *Ban {
	return &Ban{visitIPs: make(map[string]time.Time)}
}
func (o *Ban) visit(ip string) bool {
	if _, ok := o.visitIPs[ip]; ok {
		return true
	}
	o.visitIPs[ip] = time.Now()
	return false
}
func main() {
	success := 0
	ban := NewBan()
	for i := 0; i < 1000; i++ {
		for j := 0; j < 100; j++ {
			go func() {
				ip := fmt.Sprintf("192.168.1.%d", j)
				if !ban.visit(ip) {
					success++
				}
			}()
		}

	}
	fmt.Println("success:", success)
}
解析
该问题主要考察了并发情况下map的读写问题,而给出的初始代码,又存在for循环中启动goroutine时变量使用问题以及goroutine执行滞后问题。
因此,首先要保证启动的goroutine得到的参数是正确的,然后保证map的并发读写,最后保证三分钟只能访问一次。
多CPU核心下修改int的值极端情况下会存在不同步情况,因此需要原子性的修改int值。
下面给出的实例代码,是启动了一个协程每分钟检查一下map中的过期ip,for启动协程时传参。
package main
import (
"context"
"fmt"
"sync"
"sync/atomic"
"time"
)
type Ban struct {
visitIPs map[string]time.Time
lock sync.Mutex
}
func NewBan(ctx context.Context) *Ban {
o:= &Ban{visitIPs: make(map[string]time.Time)}
go func() {
timer := NewTimer(time.Minute * 1)
for {
select {
case <- timer.C:
o.lock.Lock()
for k, v := range o.visitIPs {
if time.Now().Sub(v) >= time.Minute*1 {
delete(o.visitIPs, k)
}
}
o.lock.Unlock()
timer.Reset(time.Minute * 1)
case <- ctx.Done():
return
}
}
}()
return o
}
func (o *Ban) visit(ip string) bool {
o.lock.Lock()
defer o.lock.Unlock()
if _, ok := o.visitIPs[ip]; ok {
return true
}
o.visitIPS[ip] = time.Now()
return false
}
func main() {
success := int64(0)
ctx, cancel := context.WithCancel(context.Background())
defer cancel()
ban := NewBan(ctx)
wait := &sync.WaitGroup{}
wait.Add(1000 * 100)
for i:= 0; i < 1000; i++ {
for j := 0; j < 100; j++ {
go func(j int) {
defer wait.Done()
ip := fmt.Sprintf("192.168.1.%d", j)
if !ban.visit(ip) {
atomic.AddInt64(&success, 1)
}
}(j)
}
}
wait.Wait()
fmt.Println("success:", success)
}
1. 写出以下逻辑,要求每秒钟调用一次proc并保证程序不退出?
package main

func main() {
    go func() {
        // 1 在这里需要你写算法
        // 2 要求每秒钟调用一次proc函数
        // 3 要求程序不能退出
    }()

    select {}
}

func proc() {
    panic("ok")
}
解析
题目主要考察了两个知识点:
- 定时执行执行任务
- 捕获 panic 错误
题目中要求每秒钟执行一次,首先想到的就是 time.Ticker对象,该函数可每秒钟往chan中放一个Time,正好符合我们的要求。
在 golang 中捕获 panic 一般会用到 recover() 函数。
package main
import (
"fmt"
"time"
)
func main() {
go func() {
// 1 在这里需要你写算法
// 2 要求每秒钟调用一次proc函数
// 3 要求程序不能退出
t := time.NewTicker(time.Second * 1)
for {
select {
case <- t.C:
go func() {
defer func() {
if err := recover(); err != nil {
fmt.Println(err)
}
}()
proc()
}()
}
}
}()
select{}
}
func proc() {
panic("ok")
}
为 sync.WaitGroup 中Wait函数支持 WaitTimeout 功能.
package main

import (
    "fmt"
    "sync"
    "time"
)

func main() {
    wg := sync.WaitGroup{}
    c := make(chan struct{})
    for i := 0; i < 10; i++ {
        wg.Add(1)
        go func(num int, close <-chan struct{}) {
            defer wg.Done()
            <-close
            fmt.Println(num)
        }(i, c)
    }

    if WaitTimeout(&wg, time.Second*5) {
        close(c)
        fmt.Println("timeout exit")
    }
    time.Sleep(time.Second * 10)
}

func WaitTimeout(wg *sync.WaitGroup, timeout time.Duration) bool {
    // 要求手写代码
    // 要求sync.WaitGroup支持timeout功能
    // 如果timeout到了超时时间返回true
    // 如果WaitGroup自然结束返回false
}
解析
首先 sync.WaitGroup 对象的 Wait 函数本身是阻塞的,同时,超时用到的time.Timer 对象也需要阻塞的读。
同时阻塞的两个对象肯定要每个启动一个协程,每个协程去处理一个阻塞,难点在于怎么知道哪个阻塞先完成。
目前我用的方式是声明一个没有缓冲的chan,谁先完成谁优先向管道中写入数据。
package main
import (
"fmt"
"sync"
"time"
)
func mian() {
wg := sync.WaitGroup{}
c := make(chan struct{})
for i := 0; i < 10; i++ {
wg.Add(1)
go func(num int, close <- chan struct{}) {
defer wg.Done()
<- close
fmt.Println(num)
}(i, c)
}
if WaitTimeout(&wg, time.Second *5) {
close(c)
fmt.Println("timeout exit")
}
time.Sleep(time.Second * 10)
}
func WaitTimeout(wg *sync.WaitGroup, timeout time.Duration) bool {
// 要求手写代码
// 要求sync.WaitGroup支持timeout功能
// 如果timeout到了超时时间返回true
// 如果WaitGroup自然结束返回false
ch := make(chan bool, 1)
go time.AfterFunc(timeout, func() {
ch <- true
})
go func() {
wg.Wait()
ch <- false
}()
return <- ch
}
语法找错题
写出以下代码出现的问题
package main
import (
    "fmt"
)
func main() {
    var x string = nil
    if x == nil {
        x = "default"
    }
    fmt.Println(x)
}
golang 中字符串是不能赋值 nil 的,也不能跟 nil 比较。
写出以下打印内容
   package main
   import "fmt"
   const (
       a = iota
       b = iota
   )
   const (
       name = "menglu"
       c    = iota
       d    = iota
   )
   func main() {
       fmt.Println(a)
       fmt.Println(b)
       fmt.Println(c)
       fmt.Println(d)
   }
0
1
1
2
找出下面代码的问题
package main
import "fmt"
type query func(string) string

func exec(name string, vs ...query) string {
    ch := make(chan string)
    fn := func(i int) {
        ch <- vs[i](name)
    }
    for i, _ := range vs {
        go fn(i)
    }
    return <-ch
}

func main() {
    ret := exec("111", func(n string) string {
        return n + "func1"
    }, func(n string) string {
        return n + "func2"
    }, func(n string) string {
        return n + "func3"
    }, func(n string) string {
        return n + "func4"
    })
    fmt.Println(ret)
}
上面的代码有严重的内存泄漏问题,出错的位置是 go fn(i),实际上代码执行后会启动 4 个协程,但是因为 ch 是非缓冲的,只可能有一个协程写入成功。而其他三个协程会一直在后台等待写入。
写出以下打印结果,并解释下为什么这么打印的。
package main
import (
    "fmt"
)
func main() {
    str1 := []string{"a", "b", "c"}
    str2 := str1[1:]
    str2[1] = "new"
    fmt.Println(str1)
    str2 = append(str2, "z", "x", "y")
    fmt.Println(str1)
}
golang 中的切片底层其实使用的是数组。当使用str1[1:] 使,str2 和 str1底层共享一个数组,这回导致 str2[1] = "new" 语句影响 str1。
而 append 会导致底层数组扩容,生成新的数组,因此追加数据后的 str2 不会影响 str1。
但是为什么对 str2 复制后影响的确实 str1 的第三个元素呢?这是因为切片str2 是从数组的第二个元素开始,str2 索引为 1 的元素对应的是 str1 索引为 2 的元素。
a b new
a b new
写出以下打印结果
package main

import (
    "fmt"
)

type Student struct {
    Name string
}

func main() {
    fmt.Println(&Student{Name: "menglu"} == &Student{Name: "menglu"})
    fmt.Println(Student{Name: "menglu"} == Student{Name: "menglu"})
}
false
true
个人理解:指针类型比较的是指针地址,非指针类型比较的是每个属性的值。
写出以下代码的问题
package main

import (
    "fmt"
)

func main() {
    fmt.Println([...]string{"1"} == [...]string{"1"})
    fmt.Println([]string{"1"} == []string{"1"})
}
数组只能与相同纬度长度以及类型的其他数组比较,切片之间不能直接比较。。
下面代码写法有什么问题?
package main
import (
    "fmt"
)
type Student struct {
    Age int
}
func main() {
    kv := map[string]Student{"menglu": {Age: 21}}
    kv["menglu"].Age = 22
    s := []Student{
                       {Age: 21}}
    s[0].Age = 22
    fmt.Println(kv, s)
}
golang中的map 通过key获取到的实际上是两个值,第一个是获取到的值,第二个是是否存在该key。因此不能直接通过key来赋值对象。
golang 并发题目测试
题目来源: Go并发编程小测验: 你能答对几道题?
1 Mutex
package main
import (
	"fmt"
	"sync"
)
var mu sync.Mutex
var chain string
func main() {
	chain = "main"
	A()
	fmt.Println(chain)
}
func A() {
	mu.Lock()
	defer mu.Unlock()
	chain = chain + " --> A"
	B()
}
func B() {
	chain = chain + " --> B"
	C()
}
func C() {
	mu.Lock()
	defer mu.Unlock()
	chain = chain + " --> C"
}
- A: 不能编译
- B: 输出 main --> A --> B --> C
- C: 输出 main
- D: panic
2 RWMutex
package main
import (
	"fmt"
	"sync"
	"time"
)
var mu sync.RWMutex
var count int
func main() {
	go A()
	time.Sleep(2 * time.Second)
	mu.Lock()
	defer mu.Unlock()
	count++
	fmt.Println(count)
}
func A() {
	mu.RLock()
	defer mu.RUnlock()
	B()
}
func B() {
	time.Sleep(5 * time.Second)
	C()
}
func C() {
	mu.RLock()
	defer mu.RUnlock()
}
- A: 不能编译
- B: 输出 1
- C: 程序hang住
- D: panic
3 Waitgroup
package main
import (
	"sync"
	"time"
)
func main() {
	var wg sync.WaitGroup
	wg.Add(1)
	go func() {
		time.Sleep(time.Millisecond)
		wg.Done()
		wg.Add(1)
	}()
	wg.Wait()
}
- A: 不能编译
- B: 无输出,正常退出
- C: 程序hang住
- D: panic
4 双检查实现单例
package doublecheck
import (
	"sync"
)
type Once struct {
	m    sync.Mutex
	done uint32
}
func (o *Once) Do(f func()) {
	if o.done == 1 {
		return
	}
	o.m.Lock()
	defer o.m.Unlock()
	if o.done == 0 {
		o.done = 1
		f()
	}
}
- A: 不能编译
- B: 可以编译,正确实现了单例
- C: 可以编译,有并发问题,f函数可能会被执行多次
- D: 可以编译,但是程序运行会panic
5 Mutex
package main
import (
	"fmt"
	"sync"
)
type MyMutex struct {
	count int
	sync.Mutex
}
func main() {
	var mu MyMutex
	mu.Lock()
	var mu2 = mu
	mu.count++
	mu.Unlock()
	mu2.Lock()
	mu2.count++
	mu2.Unlock()
	fmt.Println(mu.count, mu2.count)
}
- A: 不能编译
- B: 输出 1, 1
- C: 输出 1, 2
- D: panic
6 Pool
package main
import (
	"bytes"
	"fmt"
	"runtime"
	"sync"
	"time"
)
var pool = sync.Pool{New: func() interface{} { return new(bytes.Buffer) }}
func main() {
	go func() {
		for {
			processRequest(1 << 28) // 256MiB
		}
	}()
	for i := 0; i < 1000; i++ {
		go func() {
			for {
				processRequest(1 << 10) // 1KiB
			}
		}()
	}
	var stats runtime.MemStats
	for i := 0; ; i++ {
		runtime.ReadMemStats(&stats)
		fmt.Printf("Cycle %d: %dB\n", i, stats.Alloc)
		time.Sleep(time.Second)
		runtime.GC()
	}
}
func processRequest(size int) {
	b := pool.Get().(*bytes.Buffer)
	time.Sleep(500 * time.Millisecond)
	b.Grow(size)
	pool.Put(b)
	time.Sleep(1 * time.Millisecond)
}
- A: 不能编译
- B: 可以编译,运行时正常,内存稳定
- C: 可以编译,运行时内存可能暴涨
- D: 可以编译,运行时内存先暴涨,但是过一会会回收掉
7 channel
package main
import (
	"fmt"
	"runtime"
	"time"
)
func main() {
	var ch chan int
	go func() {
		ch = make(chan int, 1)
		ch <- 1
	}()
	go func(ch chan int) {
		time.Sleep(time.Second)
		<-ch
	}(ch)
	c := time.Tick(1 * time.Second)
	for range c {
		fmt.Printf("#goroutines: %d\n", runtime.NumGoroutine())
	}
}
- A: 不能编译
- B: 一段时间后总是输出
#goroutines: 1 - C: 一段时间后总是输出
#goroutines: 2 - D: panic
8 channel
package main
import "fmt"
func main() {
	var ch chan int
	var count int
	go func() {
		ch <- 1
	}()
	go func() {
		count++
		close(ch)
	}()
	<-ch
	fmt.Println(count)
}
- A: 不能编译
- B: 输出 1
- C: 输出 0
- D: panic
9 Map
package main
import (
	"fmt"
	"sync"
)
func main() {
	var m sync.Map
	m.LoadOrStore("a", 1)
	m.Delete("a")
	fmt.Println(m.Len())
}
- A: 不能编译
- B: 输出 1
- C: 输出 0
- D: panic
10 happens before
package main
var c = make(chan int)
var a int
func f() {
	a = 1
	<-c
}
func main() {
	go f()
	c <- 0
	print(a)
}
- A: 不能编译
- B: 输出 1
- C: 输出 0
- D: panic
答案
1. D
会产生死锁panic,因为Mutex 是互斥锁。
2. D
会产生死锁panic,根据sync/rwmutex.go 中注释可以知道,读写锁当有一个协程在等待写锁时,其他协程是不能获得读锁的,而在A和C中同一个调用链中间需要让出读锁,让写锁优先获取,而A的读锁又要求C调用完成,因此死锁。
3. D
WaitGroup 在调用 Wait 之后是不能再调用 Add 方法的。
4. C
在多核CPU中,因为CPU缓存会导致多个核心中变量值不同步。
5. D
加锁后复制变量,会将锁的状态也复制,所以mu1 其实是已经加锁状态,再加锁会死锁。
6. C
个人理解,在单核CPU中,内存可能会稳定在256MB,如果是多核可能会暴涨。
7. C
因为 ch 未初始化,写和读都会阻塞,之后被第一个协程重新赋值,导致写的ch 都阻塞。
8. D
ch 未有被初始化,关闭时会报错。
9. A
sync.Map 没有 Len 方法。
10. B
c <- 0 会阻塞依赖于 f() 的执行。
记一道字节跳动的算法面试题
题目
这其实是一道变形的链表反转题,大致描述如下 给定一个单链表的头节点 head,实现一个调整单链表的函数,使得每K个节点之间为一组进行逆序,并且从链表的尾部开始组起,头部剩余节点数量不够一组的不需要逆序。(不能使用队列或者栈作为辅助)
例如:
链表:1->2->3->4->5->6->7->8->null, K = 3。那么 6->7->8,3->4->5,1->2各位一组。调整后:1->2->5->4->3->8->7->6->null。其中 1,2不调整,因为不够一组。
解析
原文: 掘金
多协程查询切片问题
题目
假设有一个超长的切片,切片的元素类型为int,切片中的元素为乱序排序。限时5秒,使用多个goroutine查找切片中是否存在给定的值,在查找到目标值或者超时后立刻结束所有goroutine的执行。
比如,切片 [23,32,78,43,76,65,345,762,......915,86],查找目标值为 345 ,如果切片中存在,则目标值输出"Found it!"并立即取消仍在执行查询任务的goroutine。
如果在超时时间未查到目标值程序,则输出"Timeout!Not Found",同时立即取消仍在执行的查找任务的goroutine。
答案: 上周并发题的解题思路以及介绍Go语言调度器
首先题目里提到了在找到目标值或者超时后立刻结束所有goroutine的执行,完成这两个功能需要借助计时器、通道和context才行。我能想到的第一点就是要用context.WithCancel创建一个上下文对象传递给每个执行任务的goroutine,外部在满足条件后(找到目标值或者已超时)通过调用上下文的取消函数来通知所有goroutine停止工作。
func main() {
    timer := time.NewTimer(time.Second * 5)
    ctx, cancel := context.WithCancel(context.Background())
    resultChan := make(chan bool)
  ......
    select {
    case <-timer.C:
        fmt.Fprintln(os.Stderr, "Timeout! Not Found")
        cancel()
    case <- resultChan:
        fmt.Fprintf(os.Stdout, "Found it!\n")
        cancel()
    }
}
执行任务的goroutine们如果找到目标值后需要通知外部等待任务执行的主goroutine,这个工作是典型的应用通道的场景,上面代码也已经看到了,我们创建了一个接收查找结果的通道,接下来要做的就是把它和上下文对象一起传递给执行任务的goroutine。
func SearchTarget(ctx context.Context, data []int, target int, resultChan chan bool) {
    for _, v := range data {
        select {
        case <- ctx.Done():
            fmt.Fprintf(os.Stdout, "Task cancelded! \n")
            return
        default:
        }
        // 模拟一个耗时查找,这里只是比对值,真实开发中可以是其他操作
        fmt.Fprintf(os.Stdout, "v: %d \n", v)
        time.Sleep(time.Millisecond * 1500)
        if target == v {
            resultChan <- true
            return
        }
    }

}
在执行查找任务的goroutine里接收上下文的取消信号,为了不阻塞查找任务,我们使用了select语句加default的组合:
select {
case <- ctx.Done():
    fmt.Fprintf(os.Stdout, "Task cancelded! \n")
    return
default:
}
在goroutine里面如果找到了目标值,则会通过发送一个true值给resultChan,让外面等待的主goroutine收到一个已经找到目标值的信号。
resultChan <- true
这样通过上下文的Done通道和resultChan通道,goroutine们就能相互通信了。
Go 语言中最常见的、也是经常被人提及的设计模式 — 不要通过共享内存的方式进行通信,而是应该通过通信的方式共享内存
完整的源代码如下:
package main

import (
    "context"
    "fmt"
    "os"
    "time"
)

func main() {
    timer := time.NewTimer(time.Second * 5)
    data := []int{1, 2, 3, 10, 999, 8, 345, 7, 98, 33, 66, 77, 88, 68, 96}
    dataLen := len(data)
    size := 3
    target := 345
    ctx, cancel := context.WithCancel(context.Background())
    resultChan := make(chan bool)
    for i := 0; i < dataLen; i += size {
        end := i + size
        if end >= dataLen {
            end = dataLen - 1
        }
        go SearchTarget(ctx, data[i:end], target, resultChan)
    }
    select {
    case <-timer.C:
        fmt.Fprintln(os.Stderr, "Timeout! Not Found")
        cancel()
    case <- resultChan:
        fmt.Fprintf(os.Stdout, "Found it!\n")
        cancel()
    }

    time.Sleep(time.Second * 2)
}

func SearchTarget(ctx context.Context, data []int, target int, resultChan chan bool) {
    for _, v := range data {
        select {
        case <- ctx.Done():
            fmt.Fprintf(os.Stdout, "Task cancelded! \n")
            return
        default:
        }
        // 模拟一个耗时查找,这里只是比对值,真实开发中可以是其他操作
        fmt.Fprintf(os.Stdout, "v: %d \n", v)
        time.Sleep(time.Millisecond * 1500)
        if target == v {
            resultChan <- true
            return
        }
    }

}
为了打印演示结果所以加了几处time.Sleep,这个程序更多的是提供思路框架,所以细节的地方没有考虑。有几位读者把他们的答案发给了我,其中有一位的提供的答案在代码实现上考虑的更全面,这个我们放到文末再说。
上面程序的执行结果如下:
v: 1
v: 88
v: 33
v: 10
v: 345
Found it!
v: 2
v: 999
Task cancelded!
v: 68
Task cancelded!
Task cancelded!
因为是并发程序所以每次打印的结果的顺序是不一样的,这个你们可以自己试验一下。而且也并不是先开启的goroutine就一定会先执行,主要还是看调度器先调度哪个。
对已经关闭的的chan进行读写,会怎么样?为什么?
题目
对已经关闭的的 chan 进行读写,会怎么样?为什么?
回答
- 读已经关闭的 chan 能一直读到东西,但是读到的内容根据通道内关闭前是否有元素而不同。
- 如果 chan 关闭前,buffer 内有元素还未读 , 会正确读到 chan 内的值,且返回的第二个 bool 值(是否读成功)为 true。
- 如果 chan 关闭前,buffer 内有元素已经被读完,chan 内无值,接下来所有接收的值都会非阻塞直接成功,返回 channel 元素的零值,但是第二个 bool 值一直为 false。
- 写已经关闭的 chan 会 panic
示例
1. 写已经关闭的 chan
func main(){
    c := make(chan int,3)
    close(c)
    c <- 1
}
//输出结果
panic: send on closed channel

goroutine 1 [running]
main.main()
...
- 注意这个 send on closed channel,待会会提到。
2. 读已经关闭的 chan
package main
import "fmt"

func main()  {
    fmt.Println("以下是数值的chan")
    ci:=make(chan int,3)
    ci<-1
    close(ci)
    num,ok := <- ci
    fmt.Printf("读chan的协程结束,num=%v, ok=%v\n",num,ok)
    num1,ok1 := <-ci
    fmt.Printf("再读chan的协程结束,num=%v, ok=%v\n",num1,ok1)
    num2,ok2 := <-ci
    fmt.Printf("再再读chan的协程结束,num=%v, ok=%v\n",num2,ok2)

    fmt.Println("以下是字符串chan")
    cs := make(chan string,3)
    cs <- "aaa"
    close(cs)
    str,ok := <- cs
    fmt.Printf("读chan的协程结束,str=%v, ok=%v\n",str,ok)
    str1,ok1 := <-cs
    fmt.Printf("再读chan的协程结束,str=%v, ok=%v\n",str1,ok1)
    str2,ok2 := <-cs
    fmt.Printf("再再读chan的协程结束,str=%v, ok=%v\n",str2,ok2)

    fmt.Println("以下是结构体chan")
    type MyStruct struct{
        Name string
    }
    cstruct := make(chan MyStruct,3)
    cstruct <- MyStruct{Name: "haha"}
    close(cstruct)
    stru,ok := <- cstruct
    fmt.Printf("读chan的协程结束,stru=%v, ok=%v\n",stru,ok)
    stru1,ok1 := <-cs
    fmt.Printf("再读chan的协程结束,stru=%v, ok=%v\n",stru1,ok1)
    stru2,ok2 := <-cs
    fmt.Printf("再再读chan的协程结束,stru=%v, ok=%v\n",stru2,ok2)
}
输出结果
以下是数值的chan
读chan的协程结束,num=1, ok=true
再读chan的协程结束,num=0, ok=false
再再读chan的协程结束,num=0, ok=false
以下是字符串chan
读chan的协程结束,str=aaa, ok=true
再读chan的协程结束,str=, ok=false
再再读chan的协程结束,str=, ok=false
以下是结构体chan
读chan的协程结束,stru={haha}, ok=true
再读chan的协程结束,stru=, ok=false
再再读chan的协程结束,stru=, ok=false
多问一句
1. 为什么写已经关闭的 chan 就会 panic 呢?
//在 src/runtime/chan.go
func chansend(c *hchan,ep unsafe.Pointer,block bool,callerpc uintptr) bool {
    //省略其他
    if c.closed != 0 {
        unlock(&c.lock)
        panic(plainError("send on closed channel"))
    }
    //省略其他
}
- 当
c.closed != 0则为通道关闭,此时执行写,源码提示直接panic,输出的内容就是上面提到的"send on closed channel"。
2. 为什么读已关闭的 chan 会一直能读到值?
func chanrecv(c *hchan,ep unsafe.Pointer,block bool) (selected,received bool) {
    //省略部分逻辑
    lock(&c.lock)
    //当chan被关闭了,而且缓存为空时
    //ep 是指 val,ok := <-c 里的val地址
    if c.closed != 0 && c.qcount == 0 {
        if receenabled {
            raceacquire(c.raceaddr())
        }
        unlock(&c.lock)
        //如果接受之的地址不空,那接收值将获得一个该值类型的零值
        //typedmemclr 会根据类型清理响应的内存
        //这就解释了上面代码为什么关闭的chan 会返回对应类型的零值
        if ep != null {
            typedmemclr(c.elemtype,ep)
        }
        //返回两个参数 selected,received
        // 第二个采纳数就是 val,ok := <- c 里的 ok
        //也就解释了为什么读关闭的chan会一直返回false
        return true,false
    }
}
c.closed != 0 && c.qcount == 0指通道已经关闭,且缓存为空的情况下(已经读完了之前写到通道里的值)- 如果接收值的地址
ep不为空- 那接收值将获得是一个该类型的零值
typedmemclr会根据类型清理相应地址的内存- 这就解释了上面代码为什么关闭的 chan 会返回对应类型的零值
简单聊聊内存逃逸?
问题
知道golang的内存逃逸吗?什么情况下会发生内存逃逸?
回答
golang程序变量会携带有一组校验数据,用来证明它的整个生命周期是否在运行时完全可知。如果变量通过了这些校验,它就可以在栈上分配。否则就说它 逃逸 了,必须在堆上分配。
能引起变量逃逸到堆上的典型情况:
- 在方法内把局部变量指针返回 局部变量原本应该在栈中分配,在栈中回收。但是由于返回时被外部引用,因此其生命周期大于栈,则溢出。
- 发送指针或带有指针的值到 channel 中。 在编译时,是没有办法知道哪个
goroutine会在channel上接收数据。所以编译器没法知道变量什么时候才会被释放。 - 在一个切片上存储指针或带指针的值。 一个典型的例子就是
[]*string。这会导致切片的内容逃逸。尽管其后面的数组可能是在栈上分配的,但其引用的值一定是在堆上。 - slice 的背后数组被重新分配了,因为 append 时可能会超出其容量( cap )。 slice 初始化的地方在编译时是可以知道的,它最开始会在栈上分配。如果切片背后的存储要基于运行时的数据进行扩充,就会在堆上分配。
- 在 interface 类型上调用方法。 在 interface 类型上调用方法都是动态调度的 —— 方法的真正实现只能在运行时知道。想像一个 io.Reader 类型的变量 r , 调用 r.Read(b) 会使得 r 的值和切片b 的背后存储都逃逸掉,所以会在堆上分配。
举例
通过一个例子加深理解,接下来尝试下怎么通过 go build -gcflags=-m 查看逃逸的情况。
package main
import "fmt"
type A struct {
 s string
}
// 这是上面提到的 "在方法内把局部变量指针返回" 的情况
func foo(s string) *A {
 a := new(A)
 a.s = s
 return a //返回局部变量a,在C语言中妥妥野指针,但在go则ok,但a会逃逸到堆
}
func main() {
 a := foo("hello")
 b := a.s + " world"
 c := b + "!"
 fmt.Println(c)
}
执行go build -gcflags=-m main.go
go build -gcflags=-m main.go
# command-line-arguments
./main.go:7:6: can inline foo
./main.go:13:10: inlining call to foo
./main.go:16:13: inlining call to fmt.Println
/var/folders/45/qx9lfw2s2zzgvhzg3mtzkwzc0000gn/T/go-build409982591/b001/_gomod_.go:6:6: can inline init.0
./main.go:7:10: leaking param: s
./main.go:8:10: new(A) escapes to heap
./main.go:16:13: io.Writer(os.Stdout) escapes to heap
./main.go:16:13: c escapes to heap
./main.go:15:9: b + "!" escapes to heap
./main.go:13:10: main new(A) does not escape
./main.go:14:11: main a.s + " world" does not escape
./main.go:16:13: main []interface {} literal does not escape
:1: os.(*File).close .this does not escape
./main.go:8:10: new(A) escapes to heap说明new(A)逃逸了,符合上述提到的常见情况中的第一种。./main.go:14:11: main a.s + " world" does not escape说明 b 变量没有逃逸,因为它只在方法内存在,会在方法结束时被回收。./main.go:15:9: b + "!" escapes to heap说明 c 变量逃逸,通过fmt.Println(a ...interface{})打印的变量,都会发生逃逸,感兴趣的朋友可以去查查为什么。
以上操作其实就叫逃逸分析。下篇文章,跟大家聊聊怎么用一个比较trick的方法使变量不逃逸。方便大家在面试官面前秀一波。
原文 帐号已迁移
字符串转成byte数组,会发生内存拷贝吗?
问题
字符串转成byte数组,会发生内存拷贝吗?
回答
字符串转成切片,会产生拷贝。严格来说,只要是发生类型强转都会发生内存拷贝。那么问题来了。
频繁的内存拷贝操作听起来对性能不大友好。有没有什么办法可以在字符串转成切片的时候不用发生拷贝呢?
解释
package main

import (
 "fmt"
 "reflect"
 "unsafe"
)

func main() {
 a :="aaa"
 ssh := *(*reflect.StringHeader)(unsafe.Pointer(&a))
 b := *(*[]byte)(unsafe.Pointer(&ssh))
 fmt.Printf("%v",b)
}
StringHeader 是字符串在go的底层结构。
type StringHeader struct {
 Data uintptr
 Len  int
}
SliceHeader 是切片在go的底层结构。
type SliceHeader struct {
 Data uintptr
 Len  int
 Cap  int
}
那么如果想要在底层转换二者,只需要把 StringHeader 的地址强转成 SliceHeader 就行。那么go有个很强的包叫 unsafe 。
unsafe.Pointer(&a)方法可以得到变量a的地址。(*reflect.StringHeader)(unsafe.Pointer(&a))可以把字符串a转成底层结构的形式。(*[]byte)(unsafe.Pointer(&ssh))可以把ssh底层结构体转成byte的切片的指针。- 再通过
*转为指针指向的实际内容。
http包的内存泄漏
问题
package main

import (
	"fmt"
	"io/ioutil"
	"net/http"
	"runtime"
)

func main() {
	num := 6
	for index := 0; index < num; index++ {
		resp, _ := http.Get("https://www.baidu.com")
		_, _ = ioutil.ReadAll(resp.Body)
	}
	fmt.Printf("此时goroutine个数= %d\n", runtime.NumGoroutine())


}
上面这道题在不执行resp.Body.Close()的情况下,泄漏了吗?如果泄漏,泄漏了多少个goroutine?
怎么答
不进行resp.Body.Close(),泄漏是一定的。但是泄漏的goroutine个数就让我迷糊了。由于执行了6遍,每次泄漏一个读和写goroutine,就是12个goroutine,加上main函数本身也是一个goroutine,所以答案是13. 然而执行程序,发现答案是3,出入有点大,为什么呢?
解释
我们直接看源码。golang 的 http 包。
http.Get()

-- DefaultClient.Get
----func (c *Client) do(req *Request)
------func send(ireq *Request, rt RoundTripper, deadline time.Time)
-------- resp, didTimeout, err = send(req, c.transport(), deadline)
// 以上代码在 go/1.12.7/libexec/src/net/http/client:174

func (c *Client) transport() RoundTripper {
	if c.Transport != nil {
		return c.Transport
	}
	return DefaultTransport
}
- 说明
http.Get默认使用DefaultTransport管理连接。
DefaultTransport 是干嘛的呢?
// It establishes network connections as needed
// and caches them for reuse by subsequent calls.
DefaultTransport的作用是根据需要建立网络连接并缓存它们以供后续调用重用。
那么 DefaultTransport 什么时候会建立连接呢?
接着上面的代码堆栈往下翻
func send(ireq *Request, rt RoundTripper, deadline time.Time)
--resp, err = rt.RoundTrip(req) // 以上代码在 go/1.12.7/libexec/src/net/http/client:250
func (t *Transport) RoundTrip(req *http.Request)
func (t *Transport) roundTrip(req *Request)
func (t *Transport) getConn(treq *transportRequest, cm connectMethod)
func (t *Transport) dialConn(ctx context.Context, cm connectMethod) (*persistConn, error) {
    ...
	go pconn.readLoop()  // 启动一个读goroutine
	go pconn.writeLoop() // 启动一个写goroutine
	return pconn, nil
}
- 一次建立连接,就会启动一个读goroutine和写goroutine。这就是为什么一次
http.Get()会泄漏两个goroutine的来源。 - 泄漏的来源知道了,也知道是因为没有执行close
那为什么不执行 close 会泄漏呢?
回到刚刚启动的读goroutine 的 readLoop() 代码里
func (pc *persistConn) readLoop() {
	alive := true
	for alive {
        ...
		// Before looping back to the top of this function and peeking on
		// the bufio.Reader, wait for the caller goroutine to finish
		// reading the response body. (or for cancelation or death)
		select {
		case bodyEOF := <-waitForBodyRead:
			pc.t.setReqCanceler(rc.req, nil) // before pc might return to idle pool
			alive = alive &&
				bodyEOF &&
				!pc.sawEOF &&
				pc.wroteRequest() &&
				tryPutIdleConn(trace)
			if bodyEOF {
				eofc <- struct{}{}
			}
		case <-rc.req.Cancel:
			alive = false
			pc.t.CancelRequest(rc.req)
		case <-rc.req.Context().Done():
			alive = false
			pc.t.cancelRequest(rc.req, rc.req.Context().Err())
		case <-pc.closech:
			alive = false
        }
        ...
	}
}
其中第一个 body 被读取完或关闭这个 case:
alive = alive &&
    bodyEOF &&
    !pc.sawEOF &&
    pc.wroteRequest() &&
    tryPutIdleConn(trace)
bodyEOF 来源于到一个通道 waitForBodyRead,这个字段的 true 和 false 直接决定了 alive 变量的值(alive=true那读goroutine继续活着,循环,否则退出goroutine)。
那么这个通道的值是从哪里过来的呢?
// go/1.12.7/libexec/src/net/http/transport.go: 1758
		body := &bodyEOFSignal{
			body: resp.Body,
			earlyCloseFn: func() error {
				waitForBodyRead <- false
				<-eofc // will be closed by deferred call at the end of the function
				return nil

			},
			fn: func(err error) error {
				isEOF := err == io.EOF
				waitForBodyRead <- isEOF
				if isEOF {
					<-eofc // see comment above eofc declaration
				} else if err != nil {
					if cerr := pc.canceled(); cerr != nil {
						return cerr
					}
				}
				return err
			},
		}
- 如果执行 earlyCloseFn ,waitForBodyRead 通道输入的是 false,alive 也会是 false,那 readLoop() 这个 goroutine 就会退出。
- 如果执行 fn ,其中包括正常情况下 body 读完数据抛出 io.EOF 时的 case,waitForBodyRead 通道输入的是 true,那 alive 会是 true,那么 readLoop() 这个 goroutine 就不会退出,同时还顺便执行了 tryPutIdleConn(trace) 。
// tryPutIdleConn adds pconn to the list of idle persistent connections awaiting
// a new request.
// If pconn is no longer needed or not in a good state, tryPutIdleConn returns
// an error explaining why it wasn't registered.
// tryPutIdleConn does not close pconn. Use putOrCloseIdleConn instead for that.
func (t *Transport) tryPutIdleConn(pconn *persistConn) error
- tryPutIdleConn 将 pconn 添加到等待新请求的空闲持久连接列表中,也就是之前说的连接会复用。
那么问题又来了,什么时候会执行这个 fn 和 earlyCloseFn 呢?
func (es *bodyEOFSignal) Close() error {
	es.mu.Lock()
	defer es.mu.Unlock()
	if es.closed {
		return nil
	}
	es.closed = true
	if es.earlyCloseFn != nil && es.rerr != io.EOF {
		return es.earlyCloseFn() // 关闭时执行 earlyCloseFn
	}
	err := es.body.Close()
	return es.condfn(err)
}
- 上面这个其实就是我们比较收悉的 resp.Body.Close() ,在里面会执行 earlyCloseFn,也就是此时 readLoop() 里的 waitForBodyRead 通道输入的是 false,alive 也会是 false,那 readLoop() 这个 goroutine 就会退出,goroutine 不会泄露。
b, err = ioutil.ReadAll(resp.Body)
--func ReadAll(r io.Reader)
----func readAll(r io.Reader, capacity int64)
------func (b *Buffer) ReadFrom(r io.Reader)


// go/1.12.7/libexec/src/bytes/buffer.go:207
func (b *Buffer) ReadFrom(r io.Reader) (n int64, err error) {
	for {
		...
		m, e := r.Read(b.buf[i:cap(b.buf)])  // 看这里,是body在执行read方法
		...
	}
}
- 这个
read,其实就是bodyEOFSignal里的
func (es *bodyEOFSignal) Read(p []byte) (n int, err error) {
	...
	n, err = es.body.Read(p)
	if err != nil {
		...
    // 这里会有一个io.EOF的报错,意思是读完了
		err = es.condfn(err)
	}
	return
}


func (es *bodyEOFSignal) condfn(err error) error {
	if es.fn == nil {
		return err
	}
	err = es.fn(err)  // 这了执行了 fn
	es.fn = nil
	return err
}
- 上面这个其实就是我们比较收悉的读取 body 里的内容。 ioutil.ReadAll() ,在读完 body 的内容时会执行 fn,也就是此时 readLoop() 里的 waitForBodyRead 通道输入的是 true,alive 也会是 true,那 readLoop() 这个 goroutine 就不会退出,goroutine 会泄露,然后执行 tryPutIdleConn(trace) 把连接放回池子里复用。
总结
- 所以结论呼之欲出了,虽然执行了 6 次循环,而且每次都没有执行 Body.Close() ,就是因为执行了ioutil.ReadAll()把内容都读出来了,连接得以复用,因此只泄漏了一个读goroutine和一个写goroutine,最后加上main goroutine,所以答案就是3个goroutine。
- 从另外一个角度说,正常情况下我们的代码都会执行 ioutil.ReadAll(),但如果此时忘了 resp.Body.Close(),确实会导致泄漏。但如果你调用的域名一直是同一个的话,那么只会泄漏一个 读goroutine 和一个写goroutine,这就是为什么代码明明不规范但却看不到明显内存泄漏的原因。
- 那么问题又来了,为什么上面要特意强调是同一个域名呢?改天,回头,以后有空再说吧。
作者:9號同学 链接:掘金 来源:掘金 著作权归作者所有。商业转载请联系作者获得授权,非商业转载请注明出处。
作者:9號同学 链接:掘金 来源:掘金 著作权归作者所有。商业转载请联系作者获得授权,非商业转载请注明出处。
sync.Map 的用法
问题
package main

import (
	"fmt"
	"sync"
)

func main(){
	var m sync.Map
	m.Store("address",map[string]string{"province":"江苏","city":"南京"})
        v,_ := m.Load("address")
	fmt.Println(v["province"])
}
- A,江苏;
- B
,v["province"]取值错误; - C,
m.Store存储错误; - D,不知道
解析
invalid operation: v["province"] (type interface {} does not support indexing) 因为 func (m *Map) Store(key interface{}, value interface{}) 所以 v类型是 interface {} ,这里需要一个类型断言
fmt.Println(v.(map[string]string)["province"]) //江苏
Golang 理论
Go语言的GPM调度器是什么?
相信很多人都听说过Go语言天然支持高并发,原因是内部有协程(goroutine)加持,可以在一个进程中启动成千上万个协程。那么,它凭什么做到如此高的并发呢?那就需要先了解什么是并发模型。
并发模型
著名的C++专家Herb Sutter曾经说过“免费的午餐已经终结”。为了让代码运行的更快,单纯依靠更快的硬件已经无法得到满足,我们需要利用多核来挖掘并行的价值,而并发模型的目的就是来告诉你不同执行实体之间是如何协作的。
当然,不同的并发模型的协作方式也不尽相同,常见的并发模型有七种:
- 线程与锁
- 函数式编程
- Clojure之道
- actor
- 通讯顺序进程(CSP)
- 数据级并行
- Lambda架构
而今天,我们只讲与Go语言相关的并发模型CSP,感兴趣的同学可以自行查阅书籍《七周七并发模型》。
CSP篇
CSP,全称Communicating Sequential Processes,意为通讯顺序进程,它是七大并发模型中的一种,它的核心观念是将两个并发执行的实体通过通道channel连接起来,所有的消息都通过channel传输。其实CSP概念早在1978年就被东尼·霍尔提出,由于近来Go语言的兴起,CSP又火了起来。 那么CSP与Go语言有什么关系呢?接下来我们来看Go语言对CSP并发模型的实现——GPM调度模型。
GPM调度模型
GPM代表了三个角色,分别是Goroutine、Processor、Machine。
- Goroutine:就是咱们常用的用go关键字创建的执行体,它对应一个结构体g,结构体里保存了goroutine的堆栈信息
- Machine:表示操作系统的线程
- Processor:表示处理器,有了它才能建立G、M的联系
Goroutine
Goroutine就是代码中使用go关键词创建的执行单元,也是大家熟知的有“轻量级线程”之称的协程,协程是不为操作系统所知的,它由编程语言层面实现,上下文切换不需要经过内核态,再加上协程占用的内存空间极小,所以有着非常大的发展潜力。
go func() {}()
复制代码在Go语言中,Goroutine由一个名为runtime.go的结构体表示,该结构体非常复杂,有40多个成员变量,主要存储执行栈、状态、当前占用的线程、调度相关的数据。还有玩大家很想获取的goroutine标识,但是很抱歉,官方考虑到Go语言的发展,设置成私有了,不给你调用。
type g struct {
	stack struct {
		lo uintptr
		hi uintptr
	} 							// 栈内存:[stack.lo, stack.hi)
	stackguard0	uintptr
	stackguard1 uintptr

	_panic       *_panic
	_defer       *_defer
	m            *m				// 当前的 m
	sched        gobuf
	stktopsp     uintptr		// 期望 sp 位于栈顶,用于回溯检查
	param        unsafe.Pointer // wakeup 唤醒时候传递的参数
	atomicstatus uint32
	goid         int64
	preempt      bool       	// 抢占信号,stackguard0 = stackpreempt 的副本
	timer        *timer         // 为 time.Sleep 缓存的计时器

	...
}
Goroutine调度相关的数据存储在sched,在协程切换、恢复上下文的时候用到。
type gobuf struct {
	sp   uintptr
	pc   uintptr
	g    guintptr
	ret  sys.Uintreg
	...
}
M就是对应操作系统的线程,最多会有GOMAXPROCS个活跃线程能够正常运行,默认情况下GOMAXPROCS被设置为内核数,假如有四个内核,那么默认就创建四个线程,每一个线程对应一个runtime.m结构体。线程数等于CPU个数的原因是,每个线程分配到一个CPU上就不至于出现线程的上下文切换,可以保证系统开销降到最低。
type m struct {
	g0   *g
	curg *g
	...
}
M里面存了两个比较重要的东西,一个是g0,一个是curg。
- g0:会深度参与运行时的调度过程,比如goroutine的创建、内存分配等
- curg:代表当前正在线程上执行的goroutine。
刚才说P是负责M与G的关联,所以M里面还要存储与P相关的数据。
type m struct {
  ...
	p             puintptr
	nextp         puintptr
	oldp          puintptr
}
- p:正在运行代码的处理器
- nextp:暂存的处理器
- oldp:系统调用之前的线程的处理器
Processor
Proccessor负责Machine与Goroutine的连接,它能提供线程需要的上下文环境,也能分配G到它应该去的线程上执行,有了它,每个G都能得到合理的调用,每个线程都不再浑水摸鱼,真是居家必备之良品。
同样的,处理器的数量也是默认按照GOMAXPROCS来设置的,与线程的数量一一对应。
type p struct {
	m           muintptr

	runqhead uint32
	runqtail uint32
	runq     [256]guintptr
	runnext guintptr
	...
}
结构体P中存储了性能追踪、垃圾回收、计时器等相关的字段外,还存储了处理器的待运行队列,队列中存储的是待执行的Goroutine列表。
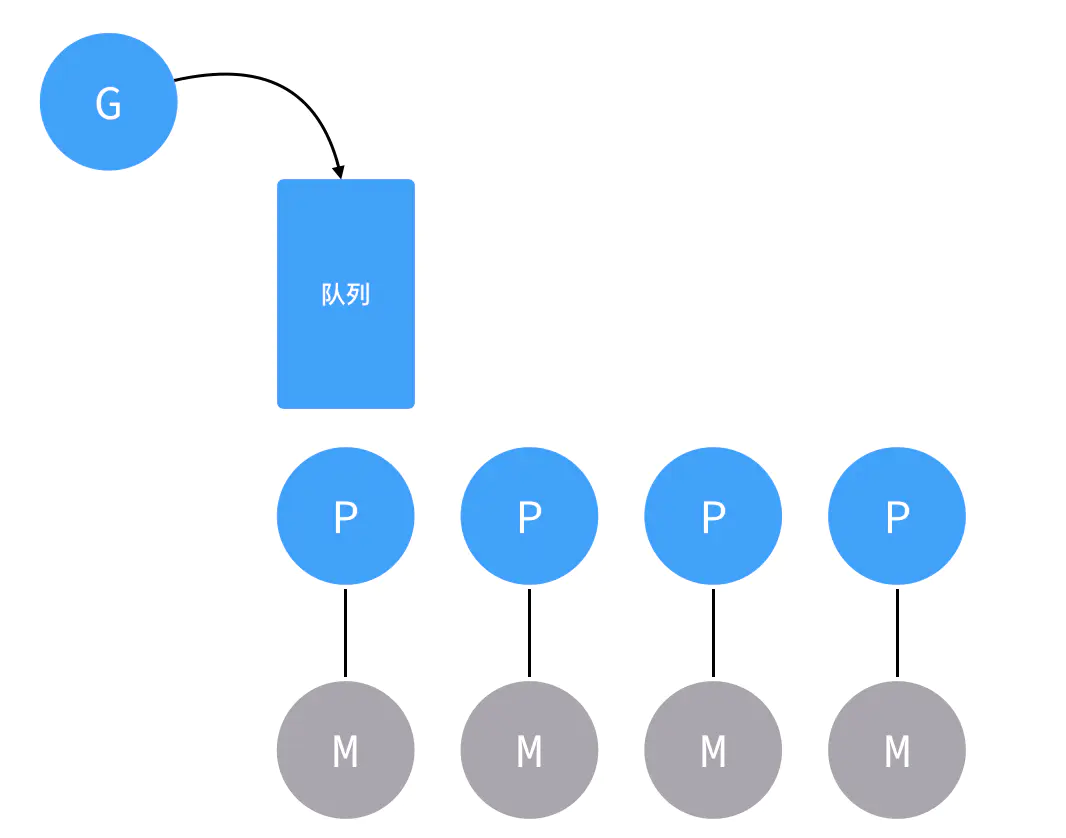
三者的关系
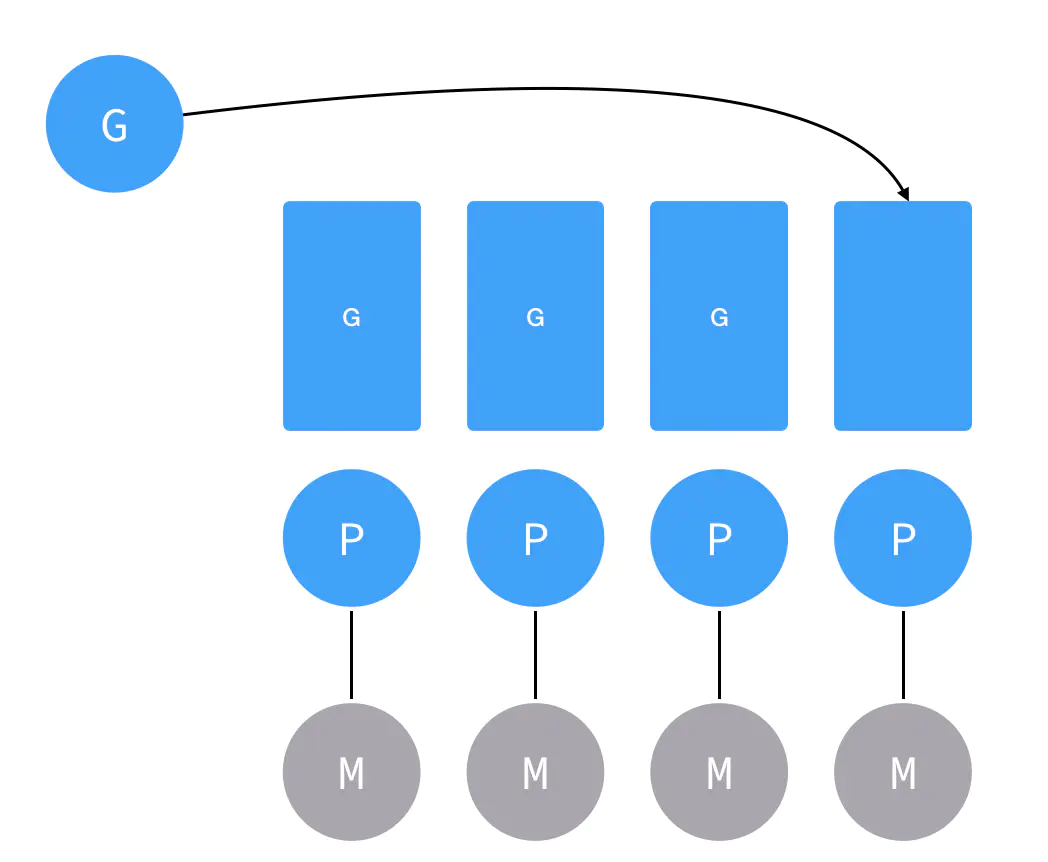
首先,默认启动四个线程四个处理器,然后互相绑定。
这个时候,一个Goroutine结构体被创建,在进行函数体地址、参数起始地址、参数长度等信息以及调度相关属性更新之后,它就要进到一个处理器的队列等待发车。
啥,又创建了一个G?那就轮流往其他P里面放呗,相信你排队取号的时候看到其他窗口没人排队也会过去的。
假如有很多G,都塞满了怎么办呢?那就不把G塞到处理器的私有队列里了,而是把它塞到全局队列里(候车大厅)。
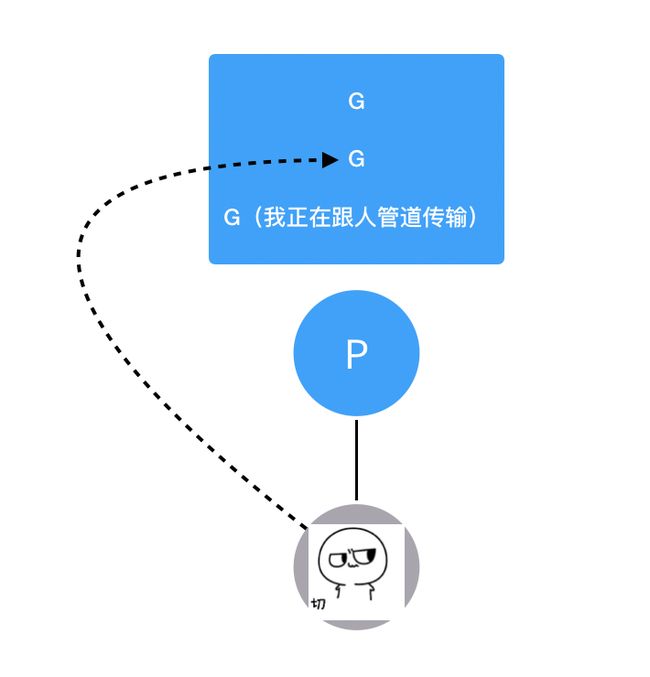
除了往里塞之外,M这边还要疯狂往外取,首先去处理器的私有队列里取G执行,如果取完的话就去全局队列取,如果全局队列里也没有的话,就去其他处理器队列里偷,哇,这么饥渴,简直是恶魔啊!
如果哪里都没找到要执行的G呢?那M就会因为太失望和P断开关系,然后去睡觉(idle)了。
那如果两个Goroutine正在通过channel做一些恩恩爱爱的事阻塞住了怎么办,难道M要等他们完事了再继续执行?显然不会,M并不稀罕这对Go男女,而会转身去找别的G执行。
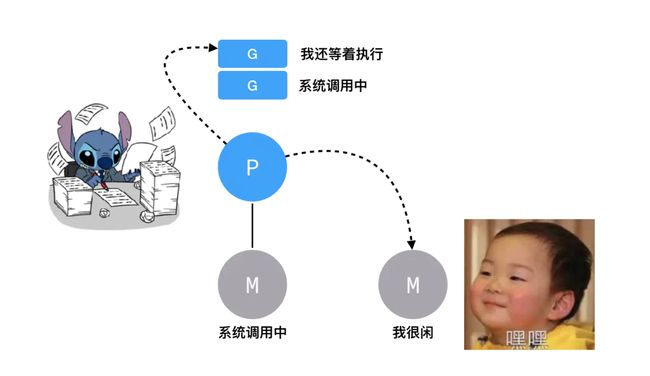
系统调用
如果G进行了系统调用syscall,M也会跟着进入系统调用状态,那么这个P留在这里就浪费了,怎么办呢?这点精妙之处在于,P不会傻傻的等待G和M系统调用完成,而会去找其他比较闲的M执行其他的G。
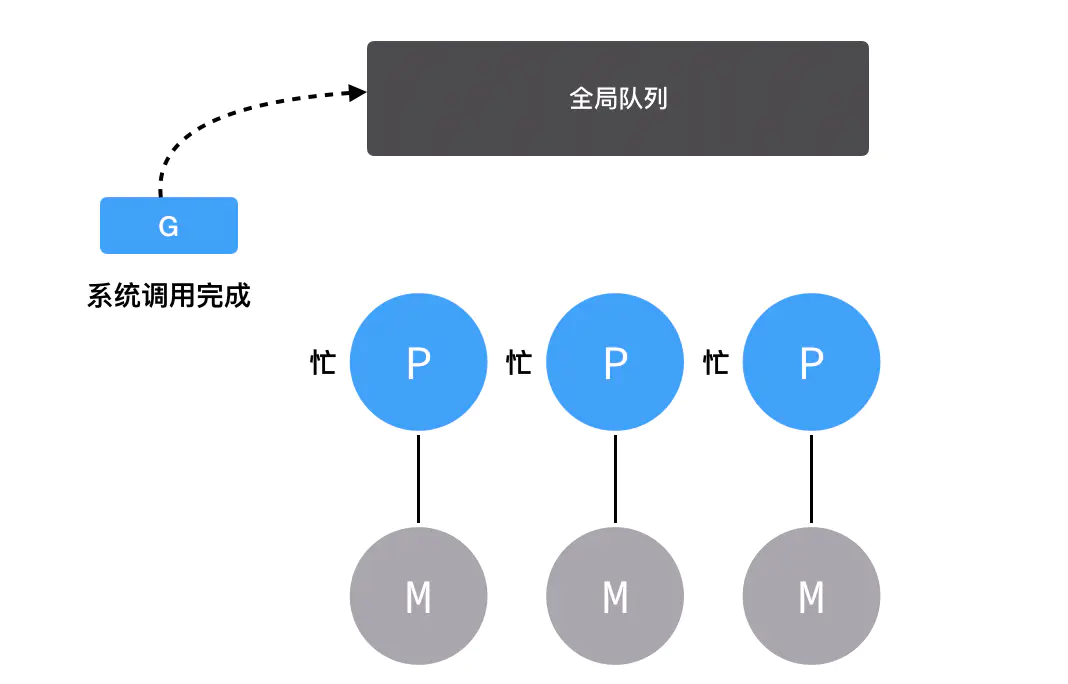
当G完成了系统调用,因为要继续往下执行,所以必须要再找一个空闲的处理器发车。
如果没有空闲的处理器了,那就只能把G放回全局队列当中等待分配。
sysmon
sysmon是我们的保洁阿姨,它是一个M,又叫监控线程,不需要P就可以独立运行,每20us~10ms会被唤醒一次出来打扫卫生,主要工作就是回收垃圾、回收长时间系统调度阻塞的P、向长时间运行的G发出抢占调度等等。
作者:平也 链接:掘金 来源:掘金 著作权归作者所有。商业转载请联系作者获得授权,非商业转载请注明出处。
Goroutine调度策略
原文: 第三章 Goroutine调度策略(16)
在调度器概述一节我们提到过,所谓的goroutine调度,是指程序代码按照一定的算法在适当的时候挑选出合适的goroutine并放到CPU上去运行的过程。这句话揭示了调度系统需要解决的三大核心问题:
- 调度时机:什么时候会发生调度?
- 调度策略:使用什么策略来挑选下一个进入运行的goroutine?
- 切换机制:如何把挑选出来的goroutine放到CPU上运行?
对这三大问题的解决构成了调度器的所有工作,因而我们对调度器的分析也必将围绕着它们所展开。
第二章我们已经详细的分析了调度器的初始化以及goroutine的切换机制,本章将重点讨论调度器如何挑选下一个goroutine出来运行的策略问题,而剩下的与调度时机相关的内容我们将在第4~6章进行全面的分析。
再探schedule函数
在讨论main goroutine的调度时我们已经见过schedule函数,因为当时我们的主要关注点在于main goroutine是如何被调度到CPU上运行的,所以并未对schedule函数如何挑选下一个goroutine出来运行做深入的分析,现在是重新回到schedule函数详细分析其调度策略的时候了。
runtime/proc.go : 2467
// One round of scheduler: find a runnable goroutine and execute it.
// Never returns.
func schedule() {
    _g_ := getg()   //_g_ = m.g0

    ......

    var gp *g

    ......

    if gp == nil {
    // Check the global runnable queue once in a while to ensure fairness.
    // Otherwise two goroutines can completely occupy the local runqueue
    // by constantly respawning each other.
       //为了保证调度的公平性,每个工作线程每进行61次调度就需要优先从全局运行队列中获取goroutine出来运行,
       //因为如果只调度本地运行队列中的goroutine,则全局运行队列中的goroutine有可能得不到运行
        if _g_.m.p.ptr().schedtick%61 == 0 && sched.runqsize > 0 {
            lock(&sched.lock) //所有工作线程都能访问全局运行队列,所以需要加锁
            gp = globrunqget(_g_.m.p.ptr(), 1) //从全局运行队列中获取1个goroutine
            unlock(&sched.lock)
        }
    }
    if gp == nil {
        //从与m关联的p的本地运行队列中获取goroutine
        gp, inheritTime = runqget(_g_.m.p.ptr())
        if gp != nil && _g_.m.spinning {
            throw("schedule: spinning with local work")
        }
    }
    if gp == nil {
        //如果从本地运行队列和全局运行队列都没有找到需要运行的goroutine,
        //则调用findrunnable函数从其它工作线程的运行队列中偷取,如果偷取不到,则当前工作线程进入睡眠,
        //直到获取到需要运行的goroutine之后findrunnable函数才会返回。
        gp, inheritTime = findrunnable() // blocks until work is available
    }

    ......

    //当前运行的是runtime的代码,函数调用栈使用的是g0的栈空间
    //调用execte切换到gp的代码和栈空间去运行
    execute(gp, inheritTime)
}
schedule函数分三步分别从各运行队列中寻找可运行的goroutine:
-
第一步,从全局运行队列中寻找goroutine。为了保证调度的公平性,每个工作线程每经过61次调度就需要优先尝试从全局运行队列中找出一个goroutine来运行,这样才能保证位于全局运行队列中的goroutine得到调度的机会。全局运行队列是所有工作线程都可以访问的,所以在访问它之前需要加锁。
-
第二步,从工作线程本地运行队列中寻找goroutine。如果不需要或不能从全局运行队列中获取到goroutine则从本地运行队列中获取。
-
第三步,从其它工作线程的运行队列中偷取goroutine。如果上一步也没有找到需要运行的goroutine,则调用findrunnable从其他工作线程的运行队列中偷取goroutine,findrunnable函数在偷取之前会再次尝试从全局运行队列和当前线程的本地运行队列中查找需要运行的goroutine。
下面我们先来看如何从全局运行队列中获取goroutine。
从全局运行队列中获取goroutine
从全局运行队列中获取可运行的goroutine是通过globrunqget函数来完成的,该函数的第一个参数是与当前工作线程绑定的p,第二个参数max表示最多可以从全局队列中拿多少个g到当前工作线程的本地运行队列中来。
runtime/proc.go : 4663
// Try get a batch of G's from the global runnable queue.
// Sched must be locked.
func globrunqget(_p_ *p, max int32) *g {
    if sched.runqsize == 0 {  //全局运行队列为空
        return nil
    }

    //根据p的数量平分全局运行队列中的goroutines
    n := sched.runqsize / gomaxprocs + 1
    if n > sched.runqsize { //上面计算n的方法可能导致n大于全局运行队列中的goroutine数量
        n = sched.runqsize
    }
    if max > 0 && n > max {
        n = max   //最多取max个goroutine
    }
    if n > int32(len(_p_.runq)) / 2 {
        n = int32(len(_p_.runq)) / 2  //最多只能取本地队列容量的一半
    }

    sched.runqsize -= n

    //直接通过函数返回gp,其它的goroutines通过runqput放入本地运行队列
    gp := sched.runq.pop()  //pop从全局运行队列的队列头取
    n--
    for ; n > 0; n-- {
        gp1 := sched.runq.pop()  //从全局运行队列中取出一个goroutine
        runqput(_p_, gp1, false)  //放入本地运行队列
    }
    return gp
}
globrunqget函数首先会根据全局运行队列中goroutine的数量,函数参数max以及_p_的本地队列的容量计算出到底应该拿多少个goroutine,然后把第一个g结构体对象通过返回值的方式返回给调用函数,其它的则通过runqput函数放入当前工作线程的本地运行队列。这段代码值得一提的是,计算应该从全局运行队列中拿走多少个goroutine时根据p的数量(gomaxprocs)做了负载均衡。
如果没有从全局运行队列中获取到goroutine,那么接下来就在工作线程的本地运行队列中寻找需要运行的goroutine。
从工作线程本地运行队列中获取goroutine
从代码上来看,工作线程的本地运行队列其实分为两个部分,一部分是由p的runq、runqhead和runqtail这三个成员组成的一个无锁循环队列,该队列最多可包含256个goroutine;另一部分是p的runnext成员,它是一个指向g结构体对象的指针,它最多只包含一个goroutine。
从本地运行队列中寻找goroutine是通过runqget函数完成的,寻找时,代码首先查看runnext成员是否为空,如果不为空则返回runnext所指的goroutine,并把runnext成员清零,如果runnext为空,则继续从循环队列中查找goroutine。
runtime/proc.go : 4825
// Get g from local runnable queue.
// If inheritTime is true, gp should inherit the remaining time in the
// current time slice. Otherwise, it should start a new time slice.
// Executed only by the owner P.
func runqget(_p_ *p) (gp *g, inheritTime bool) {
    // If there's a runnext, it's the next G to run.
    //从runnext成员中获取goroutine
    for {
        //查看runnext成员是否为空,不为空则返回该goroutine
        next := _p_.runnext
        if next == 0 {
            break
        }
        if _p_.runnext.cas(next, 0) {
            return next.ptr(), true
        }
    }

    //从循环队列中获取goroutine
    for {
        h := atomic.LoadAcq(&_p_.runqhead) // load-acquire, synchronize with other consumers
        t := _p_.runqtail
        if t == h {
            return nil, false
        }
        gp := _p_.runq[h%uint32(len(_p_.runq))].ptr()
        if atomic.CasRel(&_p_.runqhead, h, h+1) { // cas-release, commits consume
            return gp, false
        }
    }
}
这里首先需要注意的是不管是从runnext还是从循环队列中拿取goroutine都使用了cas操作,这里的cas操作是必需的,因为可能有其他工作线程此时此刻也正在访问这两个成员,从这里偷取可运行的goroutine。
其次,代码中对runqhead的操作使用了atomic.LoadAcq和atomic.CasRel,它们分别提供了load-acquire和cas-release语义。
对于atomic.LoadAcq来说,其语义主要包含如下几条:
- 原子读取,也就是说不管代码运行在哪种平台,保证在读取过程中不会有其它线程对该变量进行写入;
- 位于
atomic.LoadAcq之后的代码,对内存的读取和写入必须在atomic.LoadAcq读取完成后才能执行,编译器和CPU都不能打乱这个顺序; - 当前线程执行
atomic.LoadAcq时可以读取到其它线程最近一次通过atomic.CasRel对同一个变量写入的值,与此同时,位于atomic.LoadAcq之后的代码,不管读取哪个内存地址中的值,都可以读取到其它线程中位于atomic.CasRel(对同一个变量操作)之前的代码最近一次对内存的写入。
对于atomic.CasRel来说,其语义主要包含如下几条:
- 原子的执行比较并交换的操作;
- 位于
atomic.CasRel之前的代码,对内存的读取和写入必须在atomic.CasRel对内存的写入之前完成,编译器和CPU都不能打乱这个顺序; - 线程执行
atomic.CasRel完成后其它线程通过atomic.LoadAcq读取同一个变量可以读到最新的值,与此同时,位于atomic.CasRel之前的代码对内存写入的值,可以被其它线程中位于atomic.LoadAcq(对同一个变量操作)之后的代码读取到。
因为可能有多个线程会并发的修改和读取runqhead,以及需要依靠runqhead的值来读取runq数组的元素,所以需要使用atomic.LoadAcq和atomic.CasRel来保证上述语义。
我们可能会问,为什么读取p的runqtail成员不需要使用atomic.LoadAcq或atomic.load?因为runqtail不会被其它线程修改,只会被当前工作线程修改,此时没有人修改它,所以也就不需要使用原子相关的操作。
最后,由p的runq、runqhead和runqtail这三个成员组成的这个无锁循环队列非常精妙,我们会在后面的章节对这个循环队列进行分析。
CAS操作与ABA问题
我们知道使用cas操作需要特别注意ABA的问题,那么runqget函数这两个使用cas的地方会不会有问题呢?答案是这两个地方都不会有ABA的问题。原因分析如下:
首先来看对runnext的cas操作。只有跟_p_绑定的当前工作线程才会去修改runnext为一个非0值,其它线程只会把runnext的值从一个非0值修改为0值,然而跟_p_绑定的当前工作线程正在此处执行代码,所以在当前工作线程读取到值A之后,不可能有线程修改其值为B(0)之后再修改回A。
再来看对runq的cas操作。当前工作线程操作的是_p_的本地队列,只有跟_p_绑定在一起的当前工作线程才会因为往该队列里面添加goroutine而去修改runqtail,而其它工作线程不会往该队列里面添加goroutine,也就不会去修改runqtail,它们只会修改runqhead,所以,当我们这个工作线程从runqhead读取到值A之后,其它工作线程也就不可能修改runqhead的值为B之后再第二次把它修改为值A(因为runqtail在这段时间之内不可能被修改,runqhead的值也就无法越过runqtail再回绕到A值),也就是说,代码从逻辑上已经杜绝了引发ABA的条件。
到此,我们已经分析完工作线程从全局运行队列和本地运行队列获取goroutine的代码,由于篇幅的限制,我们下一节再来分析从其它工作线程的运行队列偷取goroutine的流程。
goroutine调度器概述
goroutine简介
goroutine是Go语言实现的用户态线程,主要用来解决操作系统线程太“重”的问题,所谓的太重,主要表现在以下两个方面:
- 创建和切换太重:操作系统线程的创建和切换都需要进入内核,而进入内核所消耗的性能代价比较高,开销较大;
- 内存使用太重:一方面,为了尽量避免极端情况下操作系统线程栈的溢出,内核在创建操作系统线程时默认会为其分配一个较大的栈内存(虚拟地址空间,内核并不会一开始就分配这么多的物理内存),然而在绝大多数情况下,系统线程远远用不了这么多内存,这导致了浪费;另一方面,栈内存空间一旦创建和初始化完成之后其大小就不能再有变化,这决定了在某些特殊场景下系统线程栈还是有溢出的风险。
而相对的,用户态的goroutine则轻量得多:
- goroutine是用户态线程,其创建和切换都在用户代码中完成而无需进入操作系统内核,所以其开销要远远小于系统线程的创建和切换;
- goroutine启动时默认栈大小只有2k,这在多数情况下已经够用了,即使不够用,goroutine的栈也会自动扩大,同时,如果栈太大了过于浪费它还能自动收缩,这样既没有栈溢出的风险,也不会造成栈内存空间的大量浪费。
正是因为Go语言中实现了如此轻量级的线程,才使得我们在Go程序中,可以轻易的创建成千上万甚至上百万的goroutine出来并发的执行任务而不用太担心性能和内存等问题。
注意: 为了避免混淆,从现在开始,后面出现的所有的线程一词均是指操作系统线程,而goroutine我们不再称之为什么什么线程而是直接使用goroutine这个词。
线程模型与调度器
第一章讨论操作系统线程调度的时候我们曾经提到过,goroutine建立在操作系统线程基础之上,它与操作系统线程之间实现了一个多对多(M:N)的两级线程模型。
这里的 M:N 是指M个goroutine运行在N个操作系统线程之上,内核负责对这N个操作系统线程进行调度,而这N个系统线程又负责对这M个goroutine进行调度和运行。
所谓的对goroutine的调度,是指程序代码按照一定的算法在适当的时候挑选出合适的goroutine并放到CPU上去运行的过程,这些负责对goroutine进行调度的程序代码我们称之为goroutine调度器。用极度简化了的伪代码来描述goroutine调度器的工作流程大概是下面这个样子:
// 程序启动时的初始化代码
......
for i := 0; i < N; i++ { // 创建N个操作系统线程执行schedule函数
    create_os_thread(schedule) // 创建一个操作系统线程执行schedule函数
}

//schedule函数实现调度逻辑
func schedule() {
   for { //调度循环
         // 根据某种算法从M个goroutine中找出一个需要运行的goroutine
         g := find_a_runnable_goroutine_from_M_goroutines()
         run_g(g) // CPU运行该goroutine,直到需要调度其它goroutine才返回
         save_status_of_g(g) // 保存goroutine的状态,主要是寄存器的值
    }
}
这段伪代码表达的意思是,程序运行起来之后创建了N个由内核调度的操作系统线程(为了方便描述,我们称这些系统线程为工作线程)去执行shedule函数,而schedule函数在一个调度循环中反复从M个goroutine中挑选出一个需要运行的goroutine并跳转到该goroutine去运行,直到需要调度其它goroutine时才返回到schedule函数中通过save_status_of_g保存刚刚正在运行的goroutine的状态然后再次去寻找下一个goroutine。
需要强调的是,这段伪代码对goroutine的调度代码做了高度的抽象、修改和简化处理,放在这里只是为了帮助我们从宏观上了解goroutine的两级调度模型,具体的实现原理和细节将从本章开始进行全面介绍。
调度器数据结构概述
第一章我们讨论操作系统线程及其调度时还说过,可以把内核对系统线程的调度简单的归纳为:在执行操作系统代码时,内核调度器按照一定的算法挑选出一个线程并把该线程保存在内存之中的寄存器的值放入CPU对应的寄存器从而恢复该线程的运行。
万变不离其宗,系统线程对goroutine的调度与内核对系统线程的调度原理是一样的,实质都是通过保存和修改CPU寄存器的值来达到切换线程/goroutine的目的。
因此,为了实现对goroutine的调度,需要引入一个数据结构来保存CPU寄存器的值以及goroutine的其它一些状态信息,在Go语言调度器源代码中,这个数据结构是一个名叫g的结构体,它保存了goroutine的所有信息,该结构体的每一个实例对象都代表了一个goroutine,调度器代码可以通过g对象来对goroutine进行调度,当goroutine被调离CPU时,调度器代码负责把CPU寄存器的值保存在g对象的成员变量之中,当goroutine被调度起来运行时,调度器代码又负责把g对象的成员变量所保存的寄存器的值恢复到CPU的寄存器。
要实现对goroutine的调度,仅仅有g结构体对象是不够的,至少还需要一个存放所有(可运行)goroutine的容器,便于工作线程寻找需要被调度起来运行的goroutine,于是Go调度器又引入了schedt结构体,一方面用来保存调度器自身的状态信息,另一方面它还拥有一个用来保存goroutine的运行队列。因为每个Go程序只有一个调度器,所以在每个Go程序中schedt结构体只有一个实例对象,该实例对象在源代码中被定义成了一个共享的全局变量,这样每个工作线程都可以访问它以及它所拥有的goroutine运行队列,我们称这个运行队列为全局运行队列。
既然说到全局运行队列,读者可能猜想到应该还有一个局部运行队列。确实如此,因为全局运行队列是每个工作线程都可以读写的,因此访问它需要加锁,然而在一个繁忙的系统中,加锁会导致严重的性能问题。于是,调度器又为每个工作线程引入了一个私有的局部goroutine运行队列,工作线程优先使用自己的局部运行队列,只有必要时才会去访问全局运行队列,这大大减少了锁冲突,提高了工作线程的并发性。在Go调度器源代码中,局部运行队列被包含在p结构体的实例对象之中,每一个运行着go代码的工作线程都会与一个p结构体的实例对象关联在一起。
除了上面介绍的g、schedt和p结构体,Go调度器源代码中还有一个用来代表工作线程的m结构体,每个工作线程都有唯一的一个m结构体的实例对象与之对应,m结构体对象除了记录着工作线程的诸如栈的起止位置、当前正在执行的goroutine以及是否空闲等等状态信息之外,还通过指针维持着与p结构体的实例对象之间的绑定关系。于是,通过m既可以找到与之对应的工作线程正在运行的goroutine,又可以找到工作线程的局部运行队列等资源。下面是g、p、m和schedt之间的关系图:
上图中圆形图案代表g结构体的实例对象,三角形代表m结构体的实例对象,正方形代表p结构体的实例对象,其中红色的g表示m对应的工作线程正在运行的goroutine,而灰色的g表示处于运行队列之中正在等待被调度起来运行的goroutine。
从上图可以看出,每个m都绑定了一个p,每个p都有一个私有的本地goroutine队列,m对应的线程从本地和全局goroutine队列中获取goroutine并运行之。
前面我们说每个工作线程都有一个m结构体对象与之对应,但并未详细说明它们之间是如何对应起来的,工作线程执行的代码是如何找到属于自己的那个m结构体实例对象的呢?
如果只有一个工作线程,那么就只会有一个m结构体对象,问题就很简单,定义一个全局的m结构体变量就行了。可是我们有多个工作线程和多个m需要一一对应,怎么办呢?还记得第一章我们讨论过的线程本地存储吗?当时我们说过,线程本地存储其实就是线程私有的全局变量,这不正是我们所需要的吗?!只要每个工作线程拥有了各自私有的m结构体全局变量,我们就能在不同的工作线程中使用相同的全局变量名来访问不同的m结构体对象,这完美的解决我们的问题。
具体到goroutine调度器代码,每个工作线程在刚刚被创建出来进入调度循环之前就利用线程本地存储机制为该工作线程实现了一个指向m结构体实例对象的私有全局变量,这样在之后的代码中就使用该全局变量来访问自己的m结构体对象以及与m相关联的p和g对象。
有了上述数据结构以及工作线程与数据结构之间的映射机制,我们可以把前面的调度伪代码写得更丰满一点:
// 程序启动时的初始化代码
......
for i := 0; i < N; i++ { // 创建N个操作系统线程执行schedule函数
     create_os_thread(schedule) // 创建一个操作系统线程执行schedule函数
}


// 定义一个线程私有全局变量,注意它是一个指向m结构体对象的指针
// ThreadLocal用来定义线程私有全局变量
ThreadLocal self *m
//schedule函数实现调度逻辑
func schedule() {
    // 创建和初始化m结构体对象,并赋值给私有全局变量self
    self = initm()
    for { //调度循环
          if (self.p.runqueue is empty) {
                 // 根据某种算法从全局运行队列中找出一个需要运行的goroutine
                 g := find_a_runnable_goroutine_from_global_runqueue()
           } else {
                 // 根据某种算法从私有的局部运行队列中找出一个需要运行的goroutine
                 g := find_a_runnable_goroutine_from_local_runqueue()
           }
          run_g(g) // CPU运行该goroutine,直到需要调度其它goroutine才返回
          save_status_of_g(g) // 保存goroutine的状态,主要是寄存器的值
     }
}
仅仅从上面这个伪代码来看,我们完全不需要线程私有全局变量,只需在schedule函数中定义一个局部变量就行了。但真实的调度代码错综复杂,不光是这个schedule函数会需要访问m,其它很多地方还需要访问它,所以需要使用全局变量来方便其它地方对m的以及与m相关的g和p的访问。
在简单的介绍了Go语言调度器以及它所需要的数据结构之后,下面我们来看一下Go的调度代码中对上述的几个结构体的定义。
重要的结构体
下面介绍的这些结构体中的字段非常多,牵涉到的细节也很庞杂,光是看这些结构体的定义我们没有必要也无法真正理解它们的用途,所以在这里我们只需要大概了解一下就行了,看不懂记不住都没有关系,随着后面对代码逐步深入的分析,我们也必将会对这些结构体有越来越清晰的认识。为了节省篇幅,下面各结构体的定义略去了跟调度器无关的成员。另外,这些结构体的定义全部位于Go语言的源代码路径下的runtime/runtime2.go文件之中。
stack结构体
stack结构体主要用来记录goroutine所使用的栈的信息,包括栈顶和栈底位置:
// Stack describes a Go execution stack.
// The bounds of the stack are exactly [lo, hi),
// with no implicit data structures on either side.
//用于记录goroutine使用的栈的起始和结束位置
type stack struct {
    lo uintptr    // 栈顶,指向内存低地址
    hi uintptr    // 栈底,指向内存高地址
}
gobuf结构体
gobuf结构体用于保存goroutine的调度信息,主要包括CPU的几个寄存器的值:
type gobuf struct {
    // The offsets of sp, pc, and g are known to (hard-coded in) libmach.
    //
    // ctxt is unusual with respect to GC: it may be a
    // heap-allocated funcval, so GC needs to track it, but it
    // needs to be set and cleared from assembly, where it's
    // difficult to have write barriers. However, ctxt is really a
    // saved, live register, and we only ever exchange it between
    // the real register and the gobuf. Hence, we treat it as a
    // root during stack scanning, which means assembly that saves
    // and restores it doesn't need write barriers. It's still
    // typed as a pointer so that any other writes from Go get
    // write barriers.
    sp   uintptr  // 保存CPU的rsp寄存器的值
    pc   uintptr  // 保存CPU的rip寄存器的值
    g    guintptr // 记录当前这个gobuf对象属于哪个goroutine
    ctxt unsafe.Pointer

    // 保存系统调用的返回值,因为从系统调用返回之后如果p被其它工作线程抢占,
    // 则这个goroutine会被放入全局运行队列被其它工作线程调度,其它线程需要知道系统调用的返回值。
    ret  sys.Uintreg
    lr   uintptr

    // 保存CPU的rip寄存器的值
    bp   uintptr // for GOEXPERIMENT=framepointer
}
g结构体
g结构体用于代表一个goroutine,该结构体保存了goroutine的所有信息,包括栈,gobuf结构体和其它的一些状态信息:
// 前文所说的g结构体,它代表了一个goroutine
type g struct {
    // Stack parameters.
    // stack describes the actual stack memory: [stack.lo, stack.hi).
    // stackguard0 is the stack pointer compared in the Go stack growth prologue.
    // It is stack.lo+StackGuard normally, but can be StackPreempt to trigger a preemption.
    // stackguard1 is the stack pointer compared in the C stack growth prologue.
    // It is stack.lo+StackGuard on g0 and gsignal stacks.
    // It is ~0 on other goroutine stacks, to trigger a call to morestackc (and crash).

    // 记录该goroutine使用的栈
    stack       stack   // offset known to runtime/cgo
    // 下面两个成员用于栈溢出检查,实现栈的自动伸缩,抢占调度也会用到stackguard0
    stackguard0 uintptr // offset known to liblink
    stackguard1 uintptr // offset known to liblink

    ......

    // 此goroutine正在被哪个工作线程执行
    m              *m      // current m; offset known to arm liblink
    // 保存调度信息,主要是几个寄存器的值
    sched          gobuf

    ......
    // schedlink字段指向全局运行队列中的下一个g,
    //所有位于全局运行队列中的g形成一个链表
    schedlink      guintptr

    ......
    // 抢占调度标志,如果需要抢占调度,设置preempt为true
    preempt        bool       // preemption signal, duplicates stackguard0 = stackpreempt

   ......
}
m结构体
m结构体用来代表工作线程,它保存了m自身使用的栈信息,当前正在运行的goroutine以及与m绑定的p等信息,详见下面定义中的注释:
type m struct {
    // g0主要用来记录工作线程使用的栈信息,在执行调度代码时需要使用这个栈
    // 执行用户goroutine代码时,使用用户goroutine自己的栈,调度时会发生栈的切换
    g0      *g     // goroutine with scheduling stack

    // 通过TLS实现m结构体对象与工作线程之间的绑定
    tls           [6]uintptr   // thread-local storage (for x86 extern register)
    mstartfn      func()
    // 指向工作线程正在运行的goroutine的g结构体对象
    curg          *g       // current running goroutine

    // 记录与当前工作线程绑定的p结构体对象
    p             puintptr // attached p for executing go code (nil if not executing go code)
    nextp         puintptr
    oldp          puintptr // the p that was attached before executing a syscall

    // spinning状态:表示当前工作线程正在试图从其它工作线程的本地运行队列偷取goroutine
    spinning      bool // m is out of work and is actively looking for work
    blocked       bool // m is blocked on a note

    // 没有goroutine需要运行时,工作线程睡眠在这个park成员上,
    // 其它线程通过这个park唤醒该工作线程
    park          note
    // 记录所有工作线程的一个链表
    alllink       *m // on allm
    schedlink     muintptr

    // Linux平台thread的值就是操作系统线程ID
    thread        uintptr // thread handle
    freelink      *m      // on sched.freem

    ......
}
p结构体
p结构体用于保存工作线程执行go代码时所必需的资源,比如goroutine的运行队列,内存分配用到的缓存等等。
type p struct {
    lock mutex

    status       uint32 // one of pidle/prunning/...
    link            puintptr
    schedtick   uint32     // incremented on every scheduler call
    syscalltick  uint32     // incremented on every system call
    sysmontick  sysmontick // last tick observed by sysmon
    m                muintptr   // back-link to associated m (nil if idle)

    ......

    // Queue of runnable goroutines. Accessed without lock.
    //本地goroutine运行队列
    runqhead uint32  // 队列头
    runqtail uint32     // 队列尾
    runq     [256]guintptr  //使用数组实现的循环队列
    // runnext, if non-nil, is a runnable G that was ready'd by
    // the current G and should be run next instead of what's in
    // runq if there's time remaining in the running G's time
    // slice. It will inherit the time left in the current time
    // slice. If a set of goroutines is locked in a
    // communicate-and-wait pattern, this schedules that set as a
    // unit and eliminates the (potentially large) scheduling
    // latency that otherwise arises from adding the ready'd
    // goroutines to the end of the run queue.
    runnext guintptr

    // Available G's (status == Gdead)
    gFree struct {
        gList
        n int32
    }

    ......
}
schedt结构体
schedt结构体用来保存调度器的状态信息和goroutine的全局运行队列:
type schedt struct {
    // accessed atomically. keep at top to ensure alignment on 32-bit systems.
    goidgen  uint64
    lastpoll uint64

    lock mutex

    // When increasing nmidle, nmidlelocked, nmsys, or nmfreed, be
    // sure to call checkdead().

    // 由空闲的工作线程组成链表
    midle        muintptr // idle m's waiting for work
    // 空闲的工作线程的数量
    nmidle       int32    // number of idle m's waiting for work
    nmidlelocked int32    // number of locked m's waiting for work
    mnext        int64    // number of m's that have been created and next M ID
    // 最多只能创建maxmcount个工作线程
    maxmcount    int32    // maximum number of m's allowed (or die)
    nmsys        int32    // number of system m's not counted for deadlock
    nmfreed      int64    // cumulative number of freed m's

    ngsys uint32 // number of system goroutines; updated atomically

    // 由空闲的p结构体对象组成的链表
    pidle      puintptr // idle p's
    // 空闲的p结构体对象的数量
    npidle     uint32
    nmspinning uint32 // See "Worker thread parking/unparking" comment in proc.go.

    // Global runnable queue.
    // goroutine全局运行队列
    runq     gQueue
    runqsize int32

    ......

    // Global cache of dead G's.
    // gFree是所有已经退出的goroutine对应的g结构体对象组成的链表
    // 用于缓存g结构体对象,避免每次创建goroutine时都重新分配内存
    gFree struct {
        lock          mutex
        stack        gList // Gs with stacks
        noStack   gList // Gs without stacks
        n              int32
    }

    ......
}
重要的全局变量
allgs     []*g     // 保存所有的g
allm       *m    // 所有的m构成的一个链表,包括下面的m0
allp       []*p    // 保存所有的p,len(allp) == gomaxprocs

ncpu             int32   // 系统中cpu核的数量,程序启动时由runtime代码初始化
gomaxprocs int32   // p的最大值,默认等于ncpu,但可以通过GOMAXPROCS修改

sched      schedt     // 调度器结构体对象,记录了调度器的工作状态

m0  m       // 代表进程的主线程
g0   g        // m0的g0,也就是m0.g0 = &g0
在程序初始化时,这些全变量都会被初始化为0值,指针会被初始化为nil指针,切片初始化为nil切片,int被初始化为数字0,结构体的所有成员变量按其本类型初始化为其类型的0值。所以程序刚启动时allgs,allm和allp都不包含任何g,m和p。
原文: goroutine调度器概述(11)
Redis基础
Redis 基础
Redis常见的数据结构?
String、Hash、List、Set、SortedSet。
1.String 字符串类型
是redis中最基本的数据类型,一个key对应一个value。
String类型是二进制安全的,意思是 redis 的 string 可以包含任何数据。如数字,字符串,jpg图片或者序列化的对象。
实战场景:
- 缓存: 经典使用场景,把常用信息,字符串,图片或者视频等信息放到redis中,redis作为缓存层,mysql做持久化层,降低mysql的读写压力。
- 计数器:redis是单线程模型,一个命令执行完才会执行下一个,同时数据可以一步落地到其他的数据源。
- session:常见方案spring session + redis实现session共享
2.Hash (哈希)
是一个Mapmap,指值本身又是一种键值对结构,如 value={ {field1,value1},......fieldN,valueN}}
实战场景:
1.缓存: 能直观,相比string更节省空间,的维护缓存信息,如用户信息,视频信息等。
3.链表
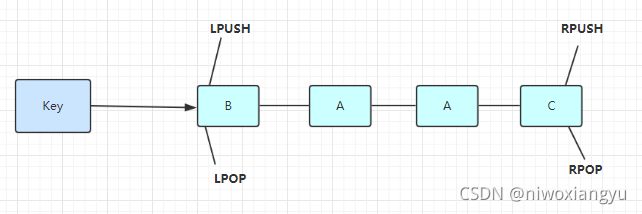
List 说白了就是链表(redis 使用双端链表实现的 List),是有序的,value可以重复,可以通过下标取出对应的value值,左右两边都能进行插入和删除数据。
- lpush+lpop=Stack(栈)
- lpush+rpop=Queue(队列)
- lpush+ltrim=Capped Collection(有限集合)
- lpush+brpop=Message Queue(消息队列)
实战场景:
1.timeline:例如微博的时间轴,有人发布微博,用lpush加入时间轴,展示新的列表信息。
4.Set 集合
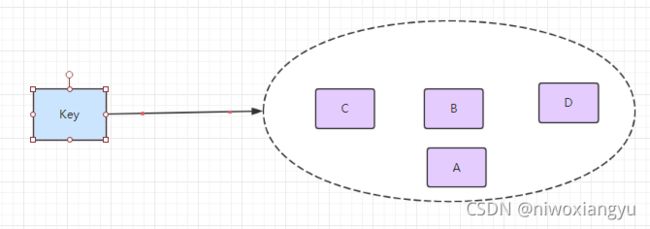
集合类型也是用来保存多个字符串的元素,但和列表不同的是集合中 1. 不允许有重复的元素,2.集合中的元素是无序的,不能通过索引下标获取元素,3.支持集合间的操作,可以取多个集合取交集、并集、差集。
实战场景;
- 标签(tag),给用户添加标签,或者用户给消息添加标签,这样有同一标签或者类似标签的可以给推荐关注的事或者关注的人。
- 点赞,或点踩,收藏等,可以放到set中实现
5.zset 有序集合
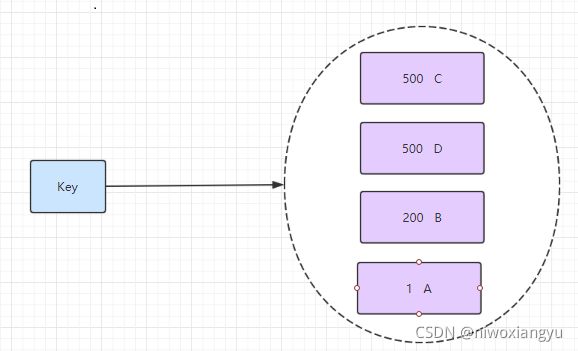
有序集合和集合有着必然的联系,保留了集合不能有重复成员的特性,区别是,有序集合中的元素是可以排序的,它给每个元素设置一个分数,作为排序的依据。
(有序集合中的元素不可以重复,但是score 分数 可以重复,就和一个班里的同学学号不能重复,但考试成绩可以相同)。
实战场景:
- 排行榜:有序集合经典使用场景。例如小说视频等网站需要对用户上传的小说视频做排行榜,榜单可以按照用户关注数,更新时间,字数等打分,做排行。
Redis中的数据结构
原文地址 Redis中的数据结构
1. 底层数据结构, 与Redis Value Type之间的关系
对于Redis的使用者来说, Redis作为Key-Value型的内存数据库, 其Value有多种类型.
- String
- Hash
- List
- Set
- ZSet
这些Value的类型, 只是"Redis的用户认为的, Value存储数据的方式". 而在具体实现上, 各个Type的Value到底如何存储, 这对于Redis的使用者来说是不公开的.
举个粟子: 使用下面的命令创建一个Key-Value
SET "Hello" "World"
对于Redis的使用者来说, Hello这个Key, 对应的Value是String类型, 其值为五个ASCII字符组成的二进制数据. 但具体在底层实现上, 这五个字节是如何存储的, 是不对用户公开的. 即, Value的Type, 只是表象, 具体数据在内存中以何种数据结构存放, 这对于用户来说是不必要了解的.
Redis对使用者暴露了五种Value Type, 其底层实现的数据结构有8种, 分别是:
- SDS - simple synamic string - 支持自动动态扩容的字节数组
- list - 平平无奇的链表
- dict - 使用双哈希表实现的, 支持平滑扩容的字典
- zskiplist - 附加了后向指针的跳跃表
- intset - 用于存储整数数值集合的自有结构
- ziplist - 一种实现上类似于TLV, 但比TLV复杂的, 用于存储任意数据的有序序列的数据结构
- quicklist - 一种以ziplist作为结点的双链表结构, 实现的非常苟
- zipmap - 一种用于在小规模场合使用的轻量级字典结构
而衔接"底层数据结构"与"Value Type"的桥梁的, 则是Redis实现的另外一种数据结构: redisObject. Redis中的Key与Value在表层都是一个redisObject实例, 故该结构有所谓的"类型", 即是ValueType. 对于每一种Value Type类型的redisObject, 其底层至少支持两种不同的底层数据结构来实现. 以应对在不同的应用场景中, Redis的运行效率, 或内存占用.
2. 底层数据结构
2.1 SDS - simple dynamic string
这是一种用于存储二进制数据的一种结构, 具有动态扩容的特点. 其实现位于src/sds.h与src/sds.c中, 其关键定义如下:
typedef char *sds;

/* Note: sdshdr5 is never used, we just access the flags byte directly.
 * However is here to document the layout of type 5 SDS strings. */
struct __attribute__ ((__packed__)) sdshdr5 {
    unsigned char flags; /* 3 lsb of type, and 5 msb of string length */
    char buf[];
};
struct __attribute__ ((__packed__)) sdshdr8 {
    uint8_t len; /* used */
    uint8_t alloc; /* excluding the header and null terminator */
    unsigned char flags; /* 3 lsb of type, 5 unused bits */
    char buf[];
};
struct __attribute__ ((__packed__)) sdshdr16 {
    uint16_t len; /* used */
    uint16_t alloc; /* excluding the header and null terminator */
    unsigned char flags; /* 3 lsb of type, 5 unused bits */
    char buf[];
};
struct __attribute__ ((__packed__)) sdshdr32 {
    uint32_t len; /* used */
    uint32_t alloc; /* excluding the header and null terminator */
    unsigned char flags; /* 3 lsb of type, 5 unused bits */
    char buf[];
};
struct __attribute__ ((__packed__)) sdshdr64 {
    uint64_t len; /* used */
    uint64_t alloc; /* excluding the header and null terminator */
    unsigned char flags; /* 3 lsb of type, 5 unused bits */
    char buf[];
};
SDS的总体概览如下图:
其中sdshdr是头部, buf是真实存储用户数据的地方. 另外注意, 从命名上能看出来, 这个数据结构除了能存储二进制数据, 显然是用于设计作为字符串使用的, 所以在buf中, 用户数据后总跟着一个\0. 即图中 "数据" + "\0" 是为所谓的buf
SDS有五种不同的头部. 其中sdshdr5实际并未使用到. 所以实际上有四种不同的头部, 分别如下:
- len分别以uint8, uint16, uint32, uint64表示用户数据的长度(不包括末尾的\0)
- alloc分别以uint8, uint16, uint32, uint64表示整个SDS, 除过头部与末尾的\0, 剩余的字节数.
- flag始终为一字节, 以低三位标示着头部的类型, 高5位未使用.
当在程序中持有一个SDS实例时, 直接持有的是数据区的头指针, 这样做的用意是: 通过这个指针, 向前偏一个字节, 就能取到flag, 通过判断flag低三位的值, 能迅速判断: 头部的类型, 已用字节数, 总字节数, 剩余字节数. 这也是为什么sds类型即是char *指针类型别名的原因.
创建一个SDS实例有三个接口, 分别是:
// 创建一个不含数据的sds:
//  头部    3字节 sdshdr8
//  数据区  0字节
//  末尾    \0 占一字节
sds sdsempty(void);
// 带数据创建一个sds:
//  头部    按initlen的值, 选择最小的头部类型
//  数据区  从入参指针init处开始, 拷贝initlen个字节
//  末尾    \0 占一字节
sds sdsnewlen(const void *init, size_t initlen);
// 带数据创建一个sds:
//  头部    按strlen(init)的值, 选择最小的头部类型
//  数据区  入参指向的字符串中的所有字符, 不包括末尾 \0
//  末尾    \0 占一字节
sds sdsnew(const char *init);
- 所有创建sds实例的接口, 都不会额外分配预留内存空间
sdsnewlen用于带二进制数据创建sds实例, sdsnew用于带字符串创建sds实例. 接口返回的sds可以直接传入libc中的字符串输出函数中进行操作, 由于无论其中存储的是用户的二进制数据, 还是字符串, 其末尾都带一个\0, 所以至少调用libc中的字符串输出函数是安全的.
在对SDS中的数据进行修改时, 若剩余空间不足, 会调用sdsMakeRoomFor函数用于扩容空间, 这是一个很低级的API, 通常情况下不应当由SDS的使用者直接调用. 其实现中核心的几行如下:
sds sdsMakeRoomFor(sds s, size_t addlen) {
    ...
    /* Return ASAP if there is enough space left. */
    if (avail >= addlen) return s;

    len = sdslen(s);
    sh = (char*)s-sdsHdrSize(oldtype);
    newlen = (len+addlen);
    if (newlen < SDS_MAX_PREALLOC)
        newlen *= 2;
    else
        newlen += SDS_MAX_PREALLOC;
    ...
}
可以看到, 在扩充空间时
- 先保证至少有addlen可用
- 然后再进一步扩充, 在总体占用空间不超过阈值
SDS_MAC_PREALLOC时, 申请空间再翻一倍. 若总体空间已经超过了阈值, 则步进增长SDS_MAC_PREALLOC. 这个阈值的默认值为1024 * 1024
SDS也提供了接口用于移除所有未使用的内存空间. sdsRemoveFreeSpace, 该接口没有间接的被任何SDS其它接口调用, 即默认情况下, SDS不会自动回收预留空间. 在SDS的使用者需要节省内存时, 由使用者自行调用:
sds sdsRemoveFreeSpace(sds s);
总结:
- SDS除了是某些Value Type的底层实现, 也被大量使用在Redis内部, 用于替代C-Style字符串. 所以默认的创建SDS实例接口, 不分配额外的预留空间. 因为多数字符串在程序运行期间是不变的. 而对于变更数据区的API, 其内部则是调用了 sdsMakeRoomFor, 每一次扩充空间, 都会预留大量的空间. 这样做的考量是: 如果一个SDS实例中的数据被变更了, 那么很有可能会在后续发生多次变更.
- SDS的API内部不负责清除未使用的闲置内存空间, 因为内部API无法判断这样做的合适时机. 即便是在操作数据区的时候导致数据区占用内存减少时, 内部API也不会清除闲置内在空间. 清除闲置内存空间责任应当由SDS的使用者自行担当.
- 用SDS替代C-Style字符串时, 由于其头部额外存储了数据区的长度信息, 所以字符串的求长操作时间复杂度为O(1)
2.2 list
这是普通的链表实现, 链表结点不直接持有数据, 而是通过void *指针来间接的指向数据. 其实现位于 src/adlist.h与src/adlist.c中, 关键定义如下:
typedef struct listNode {
    struct listNode *prev;
    struct listNode *next;
    void *value;
} listNode;

typedef struct listIter {
    listNode *next;
    int direction;
} listIter;

typedef struct list {
    listNode *head;
    listNode *tail;
    void *(*dup)(void *ptr);
    void (*free)(void *ptr);
    int (*match)(void *ptr, void *key);
    unsigned long len;
} list;
其内存布局如下图所示:
这是一个平平无奇的链表的实现. list在Redis除了作为一些Value Type的底层实现外, 还广泛用于Redis的其它功能实现中, 作为一种数据结构工具使用. 在list的实现中, 除了基本的链表定义外, 还额外增加了:
- 迭代器
listIter的定义, 与相关接口的实现. - 由于list中的链表结点本身并不直接持有数据, 而是通过value字段, 以void *指针的形式间接持有, 所以数据的生命周期并不完全与链表及其结点一致. 这给了list的使用者相当大的灵活性. 比如可以多个结点持有同一份数据的地址. 但与此同时, 在对链表进行销毁, 结点复制以及查找匹配时, 就需要list的使用者将相关的函数指针赋值于list.dup, list.free, list.match字段.
2.3 dict
dict是Redis底层数据结构中实现最为复杂的一个数据结构, 其功能类似于C++标准库中的std::unordered_map, 其实现位于 src/dict.h 与 src/dict.c中, 其关键定义如下:
typedef struct dictEntry {
    void *key;
    union {
        void *val;
        uint64_t u64;
        int64_t s64;
        double d;
    } v;
    struct dictEntry *next;
} dictEntry;

typedef struct dictType {
    uint64_t (*hashFunction)(const void *key);
    void *(*keyDup)(void *privdata, const void *key);
    void *(*valDup)(void *privdata, const void *obj);
    int (*keyCompare)(void *privdata, const void *key1, const void *key2);
    void (*keyDestructor)(void *privdata, void *key);
    void (*valDestructor)(void *privdata, void *obj);
} dictType;

/* This is our hash table structure. Every dictionary has two of this as we
 * implement incremental rehashing, for the old to the new table. */
typedef struct dictht {
    dictEntry **table;
    unsigned long size;
    unsigned long sizemask;
    unsigned long used;
} dictht;

typedef struct dict {
    dictType *type;
    void *privdata;
    dictht ht[2];
    long rehashidx; /* rehashing not in progress if rehashidx == -1 */
    unsigned long iterators; /* number of iterators currently running */
} dict;

/* If safe is set to 1 this is a safe iterator, that means, you can call
 * dictAdd, dictFind, and other functions against the dictionary even while
 * iterating. Otherwise it is a non safe iterator, and only dictNext()
 * should be called while iterating. */
typedef struct dictIterator {
    dict *d;
    long index;
    int table, safe;
    dictEntry *entry, *nextEntry;
    /* unsafe iterator fingerprint for misuse detection. */
    long long fingerprint;
} dictIterator;
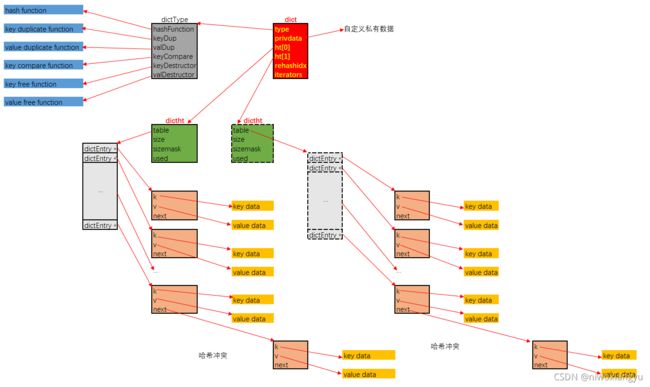
其内存布局如下所示:
-
dict中存储的键值对, 是通过dictEntry这个结构间接持有的, k通过指针间接持有键, v通过指针间接持有值. 注意, 若值是整数值的话, 是直接存储在v字段中的, 而不是间接持有. 同时next指针用于指向, 在bucket索引值冲突时, 以链式方式解决冲突, 指向同索引的下一个dictEntry结构.
-
传统的哈希表实现, 是一块连续空间的顺序表, 表中元素即是结点. 在dictht.table中, 结点本身是散布在内存中的, 顺序表中存储的是dictEntry的指针
-
哈希表即是dictht结构, 其通过table字段间接的持有顺序表形式的bucket, bucket的容量存储在size字段中, 为了加速将散列值转化为bucket中的数组索引, 引入了sizemask字段, 计算指定键在哈希表中的索引时, 执行的操作类似于dict->type->hashFunction(键) & dict->ht[x].sizemask. 从这里也可以看出来, bucket的容量适宜于为2的幂次, 这样计算出的索引值能覆盖到所有bucket索引位.
-
dict即为字典. 其中type字段中存储的是本字典使用到的各种函数指针, 包括散列函数, 键与值的复制函数, 释放函数, 以及键的比较函数. privdata是用于存储用户自定义数据. 这样, 字典的使用者可以最大化的自定义字典的实现, 通过自定义各种函数实现, 以及可以附带私有数据, 保证了字典有很大的调优空间.
-
字典为了支持平滑扩容, 定义了ht[2]这个数组字段. 其用意是这样的:
- 一般情况下, 字典dict仅持有一个哈希表dictht的实例, 即整个字典由一个bucket实现.
- 随着插入操作, bucket中出现冲突的概率会越来越大, 当字典中存储的结点数目, 与bucket数组长度的比值达到一个阈值(1:1)时, 字典为了缓解性能下降, 就需要扩容
- 扩容的操作是平滑的, 即在扩容时, 字典会持有两个dictht的实例, ht[0]指向旧哈希表, ht[1]指向扩容后的新哈希表. 平滑扩容的重点在于两个策略:
- 后续每一次的插入, 替换, 查找操作, 都插入到ht[1]指向的哈希表中
- 每一次插入, 替换, 查找操作执行时, 会将旧表ht[0]中的一个bucket索引位持有的结点链表, 迁移到ht[1]中去. 迁移的进度保存在rehashidx这个字段中.在旧表中由于冲突而被链接在同一索引位上的结点, 迁移到新表后, 可能会散布在多个新表索引中去.
- 当迁移完成后, ht[0]指向的旧表会被释放, 之后会将新表的持有权转交给ht[0], 再重置ht[1]指向NULL
-
这种平滑扩容的优点有两个:
- 平滑扩容过程中, 所有结点的实际数据, 即dict->ht[0]->table[rehashindex]->k与dict->ht[0]->table[rehashindex]->v分别指向的实际数据, 内存地址都不会变化. 没有发生键数据与值数据的拷贝或移动, 扩容整个过程仅是各种指针的操作. 速度非常快
- 扩容操作是步进式的, 这保证任何一次插入操作都是顺畅的, dict的使用者是无感知的. 若扩容是一次性的, 当新旧bucket容量特别大时, 迁移所有结点必然会导致耗时陡增.
除了字典本身的实现外, 其中还顺带实现了一个迭代器, 这个迭代器中有字段safe以标示该迭代器是"安全迭代器"还是"非安全迭代器", 所谓的安全与否, 指是的这种场景: 设想在运行迭代器的过程中, 字典正处于平滑扩容的过程中. 在平滑扩容的过程中时, 旧表一个索引位上的, 由冲突而链起来的多个结点, 迁移到新表后, 可能会散布到新表的多个索引位上. 且新的索引位的值可能比旧的索引位要低.
遍历操作的重点是, 保证在迭代器遍历操作开始时, 字典中持有的所有结点, 都会被遍历到. 而若在遍历过程中, 一个未遍历的结点, 从旧表迁移到新表后, 索引值减小了, 那么就可能会导致这个结点在遍历过程中被遗漏.
所以, 所谓的"安全"迭代器, 其在内部实现时: 在迭代过程中, 若字典正处于平滑扩容过程, 则暂停结点迁移, 直至迭代器运行结束. 这样虽然不能保证在迭代过程中插入的结点会被遍历到, 但至少保证在迭代起始时, 字典中持有的所有结点都会被遍历到.
这也是为什么dict结构中有一个iterators字段的原因: 该字段记录了运行于该字典上的安全迭代器的数目. 若该数目不为0, 字典是不会继续进行结点迁移平滑扩容的.
下面是字典的扩容操作中的核心代码, 我们以插入操作引起的扩容为例:
先是插入操作的外部逻辑:
- 如果插入时, 字典正处于平滑扩容过程中, 那么无论本次插入是否成功, 先迁移一个bucket索引中的结点至新表
- 在计算新插入结点键的bucket索引值时, 内部会探测哈希表是否需要扩容(若当前不在平滑扩容过程中)
int dictAdd(dict *d, void *key, void *val)
{
    dictEntry *entry = dictAddRaw(d,key,NULL);          // 调用dictAddRaw

    if (!entry) return DICT_ERR;
    dictSetVal(d, entry, val);
    return DICT_OK;
}

dictEntry *dictAddRaw(dict *d, void *key, dictEntry **existing)
{
    long index;
    dictEntry *entry;
    dictht *ht;

    if (dictIsRehashing(d)) _dictRehashStep(d); // 若在平滑扩容过程中, 先步进迁移一个bucket索引

    /* Get the index of the new element, or -1 if
     * the element already exists. */

    // 在计算键在bucket中的索引值时, 内部会检查是否需要扩容
    if ((index = _dictKeyIndex(d, key, dictHashKey(d,key), existing)) == -1)
        return NULL;

    /* Allocate the memory and store the new entry.
     * Insert the element in top, with the assumption that in a database
     * system it is more likely that recently added entries are accessed
     * more frequently. */
    ht = dictIsRehashing(d) ? &d->ht[1] : &d->ht[0];
    entry = zmalloc(sizeof(*entry));
    entry->next = ht->table[index];
    ht->table[index] = entry;
    ht->used++;

    /* Set the hash entry fields. */
    dictSetKey(d, entry, key);
    return entry;
}
下面是计算bucket索引值的函数, 内部会探测该哈希表是否需要扩容, 如果需要扩容(结点数目与bucket数组长度比例达到1:1), 就使字典进入平滑扩容过程:
static long _dictKeyIndex(dict *d, const void *key, uint64_t hash, dictEntry **existing)
{
    unsigned long idx, table;
    dictEntry *he;
    if (existing) *existing = NULL;

    /* Expand the hash table if needed */
    if (_dictExpandIfNeeded(d) == DICT_ERR) // 探测是否需要扩容, 如果需要, 则开始扩容
        return -1;
    for (table = 0; table <= 1; table++) {
        idx = hash & d->ht[table].sizemask;
        /* Search if this slot does not already contain the given key */
        he = d->ht[table].table[idx];
        while(he) {
            if (key==he->key || dictCompareKeys(d, key, he->key)) {
                if (existing) *existing = he;
                return -1;
            }
            he = he->next;
        }
        if (!dictIsRehashing(d)) break;
    }
    return idx;
}

/* Expand the hash table if needed */
static int _dictExpandIfNeeded(dict *d)
{
    /* Incremental rehashing already in progress. Return. */
    if (dictIsRehashing(d)) return DICT_OK; // 如果正在扩容过程中, 则什么也不做

    /* If the hash table is empty expand it to the initial size. */
    // 若字典中本无元素, 则初始化字典, 初始化时的bucket数组长度为4
    if (d->ht[0].size == 0) return dictExpand(d, DICT_HT_INITIAL_SIZE);

    /* If we reached the 1:1 ratio, and we are allowed to resize the hash
     * table (global setting) or we should avoid it but the ratio between
     * elements/buckets is over the "safe" threshold, we resize doubling
     * the number of buckets. */
    // 若字典中元素的个数与bucket数组长度比值大于1:1时, 则调用dictExpand进入平滑扩容状态
    if (d->ht[0].used >= d->ht[0].size &&
        (dict_can_resize ||
         d->ht[0].used/d->ht[0].size > dict_force_resize_ratio))
    {
        return dictExpand(d, d->ht[0].used*2);
    }
    return DICT_OK;
}

int dictExpand(dict *d, unsigned long size)
{
    dictht n; /* the new hash table */  // 新建一个dictht结构
    unsigned long realsize = _dictNextPower(size);

    /* the size is invalid if it is smaller than the number of
     * elements already inside the hash table */
    if (dictIsRehashing(d) || d->ht[0].used > size)
        return DICT_ERR;

    /* Rehashing to the same table size is not useful. */
    if (realsize == d->ht[0].size) return DICT_ERR;

    /* Allocate the new hash table and initialize all pointers to NULL */
    n.size = realsize;
    n.sizemask = realsize-1;
    n.table = zcalloc(realsize*sizeof(dictEntry*));// 初始化dictht下的table, 即bucket数组
    n.used = 0;

    /* Is this the first initialization? If so it's not really a rehashing
     * we just set the first hash table so that it can accept keys. */
    // 若是新字典初始化, 直接把dictht结构挂在ht[0]中
    if (d->ht[0].table == NULL) {
        d->ht[0] = n;
        return DICT_OK;
    }

    // 否则, 把新dictht结构挂在ht[1]中, 并开启平滑扩容(置rehashidx为0, 字典处于非扩容状态时, 该字段值为-1)
    /* Prepare a second hash table for incremental rehashing */
    d->ht[1] = n;
    d->rehashidx = 0;
    return DICT_OK;
}
下面是平滑扩容的实现:
static void _dictRehashStep(dict *d) {
    // 若字典上还运行着安全迭代器, 则不迁移结点
    // 否则每次迁移一个旧bucket索引上的所有结点
    if (d->iterators == 0) dictRehash(d,1);
}

int dictRehash(dict *d, int n) {
    int empty_visits = n*10; /* Max number of empty buckets to visit. */
    if (!dictIsRehashing(d)) return 0;

    while(n-- && d->ht[0].used != 0) {
        dictEntry *de, *nextde;

        /* Note that rehashidx can't overflow as we are sure there are more
         * elements because ht[0].used != 0 */
        assert(d->ht[0].size > (unsigned long)d->rehashidx);
        // 在旧bucket中, 找到下一个非空的索引位
        while(d->ht[0].table[d->rehashidx] == NULL) {
            d->rehashidx++;
            if (--empty_visits == 0) return 1;
        }
        // 取出该索引位上的结点链表
        de = d->ht[0].table[d->rehashidx];
        /* Move all the keys in this bucket from the old to the new hash HT */
        // 把所有结点迁移到新bucket中去
        while(de) {
            uint64_t h;

            nextde = de->next;
            /* Get the index in the new hash table */
            h = dictHashKey(d, de->key) & d->ht[1].sizemask;
            de->next = d->ht[1].table[h];
            d->ht[1].table[h] = de;
            d->ht[0].used--;
            d->ht[1].used++;
            de = nextde;
        }
        d->ht[0].table[d->rehashidx] = NULL;
        d->rehashidx++;
    }

    /* Check if we already rehashed the whole table... */
    // 检查是否旧表中的所有结点都被迁移到了新表
    // 如果是, 则置先释放原旧bucket数组, 再置ht[1]为ht[0]
    // 最后再置rehashidx=-1, 以示字典不处于平滑扩容状态
    if (d->ht[0].used == 0) {
        zfree(d->ht[0].table);
        d->ht[0] = d->ht[1];
        _dictReset(&d->ht[1]);
        d->rehashidx = -1;
        return 0;
    }

    /* More to rehash... */
    return 1;
}
总结:
字典的实现很复杂, 主要是实现了平滑扩容逻辑 用户数据均是以指针形式间接由dictEntry结构持有, 故在平滑扩容过程中, 不涉及用户数据的拷贝 有安全迭代器可用, 安全迭代器保证, 在迭代起始时, 字典中的所有结点, 都会被迭代到, 即使在迭代过程中对字典有插入操作 字典内部使用的默认散列函数其实也非常有讲究, 不过限于篇幅, 这里不展开讲. 并且字典的实现给了使用者非常大的灵活性(dictType结构与dict.privdata字段), 对于一些特定场合使用的键数据, 用户可以自行选择更高效更特定化的散列函数
2.4 zskiplist
zskiplist是Redis实现的一种特殊的跳跃表. 跳跃表是一种基于线性表实现简单的搜索结构, 其最大的特点就是: 实现简单, 性能能逼近各种搜索树结构. 血统纯正的跳跃表的介绍在维基百科中即可查阅. 在Redis中, 在原版跳跃表的基础上, 进行了一些小改动, 即是现在要介绍的zskiplist结构.
其定义在src/server.h中, 如下:
/* ZSETs use a specialized version of Skiplists */
typedef struct zskiplistNode {
    sds ele;
    double score;
    struct zskiplistNode *backward;
    struct zskiplistLevel {
        struct zskiplistNode *forward;
        unsigned int span;
    } level[];
} zskiplistNode;

typedef struct zskiplist {
    struct zskiplistNode *header, *tail;
    unsigned long length;
    int level;
} zskiplist;
其内存布局如下图:
zskiplist的核心设计要点为:
- 头结点不持有任何数据, 且其level[]的长度为32
- 每个结点, 除了持有数据的ele字段, 还有一个字段score, 其标示着结点的得分, 结点之间凭借得分来判断先后顺序, 跳跃表中的结点按结点的得分升序排列.
- 每个结点持有一个backward指针, 这是原版跳跃表中所没有的. 该指针指向结点的前一个紧邻结点.
- 每个结点中最多持有32个zskiplistLevel结构. 实际数量在结点创建时, 按幂次定律随机生成(不超过32). 每个zskiplistLevel中有两个字段.
- forward字段指向比自己得分高的某个结点(不一定是紧邻的), 并且, 若当前zskiplistLevel实例在level[]中的索引为X, 则其forward字段指向的结点, 其level[]字段的容量至少是X+1. 这也是上图中, 为什么forward指针总是画的水平的原因.
- span字段代表forward字段指向的结点, 距离当前结点的距离. 紧邻的两个结点之间的距离定义为1.
- zskiplist中持有字段level, 用以记录所有结点(除过头结点外), level[]数组最长的长度.
跳跃表主要用于, 在给定一个分值的情况下, 查找与该分值最接近的结点. 搜索时, 伪代码如下:
int level = zskiplist->level - 1;
zskiplistNode p = zskiplist->head;

while(1 && p)
{
    zskiplistNode q = (p->level)[level]->forward:
    if(q->score > 分值)
    {
        if(level > 0)
        {
            level--;
        }
        else
        {
            return :
                q为整个跳跃表中, 分值大于指定分值的第一个结点
                q->backward为整个跳跃表中, 分值小于或等于指定分值的最后一个结点
        }
    }
    else
    {
        p = q;
    }
}
跳跃表的实现比较简单, 最复杂的操作即是插入与删除结点, 需要仔细处理邻近结点的所有level[]中的所有zskiplistLevel结点中的forward与span的值的变更.
另外, 关于新创建的结点, 其level[]数组长度的随机算法, 在接口zslInsert的实现中, 核心代码片断如下:
zskiplistNode *zslInsert(zskiplist *zsl, double score, sds ele) {
    //...

    level = zslRandomLevel();   // 随机生成新结点的, level[]数组的长度
        if (level > zsl->level) {
        // 若生成的新结点的level[]数组的长度比当前表中所有结点的level[]的长度都大
        // 那么头结点中需要新增几个指向该结点的指针
        // 并刷新ziplist中的level字段
        for (i = zsl->level; i < level; i++) {
            rank[i] = 0;
            update[i] = zsl->header;
            update[i]->level[i].span = zsl->length;
        }
        zsl->level = level;
    }
    x = zslCreateNode(level,score,ele); // 创建新结点
    //... 执行插入操作
}

// 按幂次定律生成小于32的随机数的函数
// 宏 ZSKIPLIST_MAXLEVEL 的定义为32, 宏 ZSKIPLIST_P 被设定为 0.25
// 即
//      level == 1的概率为 75%
//      level == 2的概率为 75% * 25%
//      level == 3的概率为 75% * 25% * 25%
//      ...
//      level == 31的概率为 0.75 * 0.25^30
//      而
//      level == 32的概率为 0.75 * sum(i = 31 ~ +INF){ 0.25^i }
int zslRandomLevel(void) {
    int level = 1;
    while ((random()&0xFFFF) < (ZSKIPLIST_P * 0xFFFF))
        level += 1;
    return (level
2.5 intset
这是一个用于存储在序的整数的数据结构, 也底层数据结构中最简单的一个, 其定义与实现在src/intest.h与src/intset.c中, 关键定义如下:
typedef struct intset {
    uint32_t encoding;
    uint32_t length;
    int8_t contents[];
} intset;

#define INTSET_ENC_INT16 (sizeof(int16_t))
#define INTSET_ENC_INT32 (sizeof(int32_t))
#define INTSET_ENC_INT64 (sizeof(int64_t))
inset结构中的encoding的取值有三个, 分别是宏INTSET_ENC_INT16, INTSET_ENC_INT32, INTSET_ENC_INT64. length代表其中存储的整数的个数, contents指向实际存储数值的连续内存区域. 其内存布局如下图所示:
- intset中各字段, 包括contents中存储的数值, 都是以主机序(小端字节序)存储的. 这意味着Redis若运行在PPC这样的大端字节序的机器上时, 存取数据都会有额外的字节序转换开销
- 当encoding == INTSET_ENC_INT16时, contents中以int16_t的形式存储着数值. 类似的, 当encoding == INTSET_ENC_INT32时, contents中以int32_t的形式存储着数值.
- 但凡有一个数值元素的值超过了int32_t的取值范围, 整个intset都要进行升级, 即所有的数值都需要以int64_t的形式存储. 显然升级的开销是很大的.
- intset中的数值是以升序排列存储的, 插入与删除的复杂度均为O(n). 查找使用二分法, 复杂度为O(log_2(n))
- intset的代码实现中, 不预留空间, 即每一次插入操作都会调用zrealloc接口重新分配内存. 每一次删除也会调用zrealloc接口缩减占用的内存. 省是省了, 但内存操作的时间开销上升了.
- intset的编码方式一经升级, 不会再降级.
总之, intset适合于如下数据的存储:
- 所有数据都位于一个稳定的取值范围中. 比如均位于int16_t或int32_t的取值范围中
- 数据稳定, 插入删除操作不频繁. 能接受O(lgn)级别的查找开销
2.6 ziplist
ziplist是Redis底层数据结构中, 最苟的一个结构. 它的设计宗旨就是: 省内存, 从牙缝里省内存. 设计思路和TLV一致, 但为了从牙缝里节省内存, 做了很多额外工作.
ziplist的内存布局与intset一样: 就是一块连续的内存空间. 但区域划分比较复杂, 概览如下图:
- 和intset一样, ziplist中的所有值都是以小端序存储的
- zlbytes字段的类型是uint32_t, 这个字段中存储的是整个ziplist所占用的内存的字节数
- zltail字段的类型是uint32_t, 它指的是ziplist中最后一个entry的偏移量. 用于快速定位最后一个entry, 以快速完成pop等操作
- zllen字段的类型是uint16_t, 它指的是整个ziplit中entry的数量. 这个值只占16位, 所以蛋疼的地方就来了: 如果ziplist中entry的数目小于65535, 那么该字段中存储的就是实际entry的值. 若等于或超过65535, 那么该字段的值固定为65535, 但实际数量需要一个个entry的去遍历所有entry才能得到.
- zlend是一个终止字节, 其值为全F, 即0xff. ziplist保证任何情况下, 一个entry的首字节都不会是255
在画图展示entry的内存布局之前, 先讲一下entry中都存储了哪些信息:
- 每个entry中存储了它前一个entry所占用的字节数. 这样支持ziplist反向遍历.
- 每个entry用单独的一块区域, 存储着当前结点的类型: 所谓的类型, 包括当前结点存储的数据是什么(二进制, 还是数值), 如何编码(如果是数值, 数值如何存储, 如果是二进制数据, 二进制数据的长度)
- 最后就是真实的数据了
entry的内存布局如下所示:
prevlen即是"前一个entry所占用的字节数", 它本身是一个变长字段, 规约如下:
- 若前一个entry占用的字节数小于 254, 则prevlen字段占一字节
- 若前一个entry占用的字节数等于或大于 254, 则prevlen字段占五字节: 第一个字节值为 254, 即0xfe, 另外四个字节, 以uint32_t存储着值.
encoding字段的规约就复杂了许多
- 若数据是二进制数据, 且二进制数据长度小于64字节(不包括64), 那么encoding占一字节. 在这一字节中, 高两位值固定为0, 低六位值以无符号整数的形式存储着二进制数据的长度. 即 00xxxxxx, 其中低六位bitxxxxxx是用二进制保存的数据长度.
- 若数据是二进制数据, 且二进制数据长度大于或等于64字节, 但小于16384(不包括16384)字节, 那么encoding占用两个字节. 在这两个字节16位中, 第一个字节的高两位固定为01, 剩余的14个位, 以小端序无符号整数的形式存储着二进制数据的长度, 即 01xxxxxx, yyyyyyyy, 其中yyyyyyyy是高八位, xxxxxx是低六位.
- 若数据是二进制数据, 且二进制数据的长度大于或等于16384字节, 但小于2^32-1字节, 则encoding占用五个字节. 第一个字节是固定值10000000, 剩余四个字节, 按小端序uint32_t的形式存储着二进制数据的长度. 这也是ziplist能存储的二进制数据的最大长度, 超过2^32-1字节的二进制数据, ziplist无法存储.
- 若数据是整数值, 则encoding和data的规约如下:
- 首先, 所有存储数值的entry, 其encoding都仅占用一个字节. 并且最高两位均是11
- 若数值取值范围位于[0, 12]中, 则encoding和data挤在同一个字节中. 即为1111 0001~1111 1101, 高四位是固定值, 低四位的值从0001至1101, 分别代表 0 ~ 12这十五个数值
- 若数值取值范围位于[-128, -1] [13, 127]中, 则encoding == 0b 1111 1110. 数值存储在紧邻的下一个字节, 以int8_t形式编码
- 若数值取值范围位于[-32768, -129] [128, 32767]中, 则encoding == 0b 1100 0000. 数值存储在紧邻的后两个字节中, 以小端序int16_t形式编码
- 若数值取值范围位于[-8388608, -32769] [32768, 8388607]中, 则encoding == 0b 1111 0000. 数值存储在紧邻的后三个字节中, 以小端序存储, 占用三个字节.
- 若数值取值范围位于[-2^31, -8388609] [8388608, 2^31 - 1]中, 则encoding == 0b 1101 0000. 数值存储在紧邻的后四个字节中, 以小端序int32_t形式编码
- 若数值取值均不在上述范围, 但位于int64_t所能表达的范围内, 则encoding == 0b 1110 0000, 数值存储在紧邻的后八个字节中, 以小端序int64_t形式编码
在大规模数值存储中, ziplist几乎不浪费内存空间, 其苟的程序到达了字节级别, 甚至对于[0, 12]区间的数值, 连data里的那一个字节也要省下来. 显然, ziplist是一种特别节省内存的数据结构, 但它的缺点也十分明显:
- 和intset一样, ziplist也不预留内存空间, 并且在移除结点后, 也是立即缩容, 这代表每次写操作都会进行内存分配操作.
- ziplist最蛋疼的一个问题是: 结点如果扩容, 导致结点占用的内存增长, 并且超过254字节的话, 可能会导致链式反应: 其后一个结点的entry.prevlen需要从一字节扩容至五字节. 最坏情况下, 第一个结点的扩容, 会导致整个ziplist表中的后续所有结点的entry.prevlen字段扩容. 虽然这个内存重分配的操作依然只会发生一次, 但代码中的时间复杂度是o(N)级别, 因为链式扩容只能一步一步的计算. 但这种情况的概率十分的小, 一般情况下链式扩容能连锁反映五六次就很不幸了. 之所以说这是一个蛋疼问题, 是因为, 这样的坏场景下, 其实时间复杂度并不高: 依次计算每个entry新的空间占用, 也就是o(N), 总体占用计算出来后, 只执行一次内存重分配, 与对应的memmove操作, 就可以了. 蛋疼说的是: 代码特别难写, 难读. 下面放一段处理插入结点时处理链式反应的代码片断, 大家自行感受一下:
unsigned char *__ziplistInsert(unsigned char *zl, unsigned char *p, unsigned char *s, unsigned int slen) {
    size_t curlen = intrev32ifbe(ZIPLIST_BYTES(zl)), reqlen;
    unsigned int prevlensize, prevlen = 0;
    size_t offset;
    int nextdiff = 0;
    unsigned char encoding = 0;
    long long value = 123456789; /* initialized to avoid warning. Using a value
                                    that is easy to see if for some reason
                                    we use it uninitialized. */
    zlentry tail;

    /* Find out prevlen for the entry that is inserted. */
    if (p[0] != ZIP_END) {
        ZIP_DECODE_PREVLEN(p, prevlensize, prevlen);
    } else {
        unsigned char *ptail = ZIPLIST_ENTRY_TAIL(zl);
        if (ptail[0] != ZIP_END) {
            prevlen = zipRawEntryLength(ptail);
        }
    }

    /* See if the entry can be encoded */
    if (zipTryEncoding(s,slen,&value,&encoding)) {
        /* 'encoding' is set to the appropriate integer encoding */
        reqlen = zipIntSize(encoding);
    } else {
        /* 'encoding' is untouched, however zipStoreEntryEncoding will use the
         * string length to figure out how to encode it. */
        reqlen = slen;
    }
    /* We need space for both the length of the previous entry and
     * the length of the payload. */
    reqlen += zipStorePrevEntryLength(NULL,prevlen);
    reqlen += zipStoreEntryEncoding(NULL,encoding,slen);

    /* When the insert position is not equal to the tail, we need to
     * make sure that the next entry can hold this entry's length in
     * its prevlen field. */
    int forcelarge = 0;
    nextdiff = (p[0] != ZIP_END) ? zipPrevLenByteDiff(p,reqlen) : 0;
    if (nextdiff == -4 && reqlen < 4) {
        nextdiff = 0;
        forcelarge = 1;
    }

    /* Store offset because a realloc may change the address of zl. */
    offset = p-zl;
    zl = ziplistResize(zl,curlen+reqlen+nextdiff);
    p = zl+offset;

    /* Apply memory move when necessary and update tail offset. */
    if (p[0] != ZIP_END) {
        /* Subtract one because of the ZIP_END bytes */
        memmove(p+reqlen,p-nextdiff,curlen-offset-1+nextdiff);

        /* Encode this entry's raw length in the next entry. */
        if (forcelarge)
            zipStorePrevEntryLengthLarge(p+reqlen,reqlen);
        else
            zipStorePrevEntryLength(p+reqlen,reqlen);

        /* Update offset for tail */
        ZIPLIST_TAIL_OFFSET(zl) =
            intrev32ifbe(intrev32ifbe(ZIPLIST_TAIL_OFFSET(zl))+reqlen);

        /* When the tail contains more than one entry, we need to take
         * "nextdiff" in account as well. Otherwise, a change in the
         * size of prevlen doesn't have an effect on the *tail* offset. */
        zipEntry(p+reqlen, &tail);
        if (p[reqlen+tail.headersize+tail.len] != ZIP_END) {
            ZIPLIST_TAIL_OFFSET(zl) =
                intrev32ifbe(intrev32ifbe(ZIPLIST_TAIL_OFFSET(zl))+nextdiff);
        }
    } else {
        /* This element will be the new tail. */
        ZIPLIST_TAIL_OFFSET(zl) = intrev32ifbe(p-zl);
    }

    /* When nextdiff != 0, the raw length of the next entry has changed, so
     * we need to cascade the update throughout the ziplist */
    if (nextdiff != 0) {
        offset = p-zl;
        zl = __ziplistCascadeUpdate(zl,p+reqlen);
        p = zl+offset;
    }

    /* Write the entry */
    p += zipStorePrevEntryLength(p,prevlen);
    p += zipStoreEntryEncoding(p,encoding,slen);
    if (ZIP_IS_STR(encoding)) {
        memcpy(p,s,slen);
    } else {
        zipSaveInteger(p,value,encoding);
    }
    ZIPLIST_INCR_LENGTH(zl,1);
    return zl;
}

unsigned char *__ziplistCascadeUpdate(unsigned char *zl, unsigned char *p) {
    size_t curlen = intrev32ifbe(ZIPLIST_BYTES(zl)), rawlen, rawlensize;
    size_t offset, noffset, extra;
    unsigned char *np;
    zlentry cur, next;

    while (p[0] != ZIP_END) {
        zipEntry(p, &cur);
        rawlen = cur.headersize + cur.len;
        rawlensize = zipStorePrevEntryLength(NULL,rawlen);

        /* Abort if there is no next entry. */
        if (p[rawlen] == ZIP_END) break;
        zipEntry(p+rawlen, &next);

        /* Abort when "prevlen" has not changed. */
        if (next.prevrawlen == rawlen) break;

        if (next.prevrawlensize < rawlensize) {
            /* The "prevlen" field of "next" needs more bytes to hold
             * the raw length of "cur". */
            offset = p-zl;
            extra = rawlensize-next.prevrawlensize;
            zl = ziplistResize(zl,curlen+extra);
            p = zl+offset;

            /* Current pointer and offset for next element. */
            np = p+rawlen;
            noffset = np-zl;

            /* Update tail offset when next element is not the tail element. */
            if ((zl+intrev32ifbe(ZIPLIST_TAIL_OFFSET(zl))) != np) {
                ZIPLIST_TAIL_OFFSET(zl) =
                    intrev32ifbe(intrev32ifbe(ZIPLIST_TAIL_OFFSET(zl))+extra);
            }

            /* Move the tail to the back. */
            memmove(np+rawlensize,
                np+next.prevrawlensize,
                curlen-noffset-next.prevrawlensize-1);
            zipStorePrevEntryLength(np,rawlen);

            /* Advance the cursor */
            p += rawlen;
            curlen += extra;
        } else {
            if (next.prevrawlensize > rawlensize) {
                /* This would result in shrinking, which we want to avoid.
                 * So, set "rawlen" in the available bytes. */
                zipStorePrevEntryLengthLarge(p+rawlen,rawlen);
            } else {
                zipStorePrevEntryLength(p+rawlen,rawlen);
            }

            /* Stop here, as the raw length of "next" has not changed. */
            break;
        }
    }
    return zl;
}
这种代码的特点就是: 最好由作者去维护, 最好一次性写对. 因为读起来真的费劲, 改起来也很费劲.
2.7 quicklist
如果说ziplist是整个Redis中为了节省内存, 而写的最苟的数据结构, 那么称quicklist就是在最苟的基础上, 再苟了一层. 这个结构是Redis在3.2版本后新加的, 在3.2版本之前, 我们可以讲, dict是最复杂的底层数据结构, ziplist是最苟的底层数据结构. 在3.2版本之后, 这两个记录被双双刷新了.
这是一种, 以ziplist为结点的, 双端链表结构. 宏观上, quicklist是一个链表, 微观上, 链表中的每个结点都是一个ziplist.
它的定义与实现分别在src/quicklist.h与src/quicklist.c中, 其中关键定义如下:
/* Node, quicklist, and Iterator are the only data structures used currently. */

/* quicklistNode is a 32 byte struct describing a ziplist for a quicklist.
 * We use bit fields keep the quicklistNode at 32 bytes.
 * count: 16 bits, max 65536 (max zl bytes is 65k, so max count actually < 32k).
 * encoding: 2 bits, RAW=1, LZF=2.
 * container: 2 bits, NONE=1, ZIPLIST=2.
 * recompress: 1 bit, bool, true if node is temporarry decompressed for usage.
 * attempted_compress: 1 bit, boolean, used for verifying during testing.
 * extra: 12 bits, free for future use; pads out the remainder of 32 bits */
typedef struct quicklistNode {
    struct quicklistNode *prev;
    struct quicklistNode *next;
    unsigned char *zl;
    unsigned int sz;             /* ziplist size in bytes */
    unsigned int count : 16;     /* count of items in ziplist */
    unsigned int encoding : 2;   /* RAW==1 or LZF==2 */
    unsigned int container : 2;  /* NONE==1 or ZIPLIST==2 */
    unsigned int recompress : 1; /* was this node previous compressed? */
    unsigned int attempted_compress : 1; /* node can't compress; too small */
    unsigned int extra : 10; /* more bits to steal for future usage */
} quicklistNode;

/* quicklistLZF is a 4+N byte struct holding 'sz' followed by 'compressed'.
 * 'sz' is byte length of 'compressed' field.
 * 'compressed' is LZF data with total (compressed) length 'sz'
 * NOTE: uncompressed length is stored in quicklistNode->sz.
 * When quicklistNode->zl is compressed, node->zl points to a quicklistLZF */
typedef struct quicklistLZF {
    unsigned int sz; /* LZF size in bytes*/
    char compressed[];
} quicklistLZF;

/* quicklist is a 40 byte struct (on 64-bit systems) describing a quicklist.
 * 'count' is the number of total entries.
 * 'len' is the number of quicklist nodes.
 * 'compress' is: -1 if compression disabled, otherwise it's the number
 *                of quicklistNodes to leave uncompressed at ends of quicklist.
 * 'fill' is the user-requested (or default) fill factor. */
typedef struct quicklist {
    quicklistNode *head;
    quicklistNode *tail;
    unsigned long count;        /* total count of all entries in all ziplists */
    unsigned long len;          /* number of quicklistNodes */
    int fill : 16;              /* fill factor for individual nodes */
    unsigned int compress : 16; /* depth of end nodes not to compress;0=off */
} quicklist;

typedef struct quicklistIter {
    const quicklist *quicklist;
    quicklistNode *current;
    unsigned char *zi;
    long offset; /* offset in current ziplist */
    int direction;
} quicklistIter;

typedef struct quicklistEntry {
    const quicklist *quicklist;
    quicklistNode *node;
    unsigned char *zi;
    unsigned char *value;
    long long longval;
    unsigned int sz;
    int offset;
} quicklistEntry;
这里定义了五个结构体:
- quicklistNode, 宏观上, quicklist是一个链表, 这个结构描述的就是链表中的结点. 它通过zl字段持有底层的ziplist. 简单来讲, 它描述了一个ziplist实例
- quicklistLZF, ziplist是一段连续的内存, 用LZ4算法压缩后, 就可以包装成一个quicklistLZF结构. 是否压缩quicklist中的每个ziplist实例是一个可配置项. 若这个配置项是开启的, 那么quicklistNode.zl字段指向的就不是一个ziplist实例, 而是一个压缩后的quicklistLZF实例
- quicklist. 这就是一个双链表的定义. head, tail分别指向头尾指针. len代表链表中的结点. count指的是整个quicklist中的所有ziplist中的entry的数目. fill字段影响着每个链表结点中ziplist的最大占用空间, compress影响着是否要对每个ziplist以LZ4算法进行进一步压缩以更节省内存空间.
- quicklistIter是一个迭代器
- quicklistEntry是对ziplist中的entry概念的封装. quicklist作为一个封装良好的数据结构, 不希望使用者感知到其内部的实现, 所以需要把ziplist.entry的概念重新包装一下.
quicklist的内存布局图如下所示:
下面是有关quicklist的更多额外信息:
quicklist.fill的值影响着每个链表结点中, ziplist的长度.
- 当数值为负数时, 代表以字节数限制单个ziplist的最大长度. 具体为:
- -1 不超过4kb
- -2 不超过 8kb
- -3 不超过 16kb
- -4 不超过 32kb
- -5 不超过 64kb
- 当数值为正数时, 代表以entry数目限制单个ziplist的长度. 值即为数目. 由于该字段仅占16位, 所以以entry数目限制ziplist的容量时, 最大值为2^15个
- quicklist.compress的值影响着quicklistNode.zl字段指向的是原生的ziplist, 还是经过压缩包装后的quicklistLZF
- 0 表示不压缩, zl字段直接指向ziplist
- 1 表示quicklist的链表头尾结点不压缩, 其余结点的zl字段指向的是经过压缩后的quicklistLZF
- 2 表示quicklist的链表头两个, 与末两个结点不压缩, 其余结点的zl字段指向的是经过压缩后的quicklistLZF
- 以此类推, 最大值为2^16
- quicklistNode.encoding字段, 以指示本链表结点所持有的ziplist是否经过了压缩. 1代表未压缩, 持有的是原生的ziplist, 2代表压缩过
- quicklistNode.container字段指示的是每个链表结点所持有的数据类型是什么. 默认的实现是ziplist, 对应的该字段的值是2, 目前Redis没有提供其它实现. 所以实际上, 该字段的值恒为2
- quicklistNode.recompress字段指示的是当前结点所持有的ziplist是否经过了解压. 如果该字段为1即代表之前被解压过, 且需要在下一次操作时重新压缩.
quicklist的具体实现代码篇幅很长, 这里就不贴代码片断了, 从内存布局上也能看出来, 由于每个结点持有的ziplist是有上限长度的, 所以在与操作时要考虑的分支情况比较多. 想想都蛋疼.
quicklist有自己的优点, 也有缺点, 对于使用者来说, 其使用体验类似于线性数据结构, list作为最传统的双链表, 结点通过指针持有数据, 指针字段会耗费大量内存. ziplist解决了耗费内存这个问题. 但引入了新的问题: 每次写操作整个ziplist的内存都需要重分配. quicklist在两者之间做了一个平衡. 并且使用者可以通过自定义quicklist.fill, 根据实际业务情况, 经验主义调参.
2.8 zipmap
dict作为字典结构, 优点很多, 扩展性强悍, 支持平滑扩容等等, 但对于字典中的键值均为二进制数据, 且长度都很小时, dict的中的一坨指针会浪费不少内存, 因此Redis又实现了一个轻量级的字典, 即为zipmap.
zipmap适合使用的场合是:
- 键值对量不大, 单个键, 单个值长度小
- 键值均是二进制数据, 而不是复合结构或复杂结构. dict支持各种嵌套, 字典本身并不持有数据, 而仅持有数据的指针. 但zipmap是直接持有数据的.
zipmap的定义与实现在src/zipmap.h与src/zipmap.c两个文件中, 其定义与实现均未定义任何struct结构体, 因为zipmap的内存布局就是一块连续的内存空间. 其内存布局如下所示:
- zipmap起始的第一个字节存储的是zipmap中键值对的个数. 如果键值对的个数大于254的话, 那么这个字节的值就是固定值254, 真实的键值对个数需要遍历才能获得.
- zipmap的最后一个字节是固定值0xFF
- zipmap中的每一个键值对, 称为一个entry, 其内存占用如上图, 分别六部分:
- len_of_key, 一字节或五字节. 存储的是键的二进制长度. 如果长度小于254, 则用1字节存储, 否则用五个字节存储, 第一个字节的值固定为0xFE, 后四个字节以小端序uint32_t类型存储着键的二进制长度.
- key_data为键的数据
- len_of_val, 一字节或五字节, 存储的是值的二进制长度. 编码方式同len_of_key
- len_of_free, 固定值1字节, 存储的是entry中未使用的空间的字节数. 未使用的空间即为图中的free, 它一般是由于键值对中的值被替换发生的. 比如, 键值对hello <-> word被修改为hello <-> w后, 就空了四个字节的闲置空间
- val_data, 为值的数据
- free, 为闲置空间. 由于len_of_free的值最大只能是254, 所以如果值的变更导致闲置空间大于254的话, zipmap就会回收内存空间.


