Qt调用onnxruntime推理maskrcnn模型
此内容为原创,转载请注明出处。
环境:
Ubuntu 18.04
python 3.8.5
opencv 4.4
onnx 1.9.0
c++ onnxruntime 1.8.0
opencv的安装我就不讲了,网上的教程多得是,这里讲一下onnxruntime的环境布置。
onnxruntime 下载地址: https://github.com/microsoft/onnxruntime
一般来说,页面右侧都有一个已经准备好的release版本,直接拉过来用就行。也是同事提醒我的,不然我还看不到,我眼睛一向不太好使。

下载好后解压放到/usr/local/目录下面,当然也可以放在其他位置,但我习惯放这里了。我当时下载的是1.8.0的版本,当我写这篇博客的时候官方已经升级到1.8.1的版本。

下面我们进入正题:
第一步 训练maskrcnn获得pth模型。
这一步就不着重讲了,pytorch官方有案例,照搬过来用就行,连样本图片都给准备好了。
案例地址:https://pytorch.org/tutorials/intermediate/torchvision_tutorial.html
如果还搞不定的话,这里还有篇更详细的官方教程讲解:https://blog.csdn.net/u013685264/article/details/100564660
第二步 在python中将maskrcnn转换成onnx的模型。
这里需要注意一下,模型训练时如果图片的尺寸全都一致,就可以使用固定尺寸的模型转换。
但如果像prtorch官方案例那种,图片尺寸没有固定的话,就需要使用动态的模型转换了。
动态尺寸的模型转换:
	import torchvision
	import onnxruntime as ort
	import numpy as np
	import onnx


    model = torchvision.models.detection.maskrcnn_resnet50_fpn(pretrained=False, num_classes=2)
    model.load_state_dict(torch.load('./output/model.pth')['model'])	# 训练保存的pth模型
    model.eval()
    data = torch.randn(1, 3, 1024, 1278)  # (图片数量, 通道数, 高, 宽) 这个宽高值可以随意
    input_names = ["image"]
    output_names = ['boxes', 'labels', 'scores', 'masks']

    # dynamic_axes 代表哪个轴可以变动。例如输入的images中,图片数量、高、宽可以变动,即为0, 2, 3
    torch.onnx.export(model, data, "./output/model.onnx",
                  export_params=True,
                  opset_version=11,
                  input_names=input_names,
                  output_names=output_names,
                  dynamic_axes={

                      'image': [0, 2, 3],
                      "boxes": [0],
                      "labels": [0],
                      "scores": [0],
                      "masks": [0, 2, 3]})
固定尺寸的模型转换:
	import torchvision
	import onnxruntime as ort
	import numpy as np
	import onnx


    model = torchvision.models.detection.maskrcnn_resnet50_fpn(pretrained=False, num_classes=3)
    model.load_state_dict(torch.load('./output/model.pth')['model'])
    model.eval()
    data = torch.rand(1, 3, 1024, 1278)  # (图片数量, 通道数, 高, 宽)
    input_names = ["image"]
    output_names = ['boxes', 'labels', 'scores', 'masks']

    torch.onnx._export(model, data, './output/model.onnx', export_params=True, opset_version=11, input_names=input_names, output_names=output_names)
这里我们采用的是第一种“动态尺寸的模型转换”,在output文件夹下得到了一个model.onnx的模型。
也不知道什么原因,我在转换模型的时候报了一溜的红,但最终还是得到了我想要的onnx模型,我也就没管它了,毕竟还是能用的嘛。
第三步 在python中测试onnx模型
得到onnx模型后,我们先在python中调用测试一下,保证模型能成功调用并获取正确的结果。
	import torch
	import cv2
	import torchvision
	import onnxruntime as ort
	import numpy as np
	import onnx


    img = cv2.imread('./PennFudanPed/PNGImages/FudanPed00001.png')
    img = cv2.cvtColor(img, cv2.COLOR_BGR2RGB)
    img = torch.from_numpy(img.transpose((2, 0, 1)))
    img = img.float().div(256)			# 据说这里也可以用255
    img = np.expand_dims(img, axis=0)   # 3维转4维。(3, 1024, 1278) >>> (1, 3, 1024, 1278)

    model = onnx.load('./output/model.onnx')
    onnx.checker.check_model(model)     # 检查模型格式是否完整及正确
    output = model.graph.output         # 获取输出层,包含层名称、维度信息
    print(output)

    ort_session = ort.InferenceSession('./output/model.onnx')
    outputs = ort_session.run(None, {
     'image': img})
    print(outputs)
我的代码中加载两次onnx,第一次load加载是为了检查onnx模型的输出层,并检查模型是否完整。第二次InferenceSession加载才是为了预测图片。如果不需要检查模型正确性的话,直接预测也是可以的。
这一步我也是一路报红,但最后还是能得到正确的结果,所以最后我也就懒得去刨根问底了。
第四步 Qt中调用onnx
这一部分要着重讲一讲,代码量会比python要多很多,当然前提是得先把onnx的c++库和头文件部署好。这一步没做好的,可以看我文章开头。
底下附有完整代码。
1. 添加库和头文件路径
Qt新建一个项目,打开pro文件,添加onnx的头文件和库路径,不然编译会报错找不到库。
INCLUDEPATH += /usr/local/onnxruntime-linux-x64-gpu-1.8.0/include/
LIBS += -L/usr/local/onnxruntime-linux-x64-gpu-1.8.0/lib/
LIBS += -lonnxruntime -lonnxruntime_providers_cuda -lonnxruntime_providers_shared
顺便我们把opencv的路径也添加进来,等会儿代码中要用。
INCLUDEPATH += /usr/local/opencv4-4/include/opencv4/
LIBS += -L/usr/local/opencv4-4/lib/
LIBS += -lopencv_core -lopencv_imgcodecs -lopencv_objdetect -lopencv_dnn -lopencv_imgproc
最后也就是这样子的:

2. 载入onnx模型
添加文件Demo.h和Demo.cpp,创建一个Demo的Class,把onnx需要的头文件include进去。
Demo.h中:
#include Demo.cpp中:
void Demo::demoModel(QString imagePath)
{

    Ort::Env env(ORT_LOGGING_LEVEL_WARNING, "test");    /** 初始化环境,每个进程一个环境.环境保留了线程池和其他状态信息 **/

    /**
    * 初始化Session选项
    * Available levels are
    * ORT_DISABLE_ALL -> 禁用所有优化
    * ORT_ENABLE_BASIC -> 要启用基本优化(如冗余节点删除)
    * ORT_ENABLE_EXTENDED -> 启用扩展优化(包括1级以上更复杂的优化,如节点融合)
    * ORT_ENABLE_ALL -> 启用所有可能的优化
    **/
    Ort::SessionOptions session_options;
    session_options.SetIntraOpNumThreads(1);
    session_options.SetGraphOptimizationLevel(GraphOptimizationLevel::ORT_ENABLE_EXTENDED); /** 设置图像优化级别 **/

    //*************************************************************************
    // 创建Session并把模型载入内存
#ifdef _WIN32
    const wchar_t* model_path = L"model.onnx";
#else
    const char* model_path = "model.onnx";
#endif
    printf("Using Onnxruntime C++ API\n");
    Ort::Session session(env, model_path, session_options);
3. 打印一下onnx的输入层信息
这一步只是用来打印一下信息的,也是为了熟悉API,如果觉得不需要的话可以跳过也不会报错。
先添加一下函数名。
Demo.h中:
private:
    void printInputModel(Ort::Session *session);
Demo.cpp中:
void Demo::printInputModel(Ort::Session *session)
{

    Ort::AllocatorWithDefaultOptions allocator;

    //打印模型输入节点的数量
    size_t num_input_nodes = session->GetInputCount();
    std::vector<const char*> input_node_names(num_input_nodes);
    std::vector<int64_t> input_node_dims;   /** 简化……该模型只有1个输入节点{1, 3, 1024, 1278}, 否则需要 vector> **/
    qDebug() << "输入节点数量 = " <<  num_input_nodes;

    // 遍历所有输入节点
    for (int i = 0; i < num_input_nodes; i++) {

        // 打印输入节点名称
        char* input_name = session->GetInputName(i, allocator);
        qDebug("输入节点第 %d 个: name=%s", i, input_name);
        input_node_names[i] = input_name;

        // 打印输入节点类型
        Ort::TypeInfo type_info = session->GetInputTypeInfo(i);
        auto tensor_info = type_info.GetTensorTypeAndShapeInfo();
        ONNXTensorElementDataType type = tensor_info.GetElementType();
        qDebug("输入节点第 %d 个: type=%d", i, type);

        // 打印输入 shapes/dims
        input_node_dims = tensor_info.GetShape();
        qDebug("输入节点第 %d 个: num_dims=%zu", i, input_node_dims.size());
        for (int j = 0; j < input_node_dims.size(); j++)
            qDebug("输入节点第 %d 个: dim %d=%jd", i, j, input_node_dims[j]);
    }
    return input_node_dims;
}
4. 打印一下输出层信息
这一步是打印模型预测输出时,会有那些节点信息,例如maskrcnn中的labels、scores、masks等。
当拿到一个陌生的模型时可以先输出看一下,当然如果你非常熟悉这个模型的话,这一步也可以跳过。
Demo.h中:
private:
    void printOutputModel(Ort::Session *session);
Demo.cpp中:
void Demo::printOutputModel(Ort::Session *session)
{

    Ort::AllocatorWithDefaultOptions allocator;
    //打印模型输出节点的数量
    size_t num_output_nodes = session->GetOutputCount();
    std::vector<const char*> output_node_names(num_output_nodes);
    std::vector<int64_t> output_node_dims;
    qDebug() << "输出节点数量 = " <<  num_output_nodes;

    // 遍历所有输出节点
    for (int i = 0; i < num_output_nodes; i++) {

        // 打印输出节点名称
        char* output_name = session->GetOutputName(i, allocator);
        qDebug("输出节点第 %d 个: name=%s", i, output_name);
        output_node_names[i] = output_name;

        // 打印输出节点类型
        Ort::TypeInfo type_info = session->GetOutputTypeInfo(i);
        auto tensor_info = type_info.GetTensorTypeAndShapeInfo();
        ONNXTensorElementDataType type = tensor_info.GetElementType();
        qDebug("输出节点第 %d 个: type=%d", i, type);

        // 打印输出 shapes/dims
        output_node_dims = tensor_info.GetShape();
        qDebug("输出节点第 %d 个: num_dims=%zu", i, output_node_dims.size());
        for (int j = 0; j < output_node_dims.size(); j++)
            qDebug("输出节点第 %d 个: dim %d=%jd", i, j, output_node_dims[j]);
    }
}
5. 预测图片
onnx模型需要输入一组Tensor的数据,onnx创建tensor数据时,需要给定一组值为0~1的float数组。
那么首先我们需要先写一个函数,能将cv::Mat转换为float数据。遍历图片的三个通道,依次将颜色值除以255填入vector< float >中。
Demo.h中:
private:
	void normalized(cv::Mat mat, std::vector<float> &out);
Demo.cpp中:
void Demo::normalized(cv::Mat input_tensor, std::vector<float> &output_data)
{

    std::size_t counter = 0;
    for (unsigned k = 0; k < 3; k++)
    {

        for (unsigned i = 0; i < input_tensor.rows; i++)
        {

            for (unsigned j = 0; j < input_tensor.cols; j++)
            {

                output_data[counter++]=static_cast<float>(input_tensor.at<cv::Vec3b>(i, j)[k]) / 255.0;
            }
        }
    }
}
接下来我们开始预测图片:
Demo.h中:
private:
	void predictImage(Ort::Session *session, QString imagePath);
Demo.cpp中:
void Demo::predictImage(Ort::Session *session, QString imgPath)
{
// 预处理图片
cv::Mat mat = cv::imread(imgPath.toStdString().data()); /** 读取需要预测的图片 **/
cv::cvtColor(mat, mat, cv::COLOR_BGR2RGB); /** 将图片的通道转变一下 **/
size_t input_tensor_size = mat.size().width * mat.size().height * 3;
std::vector<float> input_data(input_tensor_size);
normalized(mat, input_data); /** 归一化图片数据 **/
// 从数据值创建输入张量对象
std::vector<int64_t> input_node_dims = {
1, 3, mat.size().height, mat.size().width};
Ort::MemoryInfo memory_info = Ort::MemoryInfo::CreateCpu(OrtArenaAllocator, OrtMemTypeDefault);
Ort::Value input_tensor = Ort::Value::CreateTensor<float>(memory_info, input_data.data(), input_tensor_size, input_node_dims.data(), input_node_dims.size());
assert(input_tensor.IsTensor());
std::vector<Ort::Value> ort_inputs;
ort_inputs.push_back(std::move(input_tensor));
// 设计输入和输出的名字
std::vector<const char*> input_node_names = {
"image"};
std::vector<const char*> output_node_names = {
"boxes", "labels", "scores", "masks"};
// 输入图片数据,运行模型获取预测结果,
std::vector<Ort::Value> output_tensors = session->Run(Ort::RunOptions{
nullptr}, input_node_names.data(), ort_inputs.data(), 1, output_node_names.data(), 4);
assert(output_tensors.size() == 4 && output_tensors.front().IsTensor());
// 获取一下预测结果
Ort::AllocatorWithDefaultOptions allocator;
for(int i = 0; i < output_tensors.size(); i++) {
char* output_name = session->GetOutputName(i, allocator);
qDebug() << "/****************"<<output_name<<"*******************/";
Ort::Value *output = &output_tensors[i];
float *value = output->GetTensorMutableData<float>();
std::vector<int64_t> shape = output->GetTypeInfo().GetTensorTypeAndShapeInfo().GetShape();
int index = 0;
if(strcmp(output_name, "boxes") == 0){
std::vector<std::vector<QPointF>> boxes;
for(int x = 0; x < shape[0]; x++){
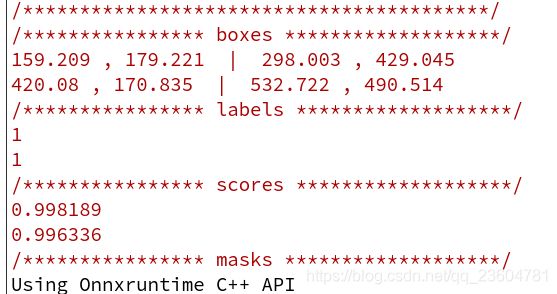
qDebug()<<value[index]<<","<<value[index+1]<<" | "<<value[index+2]<<","<<value[index+3];
std::vector<QPointF> points;
points.push_back(QPointF(value[index++],value[index++]));
points.push_back(QPointF(value[index++], value[index++]));
boxes.push_back(points);
}
}
if(strcmp(output_name, "labels") == 0){
std::vector<float> labels;
int64_t *labelV = output->GetTensorMutableData<int64_t>();
for(int x = 0; x < shape[0]; x++){
qDebug() << labelV[x];
labels.push_back(labelV[x]);
}
}
if(strcmp(output_name, "scores") == 0){
std::vector<float> scores;
for(int x = 0; x < shape[0]; x++){
qDebug() << value[x];
scores.push_back(value[x]);
}
}
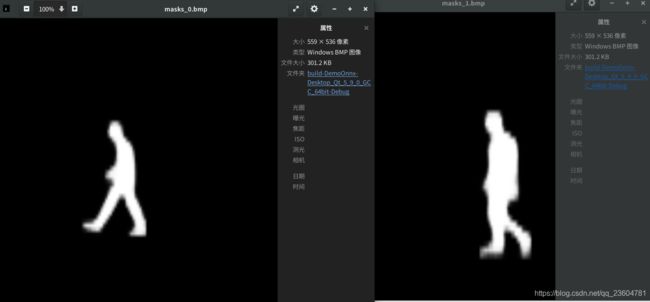
if(strcmp(output_name, "masks") == 0){
std::vector<cv::Mat> masks;
index = 0;
for(int x = 0; x < shape[0]; x++){
cv::Mat mask(shape[2], shape[3], CV_32FC1);
memcpy(mask.data, value + x * shape[2] * shape[3], shape[2]*shape[3] * sizeof(float));
QString name = QString("./masks_%1.bmp").arg(x);
cv::imwrite(name.toStdString().data(), mask*255);
masks.push_back(mask);
}
}
}
}
6. 完整代码
Demo.h
#ifndef DEMO_H
#define DEMO_H
#include Demo.cpp
#include "Demo.h"

Demo::Demo(QObject *parent) : QObject(parent)
{


}

void Demo::demoModel(QString imagePath)
{

    Ort::Env env(ORT_LOGGING_LEVEL_WARNING, "test");    /** 初始化环境,每个进程一个环境.环境保留了线程池和其他状态信息 **/

    /**
    * 初始化Session选项
    * Available levels are
    * ORT_DISABLE_ALL -> 禁用所有优化
    * ORT_ENABLE_BASIC -> 要启用基本优化(如冗余节点删除)
    * ORT_ENABLE_EXTENDED -> 启用扩展优化(包括1级以上更复杂的优化,如节点融合)
    * ORT_ENABLE_ALL -> 启用所有可能的优化
    **/
    Ort::SessionOptions session_options;
    session_options.SetIntraOpNumThreads(1);
    session_options.SetGraphOptimizationLevel(GraphOptimizationLevel::ORT_ENABLE_EXTENDED); /** 设置图像优化级别 **/

    //*************************************************************************
    // 创建Session并把模型载入内存
#ifdef _WIN32
    const wchar_t* model_path = L"model.onnx";
#else
    const char* model_path = "model2.onnx";
#endif
    printf("Using Onnxruntime C++ API\n");
    Ort::Session session(env, model_path, session_options);
    //*************************************************************************

    printInputModel(&session);  //打印一下模型输入层
    qDebug("/*****************************************/");
    printOutputModel(&session); //打印一下模型输出层
    qDebug("/*****************************************/");

    predictImage(&session, imagePath);

}

void Demo::printInputModel(Ort::Session *session)
{

    Ort::AllocatorWithDefaultOptions allocator;

    //打印模型输入节点的数量
    size_t num_input_nodes = session->GetInputCount();
    std::vector<const char*> input_node_names(num_input_nodes);
    std::vector<int64_t> input_node_dims;   /** 简化……该模型只有1个输入节点{1, 3, 1024, 1278}, 否则需要 vector> **/
    qDebug() << "输入节点数量 = " <<  num_input_nodes;

    // 遍历所有输入节点
    for (int i = 0; i < num_input_nodes; i++) {

        // 打印输入节点名称
        char* input_name = session->GetInputName(i, allocator);
        qDebug("输入节点第 %d 个: name=%s", i, input_name);
        input_node_names[i] = input_name;

        // 打印输入节点类型
        Ort::TypeInfo type_info = session->GetInputTypeInfo(i);
        auto tensor_info = type_info.GetTensorTypeAndShapeInfo();
        ONNXTensorElementDataType type = tensor_info.GetElementType();
        qDebug("输入节点第 %d 个: type=%d", i, type);

        // 打印输入 shapes/dims
        input_node_dims = tensor_info.GetShape();
        qDebug("输入节点第 %d 个: num_dims=%zu", i, input_node_dims.size());
        for (int j = 0; j < input_node_dims.size(); j++)
            qDebug("输入节点第 %d 个: dim %d=%jd", i, j, input_node_dims[j]);
    }
}

void Demo::printOutputModel(Ort::Session *session)
{

    Ort::AllocatorWithDefaultOptions allocator;
    //打印模型输出节点的数量
    size_t num_output_nodes = session->GetOutputCount();
    std::vector<const char*> output_node_names(num_output_nodes);
    std::vector<int64_t> output_node_dims;
    qDebug() << "输出节点数量 = " <<  num_output_nodes;

    // 遍历所有输出节点
    for (int i = 0; i < num_output_nodes; i++) {

        // 打印输出节点名称
        char* output_name = session->GetOutputName(i, allocator);
        qDebug("输出节点第 %d 个: name=%s", i, output_name);
        output_node_names[i] = output_name;

        // 打印输出节点类型
        Ort::TypeInfo type_info = session->GetOutputTypeInfo(i);
        auto tensor_info = type_info.GetTensorTypeAndShapeInfo();
        ONNXTensorElementDataType type = tensor_info.GetElementType();
        qDebug("输出节点第 %d 个: type=%d", i, type);

        // 打印输出 shapes/dims
        output_node_dims = tensor_info.GetShape();
        qDebug("输出节点第 %d 个: num_dims=%zu", i, output_node_dims.size());
        for (int j = 0; j < output_node_dims.size(); j++)
            qDebug("输出节点第 %d 个: dim %d=%jd", i, j, output_node_dims[j]);
    }
}

void Demo::predictImage(Ort::Session *session, QString imgPath)
{

    // 预处理图片
    cv::Mat mat = cv::imread(imgPath.toStdString().data());   /** 读取需要预测的图片 **/
    cv::cvtColor(mat, mat, cv::COLOR_BGR2RGB);                  /** 将图片的通道转变一下 **/
    size_t input_tensor_size = mat.size().width * mat.size().height * 3;
    std::vector<float> input_data(input_tensor_size);
    normalized(mat, input_data);                                /** 归一化图片数据 **/

    // 从数据值创建输入张量对象
    std::vector<int64_t> input_node_dims = {
     1, 3, mat.size().height, mat.size().width};
    Ort::MemoryInfo memory_info = Ort::MemoryInfo::CreateCpu(OrtArenaAllocator, OrtMemTypeDefault);
    Ort::Value input_tensor = Ort::Value::CreateTensor<float>(memory_info, input_data.data(), input_tensor_size, input_node_dims.data(), input_node_dims.size());
    assert(input_tensor.IsTensor());
    std::vector<Ort::Value> ort_inputs;
    ort_inputs.push_back(std::move(input_tensor));

    // 设计输入和输出的名字
    std::vector<const char*> input_node_names = {
     "image"};
    std::vector<const char*> output_node_names = {
     "boxes", "labels", "scores", "masks"};
    // 输入图片数据,运行模型获取预测结果,
    std::vector<Ort::Value> output_tensors = session->Run(Ort::RunOptions{
     nullptr}, input_node_names.data(), ort_inputs.data(), 1, output_node_names.data(), 4);
    assert(output_tensors.size() == 4 && output_tensors.front().IsTensor());

    // 获取一下预测结果
    Ort::AllocatorWithDefaultOptions allocator;
    for(int i = 0; i < output_tensors.size(); i++) {

        char* output_name = session->GetOutputName(i, allocator);
        qDebug() << "/****************"<<output_name<<"*******************/";
        Ort::Value *output = &output_tensors[i];
        float *value = output->GetTensorMutableData<float>();
        std::vector<int64_t> shape = output->GetTypeInfo().GetTensorTypeAndShapeInfo().GetShape();
        int index = 0;
        if(strcmp(output_name, "boxes") == 0){

            std::vector<std::vector<QPointF>> boxes;
            for(int x = 0; x < shape[0]; x++){

                qDebug()<<value[index]<<","<<value[index+1]<<" | "<<value[index+2]<<","<<value[index+3];
                std::vector<QPointF> points;
                points.push_back(QPointF(value[index++],value[index++]));
                points.push_back(QPointF(value[index++], value[index++]));
                boxes.push_back(points);
            }
        }
        if(strcmp(output_name, "labels") == 0){

            std::vector<float> labels;
            int64_t *labelV = output->GetTensorMutableData<int64_t>();
            for(int x = 0; x < shape[0]; x++){

                qDebug() << labelV[x];
                labels.push_back(value[x]);
            }
        }
        if(strcmp(output_name, "scores") == 0){

            std::vector<float> scores;
            for(int x = 0; x < shape[0]; x++){

                qDebug() << value[x];
                scores.push_back(value[x]);
            }
        }
        if(strcmp(output_name, "masks") == 0){

            std::vector<cv::Mat> masks;
            index = 0;
            for(int x = 0; x < shape[0]; x++){

                cv::Mat mask(shape[2], shape[3], CV_32FC1);
                memcpy(mask.data, value + x * shape[2] * shape[3], shape[2]*shape[3] * sizeof(float));
                QString name = QString("./masks_%1.bmp").arg(x);
                cv::imwrite(name.toStdString().data(), mask*255);
                masks.push_back(mask);
            }
        }

    }

}

void Demo::normalized(cv::Mat input_tensor, std::vector<float> &output_data)
{

    std::size_t counter = 0;
    for (unsigned k = 0; k < 3; k++)
    {

        for (unsigned i = 0; i < input_tensor.rows; i++)
        {

            for (unsigned j = 0; j < input_tensor.cols; j++)
            {

                output_data[counter++]=static_cast<float>(input_tensor.at<cv::Vec3b>(i, j)[k]) / 255.0;
            }
        }
    }
}
main.cpp中
#include 7. 输出结果
输入层和输出层的打印log太多了我就不放了,只放一下预测图片的输出结果。
masks的图片保存结果。