入门拾遗
Python的语言的介绍:
Python的作者是Guido van Rossum开发的,Guido开发python之前使用的是ABC语言,ABC语言是一门主要用于教学的语言,Guido在开发Python的时候借鉴了需要的ABC的可用之处,所以再后来包括Guido在内都认为Python的前身可以认为是ABC语言。为什么要叫Python语言,而不是叫Alex语言呢?是因为当时Gudio特别喜欢当地一个电视剧‘Month Python’s Flying Circus’故而Python这门语言就这样诞生了。它的第一个版本实现是在 MAC 电脑上,一直在 90 年代,PYTHON 的开放性、语法的简洁性大受很多程序员的喜欢,很 多人拿它来快速的开发一些脚本和工具,并不断的向官方 交新的代码和第三方 模块,因此 PYTHON 能做的事情也愈发多了起来,一些大公司像 YAHOO、EBAY 也开始在生产环境中使用 PYTHON。到了 2000 年 10 月 16 号,PYTHON2.0 发 布了,相比之前的 1.x 版本,实现了完整的垃圾回收,并且支持 UNICODE,同时 整个开发过程更加透明,社区对 PYTHON 的开发进度的影响逐渐增大。
Python的发展史:
从2000年的第一个2.0版本发布,到现在我们用的3.5的过程中有过一段部位人知的经历,如下:
|
||||||||||||||||||
|
||||||||||||||||||
|
||||||||||||||||||
| Python3和Python2区别在哪呢?小编就此简单的阐述下目知道的几个区别,不过大多数的优秀功能将得到延续,一些不好的使用方法将要丢弃,如下:
python2中如不生命是用utf-8的字符编码(_*_ conding:utf-8 _*_),代码中是不能出现中文的,但是python3中代码就不需要进行声明字符集了 某些库改名了
|
||||||||||||||||||
Python的安装:
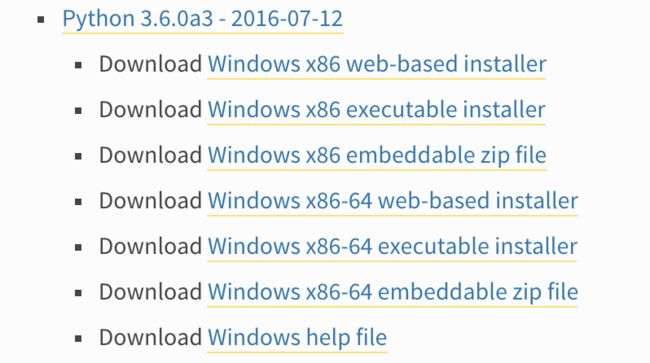
Win下面安装超级简单,只需要去到官网下载exe安装文件,然后双击安装就好了,如下:
下载地址为:https://www.python.org/downloads/windows/ 下载相应版本,安装即可,此处不在阐述如何安装。
Linux下面安装Python,同样只需要安装去到python官网下载源码包安装即可(当然linux系统下面默认是带python环境的,如果自带的环境不适用的你的生产环境可以在重新安装相应版本),我建议安装ubunt16.04LS 桌面版,系统默认有python2.7和python3.5两个版本的环境。在这我要说一点关于linux下面如果有两个版本的python的,如何正确使用python版本:
#首先找到我们默认使用python的环境命令在哪 sean@sean-Parallels-Virtual-Platform:~/python/s14$ cat hello.py #!/usr/bin/env python print 'Hello World!' print ('hello world!') #看一下执行结果 sean@sean-Parallels-Virtual-Platform:~/python/s14$ python hello.py Hello World! hello world! #我们更换python3的环境变量在进行测试这个脚本 sean@sean-Parallels-Virtual-Platform:/usr/bin$ ll /usr/bin/python lrwxrwxrwx 1 root root 18 7月 24 17:51 /usr/bin/python -> /usr/bin/python3.5* #在看一下执行结果,很明显执行报错了,那么可以断定这次使用python的环境为python3的版本 sean@sean-Parallels-Virtual-Platform:~/python/s14$ python hello.py File "hello.py", line 2 print 'Hello World!' ^ SyntaxError: Missing parentheses in call to 'print' |
你好,世界!!
在linux 下创建一个文件叫hello.py,并输入1
#!/usr/bin/env python
print ('Hello World!')
然后执行命令:python hello.py ,输出
sean@sean-Parallels-Virtual-Platform:~/python/s14$ python hello.py
hello world!
Python 解释器
看到别人的代码开头的有的写
#!/usr/bin/env python
#这种用法是为了防止操作系统用户没有将python装在默认的/usr/bin路径里。当系统看到这一行的时候,首先会到env设置里查找python的安装路径,再调用对应路径下的解释器程序完成操作
还有的人写
#!/usr/bin/python
#告诉操作系统执行这个脚本的时候,调用/usr/bin下的python解释器
前者相当于写死了python解释器的位置,后者会去环境变量下找python解释器,推荐使用后者;还有的人写的时候前面什么都没加,上来就是代码,这样的话,如果使用python FileName.py 这种方式运行脚本没有问题不报错;众所周知 linux下面我们经常使用./的方式进行运行脚本,但是当用./FileName.py的话,就会报错了,因为没有指定脚本的解释器是什么
变量
变量俗称可变的量,声明一个变量的目的是为了后面的调用,所以声明变量业内有一些规则,但是不强制,虽说变量名可以随便定义,但是定义的变量不规范的话,别人看你代码的话,肯定的非常淡定的说一句“这代码写的太low了”
简单说一下变量名的命名规范:
- 驼峰式
驼峰式:ConsumerUserName 就是每个单词的首字母大写
- 下标式
下标式: consumer_user_name 就是每个单词之间都用下划线隔开
- 不能使用的变量(python预留的关键字)
['and', 'as', 'assert', 'break', 'class', 'continue', 'def', 'del', 'elif', 'else', 'except', 'exec', 'finally', 'for','from',
'global', 'if','import', 'in', 'is', 'lambda', 'not', 'or', 'pass', 'print', 'raise', 'return', 'try', 'while', 'with', 'yield']
- 设定一个不想被更改的变量,我们可以是用全大写,比如:AGE = 25
>>>Name = 'sean'
>>> print(Name)
sean
>>>AGE = 25
>>> print(AGE)
25
关于变量的内存地址
>>>Name = 'sean' #我们先在内存中开辟一块空间并把变量指向Name
>>> id(Name) #查看一下这块空间的内存地址是多少
139912801423632
>>> Name2 = Name#我们把变量Name2也指向Name这个变量
>>> id(Name2)#看一下Name2的这个变量指向的内存地址是多少
139912801423632
>>> Name = 'xinsir' #开辟第二块空间,并把Name变量指向新的内存空间
>>> id(Name) #查看Name指向的内存地址
139912765407048
>>> id(Name2)#在查看Name2指向的内存地址
139912801423632
>>>
经过上述的内容,我们大概能得出如下的结论:
当创建一个变量的时候并赋予这个变量一个值,计算机大概做了如下的操作:开辟一块内存空间,并把变量指向这个内存空间。
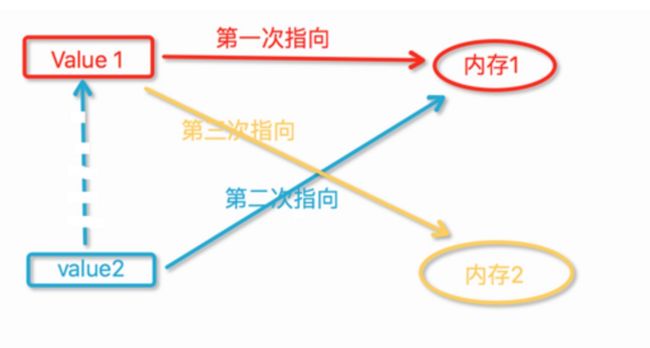
当用一个变量指向另一个变量的时候,计算机并不是指向了这一个变量,而是指向了这一个变量指定的内存地址,哎呀说不清楚,直接看图吧
当第三次指向生效后,第一次指向就不再生效了,故而Name变量指向了新的变量值,但Name2依旧没有改变,大概就是这个过程
字符编码
1字节=8bit 又叫8位,最早的ASCII码就是占一个字节(8位) 8位也就是二进制0000 0000,二进制8位最大表示数字位255,由于老外并不知道地球的另一边有其他世界的存在,所以他就在0-255之间选择0-127作为英文的存放,还预留了一半的空间作为扩展。但后后来中国人发现预留的这些空间远远不够存放中国博大精深的所有汉字,但是中国人有办法,中国人在128-255中间取了一部分用于存放汉字的索引,也可以说只要查找的位置落到了这一部分就代表着要存放汉字,在1980年中国的人们自己又创建了一个表存放中国汉字就产生了GB2312其中共收录了7445个字符,包括6763个汉字和682个其它符号;但是中国实在是博大精深在1995年又诞生了GBK编码共收录21886个符号,它分为汉字区和图形符号区,汉字区包括21003个字符。2000年的 GB18030是取代GBK1.0的正式国家标准。该标准收录了27484个汉字,同时还收录了藏文、蒙文、维吾尔文等主要的少数民族文字。现在的PC平台必须支持GB18030,对嵌入式产品暂不作要求。所以手机、MP3一般只支持GB2312。
显然ASCII码无法将世界上的各种文字和符号全部表示,所以,就需要新出一种可以代表所有字符和符号的编码,即:Unicode
Unicode(统一码、万国码、单一码)是一种在计算机上使用的字符编码。Unicode 是为了解决传统的字符编码方案的局限而产生的,它为每种语言中的每个字符设定了统一并且唯一的二进制编码,规定虽有的字符和符号最少由 16 位来表示(2个字节),即:2 **16 = 65536,
注:此处说的的是最少2个字节,可能更多
由于Unicode浪费了存储空间,无论存放中文还是英文都要是用16位来存放,平时50G的数据,使用Unicode就要使用100G,这显然不合适,这样就有了UTF-8的编码,这个编码存放英文将占用1个字节,存放中文占用3个字节。
如果使用python2里面不声明编码字符集,直接写中文那肯定会报错,因为他使用的是ASCII编码,如果使用中文,需要声明编码字符集位UTF-8就能解决问题了,如下:
bogon:d1 sean$ python hello.py
  File "hello.py", line 2
SyntaxError: Non-ASCII character '\xe4' in file hello.py on line 2, but no encoding declared; see http://python.org/dev/peps/pep-0263/ for details
bogon:d1 sean$ cat hello.py
#!/usr/bin/env    python
print '你好,世界!'
bogon:d1 sean$ python hello.py
你好,世界!
bogon:d1 sean$ cat hello.py
#!/usr/bin/env    python
#_*_ coding:utf-8 _*_
print '你好,世界!'
Python注释
单行注释使用#号
多行注释使用6个单引号或双引号 ’‘’ 注释内容 ‘’‘ ;“”“注释内容”“”
多行注释还可以一次性打印多行:
>>> msg = '''
... name = sean
... age = 25
... job = it
... '''
>>> print msg
name = sean
age = 25
job = it
>>>
用户输入
用户输入就是程序和用户的交互,程序等待用户输入一个参数。
关于python3和python2的用户输入函数详见Python2和python3的区别。
>>> name = input('please input your name:')
please input your name: sean
>>> print (name)
 sean
>>>
用户输入的时候在输入密码的时候一般都是加密的,这里再使用input()就不行了,别着急往下看:
sean@sean-Parallels-Virtual-Platform:~/python/s14$ cat login.py
#!/usr/bin/env    python
import getpass
passwd = getpass.getpass('please input your passwd:')
print (passwd)
sean@sean-Parallels-Virtual-Platform:~/python/s14$ python login.py
please input your passwd:
123
万恶的“+”号
加号的作用是用在拼接一个较长的字符串,见下面例子:
sean@sean-Parallels-Virtual-Platform:~/python/s14$ cat hello.py
#!/usr/bin/env    python
name = input('please input your name:')
age = input('please input your age:')
job = input('please input your job:')
salary = input('please input your salary:')
msg = '''
-------------info of '''+name+'''-----------------
    Name:'''+name+'''
    Age:''' +age+'''
    Job:'''+job+'''
    Salary:'''+salary
print (msg)

sean@sean-Parallels-Virtual-Platform:~/python/s14$ python hello.py
please input your name:Sean
please input your age:28
please input your job:it
please input your salary:2999

-------------info of Sean-----------------
    Name:Sean
    Age:28
    Job:it
    Salary:2999
字符串拼接
字符串凭借有很多种方法,我目前只知道有4种上面所说的万恶的加号是第一种也是最难用的一种,下面来介绍其余的三种
第二种 、使用百分号“%”
sean@sean-Parallels-Virtual-Platform:~/python/s14$ python hello.py
please input your name:XinZhiYu
please input your age:28
please input your job:It
please input your salary:90000

------------info of XinZhiYu-----------
Name: XinZhiYu
Age: 28
Job: It
Salary: 90000

sean@sean-Parallels-Virtual-Platform:~/python/s14$ cat hello.py
#!/usr/bin/env    python
name = input('please input your name:')
age = input('please input your age:')
job = input('please input your job:')
salary = input('please input your salary:')
msg = '''
------------info of %s-----------
Name: %s
Age: %s
Job: %s
Salary: %s
'''%(name,name,age,job,salary)
print (msg)
第三种、使用format函数
据说有的时候只能使用这种格式,但是目前我还不知道那种情况下必须使用这种格式的字符串拼接
sean@sean-Parallels-Virtual-Platform:~/python/s14$ cat hello.py
#!/usr/bin/env    python
name = input('please input your name:')
age = input('please input your age:')
job = input('please input your job:')
salary = input('please input your salary:')
msg = '''
------------info of {_name}-----------
Name: {_name}
Age: {_age}
Job: {_job}
Salary: {_salary}
'''.format(_name=name,_age=age,_job=job,_salary=salary)
print (msg)
sean@sean-Parallels-Virtual-Platform:~/python/s14$ python hello.py
please input your name:Xinsir
please input your age:28
please input your job:It
please input your salary:29090

------------info of Xinsir-----------
Name: Xinsir
Age: 28
Job: It
Salary: 29090
第四种、依然是format函数但是这里使用{0}{1}。。。,不在使用变量
sean@sean-Parallels-Virtual-Platform:~/python/s14$ cat hello.py
#!/usr/bin/env    python
name = input('please input your name:')
age = input('please input your age:')
job = input('please input your job:')
salary = input('please input your salary:')
msg = '''
------------info of {0}-----------
Name: {0}
Age: {1}
Job: {2}
Salary: {3}
'''.format(name,age,job,salary)
print (msg)
sean@sean-Parallels-Virtual-Platform:~/python/s14$ python hello.py
please input your name:XiaoXin
please input your age:28
please input your job:IT
please input your salary:28765

------------info of XiaoXin-----------
Name: XiaoXin
Age: 28
Job: IT
Salary: 28765
if...else...判断
if判断是shell的判断逻辑是一样的,但是格式有点查遍,往下看
sean@sean-Parallels-Virtual-Platform:~/python/s14$ cat if.py
#!/usr/bin/env    python
Name = input('please input your name:')
if Name == 'Sean':
    print ('Welcome Sean!')
else:
    print ('Sorry,Illegal users!')
sean@sean-Parallels-Virtual-Platform:~/python/s14$ python if.py
please input your name:Sean
Welcome Sean!
sean@sean-Parallels-Virtual-Platform:~/python/s14$ python if.py
please input your name:xiaoxin
Sorry,Illegal users!
sean@sean-Parallels-Virtual-Platform:~/python/s14$
for循环
for循环就是在指定的情况下循环指定次,往下看:
sean@sean-Parallels-Virtual-Platform:~/python/s14$ cat for.py
#!/usr/bin/env    python
for i in range(5):
    print ('loop:',i)
sean@sean-Parallels-Virtual-Platform:~/python/s14$ python for.py
loop: 0
loop: 1
loop: 2
loop: 3
loop: 4
for循环可以挨个循环,也可以跳着循环,上面是每个循环,如果我想打印1-10之间的所有基数呢?继续看:
sean@sean-Parallels-Virtual-Platform:~/python/s14$ cat for.py
#!/usr/bin/env    python
for i in range(1,10,2):
    print ('loop:',i)
sean@sean-Parallels-Virtual-Platform:~/python/s14$ python for.py
loop: 1
loop: 3
loop: 5
loop: 7
loop: 9
for...else...循环
for...else...循环就是当前面的循环正常执行完,没有跳出,后面的else将被执行
sean@sean-Parallels-Virtual-Platform:~/python/s14$ cat for.py
#!/usr/bin/env    python
for i in range(5):
    print ('loop:',i)
else:
    print ('OK!')
sean@sean-Parallels-Virtual-Platform:~/python/s14$ python for.py
loop: 0
loop: 1
loop: 2
loop: 3
loop: 4
OK!
sean@sean-Parallels-Virtual-Platform:~/python/s14$ cat for.py
#!/usr/bin/env    python
for i in range(5):
    if i > 3:
        break
    print ('loop:',i)
else:
    print ('OK!')
sean@sean-Parallels-Virtual-Platform:~/python/s14$ python for.py
loop: 0
loop: 1
loop: 2
loop: 3
while 循环
功能和for循环相差不多
sean@sean-Parallels-Virtual-Platform:~/python/s14$ cat while.py
#!/usr/bin/env    python
i = 0
while i < 10:
    print (i)
    i += 1
sean@sean-Parallels-Virtual-Platform:~/python/s14$ python while.py
0
1
2
3
4
5
6
7
8
9
sean@sean-Parallels-Virtual-Platform:~/python/s14$
while...else...循环
功能和for...else...循环相差不多
sean@sean-Parallels-Virtual-Platform:~/python/s14$ python while.py
0
1
2
3
4
5
sean@sean-Parallels-Virtual-Platform:~/python/s14$ vim while.py
sean@sean-Parallels-Virtual-Platform:~/python/s14$ cat while.py
#!/usr/bin/env    python
i = 0
while i < 10:
    if i > 5:
        break
    print (i)
    i += 1
else:
    print ('ok')
sean@sean-Parallels-Virtual-Platform:~/python/s14$ cat while.py
#!/usr/bin/env    python
i = 0
while i < 10:
    if i > 11:
        break
    print (i)
    i += 1
else:
    print ('ok')
sean@sean-Parallels-Virtual-Platform:~/python/s14$ python while.py
0
1
2
3
4
5
6
7
8
9
ok
sean@sean-Parallels-Virtual-Platform:~/python/s14$
i += 1
i+=1的效果等同于 i=i+1
break 与 continue 区别
在循环里面如果遇到break函数那么就跳出本次循环,如果遇到continue函数那么就跳出本次循环
循环嵌套
sean@sean-Parallels-Virtual-Platform:~/python/s14$ cat for.py
#!/usr/bin/env    python
i = 0
while i < 3:
    print ('while:',i)
    i += 1
    for x in range(0,3):
        print ('for:',x)
sean@sean-Parallels-Virtual-Platform:~/python/s14$ python for.py
while: 0
for: 0
for: 1
for: 2
while: 1
for: 0
for: 1
for: 2
while: 2
for: 0
for: 1
for: 2
跳出多层循环
break智能跳出一次循环,但是如果循环嵌套循环,想一次性跳出2曾循环,那改怎么办呢?往下看:
sean@sean-Parallels-Virtual-Platform:~/python/s14$ cat for.py
#!/usr/bin/env    python
i = 0
#定义一个跳出指示变量,当break_key等于true的时候,就告诉父循环跳出循环
break_key = 'false'
while i < 3:
    print ('while:',i)
    i += 1
    for x in range(0,3):
                #当内部循环等于2的时候,把外面的跳出指示变量设置为真
        if x == 2:
            break_key = 'true'
                        #跳出子循环
            break
        print ('for:',x)
    if break_key == 'true':
                #跳出父循环
        break
sean@sean-Parallels-Virtual-Platform:~/python/s14$ python for.py
while: 0
for: 0
for: 1

