SpringBoot-starter原理之手写
目录
一、前言
二、实现思路
2.1 命名规范
2.2 实现步骤
三、手写实现
3.1 新建第三方jar
3.2 新建starter工程
3.3 引入jar包
3.4 编写自动配置类
3.5 编写配置发现文件
3.6 打包发布
四、测试
一、前言
SpringBoot-starter的原理,在之前的文章中已作解析,可点此传送。
今天要来手动实现一个自己的SpringBoot-starter。
二、实现思路
2.1 命名规范
- Spring提供的starter命名规范spring-boot-starter-xxx.jar,如spring-boot-starter-web-2.1.3.jar
- 第三方提供的starter命名规范xxx-spring-boot-starter.jar,如druid-spring-boot-starter-1.1.13.jar
当然,只是规范而已,偏不按这个来也没关系。
2.2 实现步骤
- 准备需要引入的第三方的jar包
- 建自己的starter工程
- 引入spring-boot-starter、spring-boot-autoconfigure和第三方jar包(如需自动生成配置元信息文件META-INF/spring-configuration-metadata.json,加入spring-boot-configuration-processor)
- 编写自动配置类xxxAutoConfiguration
- 编写发现配置文件spring.factories
- 打包发布
三、手写实现
3.1 新建第三方jar
新建Maven工程share,在新建的包com.szh.share中新建类ShareDemo,加入一些属性和一个方法,如下:

接着mvn命令打包为share-0.0.1.jar,待starter引入。
3.2 新建starter工程
新建Maven工程share-spring-boot-starter,新建包com.szh.share.spring.boot.autoconfigure。
3.3 引入jar包
右键工程名share-spring-boot-starter,选择Maven,继续选择Add Dependency,输入框中输入spring-boot-starter并确认,如下:

同样地,引入spring-boot-autoconfigure.jar和share-0.0.1.jar,以及spring-boot-configuration-processor.jar。最后的pom依赖如下:
      junit
      junit
      3.8.1
      test


        org.springframework.boot
        spring-boot-starter
        2.1.3.RELEASE


        org.springframework.boot
        spring-boot-autoconfigure
        2.1.3.RELEASE


        org.springframework.boot
        spring-boot-configuration-processor
        2.1.3.RELEASE


        com.szh
        share
        0.0.1
3.4 编写自动配置类
在starter工程的包com.szh.share.spring.boot.autoconfigure中,新建自动配置类ShareAutoConfiguration,因为它是一份配置,所以为其添加注解@Configuration;因为这份配置里需要有配置bean,所以在新建的方法上添加注解@Bean,并返回share-0.0.1.jar中的ShareDemo;因为这个starter的配置属性也是来源于被引用的项目中的application.xml,所以在自动配置类ShareAutoConfiguration上添加注解@EnableConfigurationProperties(ShareProperties.class),以此启用配置属性ShareProperties。
紧接着,再去包com.szh.share.spring.boot.autoconfigure中新建配置属性类ShareProperties,添加注解@ConfigurationProperties(prefix = "szh.share"),代表application.xml中以szh.share为前缀的属性都是属于share-spring-boot-starter的;另外需在它里面定义需要的配置属性。
ShareProperties代码如下:
package com.szh.share.spring.boot.autoconfigure;

import org.springframework.boot.context.properties.ConfigurationProperties;

@ConfigurationProperties(prefix = "szh.share")
public class ShareProperties {

    private String name;
    private String desc;
    private String url;
    /**
     * 用户名属性
     */
    private String username;
    private String password;

    public String getName() {
        return name;
    }
    public void setName(String name) {
        this.name = name;
    }
    public String getDesc() {
        return desc;
    }
    public void setDesc(String desc) {
        this.desc = desc;
    }
    public String getUrl() {
        return url;
    }
    public void setUrl(String url) {
        this.url = url;
    }
    public String getUsername() {
        return username;
    }
    public void setUsername(String username) {
        this.username = username;
    }
    public String getPassword() {
        return password;
    }
    public void setPassword(String password) {
        this.password = password;
    }
}
ShareAutoConfiguration代码如下:
package com.szh.share.spring.boot.autoconfigure;

import org.springframework.boot.context.properties.EnableConfigurationProperties;
import org.springframework.context.annotation.Bean;
import org.springframework.context.annotation.Configuration;

import com.szh.share.ShareDemo;

@Configuration
@EnableConfigurationProperties(ShareProperties.class)
public class ShareAutoConfiguration {

    @Bean
    public ShareDemo getShareDemo(ShareProperties shareProperties) {
        ShareDemo shareDemo = new ShareDemo();
        shareDemo.setName(shareProperties.getName());
        shareDemo.setDesc(shareProperties.getDesc());
        shareDemo.setUrl(shareProperties.getUrl());
        shareDemo.setUsername(shareProperties.getUsername());
        shareDemo.setPassword(shareProperties.getPassword());
        return shareDemo;
    }
}
3.5 编写配置发现文件
为starter工程新建文件夹META-INF,新建配置发现文件spring.factories,将自动配置类加入进去,内容如下:
# Auto Configure
org.springframework.boot.autoconfigure.EnableAutoConfiguration=\
com.szh.share.spring.boot.autoconfigure.ShareAutoConfiguration
3.6 打包发布
在打包之前,我们肯定是需要将META-INF/spring.factories文件也打进去,因此pom.xml中还需加入以下构建配置:
            META-INF
            META-INF/
接着mvn命令打包为share-spring-boot-starter-0.0.1.jar,待另外的工程引入。这里打开看看打包好的share-spring-boot-starter-0.0.1.jar:
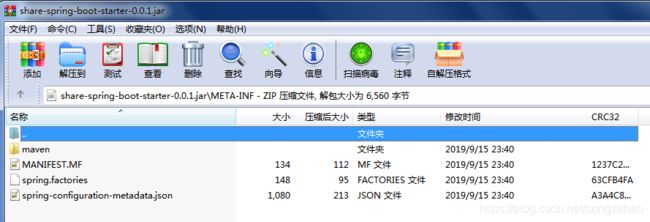
META-INF/spring-configuration-metadata.json则是spring-boot-configuration-processor帮我们创建的ShareProperties元数据文件,凭借它的介绍,我们可以在application.xml中准确配置使用。
四、测试
新建另外的工程,引入share-spring-boot-starter-0.0.1.jar,查看是否可以自动依赖第三方jar包share-0.0.1.jar,在application.xml中配置szh.share.name、szh.share.url等,查看是否可以成功注入share-spring-boot-starter中的bean——ShareDemo,它的配置属性是否生效。