Seata1.4.2-分布式事务-Seata实战
文章目录
-
- 什么是分布式事务问题?
-
- 单体应用
- 微服务应用
- 总结
- Seata简介
- Seata原理和设计
-
- 定义一个分布式事务
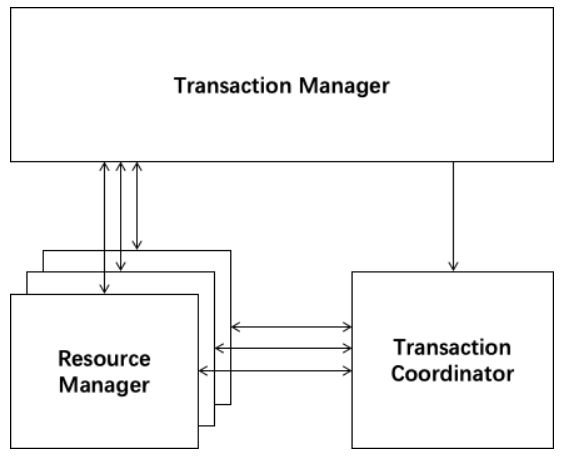
- 协议分布式事务处理过程的三个组件
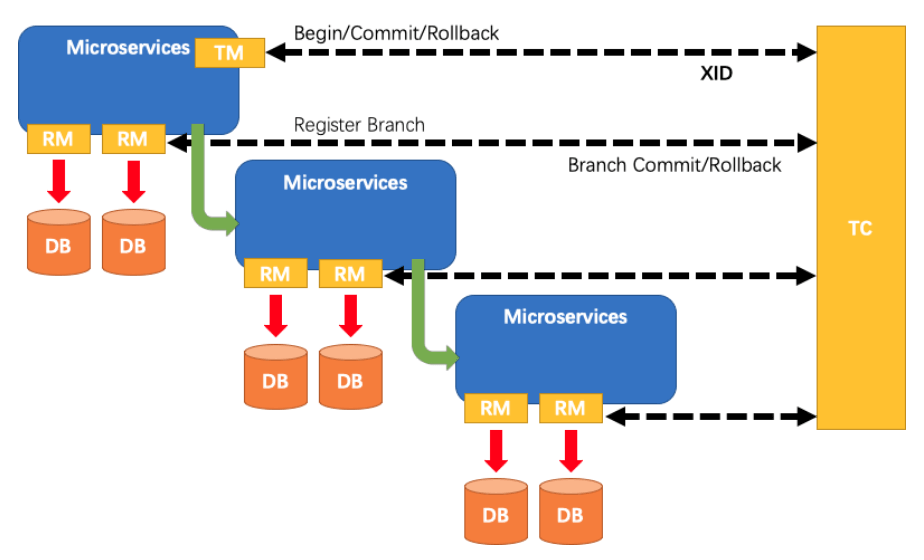
- 一个典型的分布式事务过程
- Seata-Tc事务协调者搭建
-
-
- 修改配置文件
- 初始化SQL
- 启动
- 使用Nacos作为Seata的配置中心
- RM客户端实现
-
- 数据库准备
-
- 创建业务数据库
- 初始化业务表
-
- order表
- storage表
- account表
- 创建日志回滚表
- 创建完成之后的数据库
- 实现一个业务场景
- 项目搭建
-
- POM文件
- YML配置
- 数据源代理
- 启动类配置
- 业务代码
- 错误异常代码,账户服务模块
- 流程测试
-
- 推荐文章
-
- 觉得对您有帮助就留下个宝贵的吧!
- 项目源码地址
Seata是Alibaba开源的一款分布式事务解决方案,致力于提供高性能和简单易用的分布式事务服务,本文将通过一个简单的下单业务场景来对其用法进行详细介绍。
什么是分布式事务问题?
单体应用
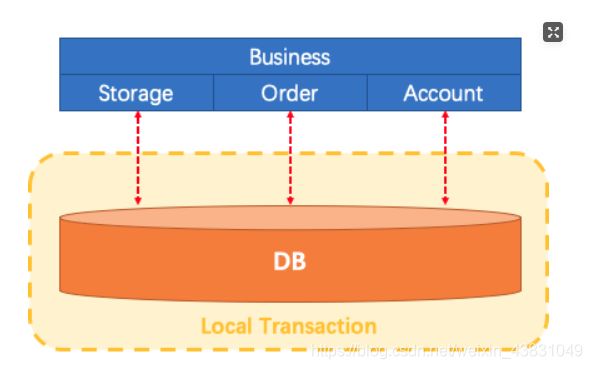
单体应用中,一个业务操作需要调用三个模块完成,此时数据的一致性由本地事务来保证。
微服务应用
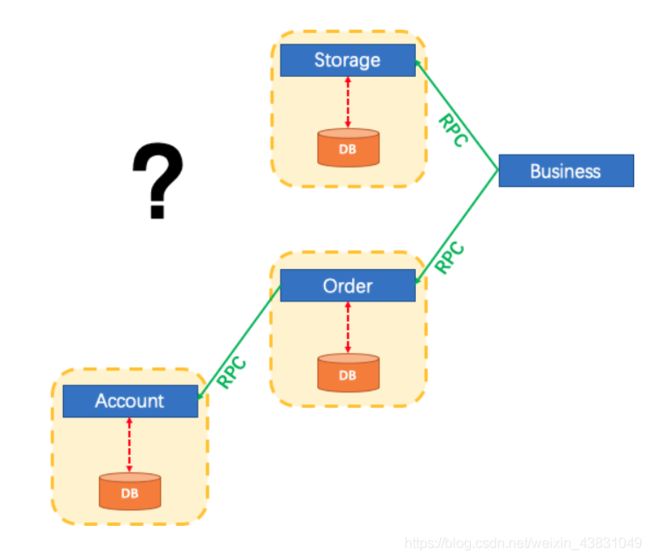
随着业务需求的变化,单体应用被拆分成微服务应用,原来的三个模块被拆分成三个独立的应用,分别使用独立的数据源,业务操作需要调用三个服务来完成。此时每个服务内部的数据一致性由本地事务来保证,但是全局的数据一致性问题没法保证。
总结
在微服务架构中由于全局数据一致性没法保证产生的问题就是分布式事务问题。简单来说,一次业务操作需要操作多个数据源或需要进行远程调用,就会产生分布式事务问题。
Seata简介
Seata 是一款开源的分布式事务解决方案,致力于提供高性能和简单易用的分布式事务服务。Seata 将为用户提供了 AT、TCC、SAGA 和 XA 事务模式,为用户打造一站式的分布式解决方案。
Seata原理和设计
定义一个分布式事务
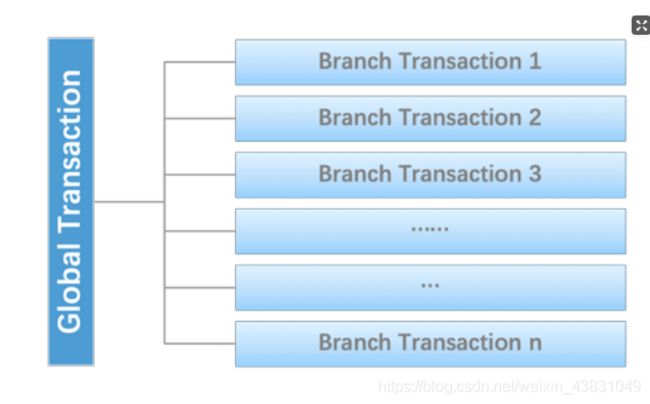
我们可以把一个分布式事务理解成一个包含了若干分支事务的全局事务,全局事务的职责是协调其下管辖的分支事务达成一致,要么一起成功提交,要么一起失败回滚。此外,通常分支事务本身就是一个满足ACID的本地事务。这是我们对分布式事务结构的基本认识,与 XA 是一致的。
协议分布式事务处理过程的三个组件
- Transaction Coordinator (TC): 事务协调器,维护全局事务的运行状态,负责协调并驱动全局事务的提交或回滚;
- Transaction Manager ™: 控制全局事务的边界,负责开启一个全局事务,并最终发起全局提交或全局回滚的决议;
- Resource Manager (RM): 控制分支事务,负责分支注册、状态汇报,并接收事务协调器的指令,驱动分支(本地)事务的提交和回滚。
一个典型的分布式事务过程
- TM 向 TC 申请开启一个全局事务,全局事务创建成功并生成一个全局唯一的 XID;
- XID 在微服务调用链路的上下文中传播;
- RM 向 TC 注册分支事务,将其纳入 XID 对应全局事务的管辖;
- TM 向 TC 发起针对 XID 的全局提交或回滚决议;
- TC 调度 XID 下管辖的全部分支事务完成提交或回滚请求。
Seata-Tc事务协调者搭建
- 我们先从官网下载seata-server,这里下载的是seata-server-1.4.2.zip 、 下载不同版本.
- 这里我们使用Nacos作为注册中心,Nacos的安装及使用可以参考:Spring Cloud Alibaba:Nacos 作为注册中心使用;
- 解压seata-server安装包到指定目录,修改
conf目录下的file.conf配置文,事务日志存储模式为db及数据库连接信息;
修改配置文件
file.conf
## transaction log store, only used in seata-server
store {

  ## store mode: file、db、redis
  mode = "db"

  ## file store property
  file {

    ## store location dir
    dir = "sessionStore"
    # branch session size , if exceeded first try compress lockkey, still exceeded throws exceptions
    maxBranchSessionSize = 16384
    # globe session size , if exceeded throws exceptions
    maxGlobalSessionSize = 512
    # file buffer size , if exceeded allocate new buffer
    fileWriteBufferCacheSize = 16384
    # when recover batch read size
    sessionReloadReadSize = 100
    # async, sync
    flushDiskMode = async
  }

  ## database store property
  db {

    ## the implement of javax.sql.DataSource, such as DruidDataSource(druid)/BasicDataSource(dbcp)/HikariDataSource(hikari) etc.
    datasource = "druid"
    ## mysql/oracle/postgresql/h2/oceanbase etc.
    dbType = "mysql"
    driverClassName = "com.mysql.jdbc.Driver"
    url = "jdbc:mysql://192.168.7.231:3306/seata-server?useUnicode=true&characterEncoding=utf8&characterSetResults=utf8"
    user = "root"
    password = "root"
    minConn = 5
    maxConn = 100
    globalTable = "global_table"
    branchTable = "branch_table"
    lockTable = "lock_table"
    queryLimit = 100
    maxWait = 5000
  }

  ## redis store property
  redis {

    host = "127.0.0.1"
    port = "6379"
    password = ""
    database = "0"
    minConn = 1
    maxConn = 10
    maxTotal = 100
    queryLimit = 100
  }

}
registry.conf
registry {

  # file 、nacos 、eureka、redis、zk、consul、etcd3、sofa
  type = "nacos"
  loadBalance = "RandomLoadBalance"
  loadBalanceVirtualNodes = 10

  nacos {

    application = "seata-server"
    serverAddr = "192.168.7.231:8848"
    group = "SEATA_GROUP"
    # 命名空间ID,下面会进行介绍
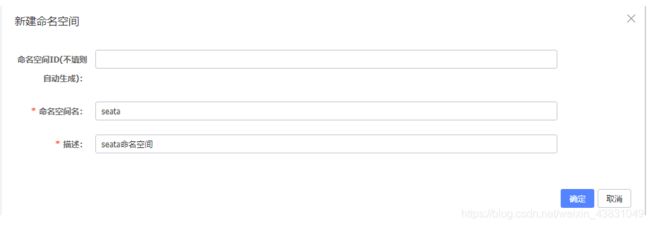
    namespace = "5c2d3558-01c2-4f88-951b-e6d990872d5c"
    cluster = "default"
    username = "nacos"
    password = "nacos"
  }
  eureka {

    serviceUrl = "http://localhost:8761/eureka"
    application = "default"
    weight = "1"
  }
  redis {

    serverAddr = "localhost:6379"
    db = 0
    password = ""
    cluster = "default"
    timeout = 0
  }
  zk {

    cluster = "default"
    serverAddr = "127.0.0.1:2181"
    sessionTimeout = 6000
    connectTimeout = 2000
    username = ""
    password = ""
  }
  consul {

    cluster = "default"
    serverAddr = "127.0.0.1:8500"
  }
  etcd3 {

    cluster = "default"
    serverAddr = "http://localhost:2379"
  }
  sofa {

    serverAddr = "127.0.0.1:9603"
    application = "default"
    region = "DEFAULT_ZONE"
    datacenter = "DefaultDataCenter"
    cluster = "default"
    group = "SEATA_GROUP"
    addressWaitTime = "3000"
  }
  file {

    name = "file.conf"
  }
}

config {

  # file、nacos 、apollo、zk、consul、etcd3
  type = "nacos"

  nacos {

    serverAddr = "192.168.7.231:8848"
    # 命名空间ID,下面会进行介绍
    namespace = "5c2d3558-01c2-4f88-951b-e6d990872d5c"
    group = "SEATA_GROUP"
    username = "nacos"
    password = "nacos"
  }
  consul {

    serverAddr = "127.0.0.1:8500"
  }
  apollo {

    appId = "seata-server"
    apolloMeta = "http://192.168.1.204:8801"
    namespace = "application"
    apolloAccesskeySecret = ""
  }
  zk {

    serverAddr = "127.0.0.1:2181"
    sessionTimeout = 6000
    connectTimeout = 2000
    username = ""
    password = ""
  }
  etcd3 {

    serverAddr = "http://localhost:2379"
  }
  file {

    name = "file.conf"
  }
}
初始化SQL
- 由于我们使用了db模式存储事务日志,所以我们需要创建一个seat-server数据库,建表sql在源码包里面,这是是重点不然根本找不到
解压zip文件SQL脚本位置: seata-1.4.1\script\server\db\mysql.sql创建数据库初始化脚本 SQL脚本官方地址
SET NAMES utf8mb4;
SET FOREIGN_KEY_CHECKS = 0;

-- ----------------------------
-- Table structure for branch_table
-- ----------------------------
DROP TABLE IF EXISTS `branch_table`;
CREATE TABLE `branch_table`  (
  `branch_id` bigint(20) NOT NULL,
  `xid` varchar(128) CHARACTER SET utf8mb4 COLLATE utf8mb4_general_ci NOT NULL,
  `transaction_id` bigint(20) NULL DEFAULT NULL,
  `resource_group_id` varchar(32) CHARACTER SET utf8mb4 COLLATE utf8mb4_general_ci NULL DEFAULT NULL,
  `resource_id` varchar(256) CHARACTER SET utf8mb4 COLLATE utf8mb4_general_ci NULL DEFAULT NULL,
  `lock_key` varchar(128) CHARACTER SET utf8mb4 COLLATE utf8mb4_general_ci NULL DEFAULT NULL,
  `branch_type` varchar(8) CHARACTER SET utf8mb4 COLLATE utf8mb4_general_ci NULL DEFAULT NULL,
  `status` tinyint(4) NULL DEFAULT NULL,
  `client_id` varchar(64) CHARACTER SET utf8mb4 COLLATE utf8mb4_general_ci NULL DEFAULT NULL,
  `application_data` varchar(2000) CHARACTER SET utf8mb4 COLLATE utf8mb4_general_ci NULL DEFAULT NULL,
  `gmt_create` datetime(0) NULL DEFAULT NULL,
  `gmt_modified` datetime(0) NULL DEFAULT NULL,
  PRIMARY KEY (`branch_id`) USING BTREE,
  INDEX `idx_xid`(`xid`) USING BTREE
) ENGINE = InnoDB CHARACTER SET = utf8mb4 COLLATE = utf8mb4_general_ci ROW_FORMAT = Dynamic;

-- ----------------------------
-- Records of branch_table
-- ----------------------------

-- ----------------------------
-- Table structure for global_table
-- ----------------------------
DROP TABLE IF EXISTS `global_table`;
CREATE TABLE `global_table`  (
  `xid` varchar(128) CHARACTER SET utf8mb4 COLLATE utf8mb4_general_ci NOT NULL,
  `transaction_id` bigint(20) NULL DEFAULT NULL,
  `status` tinyint(4) NOT NULL,
  `application_id` varchar(64) CHARACTER SET utf8mb4 COLLATE utf8mb4_general_ci NULL DEFAULT NULL,
  `transaction_service_group` varchar(64) CHARACTER SET utf8mb4 COLLATE utf8mb4_general_ci NULL DEFAULT NULL,
  `transaction_name` varchar(64) CHARACTER SET utf8mb4 COLLATE utf8mb4_general_ci NULL DEFAULT NULL,
  `timeout` int(11) NULL DEFAULT NULL,
  `begin_time` bigint(20) NULL DEFAULT NULL,
  `application_data` varchar(2000) CHARACTER SET utf8mb4 COLLATE utf8mb4_general_ci NULL DEFAULT NULL,
  `gmt_create` datetime(0) NULL DEFAULT NULL,
  `gmt_modified` datetime(0) NULL DEFAULT NULL,
  PRIMARY KEY (`xid`) USING BTREE,
  INDEX `idx_gmt_modified_status`(`gmt_modified`, `status`) USING BTREE,
  INDEX `idx_transaction_id`(`transaction_id`) USING BTREE
) ENGINE = InnoDB CHARACTER SET = utf8mb4 COLLATE = utf8mb4_general_ci ROW_FORMAT = Dynamic;

-- ----------------------------
-- Records of global_table
-- ----------------------------

-- ----------------------------
-- Table structure for lock_table
-- ----------------------------
DROP TABLE IF EXISTS `lock_table`;
CREATE TABLE `lock_table`  (
  `row_key` varchar(128) CHARACTER SET utf8mb4 COLLATE utf8mb4_general_ci NOT NULL,
  `xid` varchar(96) CHARACTER SET utf8mb4 COLLATE utf8mb4_general_ci NULL DEFAULT NULL,
  `transaction_id` mediumtext CHARACTER SET utf8mb4 COLLATE utf8mb4_general_ci NULL,
  `branch_id` mediumtext CHARACTER SET utf8mb4 COLLATE utf8mb4_general_ci NULL,
  `resource_id` varchar(256) CHARACTER SET utf8mb4 COLLATE utf8mb4_general_ci NULL DEFAULT NULL,
  `table_name` varchar(32) CHARACTER SET utf8mb4 COLLATE utf8mb4_general_ci NULL DEFAULT NULL,
  `pk` varchar(32) CHARACTER SET utf8mb4 COLLATE utf8mb4_general_ci NULL DEFAULT NULL,
  `gmt_create` datetime(0) NULL DEFAULT NULL,
  `gmt_modified` datetime(0) NULL DEFAULT NULL,
  PRIMARY KEY (`row_key`) USING BTREE
) ENGINE = InnoDB CHARACTER SET = utf8mb4 COLLATE = utf8mb4_general_ci ROW_FORMAT = Dynamic;

-- ----------------------------
-- Records of lock_table
-- ----------------------------

SET FOREIGN_KEY_CHECKS = 1;
启动
- 先启动Nacos,再使用seata-server中
/bin/seata-server.bat文件启动seata-server。
使用Nacos作为Seata的配置中心
-
下载nacos-config.sh和config.txt,点击进入下载页
-
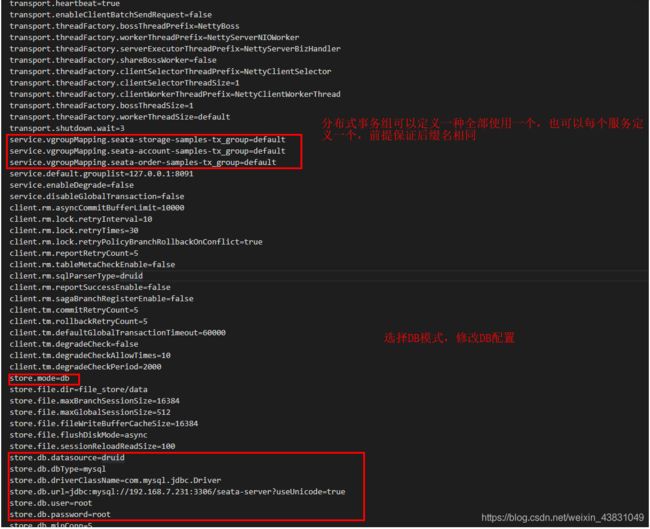
修改config.txt配置,config.txt放在seata文件夹根目录即可,nacos-config.sh新建script目录
4.打开git bash或linux类命令行,执行sh脚本(注意脚本是否有执行的权限)
-h nacos地址
-p 端口
-t 命名空间不写默认public
-u 用户名
-p 密码

sh nacos-config.sh -h 192.168.7.231 -p 8848 -g SEATA_GROUP -t 5c2d3558-01c2-4f88-951b-e6d990872d5c -u nacos -w nacos
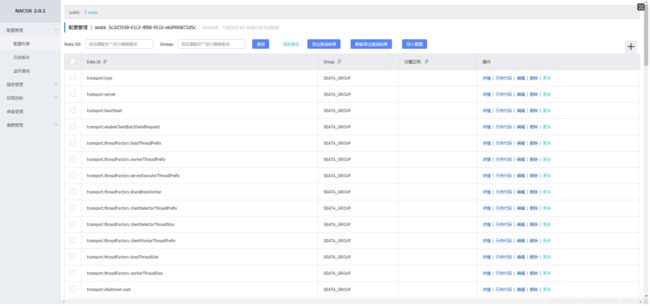
5.查看配置是推送上来
RM客户端实现
数据库准备
创建业务数据库
- seata-order:存储订单的数据库
- seata-storage:存储库存的数据库
- seata-account:存储账户信息的数据库
初始化业务表
order表
CREATE TABLE `order` (
  `id` bigint(11) NOT NULL AUTO_INCREMENT,
  `user_id` bigint(11) DEFAULT NULL COMMENT '用户id',
  `product_id` bigint(11) DEFAULT NULL COMMENT '产品id',
  `count` int(11) DEFAULT NULL COMMENT '数量',
  `money` decimal(11,0) DEFAULT NULL COMMENT '金额',
  PRIMARY KEY (`id`)
) ENGINE=InnoDB AUTO_INCREMENT=7 DEFAULT CHARSET=utf8;

ALTER TABLE `order` ADD COLUMN `status` int(1) DEFAULT NULL COMMENT '订单状态:0:创建中;1:已完结' AFTER `money` ;
storage表
CREATE TABLE `storage` (
                         `id` bigint(11) NOT NULL AUTO_INCREMENT,
                         `product_id` bigint(11) DEFAULT NULL COMMENT '产品id',
                         `total` int(11) DEFAULT NULL COMMENT '总库存',
                         `used` int(11) DEFAULT NULL COMMENT '已用库存',
                         `residue` int(11) DEFAULT NULL COMMENT '剩余库存',
                         PRIMARY KEY (`id`)
) ENGINE=InnoDB AUTO_INCREMENT=2 DEFAULT CHARSET=utf8;

INSERT INTO `seata-storage`.`storage` (`id`, `product_id`, `total`, `used`, `residue`) VALUES ('1', '1', '100', '0', '100');
account表
CREATE TABLE `account` (
  `id` bigint(11) NOT NULL AUTO_INCREMENT COMMENT 'id',
  `user_id` bigint(11) DEFAULT NULL COMMENT '用户id',
  `total` decimal(10,0) DEFAULT NULL COMMENT '总额度',
  `used` decimal(10,0) DEFAULT NULL COMMENT '已用余额',
  `residue` decimal(10,0) DEFAULT '0' COMMENT '剩余可用额度',
  PRIMARY KEY (`id`)
) ENGINE=InnoDB AUTO_INCREMENT=2 DEFAULT CHARSET=utf8;

INSERT INTO `seata-account`.`account` (`id`, `user_id`, `total`, `used`, `residue`) VALUES ('1', '1', '1000', '0', '1000');
创建日志回滚表
使用Seata还需要在每个数据库中创建日志表
-- 注意此处0.3.0+ 增加唯一索引 ux_undo_log
CREATE TABLE `undo_log` (
  `id` bigint(20) NOT NULL AUTO_INCREMENT,
  `branch_id` bigint(20) NOT NULL,
  `xid` varchar(100) NOT NULL,
  `context` varchar(128) NOT NULL,
  `rollback_info` longblob NOT NULL,
  `log_status` int(11) NOT NULL,
  `log_created` datetime NOT NULL,
  `log_modified` datetime NOT NULL,
  `ext` varchar(100) DEFAULT NULL,
  PRIMARY KEY (`id`),
  UNIQUE KEY `ux_undo_log` (`xid`,`branch_id`)
) ENGINE=InnoDB AUTO_INCREMENT=1 DEFAULT CHARSET=utf8;
创建完成之后的数据库
实现一个业务场景
这里我们会创建三个服务,一个订单服务,一个库存服务,一个账户服务。当用户下单时,会在订单服务中创建一个订单,然后通过远程调用库存服务来扣减下单商品的库存,再通过远程调用账户服务来扣减用户账户里面的余额,最后在订单服务中修改订单状态为已完成。该操作跨越三个数据库,有两次远程调用,很明显会有分布式事务问题。
项目搭建
POM文件
		<parent>
        <groupId>org.springframework.bootgroupId>
        <artifactId>spring-boot-starter-parentartifactId>
        <version>2.1.4.RELEASEversion>
        <relativePath/>
    parent>
    <properties>
        <java.version>1.8java.version>
        <spring-cloud.version>Greenwich.SR1spring-cloud.version>
        <spring-cloud-alibaba.version>2.1.0.RELEASEspring-cloud-alibaba.version>
        <seata.version>1.4.2seata.version>
        <lombok.version>1.18.8lombok.version>
        <mybatis-plus.version>3.4.0mybatis-plus.version>
    properties>


    <dependencies>

        <dependency>
            <groupId>com.alibaba.cloudgroupId>
            <artifactId>spring-cloud-starter-alibaba-seataartifactId>
            <exclusions>
                <exclusion>
                    <artifactId>seata-allartifactId>
                    <groupId>io.seatagroupId>
                exclusion>
            exclusions>
        dependency>
        <dependency>
            <groupId>io.seatagroupId>
            <artifactId>seata-spring-boot-starterartifactId>
            <version>${seata.version}version>
        dependency>
        <dependency>
            <groupId>io.seatagroupId>
            <artifactId>seata-allartifactId>
            <version>${seata.version}version>
        dependency>

        <dependency>
            <groupId>com.alibaba.cloudgroupId>
            <artifactId>spring-cloud-starter-alibaba-nacos-discoveryartifactId>
        dependency>

        <dependency>
            <groupId>org.springframework.cloudgroupId>
            <artifactId>spring-cloud-starter-openfeignartifactId>
        dependency>

        <dependency>
            <groupId>com.baomidougroupId>
            <artifactId>mybatis-plus-boot-starterartifactId>
            <version>${mybatis-plus.version}version>
        dependency>

        <dependency>
            <groupId>com.baomidougroupId>
            <artifactId>mybatis-plus-generatorartifactId>
            <version>${mybatis-plus.version}version>
        dependency>

        <dependency>
            <groupId>org.freemarkergroupId>
            <artifactId>freemarkerartifactId>
            <version>2.3.28version>
        dependency>
        <dependency>
            <groupId>org.apache.velocitygroupId>
            <artifactId>velocity-engine-coreartifactId>
            <version>2.0version>
        dependency>

        <dependency>
            <groupId>org.springframework.bootgroupId>
            <artifactId>spring-boot-starter-webartifactId>
        dependency>

        <dependency>
            <groupId>mysqlgroupId>
            <artifactId>mysql-connector-javaartifactId>
            <scope>runtimescope>
        dependency>

        <dependency>
            <groupId>org.projectlombokgroupId>
            <artifactId>lombokartifactId>
            <optional>trueoptional>
        dependency>
        <dependency>
            <groupId>org.springframework.bootgroupId>
            <artifactId>spring-boot-starter-testartifactId>
            <scope>testscope>
        dependency>
        <dependency>
            <groupId>org.junit.jupitergroupId>
            <artifactId>junit-jupiterartifactId>
            <version>RELEASEversion>
            <scope>testscope>
        dependency>

    dependencies>


    <dependencyManagement>
        <dependencies>

            <dependency>
                <groupId>org.springframework.cloudgroupId>
                <artifactId>spring-cloud-dependenciesartifactId>
                <version>${spring-cloud.version}version>
                <type>pomtype>
                <scope>importscope>
            dependency>

            <dependency>
                <groupId>com.alibaba.cloudgroupId>
                <artifactId>spring-cloud-alibaba-dependenciesartifactId>
                <version>${spring-cloud-alibaba.version}version>
                <type>pomtype>
                <scope>importscope>
            dependency>

            <dependency>
                <groupId>org.projectlombokgroupId>
                <artifactId>lombokartifactId>
                <version>${lombok.version}version>
            dependency>
        dependencies>
    dependencyManagement>
YML配置
- 三个服务的配置文件基本一样,主要还是更改服务名
server:
  port: 8083
spring:
  application:
    name: seata-order-samples
  cloud:
    nacos:
      discovery:
        #nacos服务地址
        server-addr: 192.168.7.231:8848
        #nacos命名空间ID
        namespace: 5c2d3558-01c2-4f88-951b-e6d990872d5c
    alibaba:
      seata:
        #事务群组,要和下方vgroup-mapping保持一致(可以每个应用独立取名,也可以使用相同的名字),要与服务端nacos-config.txt中service.vgroup_mapping中存在,并且要保证多个群组情况下后缀名要保持一致-tx_group
        tx-service-group: ${
     spring.application.name}-tx_group

  datasource:
    driver-class-name: com.mysql.cj.jdbc.Driver
    url: jdbc:mysql://192.168.7.231:3306/seata-order?serverTimezone=Asia/Shanghai&useUnicode=true&characterEncoding=utf-8&zeroDateTimeBehavior=convertToNull&useSSL=false&allowPublicKeyRetrieval=true
    username: root
    password: root

seata:
  application-id: ${
     spring.application.name}
  #事务群组(可以每个应用独立取名,也可以使用相同的名字),要与服务端nacos-config.txt中service.vgroup_mapping中存在,并且要保证多个群组情况下后缀名要保持一致-tx_group
  service:
    vgroup-mapping:
      seata-order-samples-tx_group: default

  registry:
    type: nacos
    nacos:
      server-addr: ${
     spring.cloud.nacos.discovery.server-addr}
      username: nacos
      password: nacos
      #seata分组名称
      group: SEATA_GROUP
      #nacos命名空间ID
      namespace: 5c2d3558-01c2-4f88-951b-e6d990872d5c
      #seata服务名
      application: seata-server

  config:
    type: nacos
    nacos:
      server-addr: ${
     spring.cloud.nacos.discovery.server-addr}
      username: nacos
      password: nacos
      #seata分组名称
      group: SEATA_GROUP
      #nacos命名空间ID
      namespace: 5c2d3558-01c2-4f88-951b-e6d990872d5c


# feign组件超时设置,用于查看seata数据库中的临时数据内容
feign:
  client:
    config:
      default:
        connect-timeout: 30000
        read-timeout: 30000


mybatis-plus:
  mapper-locations: classpath:mapper/*.xml
  configuration:
    log-impl: org.apache.ibatis.logging.stdout.StdOutImpl
数据源代理
- DataSourceProxyConfig 涉及到分布式事务的服务都需要添加数据源代理
package com.seata.order.config;


import com.alibaba.druid.pool.DruidDataSource;
import com.baomidou.mybatisplus.extension.spring.MybatisSqlSessionFactoryBean;
import io.seata.rm.datasource.DataSourceProxy;
import org.apache.ibatis.session.SqlSessionFactory;
import org.mybatis.spring.transaction.SpringManagedTransactionFactory;
import org.springframework.beans.factory.annotation.Value;
import org.springframework.boot.context.properties.ConfigurationProperties;
import org.springframework.context.annotation.Bean;
import org.springframework.context.annotation.Configuration;
import org.springframework.core.io.support.PathMatchingResourcePatternResolver;

import javax.sql.DataSource;


/**
 * TODO
 * Mybtis-plus数据源代理
 *
 * @version 1.0
 * @date 2021/5/28 10:45
 */
@Configuration
public class DataSourceProxyConfig {


    @Value("${
     mybatis-plus.mapper-locations}")
    private String mapperLocations;

    @Bean
    @ConfigurationProperties(prefix = "spring.datasource")
    public DataSource druidDataSource() {

        return new DruidDataSource();
    }

    @Bean
    public SqlSessionFactory sqlSessionFactoryBean(DataSource dataSource) throws Exception {

        MybatisSqlSessionFactoryBean sqlSessionFactoryBean = new MybatisSqlSessionFactoryBean();
        sqlSessionFactoryBean.setDataSource(dataSource);
        sqlSessionFactoryBean.setMapperLocations(new PathMatchingResourcePatternResolver()
                .getResources(mapperLocations));
        sqlSessionFactoryBean.setTransactionFactory(new SpringManagedTransactionFactory());
        return sqlSessionFactoryBean.getObject();
    }
}
启动类配置
//开启feign接口
@EnableFeignClients
//注册服务
@EnableDiscoveryClient
//扫描包
@MapperScan(value = "com.seata.order.dao")
//排除默认数据源配置
@SpringBootApplication(exclude = DataSourceAutoConfiguration.class)
业务代码
    /**
     * 创建订单->调用库存服务扣减库存->调用账户服务扣减账户余额->修改订单状态
     */
    @Override
    //开启分布式事务
    @GlobalTransactional
    public void create(Order order) {

        LOGGER.info("------->下单开始");
        //本应用创建订单
        orderMapper.insertOrder(order);

        //远程调用库存服务扣减库存
        LOGGER.info("------->seata-order-samples中扣减库存开始-------<");
        storageFeignClient.decrease(order.getProductId(), order.getCount());
        LOGGER.info("------->seata-order-samples中扣减库存结束-------<");

        //远程调用账户服务扣减余额
        LOGGER.info("------->seata-order-samples中扣减余额开始-------<");
        accountFeignClient.decrease(order.getUserId(), order.getMoney());
        LOGGER.info("------->seata-order-samples中扣减余额结束-------<");

        //修改订单状态为已完成
        LOGGER.info("------->seata-order-samples中修改订单状态开始-------<");
        orderMapper.update(order.getUserId(), 0);
        LOGGER.info("------->seata-order-samples中修改订单状态结束-------<");

        LOGGER.info("------->下单结束-------<");
    }
错误异常代码,账户服务模块
@Override
public void decrease(Long userId, BigDecimal money) {

    LOGGER.info("------->seata-account-samples中扣减账户余额开始-------<");
    //模拟超时异常,全局事务回滚
    try {

        Thread.sleep(30*1000);
    } catch (InterruptedException e) {

        e.printStackTrace();
    }
    accountMapper.decrease(userId,money);
    LOGGER.info("------->seata-account-samples中扣减账户余额结束-------<");
}
流程测试
主要测试在订单服务发起请求,首先创建订单->然后扣减库存->扣减余额(在余额模块发生错误)注意打断点观察数据库表的变化
具体参考
http://seata.io/zh-cn/
https://github.com/seata/seata-samples
https://github.com/seata/seata
推荐文章
Java学习路线个人总结-博客(建议收藏)
Spring Cloud Alibaba 系列学习笔记
SpringCloud Alibaba Nacos
SpringCloud Alibaba Sentinel
@SentinelResource注解总结,异常、降级兜底
SpringCloud Alibaba Sentine 规则持久化
SpringCloud Alibaba RocketMQ
Seata1.4.2分布式事务整合nacos+SpringCloudAlibaba
ShardingJDBC4.1.1分库分表整合SpringBoot项目实战
ShardingJdbc配置读写分离整合SpringBoot项目
flyway整合SpringBoot实战详细教程(干货!)觉得对您有帮助就留下个宝贵的吧!
项目源码地址
https://gitee.com/cncxc/spring-cloud-alibaba-seata

