Springboot框架技术总结(四)
✍、Springboot框架技术总结(四)
| SpringBoot框架技术总结 | 地址 |
|---|---|
| SpringBoot框架技术总结(一) | https://blog.csdn.net/Augenstern_QXL/article/details/120802556 |
| SpringBoot框架技术总结(二) | https://blog.csdn.net/Augenstern_QXL/article/details/120816431 |
| SpringBoot框架技术总结(三) | https://blog.csdn.net/Augenstern_QXL/article/details/120866816 |
| SpringBoot框架技术总结(四) | https://blog.csdn.net/Augenstern_QXL/article/details/120866908 |
| SpringBoot框架技术总结(五) | https://blog.csdn.net/Augenstern_QXL/article/details/120867244 |
1、Springboot自动装配原理
传统的 Spring 框架实现一个 Web 服务,需要导入各种依赖 jar 包,然后编写对应的 XML 配置文件等。相较于 Spring 框架而言,Spring Boot 框架显得更加方便、快捷和高效。那么,Spring Boot 究竟是如何做到这些呢?接下来分别针对 Spring Boot 框架的依赖管理、自动配置和执行流程进行深入分析。
1.1、SpringBoot依赖管理
在 Spring Boot 入门程序中,项目 pom.xml 文件有两个核心依赖,分别是 spring-boot-starter-parent 和 spring-boot-starter-web ,关于这两个依赖的相关介绍如下。
1.1.1、spring-boot-starter-parent依赖
在项目中的 pom.xml 文件中找到 spring-boot-starter-parent 依赖,关键代码如下
<parent>
    <groupId>org.springframework.bootgroupId>
    <artifactId>spring-boot-starter-parentartifactId>
    <version>2.5.4version>
    <relativePath/>
parent>
-
上述代码中,将 spring-boot-parent 依赖作为 Spring Boot 项目的统一父项目依赖管理,并将项目版本号统一设置未为 2.5.4,该版本号格局实际开发需求是可以修改的。
-
使用
ctrl+鼠标左键进入并查看 spring-boot-starter-parent 底层源文件,发现 spring-boot-starter-parent 的底层有一个父依赖 spring-boot-dependencies,关键代码如下:
<parent>
    <groupId>org.springframework.bootgroupId>
    <artifactId>spring-boot-dependenciesartifactId>
    <version>2.5.4version>
parent>
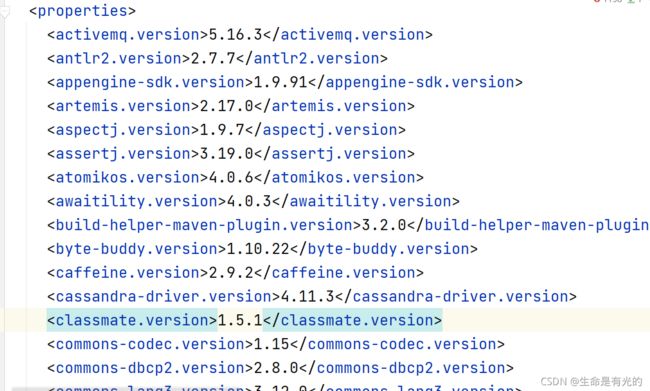
- 继续查看 spring-boot-dependencies 底层源文件,关键代码如下所示:
<properties>
	<activemq.version>5.16.3activemq.version>
    <antlr2.version>2.7.7antlr2.version>
    <appengine-sdk.version>1.9.91appengine-sdk.version>
    <artemis.version>2.17.0artemis.version>
    <aspectj.version>1.9.7aspectj.version>
    ....
	....
properties>
从 Spring-boot-dependencies 底层源文件可以看出,该文件通过 properties 标签对一些常用的技术框架依赖进行了统一版本号的管理,例如 activemq、spring、tomcat 等,都有于 Spring Boot 2.3.4 想匹配的版本,这也是 pom.xml 引入依赖文件不需要指定依赖文件版本号的原因。核心依赖都在父工程版本仓库中,这就是我们引入依赖时不用写版本号的原因。
需要注意的是,如果 pom.xml 文件引入依赖文件不是 spring-boot-starter-parent 管理的,那么在 pom.xml 引入依赖文件时,需要使用
总结:SpringBoot 依靠父项目中的版本锁定和starter机制让我们能更轻松的实现对依赖的管理。
1.1.2、spring-boot-starter-web依赖
spring-boot-starter-parent 父依赖启动器的主要作用是进行版本统一管理,那么项目运行依赖的 jar 包从何而来,又是怎样管理的呢?
查看 spring-boot-starter-web 依赖源文件,关键代码如下:
<dependencies>
    <dependency>
      <groupId>org.springframework.bootgroupId>
      <artifactId>spring-boot-starterartifactId>
      <version>2.5.4version>
      <scope>compilescope>
    dependency>
    <dependency>
      <groupId>org.springframework.bootgroupId>
      <artifactId>spring-boot-starter-jsonartifactId>
      <version>2.5.4version>
      <scope>compilescope>
    dependency>
    <dependency>
      <groupId>org.springframework.bootgroupId>
      <artifactId>spring-boot-starter-tomcatartifactId>
      <version>2.5.4version>
      <scope>compilescope>
    dependency>
    <dependency>
      <groupId>org.springframeworkgroupId>
      <artifactId>spring-webartifactId>
      <version>5.3.9version>
      <scope>compilescope>
    dependency>
    <dependency>
      <groupId>org.springframeworkgroupId>
      <artifactId>spring-webmvcartifactId>
      <version>5.3.9version>
      <scope>compilescope>
    dependency>
  dependencies>
从上述代码中可以发现, spring-boot-starter-web 依赖启动器的主要作用是提供 Web 开发场景所需要的底层所有依赖文件,它对 Web 开发场景所需的依赖文件进行了统一管理。
正是如此,在 pom.xml 文件中引入 spring-boot-starter-web 依赖启动器,就可以实现 web 场景开发,而不需要额外导入 Tomcat 服务器及其他 Web 依赖文件等。
Spring Boot 除了提供上述介绍的 Web 依赖启动器外,还提供了其他许多开发场景的相关依赖,可以通过 Spring Boot 官方文档进行查看。官方文档启动器
需要注意的是,Spring Boot 官方并不是针对所有场景开发的技术框架都提供了依赖启动器,例如 Mybatis、阿里巴巴的 Druid 数据源等,Spring Boot 官方就没有提供对象的依赖启动器。为了充分利用 Spring Boot 框架的优势,在 Spring Boot 官方没有整合这些技术的情况下, Mybatis 、Druid 等技术框架所在的团队主动与 Spring Boot 框架进行了整合,实现了各自的依赖启动器,例如 mybatis-spring-boot-starter、druid-spring-boot-starter 等。我们在pom.xml 文件中引入这些第三方的依赖启动器是需要配置对应的版本号。
1.1.3、依赖冲突
一般程序在运行时发生类似于 java.lang.ClassNotFoundException,Method not found: ‘……’,或者莫名其妙的异常信息,这种情况一般很大可能就是 jar包依赖冲突的问题引起的了。
一般在是A依赖C(低版本),B也依赖C(高版本)。 都是他们依赖的又是不同版本的C的时候会出现。
解决方案:
如果出现了类似于 java.lang.ClassNotFoundException,Method not found: 这些异常检查相关的依赖冲突问题,排除掉低版本的依赖,留下高版本的依赖。
我们可以使用 IDEA 插件 -> MavenHelper
1.1.4、版本锁定
我们的 SpringBoot 模块都需要继承一个父工程:spring-boot-starter-parent。在spring-bootstarter-parent的父工程spring-boot-dependencies 中对常用的依赖进行了版本锁定。这样我们在添加依赖时,很多时候都不需要添加依赖的版本号了。
我们也可以采用覆盖properties配置或者直接指定版本号的方式修改依赖的版本。
例如:
- 直接指定版本号
<dependency>
    <groupId>org.aspectjgroupId>
    <artifactId>aspectjweaverartifactId>
    <version>1.7.2version>
dependency>
- 覆盖 properties 配置
<properties>
	<aspectj.version>1.7.2aspectj.version>
properties>
1.1.5、starter机制
当我们需要使用某种功能时只需要引入对应的starter即可。一个starter针对一种特定的场景,其内部引入了该场景所需的依赖。这样我们就不需要单独引入多个依赖了。
命名规律:
- 官方starter都是以
spring-boot-starter开头后面跟上场景名称。例如:spring-boot-starterdata-jpa - 非官方starter则是以
场景名-spring-boot-starter的格式,例如:mybatis-spring-boot-starter
1.2、Spring Boot 自动配置
@SpringBootApplication
public class SpringBootKuangApplication {


    public static void main(String[] args) {

        SpringApplication.run(SpringBootKuangApplication.class, args);
    }

}
@SpringBootApplication注解:标注这个类是一个 SpringBoot 的应用SpringApplication.run()方法:将 springboot 应用启动
我们进入@SpringBootApplication 注解
前面提到过,Spring Boot 应用的启动入口是 @SpringBootApplication 注解标注类中的 main() 方法,@SpringBootApplication 能够扫描 Spring 组件并自动配置 Spring Boot,那么它到底是如何自动配置 Spring Boot 的呢?下面通过查询 @SpringBootApplication 内部源码进行分析,关键代码如下:
@Target({
     ElementType.TYPE})
@Retention(RetentionPolicy.RUNTIME)
@Documented
@Inherited
@SpringBootConfiguration
@EnableAutoConfiguration
@ComponentScan(
    excludeFilters = {
     @Filter(
    type = FilterType.CUSTOM,
    classes = {
     TypeExcludeFilter.class}
), @Filter(
    type = FilterType.CUSTOM,
    classes = {
     AutoConfigurationExcludeFilter.class}
)}
)
public @interface SpringBootApplication {

    @AliasFor(
        annotation = EnableAutoConfiguration.class
    )
    Class<?>[] exclude() default {
     };

    @AliasFor(
        annotation = EnableAutoConfiguration.class
    )
    String[] excludeName() default {
     };

    @AliasFor(
        annotation = ComponentScan.class,
        attribute = "basePackages"
    )
    String[] scanBasePackages() default {
     };

    @AliasFor(
        annotation = ComponentScan.class,
        attribute = "basePackageClasses"
    )
    Class<?>[] scanBasePackageClasses() default {
     };

    @AliasFor(
        annotation = ComponentScan.class,
        attribute = "nameGenerator"
    )
    Class<? extends BeanNameGenerator> nameGenerator() default BeanNameGenerator.class;

    @AliasFor(
        annotation = Configuration.class
    )
    boolean proxyBeanMethods() default true;
}
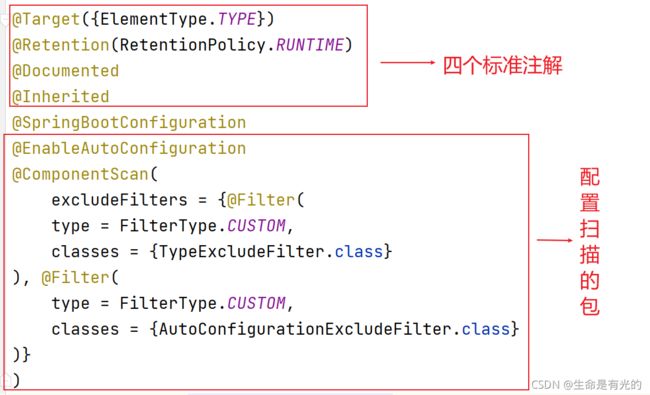
从上述源码中可以看出,@SpringBootApplication 注解是一个组合注解,包含 @SpringBootConfiguration、@EnableAutoConfiguration、@ComponentScan 这 3 个核心注解,关于这三个核心注解相关说明如下:
1.2.1、@SpringBootConfiguration注解
@SpringBootConfiguration 注解表示 Spring Boot 配置类,查看 @SpringBootConfiguration 注解源码,关键代码如下:
@Target({
     ElementType.TYPE})
@Retention(RetentionPolicy.RUNTIME)
@Documented
@Configuration
@Indexed
public @interface SpringBootConfiguration {

    @AliasFor(
        annotation = Configuration.class
    )
    boolean proxyBeanMethods() default true;
}
从上述源码中可以看出,@SpringBootConfiguration 注解内部有一个核心注解 @Configuration,该注解是 Spring 框架提供的,表示当前类是一个配置类,并可以被组件扫描器扫描。由此可见,@SpringBootConfiguration 注解的作用与 @Configuration 注解相同,都是标识一个可以被组件扫描器扫描的配置类,只不过是 @SpringBootConfiguration 是被 Spring Boot 进行了重新封装命名而已。
1.2.2、@EnableAutoConfiguration注解
@EnableAutoConfiguration 注解表示开启自动配置功能,该注解是 Spring Boot 框架最重要的注解,也是实现自动化配置的注解。查看该注解内部源码,关键代码如下:
@Target({
     ElementType.TYPE})
@Retention(RetentionPolicy.RUNTIME)
@Documented
@Inherited
@AutoConfigurationPackage
@Import({
     AutoConfigurationImportSelector.class})
public @interface EnableAutoConfiguration {

    String ENABLED_OVERRIDE_PROPERTY = "spring.boot.enableautoconfiguration";

    Class<?>[] exclude() default {
     };

    String[] excludeName() default {
     };
}
从上述源码中可以看出,@EnableAutoConfiguration注解是一个组合注解,它主要包括有 @AutoConfigurationPackage 和 @Import 两个核心注解
①、@AutoConfigurationPackage
查看 @AutoConfigurationPackage 注解内部源码信息,关键代码如下:
@Target({
     ElementType.TYPE})
@Retention(RetentionPolicy.RUNTIME)
@Documented
@Inherited
@Import({
     Registrar.class})
public @interface AutoConfigurationPackage {

    String[] basePackages() default {
     };

    Class<?>[] basePackageClasses() default {
     };
}
从上述源码中可以看出,@AutoConfigurationPackage 注解的功能是由 @Import 注解实现的,作用是向容器导入注册的所有组件,导入的组件由 Register 提供。查看 Register 类源码信息,关键代码如下:
static class Registrar implements ImportBeanDefinitionRegistrar, DeterminableImports {

        Registrar() {


        }

        public void registerBeanDefinitions(AnnotationMetadata metadata, BeanDefinitionRegistry registry) {

            AutoConfigurationPackages.register(registry, (String[])(new AutoConfigurationPackages.PackageImports(metadata)).getPackageNames().toArray(new String[0]));
        }

        public Set<Object> determineImports(AnnotationMetadata metadata) {

            return Collections.singleton(new AutoConfigurationPackages.PackageImports(metadata));
        }
    }
从上述源码中可以看出,在 Register 类中有一个 registerBeanDefinitions() 方法,使用 Debug 模式启动项目,会发现第 8 行代码中的代码获取的是项目主程序启动器类所在的目录。
也就是说,@AutoConfigurationPackage 注解的主要作用是获取项目主程序启动器类所在的根目录,从而指定后续组件扫描器要扫描的包位置。因此在定义项目包结构时,要求定义的包结构非常规范,项目主程序启动器类要定义在最外层的根目录位置,然后在根目录内部建立子包和类进行业务开发,这样才能够保证定义的类能够被组件扫描器扫描。
②、@Import({AutoConfigurationImportSelector.class})
查看 AutoConfigurationImportSelector 类的 getAutoConfigurationEntry() 方法,关键代码如下:
protected AutoConfigurationImportSelector.AutoConfigurationEntry getAutoConfigurationEntry(AnnotationMetadata annotationMetadata) {

        if (!this.isEnabled(annotationMetadata)) {

            return EMPTY_ENTRY;
        } else {

            AnnotationAttributes attributes = this.getAttributes(annotationMetadata);
            List<String> configurations = this.getCandidateConfigurations(annotationMetadata, attributes);
            configurations = this.removeDuplicates(configurations);
            Set<String> exclusions = this.getExclusions(annotationMetadata, attributes);
            this.checkExcludedClasses(configurations, exclusions);
            configurations.removeAll(exclusions);
            configurations = this.getConfigurationClassFilter().filter(configurations);
            this.fireAutoConfigurationImportEvents(configurations, exclusions);
            return new AutoConfigurationImportSelector.AutoConfigurationEntry(configurations, exclusions);
        }
    }
上述源码中的 getAutoConfigurationEntry() 方法,其主要作用是筛选出当前项目环境需要启动的自动配置类,从而实现当前项目运行所需的自动配置环境
1.2.3、@ComponentScan注解
@ComponentScan注解是一个组件包扫描器,用于将指定包中的注解类自动装配到 Spring 的 Bean 容器中。@ComponentScan注解具体扫描的包的根路径有 Spring Boot 项目主程序启动类所在包位置决定,在扫描过程中由@AutoConfigurationPackage注解进行解析,从而得到 Spring Boot 项目主程序启动类所在包的具体位置。
1.3、Spring Boot 执行流程
每个 Spring Boot 项目都有一个主程序启动器类,在主程序启动器类中有一个启动项目的 main() 方法,在该方法中通过执行 SpringApplication.run() 即可启动整个 Spring Boot 应用程序。
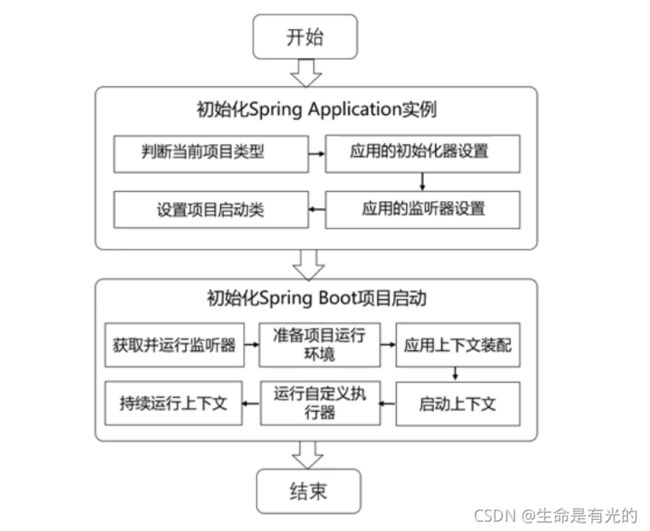
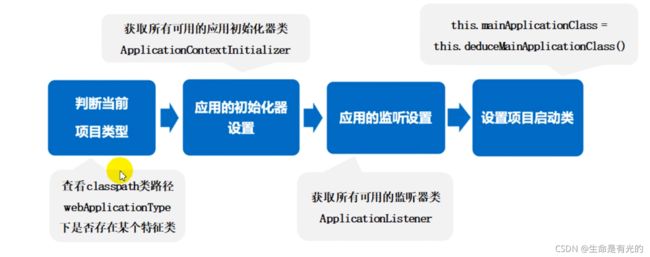
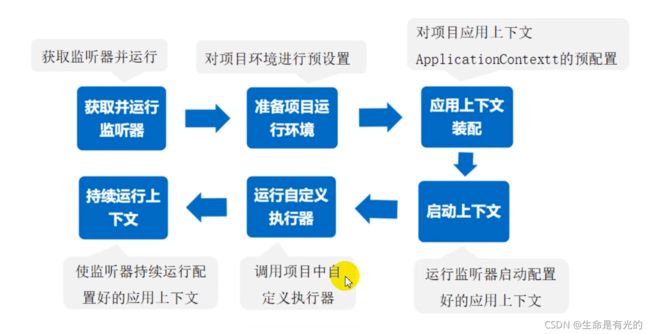
Spring Boot 的执行流程主要分为两步,分别是初始化 Spring Application 实例和初始化 Spring Boot 项目启动,如下图所示:
1.3.1、初始化 Spring Application实例
1.3.2、初始化Spring Boot 项目启动
2、SpringBoot视图技术
在一个 web 应用中,通常会采用 MVC 设计模式实现对应的模型、视图和控制器,其中,视图是用户看到并与之交互的界面。对最初的Web应用来说,视图是由 HTML 元素组成的静态界面,而后期的 Web 应用更倾向于使用动态模板技术,从而实现前后端分离和页面的动态数据展示。Spring Boot 框架为简化项目的整体开发,提供了一些视图技术支持,并主要推荐整合模板引擎技术来实现前端页面的动态化内容。
2.1、Thymeleaf
Spring Boot 官方不推荐使用 JSP 模板,并且没有提供对应的整合配置,这是因为使用嵌入式 Servlet 容器的 Spring Boot 应用程序对于 JSP 模板存在一些限制,具体如下所示:
- Spring Boot 默认使用嵌入式 Servlet 容器,以 jar 包的方式进行项目打包部署,这种 jar 包方式不支持 jsp 模板
- Spring Boot 默认提供了一个处理请求路径 “/error” 的统一错误处理器,返回具体的异常信息。使用 JSP 模板时,无法使用 Spring Boot 自带的异常处理器,只能根据要求在 Spring Boot 项目的指定位置定制错误页面。
Thymeleaf 是一种现代的基于服务器端的 Java 模板引擎技术,它具有丰富的标签语言、函数和表达式,在使用 Spring Boot 框架进行页面设计时,一般会选择 Thymeleaf 模板。
2.2、基本使用
2.2.1、添加Thymeleaf依赖
<dependency>
    <groupId>org.springframework.bootgroupId>
    <artifactId>spring-boot-starter-thymeleafartifactId>
dependency>
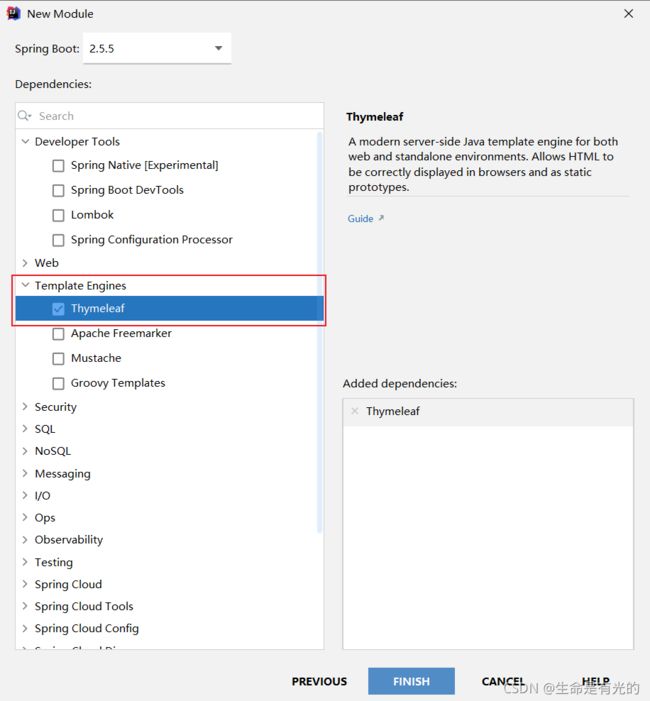
如果使用 Spring Initializr 方式创建,并选择了 Template Engines 模块下的 Thymeleaf 场景依赖,则不需要再添加依赖。
2.2.2、application.properties
在全局配置文件(application.properties 或者 application.yml)中配置 Thymeleaf 模板的参数,一般 Web 项目都会使用下列配置,关键代码如下所示(下面代码也可以不写,因为默认就是如下代码,不过最好将模板缓存设置为false):
#启动模板缓存
spring.thymeleaf.cache=true
#设置模板编码(可不配置)
spring.thymeleaf.encoding=UTF-8
#设置模板模式
spring.thymeleaf.mode=HTML5
#指定模板页面存放路径(可不配置)
spring.thymeleaf.prefix=classpath:/templates/
#指定模板页面名称后缀(可不配置)
spring.thymeleaf.suffix=.html
spring.thymeleaf.cache表示是否开启 Thymeleaf 模板缓存,默认为true,一般在开发中通常会关闭缓存,保证项目调试过程中数据能够及时响应spring.thymeleaf.encoding用于指定 Thymeleaf 模板的编码格式,默认为 UTF-8spring.thymeleaf.mode表示设置模板模式。默认为 HTMLspring.thymeleaf.prefix指定了 Thymeleaf 模板页面的存放路径spring.thymeleaf.suffix制定了 Thymelaf 模板页面的后缀名称,默认为 .html
2.2.3、创建Web控制器类
在项目中创建名称 com.xxx.controller 的包,并在该包下创建一个用于前端模板页面动态数据替换效果测试的访问控制器类 IndexController,代码如下:
@Controller
public class IndexController {


    @RequestMapping("/")
    public String index(Model model){

        model.addAttribute("title","Spring Boot");
        return "index";
    }
}
2.2.4、创建Thymeleaf模板页面
在项目的 templates 目录下创建 thymeleaf 模板(实际上创建 html 网页),只要我们把 HTML 页面放在 classpath:/templates/,thymeleaf 就能自动渲染。
- 需要注意的是,使用 thymeleaf 模板,首先要引入其命名空间,命名空间如下:
<html lang="en" xmlns:th="http://www.thymeleaf.org">html>
- 在 templates 目录下创建名为 index 的HTML网页,代码如下
DOCTYPE html>
<html lang="en" xmlns:th="http://www.thymeleaf.org">html>
<head>
    <meta charset="UTF-8">
    <title>首页title>
head>
<body>

<h1 th:text="${title}">h1>
body>
html>
2.3、静态资源的访问
开发 Web 应用时,难免需要使用静态资源。Spring Boot 默认设置了静态资源的访问路径,默认将 /** 所有访问映射到以下目录。
classpath:/META-INF/resources/:项目类路径下的 META-INF 文件夹下的 resources 文件夹下的所有文件。classpath:/resources/: 项目类路径下的 resources 文件夹下的所有文件classpath:/static/: 项目类路径下的 static 文件夹下的所有文件classpath:/public/: 项目类路径下的 public 文件夹下的所有文件
注意:使用 Spring Initializr 方式创建的 Spring boot 项目会默认生成一个 resources 目录,在 resources 目录中新建 public、resources、static 三个子目录,Spring Boot 默认会从 public、resources、static 里面查找静态资源。(优先级)
3、Thymeleaf基本语法
在 HTML 页面上使用 Thymeleaf 标签,Thymeleaf 标签能够动态地替换掉静态内容,动态显示页面内容,同时可以使用 th 前缀来替换 HTML 的任意属性,前提是在 HTML 页面中需要引入 Thymeleaf 模板的命名空间。
3.1、变量输出
在 Thymeleaf 模板页面中,输出控制器的模型数据可以使用如下方式,如下表所示:
| 表达式 | 表达式描述 |
|---|---|
| th:text | 显示文本,会转义特殊字符 |
| th:utext | 不会转义特殊字符 |
| th:value | 在 input 标签中输出值 |
| [[${}]] | 显示文本,相当于 th:text |
| [(${})] | 转义内容后显示,相当于 th:utext |
3.2、内置对象
Web 项目中经常会传递一些数据,例如 String 类型、列表、日期对象和数值等,thymeleaf 提供的内置对象可以通过 # 直接访问。常用内置对象如下:
| 内置对象 | 描述 |
|---|---|
| #dates | 日期格式化内置对象,具体方法参考 java.util.Date |
| #calendars | 日历,具体方法参考 java.util.Calendar |
| #strings | 字符串格式化,具体方法参考 java.lang.String |
| #numbers | 数字格式化 |
| #objects | 对象函数 |
| #bools | 逻辑参数,判断 boolean 类型的工具 |
| #arrays | 数组函数 |
| #list | 列表函数,具体方法参考 java.util.List |
| #sets | set操作工具,具体方法参考 java.util.Set |
| #maps | map函数,具体方法参考 java.util.Map |
| #aggregates | 操作数组或集合的工具 |
| #messages | 操作消息的工具 |
注意:内置对象一般都以 s 结尾,如 dates、lists、numbers 等,在使用内置对象时需要在对象名前加
#号
上述的内置对象需要关注的是 #dates,常用的方法为 #dates.format(key,pattern)
model.addAttribute("now",new Date())
在 Thymeleaf 模板页面中使用 #dates.format() 方法格式化输出
<p th:text="${#dates.format(now,'yyyy-MM-dd HH:mm:ss')}">p>
3.3、条件判断
Thymeleaf 模板视图提供了常用的条件判断标签
| 表达式 | 表达式描述 |
|---|---|
| th:if | 条件判断,与java中的if类似 |
| th:unless | 条件判断,取反,条件为true,结果为false |
| th:switch | 条件判断,与java中的switch类似 |
| th:case | 条件判断,与java中的case类似 |
model.addAttribute("sex",1); // 1-男,2-女
<p th:if="${sex==1}">男p>
<p th:if="${sex==2}">男p>

<div th:switch="${sex}">
    <p th:case="1">男p>
    <p th:case="2">女p>
div>
3.4、迭代循环
Thymeleaf 模板视图提供了 th:each 循环迭代标签,该标签可以循环数组 arrays、list集合、set 集合 和 map集合
| 表达式 | 描述 |
|---|---|
| th:each | 循环 |
- 在项目中创建名为 com.xxx,entity 的包,在该包下创建 User 类
@Data
@NoArgsConstructor
@AllArgsConstructor
public class User {

    private Integer id;
    private String username;
    private String phone;
    private Integer sex;
    private Date birthday;
}
- 在项目中的 com.xxx.controller 包下创建一个用户控制器 UserController
@Controller
@RequestMapping("/user")
public class UserController {


    @RequestMapping("/list")
    public String list(Model model){

        List<User> userList = new ArrayList<>();
        userList.add(new User(1,"张三1","12345678",1,new Date()));
        userList.add(new User(2,"张三2","12345678",1,new Date()));
        userList.add(new User(3,"张三3","12345678",1,new Date()));
        userList.add(new User(4,"张三4","12345678",1,new Date()));
        // 将数据添加到模型中
        model.addAttribute("userList",userList);
        return "userlist";
    }
}
- 在 Thymeleaf 模板页面中使用
DOCTYPE html>
<html lang="en" xmlns:th="http://www.thymeleaf.org">html>
<head>
    <meta charset="UTF-8">
    <title>首页title>
    <style>
        h1{

            text-align: center;
        }
        tr:nth-of-type(odd){

            background-color: palegreen;
        }
    style>
head>
<body>
<table width="1000" cellpadding="0" border="1" align="center">
    <tr>
        <th>编号th>
        <th>姓名th>
        <th>电话th>
        <th>性别th>
        <th>生日th>
    tr>
    <tr th:each="user : ${userList}">
        <td th:text="${user.id}">td>
        <td th:text="${user.username}">td>
        <td th:text="${user.phone}">td>
        <td>
            <span th:if="${user.sex==1}">男span>
            <span th:if="${user.sex==2}">男span>
        td>
        <td th:text="${#dates.format(user.birthday,'yyyy-MM-dd')}">td>
    tr>

table>

body>
html>
th:each 标签的状态变量属性如下:
- index:当前迭代器的索引,从 0 开始
- cout:当前迭代对象的计数,从 1 开始
- size:被迭代对象的长度
- even/odd:布尔值,当前循环是否是偶数/奇数,从 0 开始
- first:布尔值,当前循环的是否是第一条,如果是返回 true,否则返回 false
- last: 布尔值,当前循环的是否是最后一条,如果是则返回 true,否则返回false
DOCTYPE html>
<html lang="en" xmlns:th="http://www.thymeleaf.org">html>
<head>
    <meta charset="UTF-8">
    <title>首页title>
    <style>
        h1{

            text-align: center;
        }
        tr:nth-of-type(odd){

            background-color: palegreen;
        }
    style>
head>
<body>
<table width="1000" cellpadding="0" border="1" align="center">
    <tr>
        <th>编号th>
        <th>姓名th>
        <th>电话th>
        <th>性别th>
        <th>生日th>
    tr>
    <tr th:each="user : ${userList}">
        <td th:text="${user.id}">td>
        <td th:text="${user.username}">td>
        <td th:text="${user.phone}">td>
        <td>
            <span th:if="${user.sex==1}">男span>
            <span th:if="${user.sex==2}">男span>
        td>
        <td th:text="${#dates.format(user.birthday,'yyyy-MM-dd')}">td>
    tr>

table>

<table width="1000" cellpadding="0" border="1" align="center">
    <tr>
        <th>编号th>
        <th>姓名th>
        <th>电话th>
        <th>性别th>
        <th>生日th>
        <th>indexth>
        <th>countth>
        <th>eventh>
        <th>oddth>
        <th>firstth>
        <th>lastth>
    tr>
    <tr th:each="user,sta: ${userList}">
        <td th:text="${user.id}">td>
        <td th:text="${user.username}">td>
        <td th:text="${user.phone}">td>
        <td>
            <span th:if="${user.sex==1}">男span>
            <span th:if="${user.sex==2}">男span>
        td>
        <td th:text="${#dates.format(user.birthday,'yyyy-MM-dd')}">td>

        <td th:text="${sta.index}">td>
        <td th:text="${sta.count}">td>
        <td th:text="${sta.even}">td>
        <td th:text="${sta.odd}">td>
        <td th:text="${sta.first}">td>
        <td th:text="${sta.last}">td>
    tr>

table>

body>
html>
3.5、域对象操作
在 Thymeleaf 模板页面中,同样也是支持域对象操作,如:request、session、application。对应的域对象为 HttpServletRequest、HttpSession、ServletContext,这三个域对象的用法和 Servlet 一致。
- 在 IndexController 控制器中编写 scope() 方法,关键代码如下:
/**
 * 域对象操作
 * @param request
 * @return
 */
@RequestMapping("/scope")
public String scope(HttpServletRequest request){

    // request 作用域
    request.setAttribute("data1","SpringBoot");
    // session作用域
    request.getSession().setAttribute("data2","SpringBoot");
    // application 作用域
    request.getSession().getServletContext().setAttribute("data3","SpringBoot");
    return "scope";
}
- 在 scope 模板引擎页面使用
<body>
    <h1>域对象操作,三种方法可以拿到h1>
    request: <span th:text="${data1}">span><br>
    request: <span th:text="${#request.getAttribute('data1')}">span><br>
    request: <span th:text="${#httpServletRequest.getAttribute('data1')}">span><br>
    <hr>
    session:<span th:text="${session.data2}">span><br>
    session:<span th:text="${#session.getAttribute('data2')}">span><br>
    session:<span th:text="${#httpSession.getAttribute('data2')}">span><br>
    <hr>
    application:<span th:text="${application.data3}">span><br>
    application:<span th:text="${#session.getServletContext().getAttribute('data3')}">span><br>
    application:<span th:text="${#httpSession.getServletContext().getAttribute('data3')}">span><br>
body>
3.6、链接url表达式
链接表达式 @{} 一般用于页面跳转或者资源的引入,在 web 开发中占据着非常重要的地位,并且使用也非常频繁,常用的链接 URL 表达式如下表所示:
| 表达式 | 描述 |
|---|---|
| th:href | 对应超链接中的href属性 |
| th:src | 对应html标签的src属性 |
| th:action | 对应form表单中的action属性 |
链接表达式@{} 可以编写绝对链接地址和相对链接地址,在有参数的表达式中,需要按照 @{路径(参数名称=参数值,参数名称=参数值...}) 的形式编写,同时该参数的值可以使用变量表达式来动态传值,如下面的案例所示:
- 在UserController 控制器中编写 deleteById() 方法
@RequestMapping("/deleteById")
public String deleteById(Integer id){

    return "userlist";
}
- 在 userlist 模板引擎中使用
<td>
	<a th:href="@{/user/deleteById(id=${user.id})}">删除a>
td>
上述代码中的链接传参,最终会以 http://localhost:8080/user/deleteById?id=1 的形式显示。
3.7、REST风格入参
在 Thymeleaf 模板页面中,如果需要使用 REST 风格传递参数,则需要使用下面的方式传参。
- 编写 Web 控制器
@RequestMapping("/view/{id}")
public String view(@PathVariable Integer id){

    return "userlist";
}
- 编写 Thymeleaf 模板页面
<td>

    <a th:href = "@{/user/view/}+${user.id}">查看a>

    <a th:href="@{/user/view/}+${user.id}+@{/get/}+${user.username}">查看a>
td>
3.8、代码片段表达式
网站中有许多地方的内容是公共的,例如网站头部和底部及左侧菜单导航栏的内容,将这些公共的代码放到一个页面中进行引用,提取公共代码生成代码片段。
首先需要定义代码片段,可以通过 th:fragment 定义代码片段
然后引用代码片段,其中有三种方式引入,分别是 th:insert 、 th:replace、 th:include
| 表达式 | 描述 |
|---|---|
| th:fragment | 定义代码片段模板 |
| th:insert | 以插入的方式引用代码片段 |
| th:replace | 以替换的方式引用代码片段 |
| th:include | 以包含的方式引用代码片段 |
3.8.1、定义代码片段
通过 th:fragment 定义代码片段,建议将模板页放到某个文件夹中。
在 templates 目录下创建 common 文件夹,再创建模板也 page.html,代码如下:
DOCTYPE html>
<html lang="en" xmlns:th="http://www.thymeleaf.org">html>
<head>
    <meta charset="UTF-8">
    <title>Titletitle>
head>
<body>

<footer th:fragment="copy">
    广州市珠海区
footer>


<footer id="test">
    广州市珠海区
footer>

body>
html>
3.8.2、引用代码片段
在 index.html 页面中引入定义好的代码片段,代码如下所示:
<h2>代码片段h2>
<div th:insert="common/page :: copy">第一种引用div>
<div th:replace="common/page :: copy">第二种引用div>
<div th:include="common/page :: copy">第三种引用div>

<h2>代码片段h2>
<div th:insert="common/page :: #test">第一种引用div>
<div th:replace="common/page :: #test">第二种引用div>
<div th:include="common/page :: #test">第三种引用div>
在引用代码片段时,需要注意以下两点,分别是:
- 由于在 common 文件夹下,所以引用时需要加上文件夹名称 common
- 中间两个冒号是英文符号,冒号中间不得不出空格,必须紧挨着,两个冒号前后空格可有可无
