【论文精读】一文看懂Swin Transformer!Shifted Window到底是个啥?Mask之后还和原来一样?
文章目录
- 前言
- Abstract
- Shifted Windows Attention
-
- Shifted window partitioning in successive blocks
- Efficient batch computation
-
- cyclic shitf
- Masked MSA
- 源码
- 自己测试代码
- Swin-T
- Swin Transformer block
- 总结
- 推荐参考文章
前言
论文链接:Swin Transformer: Hierarchical Vision Transformer using Shifted Windows
源码地址:https://github.com/microsoft/Swin-Transformer
来看看为什么Swin Transformer能屠榜吧!
Abstract
Transformer做视觉有两个大的挑战:
- 目标尺寸多变。不像NLP任务中token大小基本相同,目标检测中的目标尺寸不一,用单层级的模型很难有好的效果。
- 图片的高分辨率。尤其是在分割任务中,高分辨率会使得计算复杂度呈现输入图片大小的二次方增长,这显然是不能接受的。
为了解决上述问题,就有了Swin Transformer。顾名思义,Hierarchical(多层级)解决第一个问题;Shifted Windows(滑窗)解决第二个问题。
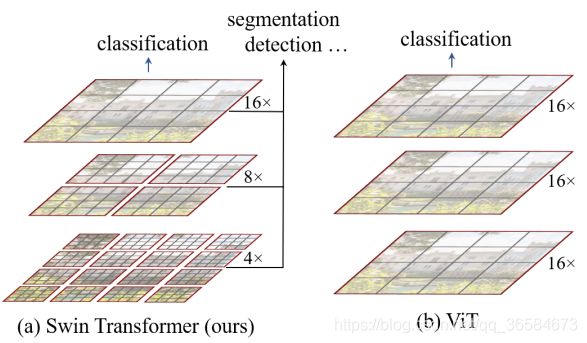
如图所示,Swin Transformer通过融合图片块构建多层级的特征图。同时,使计算复杂度与输入图片线性相关,一个window包含若干个patch,仅在window内部计算self-attention。由于window的patch固定,所以计算复杂度与输入图片线性相关。这也就是Shifted Windows,是Swin的缩写,也是本篇文章最精彩的部分。
Shifted Windows Attention
虽然在window内部计算self-attention可能大大降低模型的复杂度,但是不同window无法进行信息交互,从而表现力欠缺。为了更好的增强模型的表现能力,引入Shifted Windows Attention。Shifted Windows是在连续的Swin Transformer blocks之间交替移动的。
Shifted window partitioning in successive blocks
一般的Shifted window partition操作如下图:
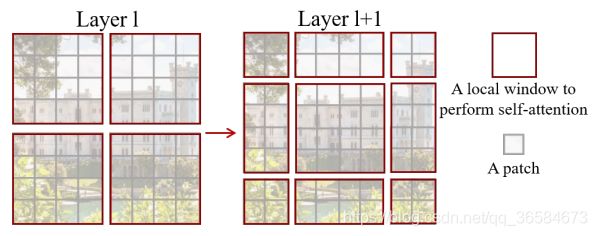
- 每一个小块叫做一个patch
- 每一个深色方块框起来的叫一个local window
- 在每一个local window中计算self-attention
- 连续两个Blocks之间转换,第一个Block平分feature map,第二个Block从( ⌊ M 2 ⌋ \lfloor\frac{M}{2}\rfloor ⌊2M⌋, ⌊ M 2 ⌋ \lfloor\frac{M}{2}\rfloor ⌊2M⌋)像素有规律地取代前一层的windows。
- windows数量变化: ⌈ h M ⌉ \lceil\frac{h}{M}\rceil ⌈Mh⌉× ⌈ w M ⌉ \lceil\frac{w}{M}\rceil ⌈Mw⌉ → \rightarrow →( ⌈ h M ⌉ + 1 \lceil\frac{h}{M}\rceil+1 ⌈Mh⌉+1)×( ⌈ w M ⌉ + 1 \lceil\frac{w}{M}\rceil+1 ⌈Mw⌉+1) 例子中是2×2变成了3×3
- 但这种方法有一个致命的问题,就是在windows变化的过程中,有些window_size小于 M × M M×M M×M,这就导致了需要用padding方法将其补齐使每个window大小相同,虽然解决了,但增加了计算量。
window partition源码:
def window_partition(x, window_size):
    """
    Args:
        x: (B, H, W, C)
        window_size (int): window size

    Returns:
        windows: (num_windows*B, window_size, window_size, C)
    """
    B, H, W, C = x.shape
    x = x.view(B, H // window_size, window_size, W // window_size, window_size, C)
    windows = x.permute(0, 1, 3, 2, 4, 5).contiguous().view(-1, window_size, window_size, C)
    return windows
阅读源码后发现,源码中也没有实现windows由4个变成9个的操作,而且当window_size为奇数时会报错,也不必过分纠结于此,因为实际的操作是通过下面更有效地方法计算的。
Efficient batch computation
通过给Attention加mask实现,限制自注意力计算量,在子窗口中计算。
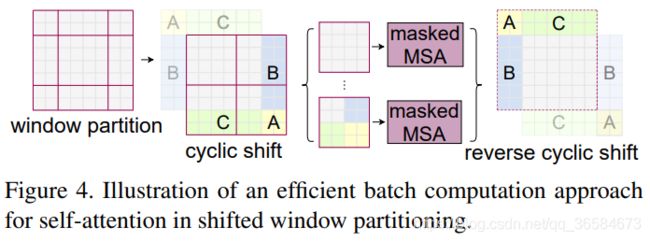
cyclic shitf
详解见文章:【Pytorch小知识】torch.roll()函数的用法及在Swin Transformer中的应用(详细易懂)
源码中的部分:
# cyclic shift
if self.shift_size > 0:
   shifted_x = torch.roll(x, shifts=(-self.shift_size, -self.shift_size), dims=(1, 2))
   attn_mask = mask_matrix
else:
   shifted_x = x
   attn_mask = None
Masked MSA
这应该是本篇论文最精彩的想法,通过mask使shifted window attention和window attention在相同窗口下的计算结果等价,完美解决了上面的window不一致问题,可以对非规则window计算attention。这部分论文中没有阐述,只能结合代码看一下:
源码
# calculate attention mask for SW-MSA
Hp = int(np.ceil(H / self.window_size)) * self.window_size
Wp = int(np.ceil(W / self.window_size)) * self.window_size
img_mask = torch.zeros((1, Hp, Wp, 1), device=x.device)  # 1 Hp Wp 1
h_slices = (slice(0, -self.window_size),
            slice(-self.window_size, -self.shift_size),
            slice(-self.shift_size, None))
w_slices = (slice(0, -self.window_size),
            slice(-self.window_size, -self.shift_size),
            slice(-self.shift_size, None))
cnt = 0
for h in h_slices:
   for w in w_slices:
       img_mask[:, h, w, :] = cnt
          cnt += 1

mask_windows = window_partition(img_mask, self.window_size)  # nW, window_size, window_size, 1
mask_windows = mask_windows.view(-1, self.window_size * self.window_size)
attn_mask = mask_windows.unsqueeze(1) - mask_windows.unsqueeze(2)
attn_mask = attn_mask.masked_fill(attn_mask != 0, float(-100.0)).masked_fill(attn_mask == 0,
自己测试代码
还是以4×4输入为例说明。
window_size=2
shift_size=1
#x = torch.randn(1,8,8,3)
#x.shape
H = 4
W = 4
- h,w,window_size,shift_size分别代表window的高,宽,M和 ⌊ M 2 ⌋ \lfloor\frac{M}{2}\rfloor ⌊2M⌋
去掉self后的代码:
# calculate attention mask for SW-MSA
Hp = int(np.ceil(H / window_size)) * window_size
Wp = int(np.ceil(W / window_size)) * window_size
img_mask = torch.zeros((1, Hp, Wp, 1), device=x.device)  # 1 Hp Wp 1
#print("img_mask:",img_mask)
h_slices = (slice(0, -window_size),
            slice(-window_size, -shift_size),
            slice(-shift_size, None))
w_slices = (slice(0, -window_size),
            slice(-window_size, -shift_size),
            slice(-shift_size, None))

#print("h_slices:",h_slices)
#print("w_slices:",w_slices)

cnt = 0
for h in h_slices:
    for w in w_slices:
        img_mask[:, h, w, :] = cnt
        print("img_mask",img_mask)
        cnt += 1

mask_windows = window_partition(img_mask, window_size)  # nW, window_size, window_size, 1
#print("mask_windows:",mask_windows)
mask_windows = mask_windows.view(-1, window_size * window_size)
#print("mask_windows:",mask_windows)
attn_mask = mask_windows.unsqueeze(1) - mask_windows.unsqueeze(2)
#print("mask_windows:",attn_mask)
attn_mask = attn_mask.masked_fill(attn_mask != 0, float(-100.0)).masked_fill(attn_mask == 0, float(0.0))
#print("mask_windows:",attn_mask)
- 首先是一些划分操作,根据shift_size将window划分成各个区域
- 二重循环是赋值操作,根据上一步划分的区域,使每个区域的值相同
- 通过window_partition得到cyclic shift,再通过变换和masked_fill得到最终的attention-mask
mask_windows: tensor([[[   0.,    0.,    0.,    0.],
         [   0.,    0.,    0.,    0.],
         [   0.,    0.,    0.,    0.],
         [   0.,    0.,    0.,    0.]],

        [[   0., -100.,    0., -100.],
         [-100.,    0., -100.,    0.],
         [   0., -100.,    0., -100.],
         [-100.,    0., -100.,    0.]],

        [[   0.,    0., -100., -100.],
         [   0.,    0., -100., -100.],
         [-100., -100.,    0.,    0.],
         [-100., -100.,    0.,    0.]],

        [[   0., -100., -100., -100.],
         [-100.,    0., -100., -100.],
         [-100., -100.,    0., -100.],
         [-100., -100., -100.,    0.]]])
其中,四个mask对应关系为:


这是feature map在roll操作后的结果,将每个部分拉直进行QKT操作,即可得到对应的mask结果。参考图解Swin Transformer中的Attention Mask部分:

得到上边代码的mask结果。
 if mask is not None:
            nW = mask.shape[0]
            attn = attn.view(B_ // nW, nW, self.num_heads, N, N) + mask.unsqueeze(1).unsqueeze(0)
            attn = attn.view(-1, self.num_heads, N, N)
            attn = self.softmax(attn)
        else:
            attn = self.softmax(attn)
softmax之后,值为-100的元素会被忽略,从而达到mask的效果,仅得到window中有效的部分的attention。
再reverse回去就达到和原先计算结果一致的目的。类似于CNN中提取特征局部计算的过程。
Swin-T
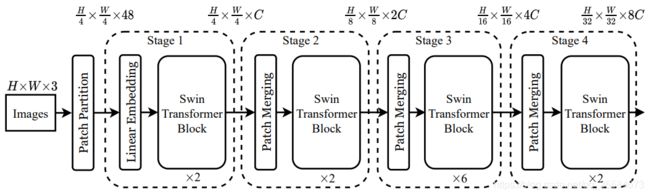
Swin Transformer block

总结
- self-attention的计算
- local window attention的计算
- shifted window attention的计算
- 创新点:用window的概念将CNN中局部性计算的思想引入到transformer中
推荐参考文章
- 图解Swin Transformer
- Swin Transformer各机制详细推导