《Centos7——FileBeat+Redis+ELK构建企业级日志分析平台》
目录
-
- ES-1部署(192.168.194.130)
-
- 1. 时间同步
- 2. 关闭防火墙
- 3. 安装JDK
- 4. 安装Elasticsearch
- 5. 查看ES集群是否同步
- 6. 安装logstash
- 7. 安装kibana
- 8. 部署redis
- 9. 测试redis
- ES2操作(192.168.194.131)
-
- 1. 时间同步
- 2. 关闭防火墙
- 3. 安装JDK
- 4. 安装Elasticsearch
- 5. 查看ES集群是否同步
- 6. 安装apache
- 7. 安装filebeat
-
- 1. 配置filebeat收集系统日志输出到文件
- 2. 配置filebeat收集系统日志输出redis
- 3. 进入ES-1验证redis的数据是否被取出
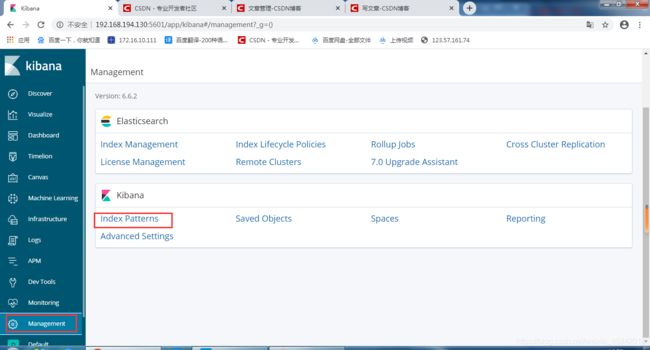
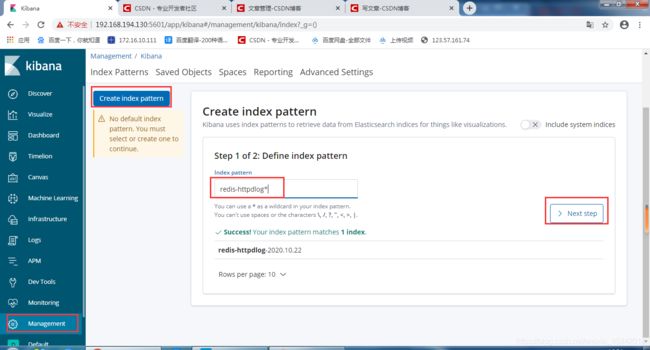
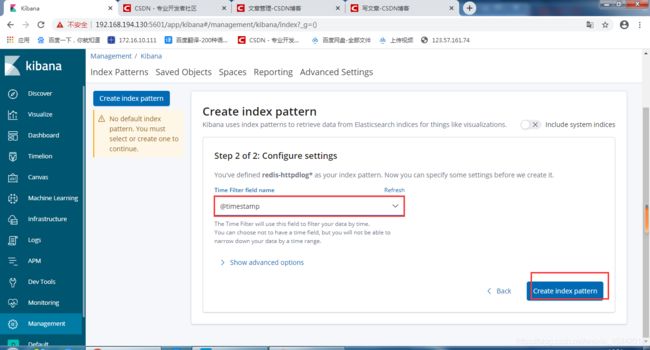
- 登录kibana网页(192.168.194.130:5601)
环境: 三台Centos7(2G内存、2个处理器、2个内核)
es1:redis kibana elasticsearch jdk
es2: httpd filebeat elasticsearch jdk
es3: httpd filebeat elasticsearch jdk
实验环境:
环境: 两台Centos7(2G内存、2个处理器、2个内核)
es1: jdk elasticsearch logstash kibana redis(192.168.194.130)
es2: jdk elasticsearch httpd filebeat(192.168.194.131)
ES-1部署(192.168.194.130)
elasticsearch包:
链接: https://pan.baidu.com/s/15_W_Kqfu0Gvk14bFunXNGg 提取码: 4a99 复制这段内容后打开百度网盘手机App,操作更方便哦
jdk包:
链接: https://pan.baidu.com/s/1YXeyNrqLHAQuj7LVQwxepQ 提取码: njmf 复制这段内容后打开百度网盘手机App,操作更方便哦
logstash包:
链接: https://pan.baidu.com/s/1hcRpNOEG5_5RfGgAulD1dA 提取码: jrcg 复制这段内容后打开百度网盘手机App,操作更方便哦
kibana包:
链接: https://pan.baidu.com/s/185sbP5Ey4WkNuh7pNA5nIg 提取码: 5fae 复制这段内容后打开百度网盘手机App,操作更方便哦
filebeat包:
链接: https://pan.baidu.com/s/1QM61Te_Jj7hg5z8KTTfhjg 提取码: 5zqf 复制这段内容后打开百度网盘手机App,操作更方便哦
redis包:
链接: https://pan.baidu.com/s/1F0CIi909rvjE4OTcs5WxEA 提取码: 9icb 复制这段内容后打开百度网盘手机App,操作更方便哦
1. 时间同步
[root@localhost ~]# yum -y install ntp   #安装ntp工具

[root@localhost ~]# ntpdate ntp1.aliyun.com   #同步时间
2. 关闭防火墙
[root@localhost ~]# systemctl stop firewalld

[root@localhost ~]# setenforce 0
3. 安装JDK
因为elasticsearch服务运行需要java环境,因此两台elasticsearch服务器需要安装java环境。
[root@localhost ~]# yum -y install jdk-8u131-linux-x64_.rpm
4. 安装Elasticsearch
[root@localhost ~]# yum -y install elasticsearch-6.6.2.rpm

[root@localhost ~]# cp /etc/elasticsearch/elasticsearch.yml /etc/elasticsearch/elasticsearch.yml.`date +%F` #备份操作
配置elasticsearch,elk2配置一个相同的节点,通过组播进行通信,如果无法通过组播查询,修改成单播即可。
[root@localhost ~]# vim /etc/elasticsearch/elasticsearch.yml
[root@localhost ~]# cat /etc/elasticsearch/elasticsearch.yml|egrep -v "^#|^$"
cluster.name: my-application	##ELK的集群名称,名称相同即属于是同一个集群
node.name: node-1	#本机在集群内的节点名称
path.data: /var/lib/elasticsearch	#数据存放目录
path.logs: /var/log/elasticsearch	#日志保存目录
network.host: 192.168.194.130	#监听的IP地址
http.port: 9200		#服务监听的端口
discovery.zen.ping.unicast.hosts: ["192.168.194.130", "192.168.194.131"]	#单播配置一台即可
[root@localhost elasticsearch]# systemctl start elasticsearch #启动服务
5. 查看ES集群是否同步
2个集群显示为2即为同步
[root@localhost ~]# curl http://192.168.194.130:9200/_cluster/health?pretty=true
{

  "cluster_name" : "my-application",
  "status" : "green",
  "timed_out" : false,
  "number_of_nodes" : 2,
  "number_of_data_nodes" : 2,
  "active_primary_shards" : 6,
  "active_shards" : 12,
  "relocating_shards" : 0,
  "initializing_shards" : 0,
  "unassigned_shards" : 0,
  "delayed_unassigned_shards" : 0,
  "number_of_pending_tasks" : 0,
  "number_of_in_flight_fetch" : 0,
  "task_max_waiting_in_queue_millis" : 0,
  "active_shards_percent_as_number" : 100.0
}
6. 安装logstash
logstash启动失败解决方案:
重新开一台虚拟机安装logstash执行分发到报错的虚拟机
[root@localhost ~]# scp /etc/systemd/system/logstash.service
[email protected]:/etc/systemd/system
[root@localhost ~]# yum -y install logstash-6.6.0.rpm

[root@localhost ~]# cd /etc/logstash/conf.d
[root@localhost conf.d]# vim httpd.conf
input {

        redis {

                data_type => "list"
                host => "192.168.194.130"
                password => "123321"
                port => "6379"
                db => "1"
                key => "filebeat-httpd"
        }
}

output {

        elasticsearch {

                hosts => ["192.168.194.130:9200"]
                index => "redis-httpdlog-%{+YYYY.MM.dd}"
        }
}
7. 安装kibana
[root@localhost ~]# yum -y install kibana-6.6.2-x86_64.rpm
[root@localhost ~]# vim /etc/kibana/kibana.yml
[root@localhost ~]# cat /etc/kibana/kibana.yml |egrep -v "^#|^$"
server.port: 5601
server.host: "192.168.194.130"
elasticsearch.hosts: ["http://192.168.194.130:9200"]
[root@localhost ~]# systemctl start kibana
[root@localhost ~]# netstat -lptnu|grep 5601
tcp        0      0 192.168.194.130:5601    0.0.0.0:*               LISTEN      29277/node
8. 部署redis
- logstash收集日志写入redis
用一台服务器部署redis服务,专门用于日志缓存使用,一般用于web服务器产生大量日志的场景。 - 这里是使用一台专门用于部署redis ,一台专门部署了logstash,在linux-elk1 ELK集群上面进行日志收集存到了redis服务器上面,然后通过专门的logstash服务器去redis服务器里面取出数据在放到kibana上面进行展示
- 实验环境redis和logstash放在一台上
没有redis包执行此命令
[root@localhost ~]# wget http://download.redis.io/releases/redis-5.0.0.tar.gz
部署redis
[root@localhost ~]# tar xf redis-5.0.0.tar.gz
[root@localhost ~]# cp -r redis-5.0.0 /usr/local/redis
[root@localhost ~]# cd /usr/local/redis
[root@localhost redis-5.0.0]# make distclean #要清除所有生成的文件
[root@localhost redis-5.0.0]# make
报错:
[root@localhost redis]# yum -y install gcc-c++
- 说关于分配器allocator, 如果有MALLOC 这个 环境变量, 会有用这个环境变量的 去建立Redis。
- 而且libc 并不是默认的 分配器, 默认的是 jemalloc, 因为 jemalloc 被证明 有更少的 fragmentation problems 比libc。
- 但是如果你又没有jemalloc 而只有 libc 当然 make 出错。 所以加这么一个参数
[root@localhost redis]# make
报错信息:
报错解决:
- 注意:报错zmalloc.h:50:31: fatal error: jemalloc/jemalloc.h: No such file or directory
- 改成:make MALLOC=libc
参考网页:
https://www.cnblogs.com/richerdyoung/p/8066373.html
[root@localhost redis]# vim README.md
[root@localhost redis]# make MALLOC=libc
[root@localhost redis]# ln -sv /usr/local/redis/src/redis-server /usr/bin/redis-server
"/usr/bin/redis-server" -> "/usr/local/redis/src/redis-server"

[root@localhost redis]# ln -sv /usr/local/redis/src/redis-cli /usr/bin/redis-cli
"/usr/bin/redis-cli" -> "/usr/local/redis/src/redis-cli"
[root@localhost conf.d]# cd /usr/local/redis

[root@localhost redis]# cp redis.conf redis.conf.bak #备份文件
[root@localhost redis]# vim redis.conf
[root@localhost redis]# cat redis.conf|egrep  "^bind|^requirepass|^daemonize"
bind 192.168.194.130
daemonize yes
requirepass 123321
[root@localhost redis]# redis-server ./redis.conf
16810:M 22 Oct 2020 15:37:48.980 # WARNING: The TCP backlog setting of 511 cannot be enforced because /proc/sys/net/core/somaxconn is set to the lower value of 128.
解决方法:
[root@localhost redis]# echo 511 > /proc/sys/net/core/somaxconn
16810:M 22 Oct 2020 15:37:48.981 # WARNING overcommit_memory is set to 0! Background save may fail under low memory condition. To fix this issue add 'vm.overcommit_memory = 1' to /etc/sysctl.conf and then reboot or run the command 'sysctl vm.overcommit_memory=1' for this to take effect
解决方法:
[root@localhost redis]# vim /etc/sysctl.conf
[root@localhost redis]# cat /etc/sysctl.conf|grep vm
vm.overcommit_memory = 1
16810:M 22 Oct 2020 15:37:48.981 # WARNING overcommit_memory is set to 0! Background save may fail under low memory condition. To fix this issue add 'vm.overcommit_memory = 1' to /etc/sysctl.conf and then reboot or run the command 'sysctl vm.overcommit_memory=1' for this to take effect.
16810:M 22 Oct 2020 15:37:48.981 # WARNING you have Transparent Huge Pages (THP) support enabled in your kernel. This will create latency and memory usage issues with Redis. To fix this issue run the command 'echo never > /sys/kernel/mm/transparent_hugepage/enabled' as root
解决方法:
[root@localhost redis]# sysctl vm.overcommit_memory=1
vm.overcommit_memory = 1
[root@localhost redis]# echo never > /sys/kernel/mm/transparent_hugepage/enabled
and add it to your /etc/rc.local in order to retain the setting after a reboot. Redis must be restarted after THP is disabled.
解决方法:
[root@localhost redis]# vim /etc/rc.local
[root@localhost redis]# cat /etc/rc.local|grep echo
echo never > /sys/kernel/mm/transparent_hugepage/enabled
9. 测试redis
[root@localhost redis]# redis-cli -h 192.168.194.130
192.168.194.130:6379> auth 123321
OK
ES2操作(192.168.194.131)
1. 时间同步
[root@localhost ~]# yum -y install ntp   #安装ntp工具
[root@localhost ~]# ntpdate ntp1.aliyun.com   #同步时间
2. 关闭防火墙
[root@localhost ~]# systemctl stop firewalld

[root@localhost ~]# setenforce 0
3. 安装JDK
因为elasticsearch服务运行需要java环境,因此两台elasticsearch服务器需要安装java环境。
[root@localhost ~]# yum -y install jdk-8u131-linux-x64_.rpm
4. 安装Elasticsearch
[root@localhost ~]# yum -y install elasticsearch-6.6.2.rpm

[root@localhost ~]# cp /etc/elasticsearch/elasticsearch.yml /etc/elasticsearch/elasticsearch.yml.`date +%F` #备份操作
配置elasticsearch,elk2配置一个相同的节点,通过组播进行通信,如果无法通过组播查询,修改成单播即可。
[root@localhost ~]# vim /etc/elasticsearch/elasticsearch.yml
[root@localhost ~]# cat /etc/elasticsearch/elasticsearch.yml|egrep -v "^#|^$"
cluster.name: my-application	##ELK的集群名称,名称相同即属于是同一个集群
node.name: node-2	#本机在集群内的节点名称
path.data: /var/lib/elasticsearch	#数据存放目录
path.logs: /var/log/elasticsearch	#日志保存目录
network.host: 192.168.194.131	#监听的IP地址
http.port: 9200		#服务监听的端口
[root@localhost elasticsearch]# systemctl start elasticsearch #启动服务
5. 查看ES集群是否同步
2个集群显示为2即为同步
[root@localhost ~]# curl http://192.168.194.131:9200/_cluster/health?pretty=true
{

  "cluster_name" : "my-application",
  "status" : "green",
  "timed_out" : false,
  "number_of_nodes" : 2,
  "number_of_data_nodes" : 2,
  "active_primary_shards" : 6,
  "active_shards" : 12,
  "relocating_shards" : 0,
  "initializing_shards" : 0,
  "unassigned_shards" : 0,
  "delayed_unassigned_shards" : 0,
  "number_of_pending_tasks" : 0,
  "number_of_in_flight_fetch" : 0,
  "task_max_waiting_in_queue_millis" : 0,
  "active_shards_percent_as_number" : 100.0
}
6. 安装apache
[root@localhost ~]# yum -y install httpd
[root@localhost ~]# systemctl start httpd
7. 安装filebeat
filebeat替代logstash收集日志
- filebeat简介
Filebeat是轻量级单用途的日志收集工具,用于在没有安装java的服务器上专门收集日志,可以将日志转发到logstash、elasticsearch或redis等场景中进行下一步处理。
官网下载地址:https://www.elastic.co/cn/downloads/past-releases#filebeat
官方文档:https://www.elastic.co/guide/en/beats/filebeat/current/configuring-howto-filebeat.html
[root@localhost ~]# yum -y install filebeat-6.8.1-x86_64.rpm
[root@localhost ~]# cd /etc/filebeat

[root@localhost filebeat]# cp filebeat.yml filebeat.yml.`date +%F`	#备份文件
1. 配置filebeat收集系统日志输出到文件
[root@localhost filebeat]# vim filebeat.yml
filebeat.inputs:
- type: log
  enabled: true
  paths:
    - /var/log/httpd/access_log
filebeat.config.modules:
  path: ${
     path.config}/modules.d/*.yml
  reload.enabled: false
setup.template.settings:
  index.number_of_shards: 3
setup.kibana:
#output.redis:
#  hosts: ["192.168.194.130:6379"]
output.file:
  path: "/tmp"
  filename: "filebeat.txt"

processors:
  - add_host_metadata: ~
  - add_cloud_metadata: ~
[root@localhost filebeat]# touch /tmp/filebeat.txt

[root@localhost filebeat]# systemctl restart filebeat
登录apache网页(192.168.194.131)
查看是否有日志产生
[root@localhost filebeat]# tailf /tmp/filebeat.txt
{
     "@timestamp":"2020-10-22T08:16:06.740Z","@metadata":{
     "beat":"filebeat","type":"doc","version":"6.8.1"},"message":"192.168.194.1 - - [22/Oct/2020:16:15:56 +0800] \"GET / HTTP/1.1\" 403 4897 \"-\" \"Mozilla/5.0 (Windows NT 6.1; Win64; x64) AppleWebKit/537.36 (KHTML, like Gecko) Chrome/83.0.4103.106 Safari/537.36\"","prospector":{
     "type":"log"},"input":{
     "type":"log"},"beat":{
     "name":"localhost.localdomain","hostname":"localhost.localdomain","version":"6.8.1"},"host":{
     "name":"localhost.localdomain","containerized":false,"architecture":"x86_64","os":{
     "platform":"centos","version":"7 (Core)","family":"redhat","name":"CentOS Linux","codename":"Core"},"id":"1c6ed991c7e64fdb99475e39fd5092b7"},"source":"/var/log/httpd/access_log","offset":0,"log":{
     "file":{
     "path":"/var/log/httpd/access_log"}}}
2. 配置filebeat收集系统日志输出redis
[root@localhost filebeat]# vim filebeat.yml
filebeat.inputs:
- type: log
  enabled: true
  paths:
    - /var/log/httpd/access_log
filebeat.config.modules:
  path: ${
     path.config}/modules.d/*.yml
  reload.enabled: false
setup.template.settings:
  index.number_of_shards: 3
setup.kibana:
output.redis:
  hosts: ["192.168.194.130:6379"]
  key: "filebeat-httpd" #这里自定义key的名称,为了后期处理
  db: 1 #使用第几个库
  timeout: 5 #超时时间
  password: 123321 #redis 密码
#output.file:
##path: "/tmp"
##filename: "filebeat.txt"
processors:
  - add_host_metadata: ~
  - add_cloud_metadata: ~
3. 进入ES-1验证redis的数据是否被取出
[root@localhost filebeat]# systemctl restart filebeat #重启filebeat
[root@localhost ~]# redis-cli -h 192.168.194.130
192.168.194.130:6379> auth 123321
OK
192.168.194.130:6379> SELECT 1
OK
192.168.194.130:6379[1]> KEYS *
1) "filebeat-httpd"
192.168.194.130:6379[1]> LLEN filebeat-httpd
(integer) 45
192.168.194.130:6379[1]>


