从零学习使用ElasticSearch:从启动服务,到使用简单增删改查,以及复杂查询的使用
文章目录
- 一、入门
-
- 1.环境准备
-
- 下载
- 安装
- 启动
- 测试
- 安装postman
- 2.倒排索引
- 3.索引
-
- (1)创建索引
- (2)查询索引
- (3)删除索引
- 4.文档
-
- (1)创建文档
- (2)查询文档:根据主键查询
- (3)查询文档:查询索引中的所有文档
- (4)修改文档:新增或覆盖
- (5)修改文档:只修改文档的部分字段
- (6)删除文档
- 5.更高级的查询
-
- (1)条件查询
- (2)分页查询
- (3)查询排序
- (4)多条件查询
- (5)范围查询
- (6)全文检索
- (7)聚合查询
- 6.映射关系
-
- (1)创建映射
- (2)查询映射
- (3)向映射中添加数据
- 二、部署环境
- 三、进阶
- 四、集成
- 五、优化
参考资料:
B站尚硅谷教程:这里
别人的博客笔记:这里
官方文档:这里
前置知识:
restful风格(了解)
json(熟悉)
一、入门
1.环境准备
下载
本文安装7.8.0 for windows版本:www.elastic.co/cn/downloads/past-releases/elasticsearch-7-8-0
如果需要安装最新版本,请访问官网:https://www.elastic.co/cn/
安装
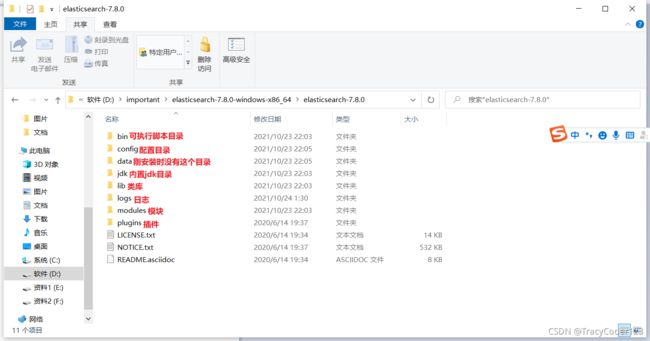
将下载下来的压缩包解压到目录,就算是安装完毕了:
启动
进入bin目录,然后双击elasticsearch.bin,会自动跳出终端,以下表示执行成功:
测试
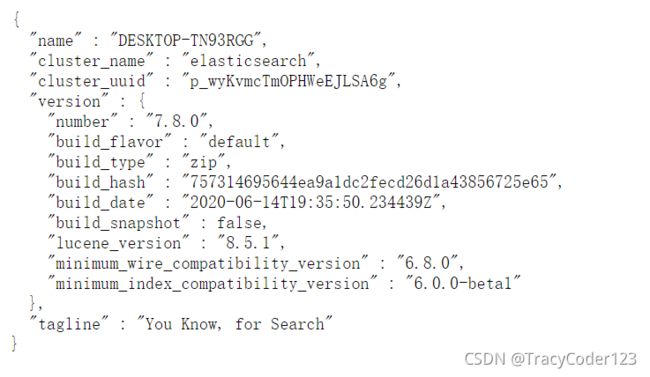
浏览器中访问http://localhost:9200,若返回以下内容,说明服务确实启动成功了:
9300 端口为 Elasticsearch 集群间组件的通信端口, 9200 端口为浏览器访问的 http协议 RESTful 端口。
安装postman
postman是一款强大的网页调试工具。
进入下载地址https://www.postman.com/downloads/,然后点击download the app就可以下载了。
下载后直接双击exe就可以打开postman,登录账号就可以使用了。
2.倒排索引
Elasticsearch是面向1文档型数据库,一条数据就是一个文档。
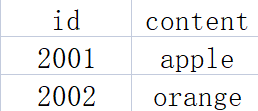
虽然ES中的索引和Mysql的索引不是同一个东西,但ES中有个特殊的概念——正排索引、倒排索引和关系型数据库中的索引是一样的用法。
- 正排索引:根据id得到内容
- 倒排索引:根据内容得到id
3.索引
(1)创建索引
我们先打开ES服务,然后启动postman,然后创建一个collection,用于管理url:
创建索引就相当于创建关系型数据库中的数据库。我们需要在postman中发送put请求:http://127.0.0.1:9200/shopping,最后的shopping是索引名称,写别的也可以。
(2)查询索引
我们需要在postman中发送get请求:http://127.0.0.1:9200/shopping。url没变,但是不再是put请求而是get请求。
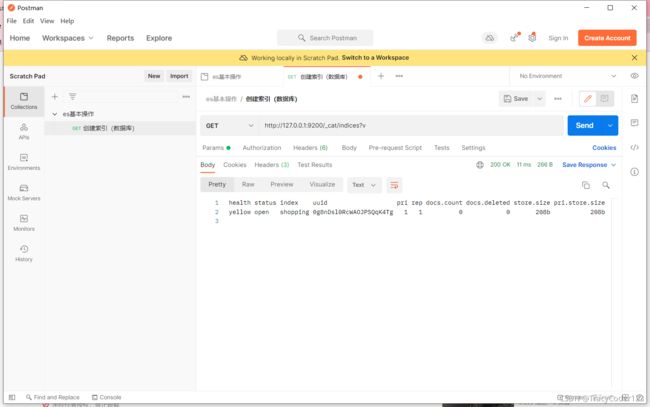
列出所有索引:
(3)删除索引
4.文档
前面一节我们删除了索引shopping,记得先重新创建好。
(1)创建文档
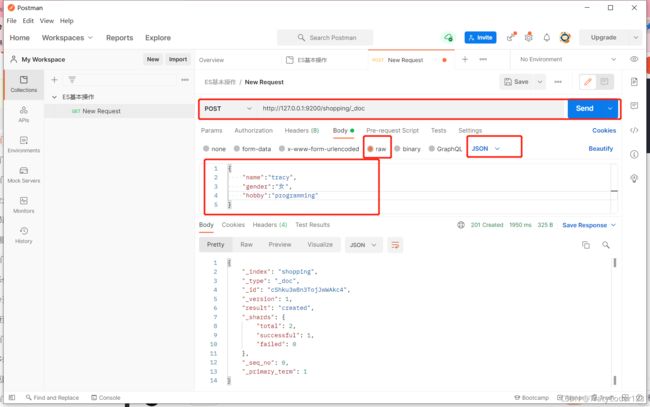
在 postman 中发post请求 : http://127.0.0.1:9200/shopping/_doc,请求体JSON内容为:
{

    "name":"tracy",
    "gender":"女",
    "hobby":"programming"
}
注意:
_doc表示类型为文档;
参数要写在body里面,而且要选择raw再选择json;
请求成功后会返回关于这条文档的详细信息。
看下面返回的内容中有返回一个_id,这是因为我们没有自己指定id,所以系统为我们默认分配了一个。
发送post请求并指定id
在 postman 中发post请求 : http://127.0.0.1:9200/shopping/_doc/1。
注意:也可发送put请求,但url一定要指定id。
(2)查询文档:根据主键查询
在 postman 中发get请求 : http://127.0.0.1:9200/shopping/_doc/1。查询索引中主键为1的数据。
(3)查询文档:查询索引中的所有文档
在 postman 中发get请求 : http://127.0.0.1:9200/shopping/_search。查询shopping索引下的所有数据。

(4)修改文档:新增或覆盖
全量修改也就是和新增文档一样,输入相同的 URL 地址请求,如果请求体变化,会将原有的数据内容覆盖。
在 postman 中发put请求 : http://127.0.0.1:9200/shopping/_doc/1。如果索引中原本没有这条数据,会创建新的数据;否则会覆盖原来的数据。
(5)修改文档:只修改文档的部分字段
在 postman 中发post请求 : http://127.0.0.1:9200/shopping/_update/1。只修改某一给条数据的局部信息。
注意body的写法和之前不一样了:
{

    "doc":{

        "hobby":"food"
    }
}
(6)删除文档
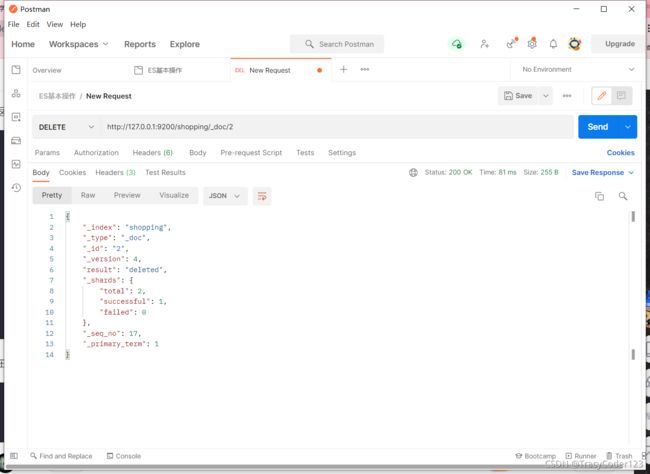
在 postman 中发delete请求 : http://127.0.0.1:9200/shopping/_doc/2。逻辑上删除该条数据(被标记为已删除,但未从磁盘上消失)。
5.更高级的查询
(1)条件查询
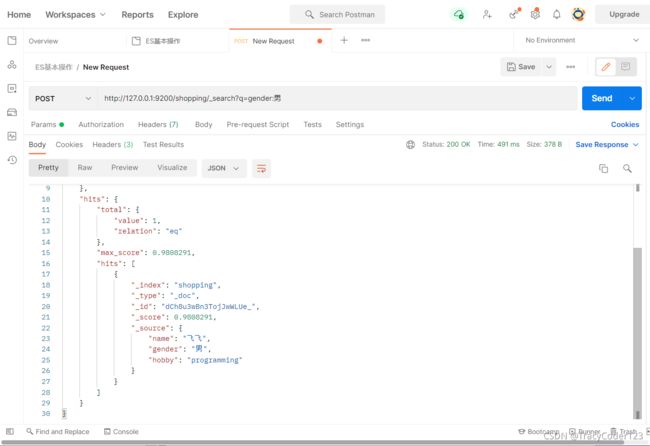
在 postman 中发get请求 : http://127.0.0.1:9200/shopping/_search?q=gender:男。这个url的意思是在shopping索引下查询所有gender为男的文档。
把参数写到body中
把请求参数写在url中有很多不便之处,所以我们可以写到body中去。
在 postman 中发get请求 : http://127.0.0.1:9200/shopping/_search。
然后在body中写入参数:
{

    "query":{

        "match":{

            "gender":"女"
        }
    }
}
只显示部分字段
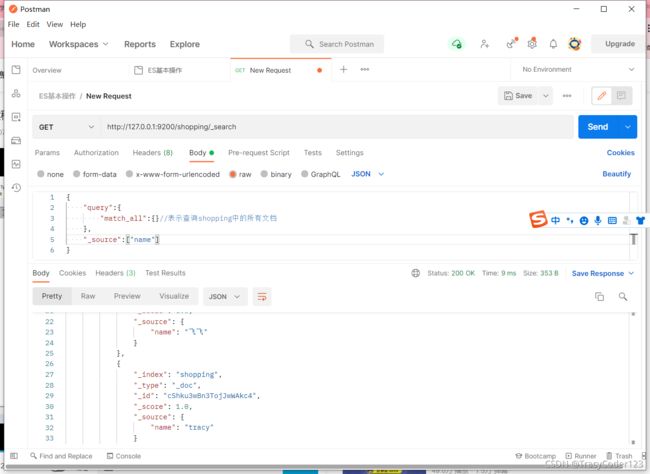
在 postman 中发get请求 : http://127.0.0.1:9200/shopping/_search。然后在body中写入参数:
{

    "query":{

        "match_all":{
     }//表示查询shopping中的所有文档
    },
    "_source":["name"]//表示结果只显示name字段
}
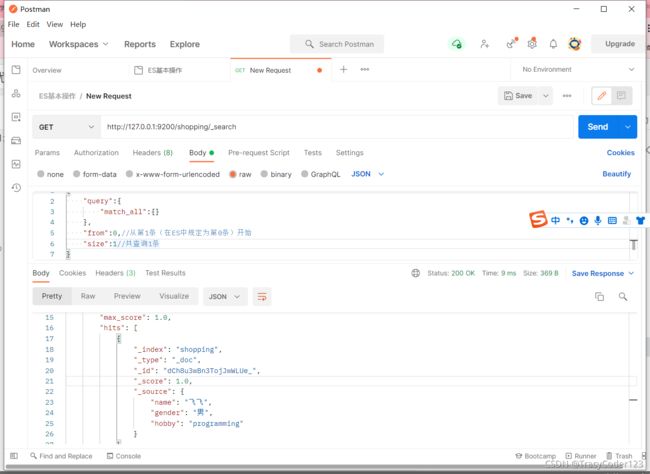
(2)分页查询
在 postman 中发get请求 : http://127.0.0.1:9200/shopping/_search。然后在body中写入参数:
{

    "query":{

        "match_all":{
     }
    },
    "from":0,//从第1条(在ES中规定为第0条)开始
    "size":1//共查询1条
}
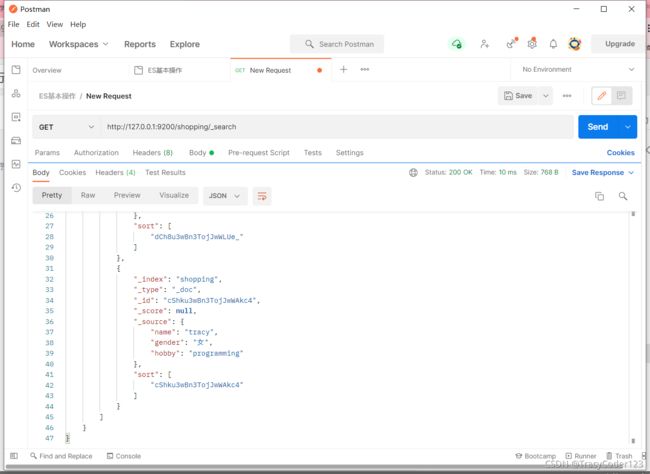
(3)查询排序
在 postman 中发get请求 : http://127.0.0.1:9200/shopping/_search。然后在body中写入参数:
{

    "query":{

        "match_all":{
     }
    },
    "sort":{

        "_id":{
     //按id字段排序
            "order":"desc"//降序desc,升序asc
        }
    }
}
(4)多条件查询
在 postman 中发get请求 : http://127.0.0.1:9200/shopping/_search。
查询gender为男 且 id为2的数据,参数写法:
{

	"query":{

		"bool":{

			"must":[{
     //这里为must表示逻辑运算中的“且”
				"match":{

					"gender":"男"
				}
			},{

				"match":{

					"_id":32
				}
			}]
		}
	}
}
查询gender为男 或 id为2的数据,参数写法:
{

	"query":{

		"bool":{

			"should":[{
     //这里为should表示逻辑运算中的“或”
				"match":{

					"gender":"男"
				}
			},{

				"match":{

					"_id":32
				}
			}]
		}
	}
}
(5)范围查询
在 postman 中发get请求 : http://127.0.0.1:9200/shopping/_search。
查询name中含有tracy,性别为女,age大于1的数据,body写法:
{

	"query":{

		"bool":{

			"must":[{

				"match":{

					"name":"tracy"
				}
			},{

				"match":{

					"gender":"女"
				}
			}],
             "filter":{

            	"range":{

                	"age":{

                    	"gt":1
                	}
	            }
    	    }
		}
	}
}
(6)全文检索
从(5)中可以看出来,我们明明match中name过滤条件为tracy,但检索出来的数据很多都只是name中含有tracy
而已,这是因为ES自带全文检索功能。
完全匹配
如果你想严格匹配,body应该这么写:
{

	"query":{

		"bool":{

			"must":[{

				"match_phrase":{
     //这里不再是match
					"name":"tracy"
				}
			},{

				"match":{

					"gender":"女"
				}
			}],
             "filter":{

            	"range":{

                	"age":{

                    	"gt":1
                	}
	            }
    	    }
		}
	}
}
高亮显示
body写法:
{

	"query":{

		"bool":{

			"must":[{

				"match_phrase":{
     //这里不再是match
					"name":"tracy"
				}
			},{

				"match":{

					"gender":"女"
				}
			}]
		}
	},
    "highlight":{

        "fields":{

            "gender":{
     }//<----高亮此字段
        }
    }
}
(7)聚合查询
在 postman 中发get请求 : http://127.0.0.1:9200/shopping/_search。
body写法:
"aggs":{
     //聚合操作
		"gender_group":{
     //名称,随意起名
			"terms":{
     //分组,如果求平均这里写avg
				"field":"gender"//分组字段
			}
		}
	}
6.映射关系
ES的映射相当于数据库中的表。
创建数据库表需要设置字段名称,类型,长度,约束等;索引库也一样,需要知道这个类型下有哪些字段,每个字段有哪些约束信息,这就叫做映射。
先创建一个索引
put http://127.0.0.1:9200/school
创建成功,返回:
{

    "acknowledged": true,
    "shards_acknowledged": true,
    "index": "school"
}
(1)创建映射
put http://127.0.0.1:9200/user/_mapping
body写法:
{

    "properties": {
     //以下为此映射的字段
        "name":{

        	"type": "text",//这个类型能被分词(全文搜索)
        	"index": true//表明这个字段能被索引
        },
        "gender":{

        	"type": "keyword",//这个类型不能被分词
        	"index": true
        },
        "student_no":{

        	"type": "keyword",
        	"index": false
        }
    }
}
返回:
{

    "acknowledged": true
}
(2)查询映射
get http://127.0.0.1:9200/user/_mapping
返回结果:
{

    "school": {

        "mappings": {

            "properties": {

                "gender": {

                    "type": "keyword"
                },
                "name": {

                    "type": "text"
                },
                "student_no": {

                    "type": "keyword",
                    "index": false
                }
            }
        }
    }
}
(3)向映射中添加数据
put http://127.0.0.1:9200/school/_create/0001
body写法:
{

	"name":"团团",
	"gender":"女",
	"student_no":"0001"
}
返回结果:
{

    "_index": "school",
    "_type": "_doc",
    "_id": "0001",
    "_version": 1,
    "result": "created",
    "_shards": {

        "total": 2,
        "successful": 1,
        "failed": 0
    },
    "_seq_no": 0,
    "_primary_term": 1
}
关于如何查询数据前面都已经讲过了。
后面这些用到了再更新。
