【网络安全】Linux内核部分文件分析
前言
对于操作系统的分析,是一个复杂且枯燥的过程,其中包括中断、调用等一系列的问题,需要从原理和代码两层的角度进行分析,包含汇编、C语言等较为难理解的知识,以及算法的思维。
【学习资料】
启动流程
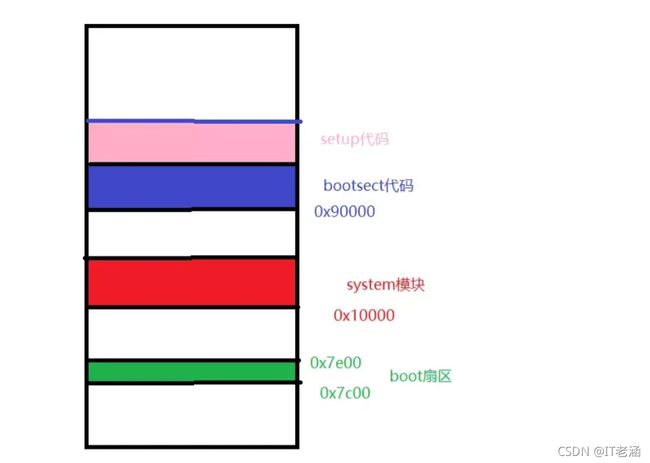
setup模块扇区长度为4个扇区,各个模块存放在内存的地址。
这里的ROOT_DEV=0x306表示第二个硬盘的第一个扇区。
基础
设备号 = 主设备号 * 256 + 次设备号
主设备号是定义好的:
1-内存
2-磁盘
3-硬盘
PC机的BIOS把bootsect的一个固定地址拿到了内存中某个固定地址(0x90000),
并且进行硬件初始化和参数设置。

bootsect中的代码首先移动到0X7C00,之后又转移到0X90000。

代码分析
bootsect模块移入内存
start:
mov  ax,#BOOTSEG
mov  ds,ax
mov  ax,#INITSEG
mov  es,ax
mov  cx,#256
sub  si,si
sub  di,di
rep
movw
jmpi  go,INITSEG
把bootsect中代码移动到内存中0X90000中,
可以看到此时的ds 存储0x07c0 地址:es 0x90000。
利用寄存器从ds:si到es:di
jmpi go,INITSEG
INITSEG是段地址,go是偏移地址,跳转到程序执行的地方(0x90000)。
bootsect.s作用
1.首先加载bootsect的代码(磁盘引导块程序,在磁盘中第一个扇区的程序)
2.将setup.s中代码加载到bootsect.s中代码之后
3.将system模块加载到0x10000地方,最后跳转到setup.s中运行
go:  mov  ax,cs
mov  ds,ax
mov  es,ax
! put stack at 0x9ff00.
mov  ss,ax
mov  sp,#0xFF00    ! arbitrary value >>512
设置ds、es、ss、sp
对栈的设置 es:sp =0x90000:0xff00
setup模块移入内存
load_setup:
mov dx,#0x0000 ! drive 0, head 0
//驱动器号0;磁头号0
mov cx,#0x0002 ! sector 2, track 0
//起始扇区2;磁道0
mov bx,#0x0200 ! address = 512, in INITSEG
mov ax,#0x0200+SETUPLEN ! service 2, nr of sectors
int 0x13 ! read it
jnc ok_load_setup ! ok - continue
mov dx,#0x0000
mov ax,#0x0000 ! reset the diskette
int 0x13
j load_setup
setup模块加载到0x90200中。
setup.s作用
- 解析BIOS传递过来的参数;
- 设置系统内核运行的局部描述符,中断描述寄存器,全局描述符;
- 设置中断控制芯片,进入保护模式;
- 跳转到system模块中head.s中代码执行。
system模块移入内存
! we want to load the system (at 0x10000)
mov  ax,#SYSSEG
mov  es,ax    ! segment of 0x010000
call  read_it
call  kill_motor
把system模块加载0x10000处,
关闭驱动器。
【学习资料】
head.s作用
- 加载内核运行时的各种数据段寄存器,重新设置中断描述表;
- 开启内核正常运行时的协处理器;
- 设置内存管理的分页机制;
- 跳转到main.c开始运行。
中断调用:
有出错号、无出错号
中断范围:
int0 ~ int255。
int0 ~ int31 : 软件中断,由Intel固定设置的。
int32 ~ int255: 可由用户自己设置。其中int32 ~ int47 对应8259A的IRQ0 ~ IRQ15中断。
特殊的一个:int128 为系统调用中断(system_call)。
#int7 – 设备不存在。
#int14 – 页错误。
#int16 – 协处理器错误。
#int 0x20 – 时钟中断。
#int 0x80 – 系统调用。
asm.s分析
寄存器入栈:
no_error_code:xchgl %eax,(%esp)pushl %ebxpushl %ecxpushl %edxpushl %edipushl %esipushl %ebppush %dspush %espush %fs
异常码入栈:
pushl $0 # “error code”
函数返回值入栈:
lea 44(%esp),%edx //把中断的地方压栈pushl %edxmovl $0x10,%edxmov %dx,%dsmov %dx,%esmov %dx,%fs
调用中断服务函数:
call *%eax //调用中断打印函数
出栈函数返回值:
addl $8,%esp //函数参数出栈pop %fspop %espop %dspopl %ebppopl %esipopl %edipopl %edxpopl %ecxpopl %ebxpopl %eaxiret
error_code:
xchgl %eax,4(%esp) # error code <-> %eax //中断错误码xchgl %ebx,(%esp) # &function <-> %ebx //中断函数pushl %ecxpushl %edxpushl %edipushl %esipushl %ebppush %dspush %espush %fspushl %eax # error code //出错号入栈lea 44(%esp),%eax # offsetpushl %eaxmovl 0x10,8,%esp pop %fspop %espop %dspopl %ebppopl %esipopl %edipopl %edxpopl %ecxpopl %ebxpopl %eaxiret
trap.c分析
本程序用来处理硬件陷阱和故障。
asm.s和traps.c 两个程序文件的关系:
asm.s 是汇编文件,主要实现大部分硬件中断(异常)引起的中断处理过程;trap.c
是C语言源文件,内部是各种中断处理的C函数,这些函数在asm.s中进行调用。
GCC编译过程:
1.预处理阶段
2.编译阶段
3.汇编阶段
4.链接阶段
内联汇编格式:
asm(“汇编语句” :输出寄存器 :输入寄存器 :会被修改的寄存器)
#define get_seg_byte(seg, addr) \ /*宏定义:取段seg中地址addr处的一个字节*/
({
      \
register char __res; \ //定义一个寄存器
__asm__("push %%fs; //保存fs寄存器的原值
mov %%ax, %%fs; //将seg设置到fs
movb %%fs:%2, %%a1; //将seg:addr处的一个字节放置到a1寄存器中
pop %%fs "\
: "=a" (__res) \ //输出寄存器列表
:"0" (seg), "m"(*(addr)));\ //输入寄存器列表
__res;}) /*输入:_res;输出:seg 内存地址*
: "=a" (__res) \ //输出寄存器列表
输出寄存器,a代表eax,运行结束后把eax的值放入res中
:"0" (seg), "m"(*(addr)));\ //输入寄存器列表
输入寄存器,0代表eax(与上面相同),m代表内存地址
取seg段addr处的四个字节。
取fs段寄存器的值。
str字符串 esp_ptr 栈指针 nr段号(在哪里出错)。
static void die(char * str,long esp_ptr,long nr)
{

long * esp = (long *) esp_ptr;
int i;
printk("%s: %04x\n\r",str,nr&0xffff);
printk("EIP:\t%04x:%p\nEFLAGS:\t%p\nESP:\t%04x:%p\n",
esp[1],esp[0],esp[2],esp[4],esp[3]);
//打印栈中的一些寄存器
printk("fs: %04x\n",_fs());
printk("base: %p, limit: %p\n",get_base(current->ldt[1]),get_limit(0x17));
if (esp[4] == 0x17) {

printk("Stack: ");
for (i=0;i<4;i++)
printk("%p ",get_seg_long(0x17,i+(long *)esp[3]));
printk("\n");
}
str(i);
printk("Pid: %d, process nr: %d\n\r",current->pid,0xffff & i);
for(i=0;i<10;i++)
printk("%02x ",0xff & get_seg_byte(esp[1],(i+(char *)esp[0])));
printk("\n\r");
do_exit(11);        /* play segment exception */
}
//打印当前栈中的内容
trap_init分析
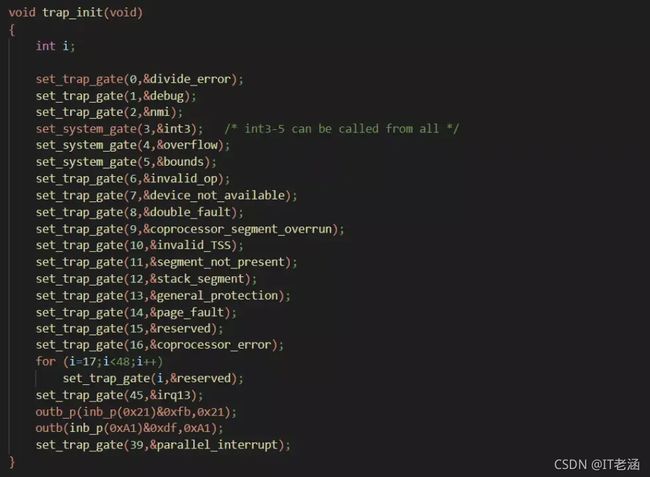
set_trap_gate:优先级为0 ,设置权限较高,只能由用户程序调用。
set_system_gate :
设置权限较低,用户和系统所有进程调用。
system_call.s分析
操作系统的进程管理
系统时间:CPU内部有一个RTC(定时器),运行时调用mktime函数,算出时间差。
给MKTIME函数传来的时间结构体赋值是由初始化时间从RTC中读出的:
#include main.c中time_init
static void time_init(void)
{

struct tm time;
do {

time.tm_sec = CMOS_READ(0);
time.tm_min = CMOS_READ(2);
time.tm_hour = CMOS_READ(4);
time.tm_mday = CMOS_READ(7);
time.tm_mon = CMOS_READ(8);
time.tm_year = CMOS_READ(9);
} while (time.tm_sec != CMOS_READ(0));
BCD_TO_BIN(time.tm_sec);
BCD_TO_BIN(time.tm_min);
BCD_TO_BIN(time.tm_hour);
BCD_TO_BIN(time.tm_mday);
BCD_TO_BIN(time.tm_mon);
BCD_TO_BIN(time.tm_year);
time.tm_mon--;
startup_time = kernel_mktime(&time);
}
小结
内核源码的时间片设计是很精妙的,对操作系统的分析同时也需要计算机组成原理的知识,硬件的理解以及利用算法如何更好的为用户和上层软件服务。
最后
点击查看【网络安全学习资料·攻略】获取相关书籍与工具


