项目--后端--HTTPS
原文网址:项目--后端--HTTPS_IT利刃出鞘的博客-CSDN博客
简介
其他网址
SpringBoot 2安装SSL配置HTTPS,实现HTTP自动跳转HTTPS或同时支持访问 - 码问
SSL证书
要使用https,首先需要ssl证书,获取SSL证书有两种方式:
- 通过证书授权机构购买或者免费领取
- 自己通过keytool生成
注意
- 一般实际使用时,通过证书授权机构购买。
- 腾讯云、阿里云、UCLOUD都提供免费的证书,可以去申请下载。
腾讯云:SSL证书_免费SSL证书-付费SSL证书_服务器证书 - 腾讯云
SSL详细配置
server.ssl.ciphers= # Supported SSL ciphers.
server.ssl.client-auth= # Whether client authentication is wanted ("want") or needed ("need"). Requires a trust store.
server.ssl.enabled= # Enable SSL support.
server.ssl.enabled-protocols= # Enabled SSL protocols.
server.ssl.key-alias= # Alias that identifies the key in the key store.
server.ssl.key-password= # Password used to access the key in the key store.
server.ssl.key-store= # Path to the key store that holds the SSL certificate (typically a jks file).
server.ssl.key-store-password= # Password used to access the key store.
server.ssl.key-store-provider= # Provider for the key store.
server.ssl.key-store-type= # Type of the key store.
server.ssl.protocol=TLS # SSL protocol to use.
server.ssl.trust-store= # Trust store that holds SSL certificates.
server.ssl.trust-store-password= # Password used to access the trust store.
server.ssl.trust-store-provider= # Provider for the trust store.
server.ssl.trust-store-type= # Type of the trust store.
key-store-password:生成ssl证书时设置的密钥库的口令。
如果server.port不配置,默认为443。
实例前提
其他网址
SpringBoot 2安装SSL配置HTTPS,实现HTTP自动跳转HTTPS或同时支持访问 - 码问
spring boot支持https请求_xqhys的博客-CSDN博客让你的Spring Boot工程支持HTTP和HTTPS-阿里云开发者社区
获取SSL证书
作为演示,我们使用keytool生成
keytool -genkey -alias tomcat -storetype PKCS12 -keyalg RSA -keysize 2048 -keystore keystore.p12 -validity 3650输入密钥库口令: 再次输入新口令: 您的名字与姓氏是什么? [Unknown]: xxx 您的组织单位名称是什么? [Unknown]: xxx 您的组织名称是什么? [Unknown]: xxx 您所在的城市或区域名称是什么? [Unknown]: beijing 您所在的省/市/自治区名称是什么? [Unknown]: beijing 该单位的双字母国家/地区代码是什么? [Unknown]: china CN=xxx, OU=xxx, O=xxx, L=beijing, ST=beijing, C=china是否正确? [否]: y会在当前目录下生成一个证书:keystore.p12,同时记住你在生成证书时候输入的密钥库口令。
将keystore.p12放入resources目录下。
参数详解
-genkey :生成key;
-alias :key的别名;
-dname:指定证书拥有者信息
dname的值详解:
CN(Common Name名字与姓氏)
OU(Organization Unit组织单位名称)
O(Organization组织名称)
L(Locality城市或区域名称)
ST(State州或省份名称)
C(Country国家名称)
-storetype :密钥库的类型。常用的有JKS(默认),JCEKS(推荐),PKCS12,BKS,UBER。每个密钥库只可以是其中一种类型。
-keyalg :DSA或RSA算法(当使用-genkeypair参数),DES或DESede或AES算法(当使用-genseckey参数);
-keysize :密钥的长度为512至1024之间(64的倍数)
-keystore :证书库的名称
-validity : 指定创建的证书有效期多少天
只支持https请求
application.yml
server:
  port: 9443
  ssl:
    key-store: classpath:keystore.p12
    key-store-password: xxxxxx
    keyAlias: tomcat
    keyStoreType: PKCS12
引入必要的依赖
	org.springframework.boot
	spring-boot-starter


	org.springframework.boot
	spring-boot-starter-web
测试controller
package com.example.demo.controller;

import org.springframework.web.bind.annotation.GetMapping;
import org.springframework.web.bind.annotation.RestController;

@RestController
public class HelloController {
    @GetMapping("/hello")
    public String hello() {
        return "hello world";
    }
}
测试
访问https://localhost:9443/hello //因为是自己生成的ssl证书,所以https请求是不被客户端识别的,会报不安全,可以将其添加到浏览器的“例外”中。项目中实际使用购买的ssl不存在此问题。
访问:http://localhost:9443/hello //访问失败
http请求转换成https请求
简介
Spring Boot不支持通过application.properties同时配置HTTP连接器和HTTPS连接器。因为通过程序的方式配置 HTTP 协议更加简单一点,所以,Spring Boot 推荐的做法是把 HTTPS 配置在配置文件,HTTP 通过程序来配置。
application.yml
server:
  port: 9443
  ssl:
    key-store: classpath:keystore.p12
    key-store-password: 222333
    keyAlias: tomcat
    keyStoreType: PKCS12
配置类
package com.example.demo.config;

import org.apache.catalina.Context;
import org.apache.catalina.connector.Connector;
import org.apache.tomcat.util.descriptor.web.SecurityCollection;
import org.apache.tomcat.util.descriptor.web.SecurityConstraint;
import org.springframework.boot.web.embedded.tomcat.TomcatServletWebServerFactory;
import org.springframework.context.annotation.Bean;
import org.springframework.context.annotation.Configuration;

@Configuration
public class TomcatHttpConfig {
    @Bean
    public Connector connector(){
        Connector connector=new Connector("org.apache.coyote.http11.Http11NioProtocol");
        connector.setScheme("http");
        //Connector监听的http的端口号
        connector.setPort(8080);
        connector.setSecure(false);
        //监听到http的端口号后转向到的https的端口号
        connector.setRedirectPort(443);
        return connector;
    }

    @Bean
    public TomcatServletWebServerFactory tomcatServletWebServerFactory(Connector connector){
        TomcatServletWebServerFactory tomcat=new TomcatServletWebServerFactory(){
            @Override
            protected void postProcessContext(Context context) {
                SecurityConstraint securityConstraint=new SecurityConstraint();
                securityConstraint.setUserConstraint("CONFIDENTIAL");
                SecurityCollection collection=new SecurityCollection();
                collection.addPattern("/*");
                securityConstraint.addCollection(collection);
                context.addConstraint(securityConstraint);
            }
        };
        tomcat.addAdditionalTomcatConnectors(connector);
        return tomcat;
    }
}
测试
访问:http://localhost:8080/hello //自动跳转到https://localhost:9443/hello
访问: https://localhost:9443/hello
同时支持http和https请求
application.yml
server:
  port: 9443
  ssl:
    key-store: classpath:keystore.p12
    key-store-password: 222333
    keyAlias: tomcat
    keyStoreType: PKCS12
配置类
法1:直接创建http
package com.example.demo.config;

import org.apache.catalina.connector.Connector;
import org.springframework.boot.web.embedded.tomcat.TomcatServletWebServerFactory;
import org.springframework.boot.web.servlet.server.ServletWebServerFactory;
import org.springframework.context.annotation.Bean;
import org.springframework.context.annotation.Configuration;

@Configuration
public class TomcatHttpConfig {
    @Bean
    public ServletWebServerFactory serverFactory() {
        TomcatServletWebServerFactory tomcat = new TomcatServletWebServerFactory();
        tomcat.addAdditionalTomcatConnectors(createStandardConnector());
        return tomcat;
    }
    private Connector createStandardConnector() {
        Connector connector = new Connector("org.apache.coyote.http11.Http11NioProtocol");
        connector.setPort(8080);
        return connector;
    }
}
法2:http隐式转为https //相对“http请求转换成https请求”,只是将false改为true
package com.example.demo.config;

import org.apache.catalina.Context;
import org.apache.catalina.connector.Connector;
import org.apache.tomcat.util.descriptor.web.SecurityCollection;
import org.apache.tomcat.util.descriptor.web.SecurityConstraint;
import org.springframework.boot.web.embedded.tomcat.TomcatServletWebServerFactory;
import org.springframework.context.annotation.Bean;
import org.springframework.context.annotation.Configuration;

@Configuration
public class TomcatHttpConfig {
    @Bean
    public Connector connector(){
        // 默认采用:"org.apache.coyote.http11.Http11NioProtocol"
        Connector connector=new Connector();
        connector.setScheme("http");
        //Connector监听的http的端口号
        connector.setPort(8080);
        connector.setSecure(true);
        //监听到http的端口号后转向到的https的端口号
        connector.setRedirectPort(443);
        return connector;
    }

    @Bean
    public TomcatServletWebServerFactory tomcatServletWebServerFactory(Connector connector){
        TomcatServletWebServerFactory tomcat=new TomcatServletWebServerFactory(){
            @Override
            protected void postProcessContext(Context context) {
                SecurityConstraint securityConstraint=new SecurityConstraint();
                securityConstraint.setUserConstraint("CONFIDENTIAL");
                SecurityCollection collection=new SecurityCollection();
                collection.addPattern("/*");
                securityConstraint.addCollection(collection);
                context.addConstraint(securityConstraint);
            }
        };
        tomcat.addAdditionalTomcatConnectors(connector);
        return tomcat;
    }
}
法3.WebServerFactoryCustomizer
其他网址
Springboot项目同时支持http和https访问 | 极客空的小博客
测试
项目启动
2020-12-14 14:41:13.697 INFO 15480 --- [ main] o.s.b.w.embedded.tomcat.TomcatWebServer : Tomcat started on port(s): 443 (https) 8080 (http) with context path ''访问:http://localhost:8080/hello
访问:https://localhost:9443/hello
多个SSL证书
其他网址
Spring Boot HTTPS配置与后台调用-iTRunner-奔跑的猿-51CTO博客
编程方式支持HTTPS
其他网址
SpringBoot2.2 官方指导手册中文版3--嵌入式Web服务器
enable-multiple-connectors-in-tomcat //SpringBoot 官网
简介
本处通过编程来支持https,所以,原来的http不用动,可以直接支持。
放置keystore.p12
放到:src/main/java/com/exmple/demo/config路径下
application.yml
server:
  port: 9000

custom:
  https:
    server:
      port: 9443
      ssl:
        enabled: true
        key-store: keystore.p12
        key-store-password: 222333
        keyAlias: tomcat
        keyStoreType: PKCS12
配置类
package com.example.demo.config;

import org.apache.catalina.connector.Connector;
import org.apache.coyote.http11.Http11NioProtocol;
import org.springframework.beans.factory.annotation.Value;
import org.springframework.boot.web.embedded.tomcat.TomcatServletWebServerFactory;
import org.springframework.boot.web.servlet.server.ServletWebServerFactory;
import org.springframework.context.annotation.Bean;
import org.springframework.context.annotation.Configuration;
import org.springframework.core.io.ClassPathResource;

import java.io.File;
import java.io.IOException;

@Configuration
public class TomcatHttpsConfig {
    @Value("${custom.https.server.port: 0}")
    private Integer httpsPort;

    @Value("${custom.https.server.ssl.enabled: 0}")
    private Boolean httpsEnabled;

    @Value("${custom.https.server.ssl.key-store:'keystore.p12'}")
    private String keyStore;

    @Value("${custom.https.server.ssl.keyAlias:'tomcat'}")
    private String kayAlias;

    @Value("${custom.https.server.ssl.key-store-password:'222333'}")
    private String kayStorePassword;

    @Bean
    public ServletWebServerFactory httpsFactory() {
        TomcatServletWebServerFactory tomcat = new TomcatServletWebServerFactory();
        if (httpsEnabled) {
            tomcat.addAdditionalTomcatConnectors(createSslConnector());
        }
        return tomcat;
    }
    private Connector createSslConnector() {
        Connector connector = new Connector("org.apache.coyote.http11.Http11NioProtocol");
        Http11NioProtocol protocol = (Http11NioProtocol) connector.getProtocolHandler();
        try {
            File keyStoreFile = new ClassPathResource(keyStore).getFile();
            connector.setScheme("https");
            connector.setSecure(true);
            connector.setPort(httpsPort);
            protocol.setSSLEnabled(true);
            protocol.setKeystoreFile(keyStoreFile.getAbsolutePath());
            protocol.setKeystorePass(kayStorePassword);
            protocol.setKeyAlias(kayAlias);
            return connector;
        }
        catch (IOException ex) {
            throw new IllegalStateException("can't access keystore: [" + "keystore"
                    + "] or truststore: [" + "keystore" + "]", ex);
        }
    }
}
测试
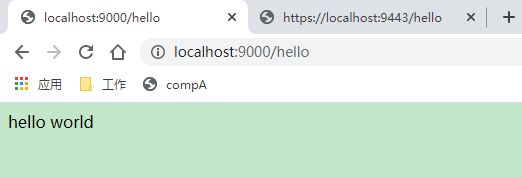
访问:http://localhost:9000/hello
访问:https://localhost:9443/hello


