基于OpenCv+Python+Dlib实现简单人脸数据采集
文章目录
- 一、原理
- 二、代码
-
- 1.标点
- 2.画墨镜
- 3.全部代码
- 三、效果
-
- 1.原图
- 2.特征点
- 3.墨镜
- 四、总结
- 五、参考
一、原理
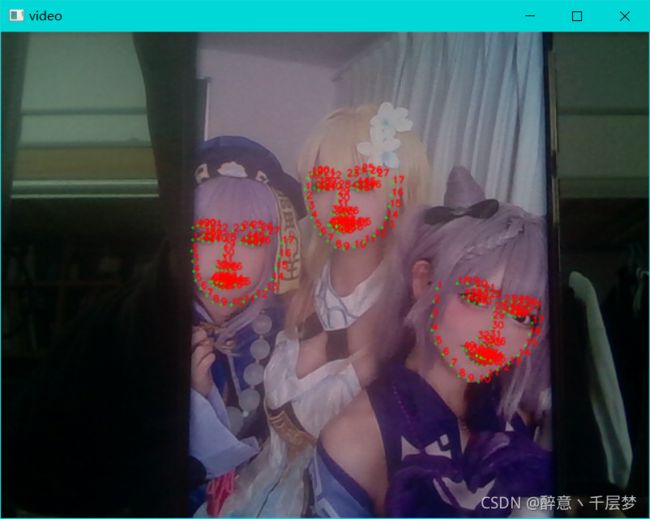
1.调用dlib库来进行人脸识别,调用预测器 “shape_predictor_68_face_landmarks.dat”进行68点标定
2.存入68个点坐标
3.利用cv2.circle来画68个点
4.利用cv2.putText()函数来画数字1-68
二、代码
1.标点
detector = dlib.get_frontal_face_detector()
predictor = dlib.shape_predictor('shape_predictor_68_face_landmarks.dat')

ok = True
# 打开摄像头 参数为输入流,可以为摄像头或视频文件
camera = cv2.VideoCapture(0)
#camera = cv2.VideoCapture('video.mp4')
while ok:
    # 读取摄像头中的图像,ok为是否读取成功的判断参数
    ok, img = camera.read()

    # 转换成灰度图像
    img_gray = cv2.cvtColor(img, cv2.COLOR_BGR2GRAY)

    rects = detector(img_gray, 0)
    for i in range(len(rects)):
        landmarks = np.matrix([[p.x, p.y] for p in predictor(img, rects[i]).parts()])
 # 画特征点
        for idx, point in enumerate(landmarks):
            # 68点的坐标
            pos = (point[0, 0], point[0, 1])

            # 利用cv2.circle给每个特征点画一个圈,共68个
            cv2.circle(img, pos, 1, color=(0, 255, 0))

            # 利用cv2.putText输出1-68
            font = cv2.FONT_HERSHEY_SIMPLEX
            cv2.putText(img, str(idx + 1), pos, font, 0.3, (0, 0, 255), 1, cv2.LINE_AA)
    cv2.imshow('video', img)
    k = cv2.waitKey(1)
    if k == 27:  # 按下ESC退出
        break
camera.release()
cv2.destroyAllWindows()
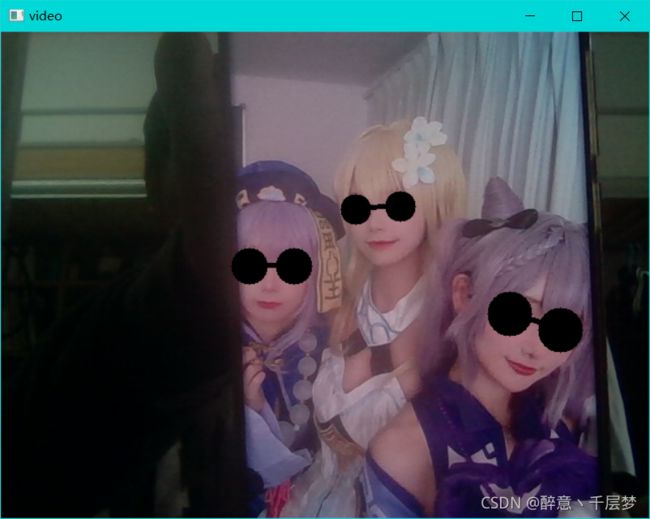
2.画墨镜
while ok:
    # 读取摄像头中的图像,ok为是否读取成功的判断参数
    ok, img = camera.read()

    # 转换成灰度图像
    img_gray = cv2.cvtColor(img, cv2.COLOR_BGR2GRAY)

    rects = detector(img_gray, 0)
    for i in range(len(rects)):
        landmarks = np.matrix([[p.x, p.y] for p in predictor(img, rects[i]).parts()])
        # 矩阵转为列表
        point_list=landmarks.getA()

        # 点坐标
        point_37 = (point_list[37][0],point_list[37][1])
        point_38 = (point_list[38][0], point_list[38][1])

        # 比例系数,37,38两点距离
        size = (pow(pow(point_38[1] - point_37[1], 2) + pow(point_38[0] - point_37[0], 2), 0.5))

        # 点坐标
        point_39 = (point_list[39][0], point_list[39][1])
        point_42 = (point_list[42][0], point_list[42][1])

        # 画眼镜
        cv2.circle(img, (point_list[41][0], point_list[41][1]), int(3 * size), (0, 0, 0), -1)
        cv2.circle(img, (point_list[46][0], point_list[46][1]), int(3 * size), (0, 0, 0), -1)
        # 画眼镜框
        cv2.line(img, point_39, point_42, (0, 0, 0), 4)
            cv2.imshow('video', img)
    k = cv2.waitKey(1)
    if k == 27:  # 按下ESC退出
        break
camera.release()
cv2.destroyAllWindows()
3.全部代码
# -*- coding: utf-8 -*-
"""
Created on Wed Oct 27 03:15:10 2021

@author: GT72VR
"""
import numpy as np
import cv2
import dlib
import os
import sys
import random

# dlib预测器
detector = dlib.get_frontal_face_detector()
predictor = dlib.shape_predictor('shape_predictor_68_face_landmarks.dat')

ok = True
# 打开摄像头 参数为输入流,可以为摄像头或视频文件
camera = cv2.VideoCapture(0)
#camera = cv2.VideoCapture('video.mp4')
while ok:
    # 读取摄像头中的图像,ok为是否读取成功的判断参数
    ok, img = camera.read()

    # 转换成灰度图像
    img_gray = cv2.cvtColor(img, cv2.COLOR_BGR2GRAY)

    rects = detector(img_gray, 0)
    for i in range(len(rects)):
        landmarks = np.matrix([[p.x, p.y] for p in predictor(img, rects[i]).parts()])
        # 矩阵转为列表
        point_list=landmarks.getA()

        # 点坐标
        point_37 = (point_list[37][0],point_list[37][1])
        point_38 = (point_list[38][0], point_list[38][1])

        # 比例系数,37,38两点距离
        size = (pow(pow(point_38[1] - point_37[1], 2) + pow(point_38[0] - point_37[0], 2), 0.5))

        # 点坐标
        point_39 = (point_list[39][0], point_list[39][1])
        point_42 = (point_list[42][0], point_list[42][1])

        # 画眼镜
        cv2.circle(img, (point_list[41][0], point_list[41][1]), int(3 * size), (0, 0, 0), -1)
        cv2.circle(img, (point_list[46][0], point_list[46][1]), int(3 * size), (0, 0, 0), -1)
        # 画眼镜框
        cv2.line(img, point_39, point_42, (0, 0, 0), 4)


        # 画特征点
        for idx, point in enumerate(landmarks):
            # 68点的坐标
            pos = (point[0, 0], point[0, 1])

            # 利用cv2.circle给每个特征点画一个圈,共68个
            cv2.circle(img, pos, 1, color=(0, 255, 0))

            # 利用cv2.putText输出1-68
            font = cv2.FONT_HERSHEY_SIMPLEX
            cv2.putText(img, str(idx + 1), pos, font, 0.3, (0, 0, 255), 1, cv2.LINE_AA)
    cv2.imshow('video', img)
    k = cv2.waitKey(1)
    if k == 27:  # 按下ESC退出
        break
camera.release()
cv2.destroyAllWindows()
三、效果
1.原图
2.特征点
3.墨镜
四、总结
通过dlib获取人脸特征点再通过OpenCV绘制达到展示效果


