全网目前最全python例子(附源码)
源码
告别枯燥,60秒学会一个小例子,系统学习Python,从入门到大师。Python之路已有190个例子:
第零章:感受Python之美
第一章:Python基础
第二章:Python之坑
第三章:Python字符串和正则
第四章:Python文件
第五章:Python日期
第六章:Python利器
第七章:Python画图
第八章:Python实战
第九章:Python基础算法
第十章:Python机器学习
后续章节:
- 不断丰富原有1~7章节;
- Python基础算法;
- python 机器学习,包括机器学习的基础概念和十大核心算法以及Sklearn和Kaggle实战的小例子。
- PyQt制作GUI
- Flask前端开发
- Python数据分析:NumPy, Pandas, Matplotlib, Plotly等
已发《Python之路.1.1.pdf》最新版本包括7个章节:Python基础,Python字符串和正则,Python文件,Python日期, Python利器,Python画图 章节,共计147个小例子。
感受Python之美
1 简洁之美
通过一行代码,体会Python语言简洁之美
- 一行代码交换
a,b:
a, b = b, a
- 一行代码反转列表
[1,2,3][::-1] # [3,2,1]
- 一行代码合并两个字典
{**{'a':1,'b':2}, **{'c':3}} # {'a': 1, 'b': 2, 'c': 3}
- 一行代码列表去重
set([1,2,2,3,3,3]) # {1, 2, 3}
- 一行代码求多个列表中的最大值
max(max([ [1,2,3], [5,1], [4] ], key=lambda v: max(v))) # 5
- 一行代码生成逆序序列
list(range(10,-1,-1)) # [10, 9, 8, 7, 6, 5, 4, 3, 2, 1, 0]
2 Python绘图
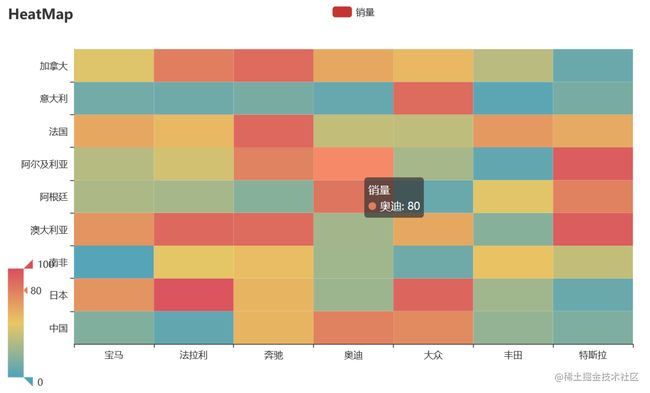
Python绘图方便、漂亮,画图神器pyecharts几行代码就能绘制出热力图:
炫酷的水球图:
经常使用的词云图:
3 Python动画
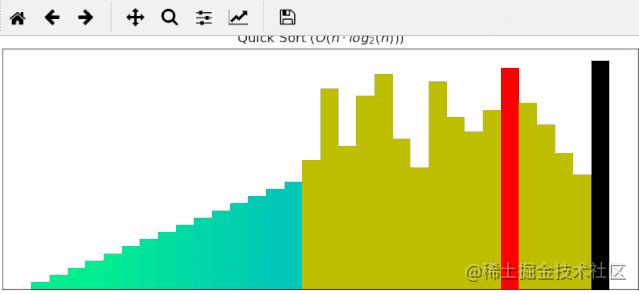
仅适用Python的常用绘图库:Matplotlib,就能制作出动画,辅助算法新手入门基本的排序算法。如下为一个随机序列,使用快速排序算法,由小到大排序的过程动画展示:
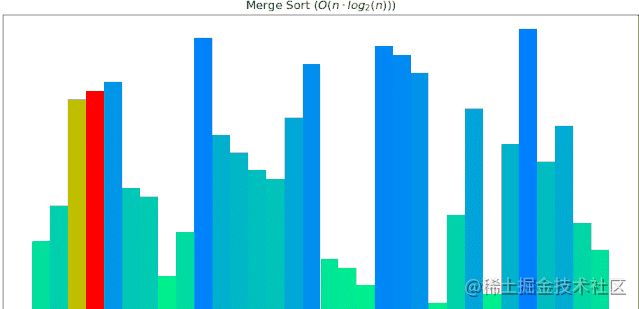
归并排序动画展示:
使用turtule绘制的漫天雪花:
4 Python数据分析
Python非常适合做数值计算、数据分析,一行代码完成数据透视:
pd.pivot_table(df, index=['Manager', 'Rep'], values=['Price'], aggfunc=np.sum)
5 Python机器学习
Python机器学习库Sklearn功能强大,接口易用,包括数据预处理模块、回归、分类、聚类、降维等。一行代码创建一个KMeans聚类模型:
from sklearn.cluster import KMeans
KMeans( n_clusters=3 )
6 Python-GUI
PyQt设计器开发GUI,能够迅速通过拖动组建搭建出来,使用方便。如下为使用PyQt,定制的一个专属自己的小而美的计算器。
除此之外,使用Python的Flask框架搭建Web框架,也非常方便。
总之,在这个Python小例子,你都能学到关于使用Python干活的方方面面的有趣的小例子,欢迎关注。
一、Python基础
Python基础主要总结Python常用内置函数;Python独有的语法特性、关键词nonlocal, global等;内置数据结构包括:列表(list), 字典(dict), 集合(set), 元组(tuple) 以及相关的高级模块collections中的Counter, namedtuple, defaultdict,heapq模块。目前共有82个小例子
此章节一共包括82个基础小例子。
1 求绝对值
绝对值或复数的模
In [1]: abs(-6)
Out[1]: 6
2 元素都为真
接受一个迭代器,如果迭代器的所有元素都为真,那么返回True,否则返回False
In [2]: all([1,0,3,6])
Out[2]: False

In [3]: all([1,2,3])
Out[3]: True
3 元素至少一个为真
接受一个迭代器,如果迭代器里至少有一个元素为真,那么返回True,否则返回False
In [4]: any([0,0,0,[]])
Out[4]: False

In [5]: any([0,0,1])
Out[5]: True
4 ascii展示对象
调用对象的__repr__() 方法,获得该方法的返回值,如下例子返回值为字符串
In [1]: class Student():
   ...:     def __init__(self,id,name):
   ...:         self.id = id
   ...:         self.name = name
   ...:     def __repr__(self):
   ...:         return 'id = '+self.id +', name = '+self.name
   ...:
   ...:

In [2]: xiaoming = Student(id='001',name='xiaoming')

In [3]: print(xiaoming)
id = 001, name = xiaoming

In [4]: ascii(xiaoming)
Out[4]: 'id = 001, name = xiaoming'
5 十转二
将十进制转换为二进制
In [1]: bin(10)
Out[1]: '0b1010'
6 十转八
将十进制转换为八进制
In [1]: oct(9)
Out[1]: '0o11'
7 十转十六
将十进制转换为十六进制
In [1]: hex(15)
Out[1]: '0xf'
8 判断是真是假
测试一个对象是True, 还是False.
In [1]: bool([0,0,0])
Out[1]: True

In [2]: bool([])
Out[2]: False

In [3]: bool([1,0,1])
Out[3]: True
9 字符串转字节
将一个字符串转换成字节类型
In [1]: s = "apple"

In [2]: bytes(s,encoding='utf-8')
Out[2]: b'apple'
10 转为字符串
将字符类型、数值类型等转换为字符串类型
In [1]: i = 100

In [2]: str(i)
Out[2]: '100'
11 是否可调用
判断对象是否可被调用,能被调用的对象就是一个callable 对象,比如函数 str, int 等都是可被调用的,但是例子4 中xiaoming实例是不可被调用的:
In [1]: callable(str)
Out[1]: True

In [2]: callable(int)
Out[2]: True

In [3]: xiaoming
Out[3]: id = 001, name = xiaoming

In [4]: callable(xiaoming)
Out[4]: False
如果想让xiaoming能被调用 xiaoming(), 需要重写Student类的__call__方法:
In [1]: class Student():
    ...:     def __init__(self,id,name):
    ...:         self.id = id
    ...:         self.name = name
    ...:     def __repr__(self):
    ...:         return 'id = '+self.id +', name = '+self.name
    ...:     def __call__(self):
    ...:         print('I can be called')
    ...:         print(f'my name is {self.name}')
    ...:
    ...:

In [2]: t = Student('001','xiaoming')

In [3]: t()
I can be called
my name is xiaoming
12 十转ASCII
查看十进制整数对应的ASCII字符
In [1]: chr(65)
Out[1]: 'A'
13 ASCII转十
查看某个ASCII字符对应的十进制数
In [1]: ord('A')
Out[1]: 65
14 静态方法
classmethod 装饰器对应的函数不需要实例化,不需要 self参数,但第一个参数需要是表示自身类的 cls 参数,可以来调用类的属性,类的方法,实例化对象等。
In [1]: class Student():
    ...:     def __init__(self,id,name):
    ...:         self.id = id
    ...:         self.name = name
    ...:     def __repr__(self):
    ...:         return 'id = '+self.id +', name = '+self.name
    ...:     @classmethod
    ...:     def f(cls):
    ...:         print(cls)
15 执行字符串表示的代码
将字符串编译成python能识别或可执行的代码,也可以将文字读成字符串再编译。
In [1]: s  = "print('helloworld')"

In [2]: r = compile(s,"", "exec")

In [3]: r
Out[3]:  at 0x0000000005DE75D0, file "", line 1>

In [4]: exec(r)
helloworld
16 创建复数
创建一个复数
In [1]: complex(1,2)
Out[1]: (1+2j)
17 动态删除属性
删除对象的属性
In [1]: delattr(xiaoming,'id')

In [2]: hasattr(xiaoming,'id')
Out[2]: False
18 转为字典
创建数据字典
In [1]: dict()
Out[1]: {}

In [2]: dict(a='a',b='b')
Out[2]: {'a': 'a', 'b': 'b'}

In [3]: dict(zip(['a','b'],[1,2]))
Out[3]: {'a': 1, 'b': 2}

In [4]: dict([('a',1),('b',2)])
Out[4]: {'a': 1, 'b': 2}
19 一键查看对象所有方法
不带参数时返回当前范围内的变量、方法和定义的类型列表;带参数时返回参数的属性,方法列表。
In [96]: dir(xiaoming)
Out[96]:
['__class__',
 '__delattr__',
 '__dict__',
 '__dir__',
 '__doc__',
 '__eq__',
 '__format__',
 '__ge__',
 '__getattribute__',
 '__gt__',
 '__hash__',
 '__init__',
 '__init_subclass__',
 '__le__',
 '__lt__',
 '__module__',
 '__ne__',
 '__new__',
 '__reduce__',
 '__reduce_ex__',
 '__repr__',
 '__setattr__',
 '__sizeof__',
 '__str__',
 '__subclasshook__',
 '__weakref__',

 'name']
20 取商和余数
分别取商和余数
In [1]: divmod(10,3)
Out[1]: (3, 1)
21 枚举对象
返回一个可以枚举的对象,该对象的next()方法将返回一个元组。
In [1]: s = ["a","b","c"]
    ...: for i ,v in enumerate(s,1):
    ...:     print(i,v)
    ...:
1 a
2 b
3 c
22 计算表达式
将字符串str 当成有效的表达式来求值并返回计算结果取出字符串中内容
In [1]: s = "1 + 3 +5"
    ...: eval(s)
    ...:
Out[1]: 9
23 查看变量所占字节数
In [1]: import sys

In [2]: a = {'a':1,'b':2.0}

In [3]: sys.getsizeof(a) # 占用240个字节
Out[3]: 240
24 过滤器
在函数中设定过滤条件,迭代元素,保留返回值为True的元素:
In [1]: fil = filter(lambda x: x>10,[1,11,2,45,7,6,13])

In [2]: list(fil)
Out[2]: [11, 45, 13]
25 转为浮点类型
将一个整数或数值型字符串转换为浮点数
In [1]: float(3)
Out[1]: 3.0
如果不能转化为浮点数,则会报ValueError:
In [2]: float('a')
ValueError                                Traceback (most recent call last)
 in ()
----> 1 float('a')

ValueError: could not convert string to float: 'a'
26 字符串格式化
格式化输出字符串,format(value, format_spec)实质上是调用了value的__format__(format_spec)方法。
In [104]: print("i am {0},age{1}".format("tom",18))
i am tom,age18
| 3.1415926 | {:.2f} | 3.14 | 保留小数点后两位 |
|---|---|---|---|
| 3.1415926 | {:+.2f} | +3.14 | 带符号保留小数点后两位 |
| -1 | {:+.2f} | -1.00 | 带符号保留小数点后两位 |
| 2.71828 | {:.0f} | 3 | 不带小数 |
| 5 | {:0>2d} | 05 | 数字补零 (填充左边, 宽度为2) |
| 5 | {:x<4d} | 5xxx | 数字补x (填充右边, 宽度为4) |
| 10 | {:x<4d} | 10xx | 数字补x (填充右边, 宽度为4) |
| 1000000 | {:,} | 1,000,000 | 以逗号分隔的数字格式 |
| 0.25 | {:.2%} | 25.00% | 百分比格式 |
| 1000000000 | {:.2e} | 1.00e+09 | 指数记法 |
| 18 | {:>10d} | ’ 18’ | 右对齐 (默认, 宽度为10) |
| 18 | {:<10d} | '18 ’ | 左对齐 (宽度为10) |
| 18 | {:^10d} | ’ 18 ’ | 中间对齐 (宽度为10) |
27 冻结集合
创建一个不可修改的集合。
In [1]: frozenset([1,1,3,2,3])
Out[1]: frozenset({1, 2, 3})
因为不可修改,所以没有像set那样的add和pop方法
28 动态获取对象属性
获取对象的属性
In [1]: class Student():
   ...:     def __init__(self,id,name):
   ...:         self.id = id
   ...:         self.name = name
   ...:     def __repr__(self):
   ...:         return 'id = '+self.id +', name = '+self.name

In [2]: xiaoming = Student(id='001',name='xiaoming')
In [3]: getattr(xiaoming,'name') # 获取xiaoming这个实例的name属性值
Out[3]: 'xiaoming'
29 对象是否有这个属性
In [1]: class Student():
   ...:     def __init__(self,id,name):
   ...:         self.id = id
   ...:         self.name = name
   ...:     def __repr__(self):
   ...:         return 'id = '+self.id +', name = '+self.name

In [2]: xiaoming = Student(id='001',name='xiaoming')
In [3]: hasattr(xiaoming,'name')
Out[3]: True

In [4]: hasattr(xiaoming,'address')
Out[4]: False
30 返回对象的哈希值
返回对象的哈希值,值得注意的是自定义的实例都是可哈希的,list, dict, set等可变对象都是不可哈希的(unhashable)
In [1]: hash(xiaoming)
Out[1]: 6139638

In [2]: hash([1,2,3])
TypeError                                 Traceback (most recent call last)
 in ()
----> 1 hash([1,2,3])

TypeError: unhashable type: 'list'
31 一键帮助
返回对象的帮助文档
In [1]: help(xiaoming)
Help on Student in module __main__ object:

class Student(builtins.object)
 |  Methods defined here:
 |
 |  __init__(self, id, name)
 |
 |  __repr__(self)
 |
 |  Data descriptors defined here:
 |
 |  __dict__
 |      dictionary for instance variables (if defined)
 |
 |  __weakref__
 |      list of weak references to the object (if defined)
32 对象门牌号
返回对象的内存地址
In [1]: id(xiaoming)
Out[1]: 98234208
33 获取用户输入
获取用户输入内容
In [1]: input()
aa
Out[1]: 'aa'
34 转为整型
int(x, base =10) , x可能为字符串或数值,将x 转换为一个普通整数。如果参数是字符串,那么它可能包含符号和小数点。如果超出了普通整数的表示范围,一个长整数被返回。
In [1]: int('12',16)
Out[1]: 18
35 isinstance
判断_object_是否为类_classinfo_的实例,是返回true
In [1]: class Student():
   ...:     def __init__(self,id,name):
   ...:         self.id = id
   ...:         self.name = name
   ...:     def __repr__(self):
   ...:         return 'id = '+self.id +', name = '+self.name

In [2]: xiaoming = Student(id='001',name='xiaoming')

In [3]: isinstance(xiaoming,Student)
Out[3]: True
36 父子关系鉴定
In [1]: class undergraduate(Student):
    ...:     def studyClass(self):
    ...:         pass
    ...:     def attendActivity(self):
    ...:         pass

In [2]: issubclass(undergraduate,Student)
Out[2]: True

In [3]: issubclass(object,Student)
Out[3]: False

In [4]: issubclass(Student,object)
Out[4]: True
如果class是classinfo元组中某个元素的子类,也会返回True
In [1]: issubclass(int,(int,float))
Out[1]: True
37 创建迭代器类型
使用iter(obj, sentinel), 返回一个可迭代对象, sentinel可省略(一旦迭代到此元素,立即终止)
In [1]: lst = [1,3,5]

In [2]: for i in iter(lst):
    ...:     print(i)
    ...:
1
3
5
In [1]: class TestIter(object):
    ...:     def __init__(self):
    ...:         self.l=[1,3,2,3,4,5]
    ...:         self.i=iter(self.l)
    ...:     def __call__(self):  #定义了__call__方法的类的实例是可调用的
    ...:         item = next(self.i)
    ...:         print ("__call__ is called,fowhich would return",item)
    ...:         return item
    ...:     def __iter__(self): #支持迭代协议(即定义有__iter__()函数)
    ...:         print ("__iter__ is called!!")
    ...:         return iter(self.l)
In [2]: t = TestIter()
In [3]: t() # 因为实现了__call__,所以t实例能被调用
__call__ is called,which would return 1
Out[3]: 1

In [4]: for e in TestIter(): # 因为实现了__iter__方法,所以t能被迭代
    ...:     print(e)
    ...:
__iter__ is called!!
1
3
2
3
4
5
44 所有对象之根
object 是所有类的基类
In [1]: o = object()

In [2]: type(o)
Out[2]: object
45 打开文件
返回文件对象
In [1]: fo = open('D:/a.txt',mode='r', encoding='utf-8')

In [2]: fo.read()
Out[2]: '\ufefflife is not so long,\nI use Python to play.'
mode取值表:
| 字符 | 意义 |
|---|---|
'r' |
读取(默认) |
'w' |
写入,并先截断文件 |
'x' |
排它性创建,如果文件已存在则失败 |
'a' |
写入,如果文件存在则在末尾追加 |
'b' |
二进制模式 |
't' |
文本模式(默认) |
'+' |
打开用于更新(读取与写入) |
46 次幂
base为底的exp次幂,如果mod给出,取余
In [1]: pow(3, 2, 4)
Out[1]: 1
47 打印
In [5]: lst = [1,3,5]

In [6]: print(lst)
[1, 3, 5]

In [7]: print(f'lst: {lst}')
lst: [1, 3, 5]

In [8]: print('lst:{}'.format(lst))
lst:[1, 3, 5]

In [9]: print('lst:',lst)
lst: [1, 3, 5]
48 创建属性的两种方式
返回 property 属性,典型的用法:
class C:
    def __init__(self):
        self._x = None

    def getx(self):
        return self._x

    def setx(self, value):
        self._x = value

    def delx(self):
        del self._x
    # 使用property类创建 property 属性
    x = property(getx, setx, delx, "I'm the 'x' property.")
使用python装饰器,实现与上完全一样的效果代码:
class C:
    def __init__(self):
        self._x = None

    @property
    def x(self):
        return self._x

    @x.setter
    def x(self, value):
        self._x = value

    @x.deleter
    def x(self):
        del self._x
49 创建range序列
- range(stop)
- range(start, stop[,step])
生成一个不可变序列:
In [1]: range(11)
Out[1]: range(0, 11)

In [2]: range(0,11,1)
Out[2]: range(0, 11)
50 反向迭代器
In [1]: rev = reversed([1,4,2,3,1])

In [2]: for i in rev:
     ...:     print(i)
     ...:
1
3
2
4
1
51 四舍五入
四舍五入,ndigits代表小数点后保留几位:
In [11]: round(10.0222222, 3)
Out[11]: 10.022

In [12]: round(10.05,1)
Out[12]: 10.1
52 转为集合类型
返回一个set对象,集合内不允许有重复元素:
In [159]: a = [1,4,2,3,1]

In [160]: set(a)
Out[160]: {1, 2, 3, 4}
53 转为切片对象
class slice(start, stop[, step])
返回一个表示由 range(start, stop, step) 所指定索引集的 slice对象,它让代码可读性、可维护性变好。
In [1]: a = [1,4,2,3,1]

In [2]: my_slice_meaning = slice(0,5,2)

In [3]: a[my_slice_meaning]
Out[3]: [1, 2, 1]
54 拿来就用的排序函数
排序:
In [1]: a = [1,4,2,3,1]

In [2]: sorted(a,reverse=True)
Out[2]: [4, 3, 2, 1, 1]

In [3]: a = [{'name':'xiaoming','age':18,'gender':'male'},{'name':'
     ...: xiaohong','age':20,'gender':'female'}]
In [4]: sorted(a,key=lambda x: x['age'],reverse=False)
Out[4]:
[{'name': 'xiaoming', 'age': 18, 'gender': 'male'},
 {'name': 'xiaohong', 'age': 20, 'gender': 'female'}]
55 求和函数
求和:
In [181]: a = [1,4,2,3,1]

In [182]: sum(a)
Out[182]: 11

In [185]: sum(a,10) #求和的初始值为10
Out[185]: 21
56 转元组
tuple() 将对象转为一个不可变的序列类型
In [16]: i_am_list = [1,3,5]
In [17]: i_am_tuple = tuple(i_am_list)
In [18]: i_am_tuple
Out[18]: (1, 3, 5)
57 查看对象类型
class type(name, bases, dict)
传入一个参数时,返回 object 的类型:
In [1]: class Student():
   ...:     def __init__(self,id,name):
   ...:         self.id = id
   ...:         self.name = name
   ...:     def __repr__(self):
   ...:         return 'id = '+self.id +', name = '+self.name
   ...:
   ...:

In [2]: xiaoming = Student(id='001',name='xiaoming')
In [3]: type(xiaoming)
Out[3]: __main__.Student

In [4]: type(tuple())
Out[4]: tuple
58 聚合迭代器
创建一个聚合了来自每个可迭代对象中的元素的迭代器:
In [1]: x = [3,2,1]
In [2]: y = [4,5,6]
In [3]: list(zip(y,x))
Out[3]: [(4, 3), (5, 2), (6, 1)]

In [4]: a = range(5)
In [5]: b = list('abcde')
In [6]: b
Out[6]: ['a', 'b', 'c', 'd', 'e']
In [7]: [str(y) + str(x) for x,y in zip(a,b)]
Out[7]: ['a0', 'b1', 'c2', 'd3', 'e4']
59 nonlocal用于内嵌函数中
关键词nonlocal常用于函数嵌套中,声明变量i为非局部变量; 如果不声明,i+=1表明i为函数wrapper内的局部变量,因为在i+=1引用(reference)时,i未被声明,所以会报unreferenced variable的错误。
def excepter(f):
    i = 0
    t1 = time.time()
    def wrapper():
        try:
            f()
        except Exception as e:
            nonlocal i
            i += 1
            print(f'{e.args[0]}: {i}')
            t2 = time.time()
            if i == n:
                print(f'spending time:{round(t2-t1,2)}')
    return wrapper
60 global 声明全局变量
先回答为什么要有global,一个变量被多个函数引用,想让全局变量被所有函数共享。有的伙伴可能会想这还不简单,这样写:
i = 5
def f():
    print(i)

def g():
    print(i)
    pass

f()
g()
f和g两个函数都能共享变量i,程序没有报错,所以他们依然不明白为什么要用global.
但是,如果我想要有个函数对i递增,这样:
def h():
    i += 1

h()
此时执行程序,bang, 出错了! 抛出异常:UnboundLocalError,原来编译器在解释i+=1时会把i解析为函数h()内的局部变量,很显然在此函数内,编译器找不到对变量i的定义,所以会报错。
global就是为解决此问题而被提出,在函数h内,显示地告诉编译器i为全局变量,然后编译器会在函数外面寻找i的定义,执行完i+=1后,i还为全局变量,值加1:
i = 0
def h():
    global i
    i += 1

h()
print(i)
61 链式比较
i = 3
print(1 < i < 3)  # False
print(1 < i <= 3)  # True
62 不用else和if实现计算器
from operator import *

def calculator(a, b, k):
    return {
        '+': add,
        '-': sub,
        '*': mul,
        '/': truediv,
        '**': pow
    }[k](a, b)


calculator(1, 2, '+')  # 3
calculator(3, 4, '**')  # 81
63 链式操作
from operator import (add, sub)

def add_or_sub(a, b, oper):
    return (add if oper == '+' else sub)(a, b)


add_or_sub(1, 2, '-')  # -1
64 交换两元素
def swap(a, b):
    return b, a


print(swap(1, 0))  # (0,1)
65 去最求平均
def score_mean(lst):
    lst.sort()
    lst2=lst[1:(len(lst)-1)]
    return round((sum(lst2)/len(lst2)),1)

lst=[9.1, 9.0,8.1, 9.7, 19,8.2, 8.6,9.8]
score_mean(lst) # 9.1
66 打印99乘法表
打印出如下格式的乘法表
1*1=1
1*2=2   2*2=4
1*3=3   2*3=6   3*3=9
1*4=4   2*4=8   3*4=12  4*4=16
1*5=5   2*5=10  3*5=15  4*5=20  5*5=25
1*6=6   2*6=12  3*6=18  4*6=24  5*6=30  6*6=36
1*7=7   2*7=14  3*7=21  4*7=28  5*7=35  6*7=42  7*7=49
1*8=8   2*8=16  3*8=24  4*8=32  5*8=40  6*8=48  7*8=56  8*8=64
1*9=9   2*9=18  3*9=27  4*9=36  5*9=45  6*9=54  7*9=63  8*9=72  9*9=81
一共有10 行,第i行的第j列等于:j*i,
其中,
i取值范围:1<=i<=9
j取值范围:1<=j<=i
根据例子分析的语言描述,转化为如下代码:
for i in range(1,10):
    ...:     for j in range(1,i+1):
    ...:         print('%d*%d=%d'%(j,i,j*i),end="\t")
    ...:     print()
67 全展开
对于如下数组:
[[[1,2,3],[4,5]]]
如何完全展开成一维的。这个小例子实现的flatten是递归版,两个参数分别表示带展开的数组,输出数组。
from collections.abc import *

def flatten(lst, out_lst=None):
    if out_lst is None:
        out_lst = []
    for i in lst:
        if isinstance(i, Iterable): # 判断i是否可迭代
            flatten(i, out_lst)  # 尾数递归
        else:
            out_lst.append(i)    # 产生结果
    return out_lst
调用flatten:
print(flatten([[1,2,3],[4,5]]))
print(flatten([[1,2,3],[4,5]], [6,7]))
print(flatten([[[1,2,3],[4,5,6]]]))
# 结果:
[1, 2, 3, 4, 5]
[6, 7, 1, 2, 3, 4, 5]
[1, 2, 3, 4, 5, 6]
numpy里的flatten与上面的函数实现有些微妙的不同:
import numpy
b = numpy.array([[1,2,3],[4,5]])
b.flatten()
array([list([1, 2, 3]), list([4, 5])], dtype=object)
68 列表等分
from math import ceil

def divide(lst, size):
    if size <= 0:
        return [lst]
    return [lst[i * size:(i+1)*size] for i in range(0, ceil(len(lst) / size))]


r = divide([1, 3, 5, 7, 9], 2)
print(r)  # [[1, 3], [5, 7], [9]]

r = divide([1, 3, 5, 7, 9], 0)
print(r)  # [[1, 3, 5, 7, 9]]

r = divide([1, 3, 5, 7, 9], -3)
print(r)  # [[1, 3, 5, 7, 9]]
69 列表压缩
def filter_false(lst):
    return list(filter(bool, lst))


r = filter_false([None, 0, False, '', [], 'ok', [1, 2]])
print(r)  # ['ok', [1, 2]]
70 更长列表
def max_length(*lst):
    return max(*lst, key=lambda v: len(v))


r = max_length([1, 2, 3], [4, 5, 6, 7], [8])
print(f'更长的列表是{r}')  # [4, 5, 6, 7]

r = max_length([1, 2, 3], [4, 5, 6, 7], [8, 9])
print(f'更长的列表是{r}')  # [4, 5, 6, 7]
71 求众数
def top1(lst):
    return max(lst, default='列表为空', key=lambda v: lst.count(v))

lst = [1, 3, 3, 2, 1, 1, 2]
r = top1(lst)
print(f'{lst}中出现次数最多的元素为:{r}')  # [1, 3, 3, 2, 1, 1, 2]中出现次数最多的元素为:1
72 多表之最
def max_lists(*lst):
    return max(max(*lst, key=lambda v: max(v)))


r = max_lists([1, 2, 3], [6, 7, 8], [4, 5])
print(r)  # 8
73 列表查重
def has_duplicates(lst):
    return len(lst) == len(set(lst))


x = [1, 1, 2, 2, 3, 2, 3, 4, 5, 6]
y = [1, 2, 3, 4, 5]
has_duplicates(x)  # False
has_duplicates(y)  # True
74 列表反转
def reverse(lst):
    return lst[::-1]


r = reverse([1, -2, 3, 4, 1, 2])
print(r)  # [2, 1, 4, 3, -2, 1]
75 浮点数等差数列
def rang(start, stop, n):
    start,stop,n = float('%.2f' % start), float('%.2f' % stop),int('%.d' % n)
    step = (stop-start)/n
    lst = [start]
    while n > 0:
        start,n = start+step,n-1
        lst.append(round((start), 2))
    return lst

rang(1, 8, 10) # [1.0, 1.7, 2.4, 3.1, 3.8, 4.5, 5.2, 5.9, 6.6, 7.3, 8.0]
76 按条件分组
def bif_by(lst, f):
    return [ [x for x in lst if f(x)],[x for x in lst if not f(x)]]

records = [25,89,31,34]
bif_by(records, lambda x: x<80) # [[25, 31, 34], [89]]
77 map实现向量运算
#多序列运算函数—map(function,iterabel,iterable2)
lst1=[1,2,3,4,5,6]
lst2=[3,4,5,6,3,2]
list(map(lambda x,y:x*y+1,lst1,lst2))
### [4, 9, 16, 25, 16, 13]
78 值最大的字典
def max_pairs(dic):
    if len(dic) == 0:
        return dic
    max_val = max(map(lambda v: v[1], dic.items()))
    return [item for item in dic.items() if item[1] == max_val]


r = max_pairs({'a': -10, 'b': 5, 'c': 3, 'd': 5})
print(r)  # [('b', 5), ('d', 5)]
79 合并两个字典
def merge_dict2(dic1, dic2):
    return {**dic1, **dic2}  # python3.5后支持的一行代码实现合并字典

merge_dict({'a': 1, 'b': 2}, {'c': 3})  # {'a': 1, 'b': 2, 'c': 3}
80 topn字典
from heapq import nlargest

# 返回字典d前n个最大值对应的键

def topn_dict(d, n):
    return nlargest(n, d, key=lambda k: d[k])

topn_dict({'a': 10, 'b': 8, 'c': 9, 'd': 10}, 3)  # ['a', 'd', 'c']
81 异位词
from collections import Counter

# 检查两个字符串是否 相同字母异序词,简称:互为变位词

def anagram(str1, str2):
    return Counter(str1) == Counter(str2)

anagram('eleven+two', 'twelve+one')  # True 这是一对神器的变位词
anagram('eleven', 'twelve')  # False
82 逻辑上合并字典
(1) 两种合并字典方法 这是一般的字典合并写法
dic1 = {'x': 1, 'y': 2 }
dic2 = {'y': 3, 'z': 4 }
merged1 = {**dic1, **dic2} # {'x': 1, 'y': 3, 'z': 4}
修改merged[‘x’]=10,dic1中的x值不变,merged是重新生成的一个新字典。
但是,ChainMap却不同,它在内部创建了一个容纳这些字典的列表。因此使用ChainMap合并字典,修改merged[‘x’]=10后,dic1中的x值改变,如下所示:
from collections import ChainMap
merged2 = ChainMap(dic1,dic2)
print(merged2) # ChainMap({'x': 1, 'y': 2}, {'y': 3, 'z': 4})
83 命名元组提高可读性
from collections import namedtuple
Point = namedtuple('Point', ['x', 'y', 'z'])  # 定义名字为Point的元祖,字段属性有x,y,z
lst = [Point(1.5, 2, 3.0), Point(-0.3, -1.0, 2.1), Point(1.3, 2.8, -2.5)]
print(lst[0].y - lst[1].y)
使用命名元组写出来的代码可读性更好,尤其处理上百上千个属性时作用更加凸显。
84 样本抽样
使用sample抽样,如下例子从100个样本中随机抽样10个。
from random import randint,sample
lst = [randint(0,50) for _ in range(100)]
print(lst[:5])# [38, 19, 11, 3, 6]
lst_sample = sample(lst,10)
print(lst_sample) # [33, 40, 35, 49, 24, 15, 48, 29, 37, 24]
85 重洗数据集
使用shuffle用来重洗数据集,值得注意shuffle是对lst就地(in place)洗牌,节省存储空间
from random import shuffle
lst = [randint(0,50) for _ in range(100)]
shuffle(lst)
print(lst[:5]) # [50, 3, 48, 1, 26]
86 10个均匀分布的坐标点
random模块中的uniform(a,b)生成[a,b)内的一个随机数,如下生成10个均匀分布的二维坐标点
from random import uniform
In [1]: [(uniform(0,10),uniform(0,10)) for _ in range(10)]
Out[1]:
[(9.244361194237328, 7.684326645514235),
 (8.129267671737324, 9.988395854203773),
 (9.505278771040661, 2.8650440524834107),
 (3.84320100484284, 1.7687190176304601),
 (6.095385729409376, 2.377133802224657),
 (8.522913365698605, 3.2395995841267844),
 (8.827829601859406, 3.9298809217233766),
 (1.4749644859469302, 8.038753079253127),
 (9.005430657826324, 7.58011186920019),
 (8.700789540392917, 1.2217577293254112)]
87 10个高斯分布的坐标点
random模块中的gauss(u,sigma)生成均值为u, 标准差为sigma的满足高斯分布的值,如下生成10个二维坐标点,样本误差(y-2*x-1)满足均值为0,标准差为1的高斯分布:
from random import gauss
x = range(10)
y = [2*xi+1+gauss(0,1) for xi in x]
points = list(zip(x,y))
### 10个二维点:
[(0, -0.86789025305992),
 (1, 4.738439437453464),
 (2, 5.190278040856102),
 (3, 8.05270893133576),
 (4, 9.979481700775292),
 (5, 11.960781766216384),
 (6, 13.025427054303737),
 (7, 14.02384035204836),
 (8, 15.33755823101161),
 (9, 17.565074449028497)]
88 chain高效串联多个容器对象
chain函数串联a和b,兼顾内存效率同时写法更加优雅。
from itertools import chain
a = [1,3,5,0]
b = (2,4,6)

for i in chain(a,b):
  print(i)
### 结果
1
3
5
0
2
4
6
89 操作函数对象
In [31]: def f():
    ...:     print('i\'m f')
    ...:

In [32]: def g():
    ...:     print('i\'m g')
    ...:

In [33]: [f,g][1]()
i'm g
创建函数对象的list,根据想要调用的index,方便统一调用。
90 生成逆序序列
list(range(10,-1,-1)) # [10, 9, 8, 7, 6, 5, 4, 3, 2, 1, 0]
第三个参数为负时,表示从第一个参数开始递减,终止到第二个参数(不包括此边界)
二 Python之坑
1 含单个元素的元组
Python中有些函数的参数类型为元组,其内有1个元素,这样创建是错误的:
c = (5) # NO!
它实际创建一个整型元素5,必须要在元素后加一个逗号:
c = (5,) # YES!
2 默认参数设为空
含有默认参数的函数,如果类型为容器,且设置为空:
def f(a,b=[]):  # NO!
    print(b)
    return b

ret = f(1)
ret.append(1)
ret.append(2)
# 当再调用f(1)时,预计打印为 []
f(1)
# 但是却为 [1,2]
这是可变类型的默认参数之坑,请务必设置此类默认参数为None:
def f(a,b=None): # YES!
    pass
3 共享变量未绑定之坑
有时想要多个函数共享一个全局变量,但却在某个函数内试图修改它为局部变量:
i = 1
def f():
    i+=1 #NO!

def g():
    print(i)
应该在f函数内显示声明i为global变量:
i = 1
def f():
    global i # YES!
    i+=1
4 lambda自由参数之坑
排序和分组的key函数常使用lambda,表达更加简洁,但是有个坑新手容易掉进去:
a = [lambda x: x+i for i in range(3)] # NO!
for f in a:
    print(f(1))
# 你可能期望输出:1,2,3
但是实际却输出: 3,3,3. 定义lambda使用的i被称为自由参数,它只在调用lambda函数时,值才被真正确定下来,这就犹如下面打印出2,你肯定确信无疑吧。
a = 0
a = 1
a = 2
def f(a):
    print(a)
正确做法是转化自由参数为lambda函数的默认参数:
a = [lambda x,i=i: x+i for i in range(3)] # YES!
5 分不清是默认参数还是关键字参数
定义函数f,在使用它时,width的以下三种写法都是OK的,如果未了解函数原型,容易分不清width到底是位置参数还是关键字参数。
def f(a,width=10.0):
    print(width)

f(1,width=15.0) # 15.0  # 容易分不清width是位置参数还是关键字参数
f(1,15.0) # 15.0
f(1) # 10.0
width是带默认参数的位置参数,关键字参数必须使用两个星号声明。因此如果要区分它们,需要关注函数的定义。
def f(a,**b):
    print(b)
f(1,width=15.0) # width是关键字参数,不是默认参数
6 列表删除之坑
删除一个列表中的元素,此元素可能在列表中重复多次:
def del_item(lst,e):
    return [lst.remove(i) for i in e if i==e] # NO!
考虑删除这个序列[1,3,3,3,5]中的元素3,结果发现只删除其中两个:
del_item([1,3,3,3,5],3) # 结果:[1,3,5]
正确做法:
def del_item(lst,e):
    d = dict(zip(range(len(lst)),lst)) # YES! 构造字典
    return [v for k,v in d.items() if v!=e]
7 列表快速复制之坑
在python中*与列表操作,实现快速元素复制:
a = [1,3,5] * 3 # [1,3,5,1,3,5,1,3,5]
a[0] = 10 # [10, 2, 3, 1, 2, 3, 1, 2, 3]
如果列表元素为列表或字典等复合类型:
a = [[1,3,5],[2,4]] * 3 # [[1, 3, 5], [2, 4], [1, 3, 5], [2, 4], [1, 3, 5], [2, 4]]

a[0][0] = 10 #
结果可能出乎你的意料,其他a[1[0]等也被修改为10
[[10, 3, 5], [2, 4], [10, 3, 5], [2, 4], [10, 3, 5], [2, 4]]
这是因为*复制的复合对象都是浅引用,也就是说id(a[0])与id(a[2])门牌号是相等的。如果想要实现深复制效果,这么做:
a = [[] for _ in range(3)]
8 字符串驻留
In [1]: a = 'something'
    ...: b = 'some'+'thing'
    ...: id(a)==id(b)
Out[1]: True
如果上面例子返回True,但是下面例子为什么是False:
In [1]: a = '@zglg.com'

In [2]: b = '@zglg'+'.com'

In [3]: id(a)==id(b)
Out[3]: False
这与Cpython 编译优化相关,行为称为字符串驻留,但驻留的字符串中只包含字母,数字或下划线。
9 相同值的不可变对象
In [5]: d = {}
    ...: d[1] = 'java'
    ...: d[1.0] = 'python'

In [6]: d
Out[6]: {1: 'python'}

### key=1,value=java的键值对神器消失了
In [7]: d[1]
Out[7]: 'python'
In [8]: d[1.0]
Out[8]: 'python'
这是因为具有相同值的不可变对象在Python中始终具有相同的哈希值
由于存在哈希冲突,不同值的对象也可能具有相同的哈希值。
10 对象销毁顺序
创建一个类SE:
class SE(object):
  def __init__(self):
    print('init')
  def __del__(self):
    print('del')
创建两个SE实例,使用is判断:
In [63]: SE() is SE()
init
init
del
del
Out[63]: False
创建两个SE实例,使用id判断:
In [64]: id(SE()) == id(SE())
init
del
init
del
Out[64]: True
调用id函数, Python 创建一个 SE 类的实例,并使用id函数获得内存地址后,销毁内存丢弃这个对象。
当连续两次进行此操作, Python会将相同的内存地址分配给第二个对象,所以两个对象的id值是相同的.
但是is行为却与之不同,通过打印顺序就可以看到。
11 充分认识for
In [65]: for i in range(5):
    ...:   print(i)
    ...:   i = 10
0
1
2
3
4
为什么不是执行一次就退出?
按照for在Python中的工作方式, i = 10 并不会影响循环。range(5)生成的下一个元素就被解包,并赋值给目标列表的变量i.
12 认识执行时机
array = [1, 3, 5]
g = (x for x in array if array.count(x) > 0)
g为生成器,list(g)后返回[1,3,5],因为每个元素肯定至少都出现一次。所以这个结果这不足为奇。但是,请看下例:
array = [1, 3, 5]
g = (x for x in array if array.count(x) > 0)
array = [5, 7, 9]
请问,list(g)等于多少?这不是和上面那个例子结果一样吗,结果也是[1,3,5],但是:
In [74]: list(g)
Out[74]: [5]
这有些不可思议~~ 原因在于:
生成器表达式中, in 子句在声明时执行, 而条件子句则是在运行时执行。
所以代码:
array = [1, 3, 5]
g = (x for x in array if array.count(x) > 0)
array = [5, 7, 9]
等价于:
g = (x for x in [1,3,5] if [5,7,9].count(x) > 0)
正在陆续汇总更多Python使用之坑 …
三、Python字符串和正则
字符串无所不在,字符串的处理也是最常见的操作。本章节将总结和字符串处理相关的一切操作。主要包括基本的字符串操作;高级字符串操作之正则。目前共有16个小例子
1 反转字符串
st="python"
#方法1
''.join(reversed(st))
#方法2
st[::-1]
2 字符串切片操作
字符串切片操作——查找替换3或5的倍数
In [1]:[str("java"[i%3*4:]+"python"[i%5*6:] or i) for i in range(1,15)]
OUT[1]:['1',
 '2',
 'java',
 '4',
 'python',
 'java',
 '7',
 '8',
 'java',
 'python',
 '11',
 'java',
 '13',
 '14']
3 join串联字符串
In [4]: mystr = ['1',
   ...:  '2',
   ...:  'java',
   ...:  '4',
   ...:  'python',
   ...:  'java',
   ...:  '7',
   ...:  '8',
   ...:  'java',
   ...:  'python',
   ...:  '11',
   ...:  'java',
   ...:  '13',
   ...:  '14']

In [5]: ','.join(mystr) #用逗号连接字符串
Out[5]: '1,2,java,4,python,java,7,8,java,python,11,java,13,14'
4 字符串的字节长度
def str_byte_len(mystr):
    return (len(mystr.encode('utf-8')))


str_byte_len('i love python')  # 13(个字节)
str_byte_len('字符')  # 6(个字节)
以下是正则部分
import re
1 查找第一个匹配串
s = 'i love python very much'
pat = 'python'
r = re.search(pat,s)
print(r.span()) #(7,13)
2 查找所有1的索引
s = '山东省潍坊市青州第1中学高三1班'
pat = '1'
r = re.finditer(pat,s)
for i in r:
    print(i)

#
#
3 \d 匹配数字[0-9]
findall找出全部位置的所有匹配
s = '一共20行代码运行时间13.59s'
pat = r'\d+' # +表示匹配数字(\d表示数字的通用字符)1次或多次
r = re.findall(pat,s)
print(r)
# ['20', '13', '59']
4 匹配浮点数
?表示前一个字符匹配0或1次
s = '一共20行代码运行时间13.59s'
pat = r'\d+\.?\d+' # ?表示匹配小数点(\.)0次或1次
r = re.findall(pat,s)
print(r)
# ['20', '13.59']
5 ^匹配字符串的开头
s = 'This module provides regular expression matching operations similar to those found in Perl'
pat = r'^[emrt]' # 查找以字符e,m,r或t开始的字符串
r = re.findall(pat,s)
print(r)
# [],因为字符串的开头是字符`T`,不在emrt匹配范围内,所以返回为空
IN [11]: s2 = 'email for me is [email protected]'
re.findall('^[emrt].*',s2)# 匹配以e,m,r,t开始的字符串,后面是多个任意字符
Out[11]: ['email for me is [email protected]']
6 re.I 忽略大小写
s = 'That'
pat = r't'
r = re.findall(pat,s,re.I)
In [22]: r
Out[22]: ['T', 't']
7 理解compile的作用
如果要做很多次匹配,可以先编译匹配串:
import re
pat = re.compile('\W+') # \W 匹配不是数字和字母的字符
has_special_chars = pat.search('ed#2@edc')
if has_special_chars:
    print(f'str contains special characters:{has_special_chars.group(0)}')

###输出结果:
 # str contains special characters:#

### 再次使用pat正则编译对象 做匹配
again_pattern = pat.findall('[email protected]')
if '@' in again_pattern:
    print('possibly it is an email')
8 使用()捕获单词,不想带空格
使用()捕获
s = 'This module provides regular expression matching operations similar to those found in Perl'
pat = r'\s([a-zA-Z]+)'
r = re.findall(pat,s)
print(r) #['module', 'provides', 'regular', 'expression', 'matching', 'operations', 'similar', 'to', 'those', 'found', 'in', 'Perl']
看到提取单词中未包括第一个单词,使用?表示前面字符出现0次或1次,但是此字符还有表示贪心或非贪心匹配含义,使用时要谨慎。
s = 'This module provides regular expression matching operations similar to those found in Perl'
pat = r'\s?([a-zA-Z]+)'
r = re.findall(pat,s)
print(r) #['This', 'module', 'provides', 'regular', 'expression', 'matching', 'operations', 'similar', 'to', 'those', 'found', 'in', 'Perl']
9 split分割单词
使用以上方法分割单词不是简洁的,仅仅是为了演示。分割单词最简单还是使用split函数。
s = 'This module provides regular expression matching operations similar to those found in Perl'
pat = r'\s+'
r = re.split(pat,s)
print(r) # ['This', 'module', 'provides', 'regular', 'expression', 'matching', 'operations', 'similar', 'to', 'those', 'found', 'in', 'Perl']

### 上面这句话也可直接使用str自带的split函数:
s.split(' ') #使用空格分隔

### 但是,对于风格符更加复杂的情况,split无能为力,只能使用正则

s = 'This,,,   module ; \t   provides|| regular ; '
words = re.split('[,\s;|]+',s)  #这样分隔出来,最后会有一个空字符串
words = [i for i in words if len(i)>0]
10 match从字符串开始位置匹配
注意match,search等的不同:
- match函数
import re
### match
mystr = 'This'
pat = re.compile('hi')
pat.match(mystr) # None
pat.match(mystr,1) # 从位置1处开始匹配
Out[90]:
- search函数 search是从字符串的任意位置开始匹配
In [91]: mystr = 'This'
    ...: pat = re.compile('hi')
    ...: pat.search(mystr)
Out[91]:
11 替换匹配的子串
sub函数实现对匹配子串的替换
content="hello 12345, hello 456321"
pat=re.compile(r'\d+') #要替换的部分
m=pat.sub("666",content)
print(m) # hello 666, hello 666
12 贪心捕获
(.*)表示捕获任意多个字符,尽可能多的匹配字符
content='ddedadsad graphbbmathcc'
pat=re.compile(r"(.*)") #贪婪模式
m=pat.findall(content)
print(m) #匹配结果为: ['graph13 非贪心捕获
仅添加一个问号(?),得到结果完全不同,这是非贪心匹配,通过这个例子体会贪心和非贪心的匹配的不同。
content='ddedadsad graphbbmathcc'
pat=re.compile(r"(.*?)")
m=pat.findall(content)
print(m) # ['graph', 'math']
非贪心捕获,见好就收。
14 常用元字符总结
. 匹配任意字符
^ 匹配字符串开始位置
$ 匹配字符串中结束的位置
* 前面的原子重复0次、1次、多次
? 前面的原子重复0次或者1次
+ 前面的原子重复1次或多次
{n} 前面的原子出现了 n 次
{n,} 前面的原子至少出现 n 次
{n,m} 前面的原子出现次数介于 n-m 之间
( ) 分组,需要输出的部分
15 常用通用字符总结
\s 匹配空白字符 \w 匹配任意字母/数字/下划线 \W 和小写 w 相反,匹配任意字母/数字/下划线以外的字符\d 匹配十进制数字\D 匹配除了十进制数以外的值 [0-9] 匹配一个0-9之间的数字[a-z] 匹配小写英文字母[A-Z] 匹配大写英文字母
14 密码安全检查
密码安全要求:1)要求密码为6到20位; 2)密码只包含英文字母和数字
pat = re.compile(r'\w{6,20}') # 这是错误的,因为\w通配符匹配的是字母,数字和下划线,题目要求不能含有下划线# 使用最稳的方法:\da-zA-Z满足`密码只包含英文字母和数字`pat = re.compile(r'[\da-zA-Z]{6,20}')
选用最保险的fullmatch方法,查看是否整个字符串都匹配:
pat.fullmatch('qaz12') # 返回 None, 长度小于6pat.fullmatch('qaz12wsxedcrfvtgb67890942234343434') # None 长度大于22pat.fullmatch('qaz_231') # None 含有下划线pat.fullmatch('n0passw0Rd')Out[4]:
15 爬取百度首页标题
import refrom urllib import request#爬虫爬取百度首页内容data=request.urlopen("http://www.baidu.com/").read().decode()#分析网页,确定正则表达式pat=r'(.*?) 'result=re.search(pat,data)print(result) result.group() # 百度一下,你就知道
16 批量转化为驼峰格式(Camel)
数据库字段名批量转化为驼峰格式
分析过程
# 用到的正则串讲解# \s 指匹配: [ \t\n\r\f\v]# A|B:表示匹配A串或B串# re.sub(pattern, newchar, string): # substitue代替,用newchar字符替代与pattern匹配的字符所有.
# title(): 转化为大写,例子:# 'Hello world'.title() # 'Hello World'
# print(re.sub(r"\s|_|", "", "He llo_worl\td"))s = re.sub(r"(\s|_|-)+", " ", 'some_database_field_name').title().replace(" ", "") #结果: SomeDatabaseFieldName
# 可以看到此时的第一个字符为大写,需要转化为小写s = s[0].lower()+s[1:] # 最终结果
整理以上分析得到如下代码:
import redef camel(s): s = re.sub(r"(\s|_|-)+", " ", s).title().replace(" ", "") return s[0].lower() + s[1:]# 批量转化def batch_camel(slist): return [camel(s) for s in slist]
测试结果:
s = batch_camel(['student_id', 'student\tname', 'student-add'])print(s)# 结果['studentId', 'studentName', 'studentAdd']
四、Python文件
1 获取后缀名
import osfile_ext = os.path.splitext('./data/py/test.py')front,ext = file_extIn [5]: frontOut[5]: './data/py/test'In [6]: extOut[6]: '.py'
2 文件读操作
import os# 创建文件夹def mkdir(path): isexists = os.path.exists(path) if not isexists: os.mkdir(path)# 读取文件信息def openfile(filename): f = open(filename) fllist = f.read() f.close() return fllist # 返回读取内容
3 文件写操作
# 写入文件信息# example1# w写入,如果文件存在,则清空内容后写入,不存在则创建f = open(r"./data/test.txt", "w", encoding="utf-8")print(f.write("测试文件写入"))f.close# example2# a写入,文件存在,则在文件内容后追加写入,不存在则创建f = open(r"./data/test.txt", "a", encoding="utf-8")print(f.write("测试文件写入"))f.close# example3# with关键字系统会自动关闭文件和处理异常with open(r"./data/test.txt", "w") as f: f.write("hello world!")
4 路径中的文件名
In [11]: import os ...: file_ext = os.path.split('./data/py/test.py') ...: ipath,ifile = file_ext ...:In [12]: ipathOut[12]: './data/py'In [13]: ifileOut[13]: 'test.py'
5 批量修改文件后缀
批量修改文件后缀
本例子使用Python的os模块和 argparse模块,将工作目录work_dir下所有后缀名为old_ext的文件修改为后缀名为new_ext
通过本例子,大家将会大概清楚argparse模块的主要用法。
导入模块
import argparseimport os
定义脚本参数
def get_parser(): parser = argparse.ArgumentParser( description='工作目录中文件后缀名修改') parser.add_argument('work_dir', metavar='WORK_DIR', type=str, nargs=1, help='修改后缀名的文件目录') parser.add_argument('old_ext', metavar='OLD_EXT', type=str, nargs=1, help='原来的后缀') parser.add_argument('new_ext', metavar='NEW_EXT', type=str, nargs=1, help='新的后缀') return parser
后缀名批量修改
def batch_rename(work_dir, old_ext, new_ext): """ 传递当前目录,原来后缀名,新的后缀名后,批量重命名后缀 """ for filename in os.listdir(work_dir): # 获取得到文件后缀 split_file = os.path.splitext(filename) file_ext = split_file[1] # 定位后缀名为old_ext 的文件 if old_ext == file_ext: # 修改后文件的完整名称 newfile = split_file[0] + new_ext # 实现重命名操作 os.rename( os.path.join(work_dir, filename), os.path.join(work_dir, newfile) ) print("完成重命名") print(os.listdir(work_dir))
实现Main
def main(): """ main函数 """ # 命令行参数 parser = get_parser() args = vars(parser.parse_args()) # 从命令行参数中依次解析出参数 work_dir = args['work_dir'][0] old_ext = args['old_ext'][0] if old_ext[0] != '.': old_ext = '.' + old_ext new_ext = args['new_ext'][0] if new_ext[0] != '.': new_ext = '.' + new_ext batch_rename(work_dir, old_ext, new_ext)
6 xls批量转换成xlsx
import os

def xls_to_xlsx(work_dir):
    """
    传递当前目录,原来后缀名,新的后缀名后,批量重命名后缀
    """
    old_ext, new_ext = '.xls', '.xlsx'
    for filename in os.listdir(work_dir):
        # 获取得到文件后缀
        split_file = os.path.splitext(filename)
        file_ext = split_file[1]
        # 定位后缀名为old_ext 的文件
        if old_ext == file_ext:
            # 修改后文件的完整名称
            newfile = split_file[0] + new_ext
            # 实现重命名操作
            os.rename(
                os.path.join(work_dir, filename),
                os.path.join(work_dir, newfile)
            )
    print("完成重命名")
    print(os.listdir(work_dir))


xls_to_xlsx('./data')

# 输出结果:
# ['cut_words.csv', 'email_list.xlsx', 'email_test.docx', 'email_test.jpg', 'email_test.xlsx', 'geo_data.png', 'geo_data.xlsx',
'iotest.txt', 'pyside2.md', 'PySimpleGUI-4.7.1-py3-none-any.whl', 'test.txt', 'test_excel.xlsx', 'ziptest', 'ziptest.zip']
7 定制文件不同行
比较两个文件在哪些行内容不同,返回这些行的编号,行号编号从1开始。
定义统计文件行数的函数
# 统计文件个数
    def statLineCnt(statfile):
        print('文件名:'+statfile)
        cnt = 0
        with open(statfile, encoding='utf-8') as f:
            while f.readline():
                cnt += 1
            return cnt
统计文件不同之处的子函数:
# more表示含有更多行数的文件 def diff(more, cnt, less): difflist = [] with open(less, encoding='utf-8') as l: with open(more, encoding='utf-8') as m: lines = l.readlines() for i, line in enumerate(lines): if line.strip() != m.readline().strip(): difflist.append(i) if cnt - i > 1: difflist.extend(range(i + 1, cnt)) return [no+1 for no in difflist]
主函数:
# 返回的结果行号从1开始# list表示fileA和fileB不同的行的编号def file_diff_line_nos(fileA, fileB): try: cntA = statLineCnt(fileA) cntB = statLineCnt(fileB) if cntA > cntB: return diff(fileA, cntA, fileB) return diff(fileB, cntB, fileA) except Exception as e: print(e)
比较两个文件A和B,拿相对较短的文件去比较,过滤行后的换行符\n和空格。
暂未考虑某个文件最后可能有的多行空行等特殊情况
使用file_diff_line_nos 函数:
if __name__ == '__main__': import os print(os.getcwd()) ''' 例子: fileA = "'hello world!!!!''\ 'nice to meet you'\ 'yes'\ 'no1'\ 'jack'" fileB = "'hello world!!!!''\ 'nice to meet you'\ 'yes' " ''' diff = file_diff_line_nos('./testdir/a.txt', './testdir/b.txt') print(diff) # [4, 5]
关于文件比较的,实际上,在Python中有对应模块difflib , 提供更多其他格式的文件更详细的比较,大家可参考:
docs.python.org/3/library/d…
8 获取指定后缀名的文件
import osdef find_file(work_dir,extension='jpg'): lst = [] for filename in os.listdir(work_dir): print(filename) splits = os.path.splitext(filename) ext = splits[1] # 拿到扩展名 if ext == '.'+extension: lst.append(filename) return lstr = find_file('.','md') print(r) # 返回所有目录下的md文件
9 批量获取文件修改时间
# 获取目录下文件的修改时间import osfrom datetime import datetimeprint(f"当前时间:{datetime.now().strftime('%Y-%m-%d %H:%M:%S')}")def get_modify_time(indir): for root, _, files in os.walk(indir): # 循环D:\works目录和子目录 for file in files: absfile = os.path.join(root, file) modtime = datetime.fromtimestamp(os.path.getmtime(absfile)) now = datetime.now() difftime = now-modtime if difftime.days < 20: # 条件筛选超过指定时间的文件 print(f"""{absfile} 修改时间[{modtime.strftime('%Y-%m-%d %H:%M:%S')}] 距今[{difftime.days:3d}天{difftime.seconds//3600:2d}时{difftime.seconds%3600//60:2d}]""" ) # 打印相关信息get_modify_time('./data')
打印效果:当前时间:2019-12-22 16:38:53./data\cut_words.csv 修改时间[2019-12-21 10:34:15] 距今[ 1天 6时 4]当前时间:2019-12-22 16:38:53./data\cut_words.csv 修改时间[2019-12-21 10:34:15] 距今[ 1天 6时 4]./data\email_test.docx 修改时间[2019-12-03 07:46:29] 距今[ 19天 8时52]./data\email_test.jpg 修改时间[2019-12-03 07:46:29] 距今[ 19天 8时52]./data\email_test.xlsx 修改时间[2019-12-03 07:46:29] 距今[ 19天 8时52]./data\iotest.txt 修改时间[2019-12-13 08:23:18] 距今[ 9天 8时15]./data\pyside2.md 修改时间[2019-12-05 08:17:22] 距今[ 17天 8时21]./data\PySimpleGUI-4.7.1-py3-none-any.whl 修改时间[2019-12-05 00:25:47] 距今[ 17天16时13]
10 批量压缩文件
import zipfile # 导入zipfile,这个是用来做压缩和解压的Python模块;import osimport timedef batch_zip(start_dir): start_dir = start_dir # 要压缩的文件夹路径 file_news = start_dir + '.zip' # 压缩后文件夹的名字 z = zipfile.ZipFile(file_news, 'w', zipfile.ZIP_DEFLATED) for dir_path, dir_names, file_names in os.walk(start_dir): # 这一句很重要,不replace的话,就从根目录开始复制 f_path = dir_path.replace(start_dir, '') f_path = f_path and f_path + os.sep # 实现当前文件夹以及包含的所有文件的压缩 for filename in file_names: z.write(os.path.join(dir_path, filename), f_path + filename) z.close() return file_newsbatch_zip('./data/ziptest')
11 32位加密
import hashlib# 对字符串s实现32位加密def hash_cry32(s): m = hashlib.md5() m.update((str(s).encode('utf-8'))) return m.hexdigest()print(hash_cry32(1)) # c4ca4238a0b923820dcc509a6f75849bprint(hash_cry32('hello')) # 5d41402abc4b2a76b9719d911017c592
五、Python日期
Python日期章节,由表示大日期的calendar, date模块,逐渐过渡到表示时间刻度更小的模块:datetime, time模块,按照此逻辑展开,总结了最常用的9个关于时间处理模块的例子。
1 年的日历图
import calendaryear_calendar_str = calendar.calendar(2019)print(f"{mydate.year}年的日历图:{year_calendar_str}\n")
打印结果:
2019 January February MarchMo Tu We Th Fr Sa Su Mo Tu We Th Fr Sa Su Mo Tu We Th Fr Sa Su 1 2 3 4 5 6 1 2 3 1 2 3 7 8 9 10 11 12 13 4 5 6 7 8 9 10 4 5 6 7 8 9 1014 15 16 17 18 19 20 11 12 13 14 15 16 17 11 12 13 14 15 16 1721 22 23 24 25 26 27 18 19 20 21 22 23 24 18 19 20 21 22 23 2428 29 30 31 25 26 27 28 25 26 27 28 29 30 31 April May JuneMo Tu We Th Fr Sa Su Mo Tu We Th Fr Sa Su Mo Tu We Th Fr Sa Su 1 2 3 4 5 6 7 1 2 3 4 5 1 2 8 9 10 11 12 13 14 6 7 8 9 10 11 12 3 4 5 6 7 8 915 16 17 18 19 20 21 13 14 15 16 17 18 19 10 11 12 13 14 15 1622 23 24 25 26 27 28 20 21 22 23 24 25 26 17 18 19 20 21 22 2329 30 27 28 29 30 31 24 25 26 27 28 29 30 July August SeptemberMo Tu We Th Fr Sa Su Mo Tu We Th Fr Sa Su Mo Tu We Th Fr Sa Su 1 2 3 4 5 6 7 1 2 3 4 1 8 9 10 11 12 13 14 5 6 7 8 9 10 11 2 3 4 5 6 7 815 16 17 18 19 20 21 12 13 14 15 16 17 18 9 10 11 12 13 14 1522 23 24 25 26 27 28 19 20 21 22 23 24 25 16 17 18 19 20 21 2229 30 31 26 27 28 29 30 31 23 24 25 26 27 28 29 30 October November DecemberMo Tu We Th Fr Sa Su Mo Tu We Th Fr Sa Su Mo Tu We Th Fr Sa Su 1 2 3 4 5 6 1 2 3 1 7 8 9 10 11 12 13 4 5 6 7 8 9 10 2 3 4 5 6 7 814 15 16 17 18 19 20 11 12 13 14 15 16 17 9 10 11 12 13 14 1521 22 23 24 25 26 27 18 19 20 21 22 23 24 16 17 18 19 20 21 2228 29 30 31 25 26 27 28 29 30 23 24 25 26 27 28 29 30 31
2 判断是否为闰年
import calendaris_leap = calendar.isleap(mydate.year)print_leap_str = "%s年是闰年" if is_leap else "%s年不是闰年\n"print(print_leap_str % mydate.year)
打印结果:
2019年不是闰年
3 月的日历图
import calendarmonth_calendar_str = calendar.month(mydate.year, mydate.month)print(f"{mydate.year}年-{mydate.month}月的日历图:{month_calendar_str}\n")
打印结果:
December 2019Mo Tu We Th Fr Sa Su 1 2 3 4 5 6 7 8 9 10 11 12 13 14 1516 17 18 19 20 21 2223 24 25 26 27 28 2930 31
4 月有几天
import calendarweekday, days = calendar.monthrange(mydate.year, mydate.month)print(f'{mydate.year}年-{mydate.month}月的第一天是那一周的第{weekday}天\n')print(f'{mydate.year}年-{mydate.month}月共有{days}天\n')
打印结果:
2019年-12月的第一天是那一周的第6天2019年-12月共有31天
5 月第一天
from datetime import datemonth_first_day = date(mydate.year, mydate.month, 1)print(f"当月第一天:{month_first_day}\n")
打印结果:
当月第一天:2019-12-01
6 月最后一天
from datetime import dateimport calendar_, days = calendar.monthrange(mydate.year, mydate.month)month_last_day = date(mydate.year, mydate.month, days)print(f"当月最后一天:{month_last_day}\n")
打印结果:
当月最后一天:2019-12-31
7 获取当前时间
from datetime import date, datetimefrom time import localtimetoday_date = date.today()print(today_date) # 2019-12-22today_time = datetime.today()print(today_time) # 2019-12-22 18:02:33.398894local_time = localtime()print(strftime("%Y-%m-%d %H:%M:%S", local_time)) # 转化为定制的格式 2019-12-22 18:13:41
8 字符时间转时间
from time import strptime# parse str time to struct timestruct_time = strptime('2019-12-22 10:10:08', "%Y-%m-%d %H:%M:%S")print(struct_time) # struct_time类型就是time中的一个类# time.struct_time(tm_year=2019, tm_mon=12, tm_mday=22, tm_hour=10, tm_min=10, tm_sec=8, tm_wday=6, tm_yday=356, tm_isdst=-1)
9 时间转字符时间
from time import strftime, strptime, localtimeIn [2]: print(localtime()) #这是输入的时间Out[2]: time.struct_time(tm_year=2019, tm_mon=12, tm_mday=22, tm_hour=18, tm_min=24, tm_sec=56, tm_wday=6, tm_yday=356, tm_isdst=0)print(strftime("%m-%d-%Y %H:%M:%S", localtime())) # 转化为定制的格式# 这是字符串表示的时间: 12-22-2019 18:26:21
六、Python利器
Python中的三大利器包括:迭代器,生成器,装饰器,利用好它们才能开发出最高性能的Python程序,涉及到的内置模块 itertools提供迭代器相关的操作。此部分收录有意思的例子共计14例。
1 寻找第n次出现位置
def search_n(s, c, n): size = 0 for i, x in enumerate(s): if x == c: size += 1 if size == n: return i return -1print(search_n("fdasadfadf", "a", 3))# 结果为7,正确print(search_n("fdasadfadf", "a", 30))# 结果为-1,正确
2 斐波那契数列前n项
def fibonacci(n): a, b = 1, 1 for _ in range(n): yield a a, b = b, a + blist(fibonacci(5)) # [1, 1, 2, 3, 5]
3 找出所有重复元素
from collections import Counterdef find_all_duplicates(lst): c = Counter(lst) return list(filter(lambda k: c[k] > 1, c))find_all_duplicates([1, 2, 2, 3, 3, 3]) # [2,3]
4 联合统计次数
Counter对象间可以做数学运算
from collections import Countera = ['apple', 'orange', 'computer', 'orange']b = ['computer', 'orange']ca = Counter(a)cb = Counter(b)#Counter对象间可以做数学运算ca + cb # Counter({'orange': 3, 'computer': 2, 'apple': 1})# 进一步抽象,实现多个列表内元素的个数统计def sumc(*c): if (len(c) < 1): return mapc = map(Counter, c) s = Counter([]) for ic in mapc: # ic 是一个Counter对象 s += ic return s#Counter({'orange': 3, 'computer': 3, 'apple': 1, 'abc': 1, 'face': 1})sumc(a, b, ['abc'], ['face', 'computer'])
5 groupby单字段分组
天气记录:
a = [{'date': '2019-12-15', 'weather': 'cloud'}, {'date': '2019-12-13', 'weather': 'sunny'}, {'date': '2019-12-14', 'weather': 'cloud'}]
按照天气字段weather分组汇总:
from itertools import groupbyfor k, items in groupby(a,key=lambda x:x['weather']): print(k)
输出结果看出,分组失败!原因:分组前必须按照分组字段排序,这个很坑~
cloudsunnycloud
修改代码:
a.sort(key=lambda x: x['weather'])for k, items in groupby(a,key=lambda x:x['weather']): print(k) for i in items: print(i)
输出结果:
cloud{'date': '2019-12-15', 'weather': 'cloud'}{'date': '2019-12-14', 'weather': 'cloud'}sunny{'date': '2019-12-13', 'weather': 'sunny'}
6 itemgetter和key函数
注意到sort和groupby所用的key函数,除了lambda写法外,还有一种简写,就是使用itemgetter:
a = [{'date': '2019-12-15', 'weather': 'cloud'}, {'date': '2019-12-13', 'weather': 'sunny'}, {'date': '2019-12-14', 'weather': 'cloud'}]from operator import itemgetterfrom itertools import groupbya.sort(key=itemgetter('weather'))for k, items in groupby(a, key=itemgetter('weather')): print(k) for i in items: print(i)
结果:
cloud{'date': '2019-12-15', 'weather': 'cloud'}{'date': '2019-12-14', 'weather': 'cloud'}sunny{'date': '2019-12-13', 'weather': 'sunny'}
7 groupby多字段分组
itemgetter是一个类,itemgetter('weather')返回一个可调用的对象,它的参数可有多个:
from operator import itemgetterfrom itertools import groupbya.sort(key=itemgetter('weather', 'date'))for k, items in groupby(a, key=itemgetter('weather')): print(k) for i in items: print(i)
结果如下,使用weather和date两个字段排序a,
cloud{'date': '2019-12-14', 'weather': 'cloud'}{'date': '2019-12-15', 'weather': 'cloud'}sunny{'date': '2019-12-13', 'weather': 'sunny'}
注意这个结果与上面结果有些微妙不同,这个更多是我们想看到和使用更多的。
8 sum函数计算和聚合同时做
Python中的聚合类函数sum,min,max第一个参数是iterable类型,一般使用方法如下:
a = [4,2,5,1]
sum([i+1 for i in a]) # 16
使用列表生成式[i+1 for i in a]创建一个长度与a一行的临时列表,这步完成后,再做sum聚合。
试想如果你的数组a长度十百万级,再创建一个这样的临时列表就很不划算,最好是一边算一边聚合,稍改动为如下:
a = [4,2,5,1]
sum(i+1 for i in a) # 16
此时i+1 for i in a是(i+1 for i in a)的简写,得到一个生成器(generator)对象,如下所示:
In [8]:(i+1 for i in a)
OUT [8]: at 0x000002AC7FFA8CF0>
生成器每迭代一步吐出(yield)一个元素并计算和聚合后,进入下一次迭代,直到终点。
9 list分组(生成器版)
from math import ceil

def divide_iter(lst, n):
    if n <= 0:
        yield lst
        return
    i, div = 0, ceil(len(lst) / n)
    while i < n:
        yield lst[i * div: (i + 1) * div]
        i += 1

list(divide_iter([1, 2, 3, 4, 5], 0))  # [[1, 2, 3, 4, 5]]
list(divide_iter([1, 2, 3, 4, 5], 2))  # [[1, 2, 3], [4, 5]]
10 列表全展开(生成器版)
#多层列表展开成单层列表a=[1,2,[3,4,[5,6],7],8,["python",6],9]def function(lst): for i in lst: if type(i)==list: yield from function(i) else: yield iprint(list(function(a))) # [1, 2, 3, 4, 5, 6, 7, 8, 'python', 6, 9]
11 测试函数运行时间的装饰器
#测试函数执行时间的装饰器示例import timedef timing_func(fn): def wrapper(): start=time.time() fn() #执行传入的fn参数 stop=time.time() return (stop-start) return wrapper@timing_funcdef test_list_append(): lst=[] for i in range(0,100000): lst.append(i) @timing_funcdef test_list_compre(): [i for i in range(0,100000)] #列表生成式a=test_list_append()c=test_list_compre()print("test list append time:",a)print("test list comprehension time:",c)print("append/compre:",round(a/c,3))test list append time: 0.0219423770904541test list comprehension time: 0.007980823516845703append/compre: 2.749
12 统计异常出现次数和时间的装饰器
写一个装饰器,统计某个异常重复出现指定次数时,经历的时长。
import timeimport mathdef excepter(f): i = 0 t1 = time.time() def wrapper(): try: f() except Exception as e: nonlocal i i += 1 print(f'{e.args[0]}: {i}') t2 = time.time() if i == n: print(f'spending time:{round(t2-t1,2)}') return wrapper
关键词nonlocal常用于函数嵌套中,声明变量i为非局部变量;
如果不声明,i+=1表明i为函数wrapper内的局部变量,因为在i+=1引用(reference)时,i未被声明,所以会报unreferenced variable的错误。
使用创建的装饰函数excepter, n是异常出现的次数。
共测试了两类常见的异常:被零除和数组越界。
n = 10 # except count@excepterdef divide_zero_except(): time.sleep(0.1) j = 1/(40-20*2)# test zero divived exceptfor _ in range(n): divide_zero_except()@excepterdef outof_range_except(): a = [1,3,5] time.sleep(0.1) print(a[3])# test out of range exceptfor _ in range(n): outof_range_except()
打印出来的结果如下:
division by zero: 1division by zero: 2division by zero: 3division by zero: 4division by zero: 5division by zero: 6division by zero: 7division by zero: 8division by zero: 9division by zero: 10spending time:1.01list index out of range: 1list index out of range: 2list index out of range: 3list index out of range: 4list index out of range: 5list index out of range: 6list index out of range: 7list index out of range: 8list index out of range: 9list index out of range: 10spending time:1.01
13 定制递减迭代器
#编写一个迭代器,通过循环语句,实现对某个正整数的依次递减1,直到0.class Descend(Iterator): def __init__(self,N): self.N=N self.a=0 def __iter__(self): return self def __next__(self): while self.a核心要点:
1 __nex__名字不能变,实现定制的迭代逻辑
2 raise StopIteration:通过 raise 中断程序,必须这样写
14 测试运行时长的装饰器
#测试函数执行时间的装饰器示例import timedef timing(fn): def wrapper(): start=time.time() fn() #执行传入的fn参数 stop=time.time() return (stop-start) return wrapper@timingdef test_list_append(): lst=[] for i in range(0,100000): lst.append(i) @timingdef test_list_compre(): [i for i in range(0,100000)] #列表生成式a=test_list_append()c=test_list_compre()print("test list append time:",a)print("test list comprehension time:",c)print("append/compre:",round(a/c,3))# test list append time: 0.0219# test list comprehension time: 0.00798# append/compre: 2.749
七、Python画图
Python常用的绘图工具包括:matplotlib, seaborn, plotly等,以及一些其他专用于绘制某类图如词云图等的包,描绘绘图轨迹的turtle包等。本章节将会使用一些例子由易到难的阐述绘图的经典小例子,目前共收录10个。
1 turtle绘制奥运五环图
turtle绘图的函数非常好用,基本看到函数名字,就能知道它的含义,下面使用turtle,仅用15行代码来绘制奥运五环图。
1 导入库
import turtle
2 定义画圆函数
def drawCircle(x,y,c='red'): p.pu()# 抬起画笔 p.goto(x,y) # 绘制圆的起始位置 p.pd()# 放下画笔 p.color(c)# 绘制c色圆环 p.circle(30,360) #绘制圆:半径,角度
3 画笔基本设置
p = turtlep.pensize(3) # 画笔尺寸设置3
4 绘制五环图
调用画圆函数
drawCircle(0,0,'blue')drawCircle(60,0,'black')drawCircle(120,0,'red')drawCircle(90,-30,'green')drawCircle(30,-30,'yellow') p.done()
结果:
[图片上传失败…(image-7c479f-1577689175382)]
2 turtle绘制漫天雪花
导入模块
导入 turtle库和 python的 random
import turtle as pimport random
绘制雪花
def snow(snow_count):
    p.hideturtle()
    p.speed(500)
    p.pensize(2)
    for i in range(snow_count):
        r = random.random()
        g = random.random()
        b = random.random()
        p.pencolor(r, g, b)
        p.pu()
        p.goto(random.randint(-350, 350), random.randint(1, 270))
        p.pd()
        dens = random.randint(8, 12)
        snowsize = random.randint(10, 14)
        for _ in range(dens):
            p.forward(snowsize)  # 向当前画笔方向移动snowsize像素长度
            p.backward(snowsize)  # 向当前画笔相反方向移动snowsize像素长度
            p.right(360 / dens)  # 顺时针移动360 / dens度
绘制地面
def ground(ground_line_count):
    p.hideturtle()
    p.speed(500)
    for i in range(ground_line_count):
        p.pensize(random.randint(5, 10))
        x = random.randint(-400, 350)
        y = random.randint(-280, -1)
        r = -y / 280
        g = -y / 280
        b = -y / 280
        p.pencolor(r, g, b)
        p.penup()  # 抬起画笔
        p.goto(x, y)  # 让画笔移动到此位置
        p.pendown()  # 放下画笔
        p.forward(random.randint(40, 100))  # 眼当前画笔方向向前移动40~100距离
主函数
def main():
    p.setup(800, 600, 0, 0)
    # p.tracer(False)
    p.bgcolor("black")
    snow(30)
    ground(30)
    # p.tracer(True)
    p.mainloop()

main()
动态图结果展示:
[外链图片转存失败,源站可能有防盗链机制,建议将图片保存下来直接上传(img-Odd88bBd-1637763621347)(https://juejin.cn/img/turtlesnow.gif)]
3 wordcloud词云图
import hashlib
import pandas as pd
from wordcloud import WordCloud
geo_data=pd.read_excel(r"../data/geo_data.xlsx")
print(geo_data)
# 0     深圳
# 1     深圳
# 2     深圳
# 3     深圳
# 4     深圳
# 5     深圳
# 6     深圳
# 7     广州
# 8     广州
# 9     广州

words = ','.join(x for x in geo_data['city'] if x != []) #筛选出非空列表值
wc = WordCloud(
    background_color="green", #背景颜色"green"绿色
    max_words=100, #显示最大词数
    font_path='./fonts/simhei.ttf', #显示中文
    min_font_size=5,
    max_font_size=100,
    width=500  #图幅宽度
    )
x = wc.generate(words)
x.to_file('../data/geo_data.png')
[图片上传失败…(image-78330d-1577689175382)]
4 plotly画柱状图和折线图
#柱状图+折线图
import plotly.graph_objects as go
fig = go.Figure()
fig.add_trace(
    go.Scatter(
        x=[0, 1, 2, 3, 4, 5],
        y=[1.5, 1, 1.3, 0.7, 0.8, 0.9]
    ))
fig.add_trace(
    go.Bar(
        x=[0, 1, 2, 3, 4, 5],
        y=[2, 0.5, 0.7, -1.2, 0.3, 0.4]
    ))
fig.show()
[外链图片转存失败,源站可能有防盗链机制,建议将图片保存下来直接上传(img-WW5yW2ts-1637763621349)(https://juejin.cn/img/plotly1.png)]
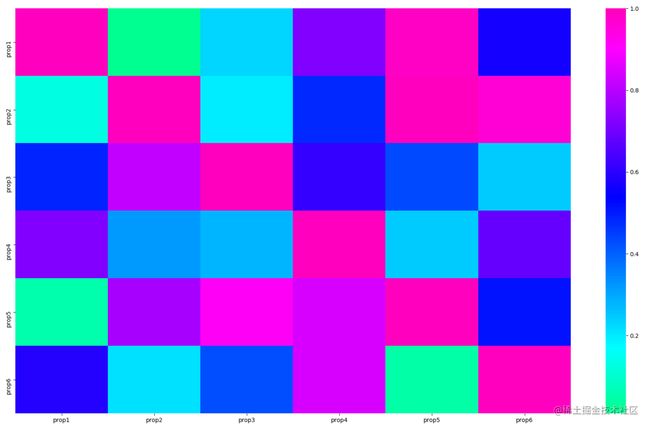
5 seaborn热力图
# 导入库
import seaborn as sns
import pandas as pd
import numpy as np
import matplotlib.pyplot as plt

# 生成数据集
data = np.random.random((6,6))
np.fill_diagonal(data,np.ones(6))
features = ["prop1","prop2","prop3","prop4","prop5", "prop6"]
data = pd.DataFrame(data, index = features, columns=features)
print(data)
# 绘制热力图
heatmap_plot = sns.heatmap(data, center=0, cmap='gist_rainbow')
plt.show()
6 matplotlib折线图
模块名称:example_utils.py,里面包括三个函数,各自功能如下:
import matplotlib.pyplot as plt

# 创建画图fig和axes
def setup_axes():
    fig, axes = plt.subplots(ncols=3, figsize=(6.5,3))
    for ax in fig.axes:
        ax.set(xticks=[], yticks=[])
    fig.subplots_adjust(wspace=0, left=0, right=0.93)
    return fig, axes
# 图片标题
def title(fig, text, y=0.9):
    fig.suptitle(text, size=14, y=y, weight='semibold', x=0.98, ha='right',
                 bbox=dict(boxstyle='round', fc='floralwhite', ec='#8B7E66',
                           lw=2))
# 为数据添加文本注释
def label(ax, text, y=0):
    ax.annotate(text, xy=(0.5, 0.00), xycoords='axes fraction', ha='center',
                style='italic',
                bbox=dict(boxstyle='round', facecolor='floralwhite',
                          ec='#8B7E66'))
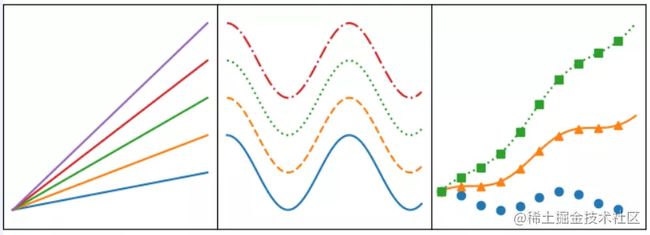
import numpy as npimport matplotlib.pyplot as pltimport example_utilsx = np.linspace(0, 10, 100)fig, axes = example_utils.setup_axes()for ax in axes: ax.margins(y=0.10)# 子图1 默认plot多条线,颜色系统分配for i in range(1, 6): axes[0].plot(x, i * x)# 子图2 展示线的不同linestylefor i, ls in enumerate(['-', '--', ':', '-.']): axes[1].plot(x, np.cos(x) + i, linestyle=ls)# 子图3 展示线的不同linestyle和markerfor i, (ls, mk) in enumerate(zip(['', '-', ':'], ['o', '^', 's'])): axes[2].plot(x, np.cos(x) + i * x, linestyle=ls, marker=mk, markevery=10)# 设置标题# example_utils.title(fig, '"ax.plot(x, y, ...)": Lines and/or markers', y=0.95)# 保存图片fig.savefig('plot_example.png', facecolor='none')# 展示图片plt.show()
7 matplotlib散点图
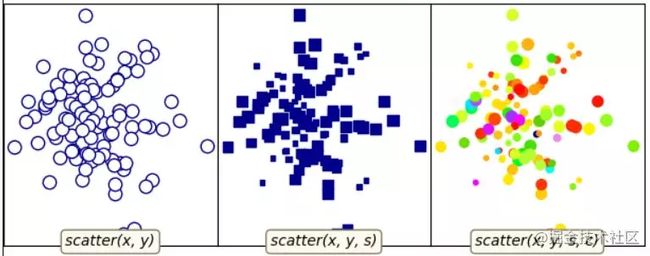
对应代码:
"""
散点图的基本用法
"""
import numpy as np
import matplotlib.pyplot as plt

import example_utils

# 随机生成数据
np.random.seed(1874)
x, y, z = np.random.normal(0, 1, (3, 100))
t = np.arctan2(y, x)
size = 50 * np.cos(2 * t)**2 + 10

fig, axes = example_utils.setup_axes()

# 子图1
axes[0].scatter(x, y, marker='o',  color='darkblue', facecolor='white', s=80)
example_utils.label(axes[0], 'scatter(x, y)')

# 子图2
axes[1].scatter(x, y, marker='s', color='darkblue', s=size)
example_utils.label(axes[1], 'scatter(x, y, s)')

# 子图3
axes[2].scatter(x, y, s=size, c=z,  cmap='gist_ncar')
example_utils.label(axes[2], 'scatter(x, y, s, c)')

# example_utils.title(fig, '"ax.scatter(...)": Colored/scaled markers',
#                     y=0.95)
fig.savefig('scatter_example.png', facecolor='none')

plt.show()
8 matplotlib柱状图
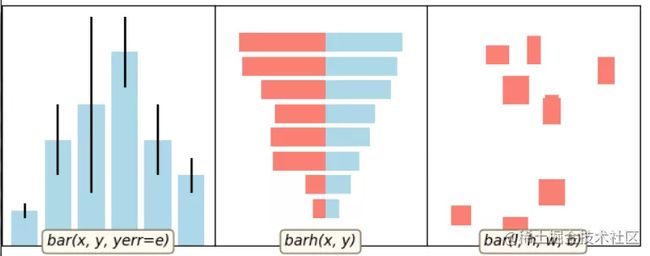
对应代码:
import numpy as npimport matplotlib.pyplot as pltimport example_utilsdef main(): fig, axes = example_utils.setup_axes() basic_bar(axes[0]) tornado(axes[1]) general(axes[2]) # example_utils.title(fig, '"ax.bar(...)": Plot rectangles') fig.savefig('bar_example.png', facecolor='none') plt.show()# 子图1def basic_bar(ax): y = [1, 3, 4, 5.5, 3, 2] err = [0.2, 1, 2.5, 1, 1, 0.5] x = np.arange(len(y)) ax.bar(x, y, yerr=err, color='lightblue', ecolor='black') ax.margins(0.05) ax.set_ylim(bottom=0) example_utils.label(ax, 'bar(x, y, yerr=e)')# 子图2def tornado(ax): y = np.arange(8) x1 = y + np.random.random(8) + 1 x2 = y + 3 * np.random.random(8) + 1 ax.barh(y, x1, color='lightblue') ax.barh(y, -x2, color='salmon') ax.margins(0.15) example_utils.label(ax, 'barh(x, y)')# 子图3def general(ax): num = 10 left = np.random.randint(0, 10, num) bottom = np.random.randint(0, 10, num) width = np.random.random(num) + 0.5 height = np.random.random(num) + 0.5 ax.bar(left, height, width, bottom, color='salmon') ax.margins(0.15) example_utils.label(ax, 'bar(l, h, w, b)')main()
9 matplotlib等高线图
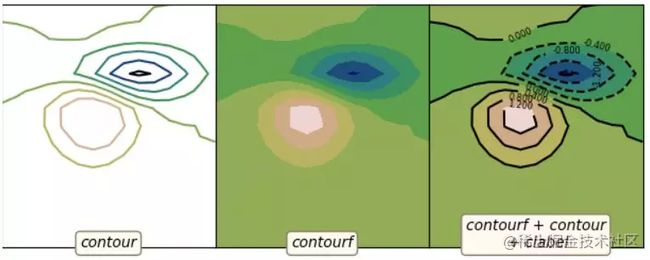
对应代码:
import matplotlib.pyplot as pltimport numpy as npfrom matplotlib.cbook import get_sample_dataimport example_utilsz = np.load(get_sample_data('bivariate_normal.npy'))fig, axes = example_utils.setup_axes()axes[0].contour(z, cmap='gist_earth')example_utils.label(axes[0], 'contour')axes[1].contourf(z, cmap='gist_earth')example_utils.label(axes[1], 'contourf')axes[2].contourf(z, cmap='gist_earth')cont = axes[2].contour(z, colors='black')axes[2].clabel(cont, fontsize=6)example_utils.label(axes[2], 'contourf + contour\n + clabel')# example_utils.title(fig, '"contour, contourf, clabel": Contour/label 2D data',# y=0.96)fig.savefig('contour_example.png', facecolor='none')plt.show()
10 imshow图
对应代码:
import matplotlib.pyplot as pltimport numpy as npfrom matplotlib.cbook import get_sample_datafrom mpl_toolkits import axes_grid1import example_utilsdef main(): fig, axes = setup_axes() plot(axes, *load_data()) # example_utils.title(fig, '"ax.imshow(data, ...)": Colormapped or RGB arrays') fig.savefig('imshow_example.png', facecolor='none') plt.show()def plot(axes, img_data, scalar_data, ny): # 默认线性插值 axes[0].imshow(scalar_data, cmap='gist_earth', extent=[0, ny, ny, 0]) # 最近邻插值 axes[1].imshow(scalar_data, cmap='gist_earth', interpolation='nearest', extent=[0, ny, ny, 0]) # 展示RGB/RGBA数据 axes[2].imshow(img_data)def load_data(): img_data = plt.imread(get_sample_data('5.png')) ny, nx, nbands = img_data.shape scalar_data = np.load(get_sample_data('bivariate_normal.npy')) return img_data, scalar_data, nydef setup_axes(): fig = plt.figure(figsize=(6, 3)) axes = axes_grid1.ImageGrid(fig, [0, 0, .93, 1], (1, 3), axes_pad=0) for ax in axes: ax.set(xticks=[], yticks=[]) return fig, axesmain()
11 pyecharts绘制仪表盘
使用pip install pyecharts 安装,版本为 v1.6,pyecharts绘制仪表盘,只需要几行代码:
from pyecharts import charts# 仪表盘gauge = charts.Gauge()gauge.add('Python小例子', [('Python机器学习', 30), ('Python基础', 70.), ('Python正则', 90)])gauge.render(path="./data/仪表盘.html")print('ok')
仪表盘中共展示三项,每项的比例为30%,70%,90%,如下图默认名称显示第一项:Python机器学习,完成比例为30%
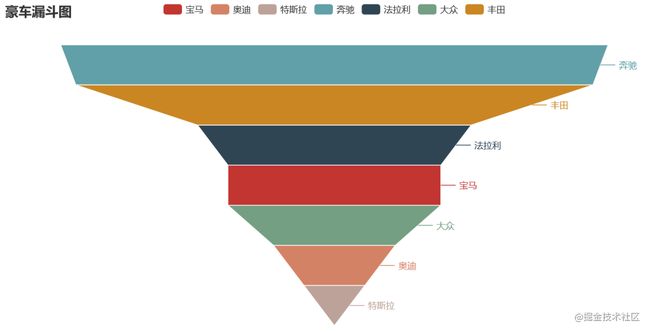
12 pyecharts漏斗图
from pyecharts import options as opts
from pyecharts.charts import Funnel, Page
from random import randint

def funnel_base() -> Funnel:
  c = (
    Funnel()
    .add("豪车", [list(z) for z in zip(['宝马', '法拉利', '奔驰', '奥迪', '大众', '丰田', '特斯拉'],
                 [randint(1, 20) for _ in range(7)])])
    .set_global_opts(title_opts=opts.TitleOpts(title="豪车漏斗图"))
  )
  return c
funnel_base().render('./img/car_fnnel.html')
以7种车型及某个属性值绘制的漏斗图,属性值大越靠近漏斗的大端。
13 pyecharts日历图
import datetime
import random
from pyecharts import options as opts
from pyecharts.charts import Calendar

def calendar_interval_1() -> Calendar:
    begin = datetime.date(2019, 1, 1)
    end = datetime.date(2019, 12, 27)
    data = [
        [str(begin + datetime.timedelta(days=i)), random.randint(1000, 25000)]
        for i in range(0, (end - begin).days + 1, 2)  # 隔天统计
    ]
    calendar = (
      Calendar(init_opts=opts.InitOpts(width="1200px")).add(
            "", data, calendar_opts=opts.CalendarOpts(range_="2019"))
        .set_global_opts(
            title_opts=opts.TitleOpts(title="Calendar-2019年步数统计"),
            visualmap_opts=opts.VisualMapOpts(
                max_=25000,
                min_=1000,
                orient="horizontal",
                is_piecewise=True,
                pos_top="230px",
                pos_left="100px",
            ),
        )
    )
    return calendar

calendar_interval_1().render('./img/calendar.html')
绘制2019年1月1日到12月27日的步行数,官方给出的图形宽度900px不够,只能显示到9月份,本例使用opts.InitOpts(width="1200px")做出微调,并且visualmap显示所有步数,每隔一天显示一次:
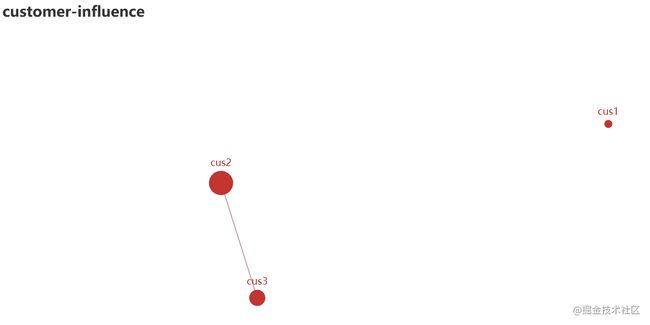
14 pyecharts绘制graph图
import json
import os
from pyecharts import options as opts
from pyecharts.charts import Graph, Page

def graph_base() -> Graph:
    nodes = [
        {"name": "cus1", "symbolSize": 10},
        {"name": "cus2", "symbolSize": 30},
        {"name": "cus3", "symbolSize": 20}
    ]
    links = []
    for i in nodes:
        if i.get('name') == 'cus1':
            continue
        for j in nodes:
            if j.get('name') == 'cus1':
                continue
            links.append({"source": i.get("name"), "target": j.get("name")})
    c = (
        Graph()
        .add("", nodes, links, repulsion=8000)
        .set_global_opts(title_opts=opts.TitleOpts(title="customer-influence"))
    )
    return c
构建图,其中客户点1与其他两个客户都没有关系(link),也就是不存在有效边:
15 pyecharts水球图
from pyecharts import options as opts
from pyecharts.charts import Liquid, Page
from pyecharts.globals import SymbolType

def liquid() -> Liquid:
    c = (
        Liquid()
        .add("lq", [0.67, 0.30, 0.15])
        .set_global_opts(title_opts=opts.TitleOpts(title="Liquid"))
    )
    return c

liquid().render('./img/liquid.html')
水球图的取值[0.67, 0.30, 0.15]表示下图中的三个波浪线,一般代表三个百分比:
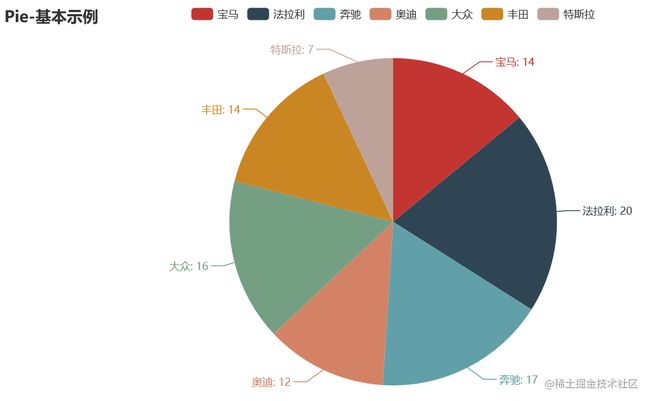
16 pyecharts饼图
from pyecharts import options as opts
from pyecharts.charts import Pie
from random import randint

def pie_base() -> Pie:
    c = (
        Pie()
        .add("", [list(z) for z in zip(['宝马', '法拉利', '奔驰', '奥迪', '大众', '丰田', '特斯拉'],
                                       [randint(1, 20) for _ in range(7)])])
        .set_global_opts(title_opts=opts.TitleOpts(title="Pie-基本示例"))
        .set_series_opts(label_opts=opts.LabelOpts(formatter="{b}: {c}"))
    )
    return c

pie_base().render('./img/pie_pyecharts.html')
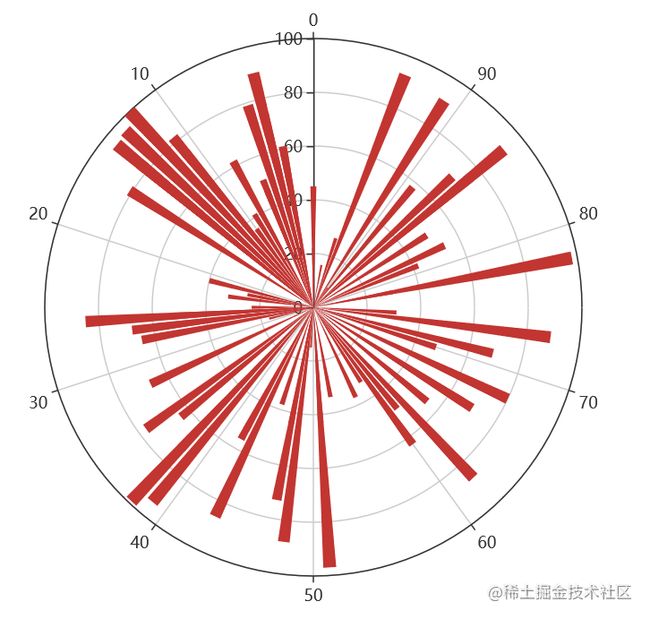
17 pyecharts极坐标图
import random
from pyecharts import options as opts
from pyecharts.charts import Page, Polar

def polar_scatter0() -> Polar:
    data = [(alpha, random.randint(1, 100)) for alpha in range(101)] # r = random.randint(1, 100)
    print(data)
    c = (
        Polar()
        .add("", data, type_="bar", label_opts=opts.LabelOpts(is_show=False))
        .set_global_opts(title_opts=opts.TitleOpts(title="Polar"))
    )
    return c

polar_scatter0().render('./img/polar.html')
极坐标表示为(夹角,半径),如(6,94)表示夹角为6,半径94的点:
18 pyecharts词云图
from pyecharts import options as opts
from pyecharts.charts import Page, WordCloud
from pyecharts.globals import SymbolType

words = [
    ("Python", 100),
    ("C++", 80),
    ("Java", 95),
    ("R", 50),
    ("JavaScript", 79),
    ("C", 65)
]

def wordcloud() -> WordCloud:
    c = (
        WordCloud()
        # word_size_range: 单词字体大小范围
        .add("", words, word_size_range=[20, 100], shape='cardioid')
        .set_global_opts(title_opts=opts.TitleOpts(title="WordCloud"))
    )
    return c

wordcloud().render('./img/wordcloud.html')
("C",65)表示在本次统计中C语言出现65次
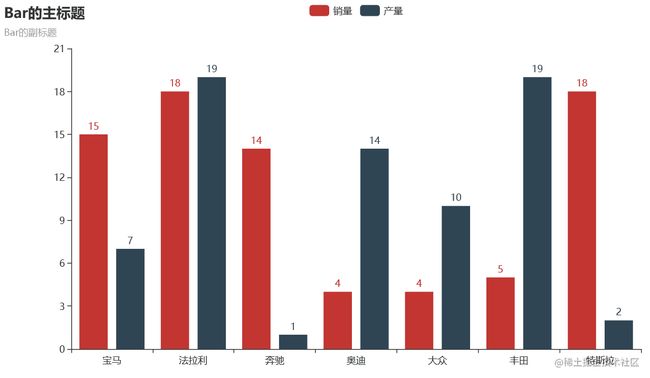
19 pyecharts系列柱状图
from pyecharts import options as opts
from pyecharts.charts import Bar
from random import randint

def bar_series() -> Bar:
    c = (
        Bar()
        .add_xaxis(['宝马', '法拉利', '奔驰', '奥迪', '大众', '丰田', '特斯拉'])
        .add_yaxis("销量", [randint(1, 20) for _ in range(7)])
        .add_yaxis("产量", [randint(1, 20) for _ in range(7)])
        .set_global_opts(title_opts=opts.TitleOpts(title="Bar的主标题", subtitle="Bar的副标题"))
    )
    return c

bar_series().render('./img/bar_series.html')
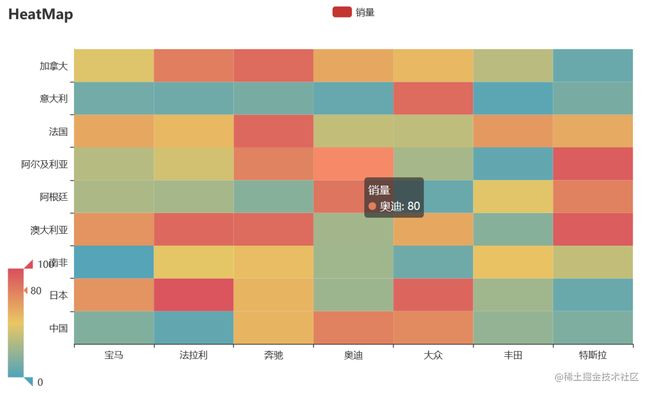
20 pyecharts热力图
import random
from pyecharts import options as opts
from pyecharts.charts import HeatMap

def heatmap_car() -> HeatMap:
    x = ['宝马', '法拉利', '奔驰', '奥迪', '大众', '丰田', '特斯拉']
    y = ['中国','日本','南非','澳大利亚','阿根廷','阿尔及利亚','法国','意大利','加拿大']
    value = [[i, j, random.randint(0, 100)]
             for i in range(len(x)) for j in range(len(y))]
    c = (
        HeatMap()
        .add_xaxis(x)
        .add_yaxis("销量", y, value)
        .set_global_opts(
            title_opts=opts.TitleOpts(title="HeatMap"),
            visualmap_opts=opts.VisualMapOpts(),
        )
    )
    return c

heatmap_car().render('./img/heatmap_pyecharts.html')
热力图描述的实际是三维关系,x轴表示车型,y轴表示国家,每个色块的颜色值代表销量,颜色刻度尺显示在左下角,颜色越红表示销量越大。
八、Python实战
1 环境搭建
区分几个小白容易混淆的概念:pycharm,python解释器,conda安装,pip安装,总结来说:
pycharm是python开发的集成开发环境(Integrated Development Environment,简称IDE),它本身无法执行Python代码python解释器才是真正执行代码的工具,pycharm里可设置Python解释器,一般去python官网下载python3.7或python3.8版本;如果安装过anaconda,它里面必然也包括一个某版本的Python解释器;pycharm配置python解释器选择哪一个都可以。- anaconda是python常用包的合集,并提供给我们使用
conda命令非常方便的安装各种Python包。 conda安装:我们安装过anaconda软件后,就能够使用conda命令下载anaconda源里(比如中科大镜像源)的包pip安装:类似于conda安装的python安装包的方法
修改镜像源
在使用安装conda 安装某些包会出现慢或安装失败问题,最有效方法是修改镜像源为国内镜像源。之前都选用清华镜像源,但是2019年后已停止服务。推荐选用中科大镜像源。
先查看已经安装过的镜像源,cmd窗口执行命令:
conda config --show
查看配置项channels,如果显示带有tsinghua,则说明已安装过清华镜像。
channels:
- https://mirrors.tuna.tsinghua.edu.cn/tensorflow/linux/cpu/
- https://mirrors.tuna.tsinghua.edu.cn/anaconda/cloud/msys2/
- https://mirrors.tuna.tsinghua.edu.cn/anaconda/cloud/conda-forge/
- https://mirrors.tuna.tsinghua.edu.cn/anaconda/pkgs/free/
- https://mirrors.tuna.tsinghua.edu.cn/anaconda/cloud/pytorch/
下一步,使用conda config --remove channels url地址删除清华镜像,如下命令删除第一个。然后,依次删除所有镜像源
conda config --remove channels https://mirrors.tuna.tsinghua.edu.cn/tensorflow/linux/cpu/
添加目前可用的中科大镜像源:
conda config --add channels https://mirrors.ustc.edu.cn/anaconda/pkgs/free/
并设置搜索时显示通道地址:
conda config --set show_channel_urls yes
确认是否安装镜像源成功,执行conda config --show,找到channels值为如下:
channels: - https://mirrors.ustc.edu.cn/anaconda/pkgs/free/ - defaults
Done~
2 自动群发邮件
Python自动群发邮件
import smtplib
from email import (header)
from email.mime import (text, application, multipart)
import time

def sender_mail():
    smt_p = smtplib.SMTP()
    smt_p.connect(host='smtp.qq.com', port=25)
    sender, password = '[email protected]', "**************"
    smt_p.login(sender, password)
    receiver_addresses, count_num = [
        '[email protected]', '[email protected]'], 1
    for email_address in receiver_addresses:
        try:
            msg = multipart.MIMEMultipart()
            msg['From'] = "zhenguo"
            msg['To'] = email_address
            msg['subject'] = header.Header('这是邮件主题通知', 'utf-8')
            msg.attach(text.MIMEText(
                '这是一封测试邮件,请勿回复本邮件~', 'plain', 'utf-8'))
            smt_p.sendmail(sender, email_address, msg.as_string())
            time.sleep(10)
            print('第%d次发送给%s' % (count_num, email_address))
            count_num = count_num + 1
        except Exception as e:
            print('第%d次给%s发送邮件异常' % (count_num, email_address))
            continue
    smt_p.quit()

sender_mail()
注意: 发送邮箱是qq邮箱,所以要在qq邮箱中设置开启SMTP服务,设置完成时会生成一个授权码,将这个授权码赋值给文中的password变量。
发送后的截图:
3 二分搜索
二分搜索是程序员必备的算法,无论什么场合,都要非常熟练地写出来。
小例子描述: 在有序数组arr中,指定区间[left,right]范围内,查找元素x 如果不存在,返回-1
二分搜索binarySearch实现的主逻辑
def binarySearch(arr, left, right, x):
    while left <= right:

        mid = int(left + (right - left) / 2); # 找到中间位置。求中点写成(left+right)/2更容易溢出,所以不建议这样写

        # 检查x是否出现在位置mid
        if arr[mid] == x:
            print('found %d 在索引位置%d 处' %(x,mid))
            return mid

            # 假如x更大,则不可能出现在左半部分
        elif arr[mid] < x:
            left = mid + 1 #搜索区间变为[mid+1,right]
            print('区间缩小为[%d,%d]' %(mid+1,right))

        # 同理,假如x更小,则不可能出现在右半部分
elif x在Ipython交互界面中,调用binarySearch的小Demo:
In [8]: binarySearch([4,5,6,7,10,20,100],0,6,5)区间缩小为[0,2]found 5 at 1Out[8]: 1In [9]: binarySearch([4,5,6,7,10,20,100],0,6,4)区间缩小为[0,2]区间缩小为[0,0]found 4 at 0Out[9]: 0In [10]: binarySearch([4,5,6,7,10,20,100],0,6,20)区间缩小为[4,6]found 20 at 5Out[10]: 5In [11]: binarySearch([4,5,6,7,10,20,100],0,6,100)区间缩小为[4,6]区间缩小为[6,6]found 100 at 6Out[11]: 6
4 爬取天气数据并解析温度值
爬取天气数据并解析温度值
素材来自朋友袁绍,感谢!
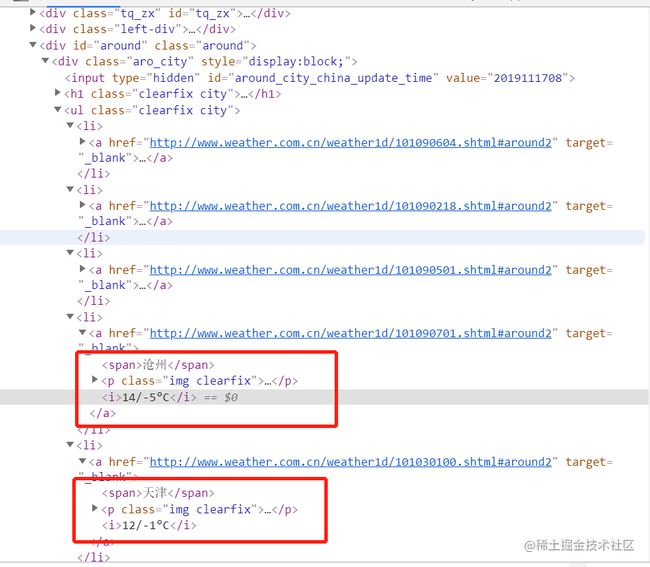
爬取的html 结构
import requests
from lxml import etree
import pandas as pd
import re

url = 'http://www.weather.com.cn/weather1d/101010100.shtml#input'
with requests.get(url) as res:
    content = res.content
    html = etree.HTML(content)
通过lxml模块提取值
lxml比beautifulsoup解析在某些场合更高效
location = html.xpath('//*[@id="around"]//a[@target="_blank"]/span/text()')
temperature = html.xpath('//*[@id="around"]/div/ul/li/a/i/text()')
结果:
['香河', '涿州', '唐山', '沧州', '天津', '廊坊', '太原', '石家庄', '涿鹿', '张家口', '保定', '三河', '北京孔庙', '北京国子监', '中国地质博物馆', '月坛公
园', '明城墙遗址公园', '北京市规划展览馆', '什刹海', '南锣鼓巷', '天坛公园', '北海公园', '景山公园', '北京海洋馆']

['11/-5°C', '14/-5°C', '12/-6°C', '12/-5°C', '11/-1°C', '11/-5°C', '8/-7°C', '13/-2°C', '8/-6°C', '5/-9°C', '14/-6°C', '11/-4°C', '13/-3°C'
, '13/-3°C', '12/-3°C', '12/-3°C', '13/-3°C', '12/-2°C', '12/-3°C', '13/-3°C', '12/-2°C', '12/-2°C', '12/-2°C', '12/-3°C']
构造DataFrame对象
df = pd.DataFrame({'location':location, 'temperature':temperature})print('温度列')print(df['temperature'])
正则解析温度值
df['high'] = df['temperature'].apply(lambda x: int(re.match('(-?[0-9]*?)/-?[0-9]*?°C', x).group(1) ) )df['low'] = df['temperature'].apply(lambda x: int(re.match('-?[0-9]*?/(-?[0-9]*?)°C', x).group(1) ) )print(df)
详细说明子字符创捕获
除了简单地判断是否匹配之外,正则表达式还有提取子串的强大功能。用()表示的就是要提取的分组(group)。比如:^(\d{3})-(\d{3,8})$分别定义了两个组,可以直接从匹配的字符串中提取出区号和本地号码
m = re.match(r'^(\d{3})-(\d{3,8})$', '010-12345')
print(m.group(0))
print(m.group(1))
print(m.group(2))

# 010-12345
# 010
# 12345
如果正则表达式中定义了组,就可以在Match对象上用group()方法提取出子串来。
注意到group(0)永远是原始字符串,group(1)、group(2)……表示第1、2、……个子串。
最终结果
Name: temperature, dtype: object
    location temperature  high  low
0         香河     11/-5°C    11   -5
1         涿州     14/-5°C    14   -5
2         唐山     12/-6°C    12   -6
3         沧州     12/-5°C    12   -5
4         天津     11/-1°C    11   -1
5         廊坊     11/-5°C    11   -5
6         太原      8/-7°C     8   -7
7        石家庄     13/-2°C    13   -2
8         涿鹿      8/-6°C     8   -6
9        张家口      5/-9°C     5   -9
10        保定     14/-6°C    14   -6
11        三河     11/-4°C    11   -4
12      北京孔庙     13/-3°C    13   -3
13     北京国子监     13/-3°C    13   -3
14   中国地质博物馆     12/-3°C    12   -3
15      月坛公园     12/-3°C    12   -3
16   明城墙遗址公园     13/-3°C    13   -3
17  北京市规划展览馆     12/-2°C    12   -2
18       什刹海     12/-3°C    12   -3
19      南锣鼓巷     13/-3°C    13   -3
20      天坛公园     12/-2°C    12   -2
21      北海公园     12/-2°C    12   -2
22      景山公园     12/-2°C    12   -2
23     北京海洋馆     12/-3°C    12   -3
