docker下安装vasp6.1GPU加速版
文章目录
-
- 0.环境准备
-
- 0.1 配置支持nvidia的docker环境
- 0.2 **docker运行容器时,指定nvidia:**
- 1. 拉取代cuda的镜像
-
- 1.1 设置好cuda环境
- 2. 安装Inter编译器
-
- 2.1 安装oneAPI套件
- 2.2 添加环境变量
- 2.3 编译fftw
- 3. 安裝VASP6.1
-
- 3.1 修改文件makefile.include的注意事项
-
- 3.1.1 主要修改的地方
- 3.1.2我的`makefile.include` 配置文件
-
- 3.1.3 可能遇到的错误
- 4. 测试VASP
- 5. 参考链接
0.环境准备
- 显卡:3090 * (1-4)
- ubunt20.04
0.1 配置支持nvidia的docker环境
- 安装nvidia-docker2
想要在容器使用nvidia-smi,需要安装nvidia-docker2
sudo apt-get install -y nvidia-docker2 - 测试安装
docker run --runtime=nvidia --rm nvidia/cuda:9.0-base nvidia-smi
0.2 docker运行容器时,指定nvidia:
docker run -itd \
   --runtime=nvidia --gpus=all \
   -e NVIDIA_DRIVER_CAPABILITIES=compute,utility,video,graphics \
   image_name
1. 拉取代cuda的镜像
因为随便从dockerhub拉一个带cuda的镜像都可以,我拉的是ubuntu:20.04,cuda11.1的版本。对docker不熟悉的可以参考docker快速入门,其中记录了常用的命令。
docker pull alexartemis/cuda11.1-cudnn8-ubuntu20.0
- docker运行容器时,指定nvidia:
docker run -itd \
   --runtime=nvidia --gpus=all \
   -e NVIDIA_DRIVER_CAPABILITIES=compute,utility,video,graphics \
   image_name
登录自己的容器,最好是root权限安装编译。如果使用root用户安装,下面的命令去掉sudo 即可。
sudo apt-get install build-essential
1.1 设置好cuda环境
export PATH=$PATH:/usr/local/cuda/bin
export LD_LIBRARY_PATH=$LD_LIBRARY_PATH:/usr/local/cuda/lib64
输入nvcc --version可以查看cuda版本,nvidia-smi查看显卡信息。

2. 安装Inter编译器
由于intel不再更新parallel studio xe,可以用OneAPI代替,网上的好多教程都是用的parallel studio xe,还需要激活码,可以使用OneAPI(免费)下的MPI编译vasp。
2.1 安装oneAPI套件
oneAPI Base Toolkit
oneAPI HPC Toolkit
## 安装oneAPI Base Toolki
wget https://registrationcenter-download.intel.com/akdlm/irc_nas/18236/l_BaseKit_p_2021.4.0.3422.s
sudo bash l_BaseKit_p_2021.4.0.3422.s

## 安装oneAPI HPC Toolkit
wget https://registrationcenter-download.intel.com/akdlm/irc_nas/18211/l_HPCKit_p_2021.4.0.3347.sh

sudo bash l_HPCKit_p_2021.4.0.3347.s
- 我这里安装intel全家桶。其实:
oneAPI Base Toolki只需要安装MKL库,(即Math Kernel library)。
oneAPI HPC Toolkit只需要安装MPI库、c/c+编译器、Fortan编译器三部分即可。
2.2 添加环境变量
把intel的MPI替换系统可能装好的openMPI,运行该目录下的setvars.sh文件
# 编辑 ~/.bashrc或在/etc/profile中添加以下命令
source /opt/intel/oneapi/setvars.sh intel64
2.3 编译fftw
cd /opt/intel/oneapi/mkl/2021.2.0/interfaces/fftw3xf/
make libintel64			#没有权限的可將/opt/intel/oneapi修改user
- 查看是否安装成功
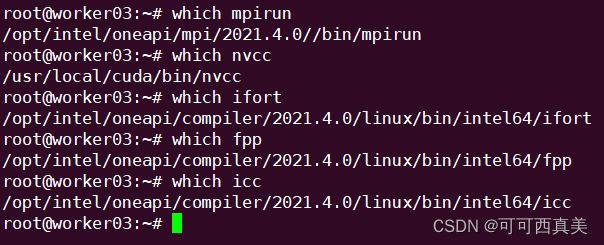
$ ifort --version
# 或者
$ fpp -V
3. 安裝VASP6.1
tar xvf vasp.6.1.0.tar.gz # 解压vasp安装包
cd vasp.6.1.0
cp arch/makefile.include.linux_intel makefile.include
#修改文件makefile.include(注意看下面的注意事项,很关键)
make all
3.1 修改文件makefile.include的注意事项
3.1.1 主要修改的地方
# 加入MKLROOT路径
MKLROOT    = /opt/intel/oneapi/mkl/2021.4.0
# 修改BLAS 和 LAPACK,默认为空
BLAS       = -L$(MKL_PATH) -lmkl_intel_lp64 -lmkl_sequential -lmkl_core -lpthread
LAPACK     = -L$(MKL_PATH) -lmkl_intel_lp64 -lmkl_sequential -lmkl_core -lpthread

# gpu设置部分, nvcc后的-allow-unsupported-compiler可以不用加
CUDA_ROOT  ?= /usr/local/cuda/
NVCC       := $(CUDA_ROOT)/bin/nvcc -ccbin=icc -allow-unsupported-compiler
CUDA_LIB   := -L$(CUDA_ROOT)/lib64 -lnvToolsExt -lcudart -lcuda -lcufft -lcublas

GENCODE_ARCH    := -gencode=arch=compute_60,code=\"sm_60,compute_60\" \
                   -gencode=arch=compute_70,code=\"sm_70,compute_70\" \
                   -gencode=arch=compute_72,code=\"sm_72,compute_72\" \
                   -gencode=arch=compute_80,code=\"sm_80,compute_80\"

I_MPI_ROOT = /opt/intel/oneapi/mpi/2021.4.0
MPI_INC    = $(I_MPI_ROOT)/include
##
3.1.2我的makefile.include 配置文件
# Precompiler options
CPP_OPTIONS= -DHOST=\"LinuxIFC\"\
             -DMPI -DMPI_BLOCK=8000 -Duse_collective \
             -DscaLAPACK \
             -DCACHE_SIZE=4000 \
             -Davoidalloc \
             -Dvasp6 \
             -Duse_bse_te \
             -Dtbdyn \
             -Dfock_dblbuf

CPP        = fpp -f_com=no -free -w0  $*$(FUFFIX) $*$(SUFFIX) $(CPP_OPTIONS)

FC         = mpiifort
FCL        = mpiifort -mkl=sequential

FREE       = -free -names lowercase

FFLAGS     = -assume byterecl -w -xHOST
OFLAG      = -O2
OFLAG_IN   = $(OFLAG)
DEBUG      = -O0

MKLROOT    = /opt/intel/oneapi/mkl/2021.4.0
MKL_PATH   = $(MKLROOT)/lib/intel64
BLAS       = -L$(MKL_PATH) -lmkl_intel_lp64 -lmkl_sequential -lmkl_core -lpthread
LAPACK     = -L$(MKL_PATH) -lmkl_intel_lp64 -lmkl_sequential -lmkl_core -lpthread
BLACS      = -lmkl_blacs_intelmpi_lp64
SCALAPACK  = $(MKL_PATH)/libmkl_scalapack_lp64.a $(BLACS)

OBJECTS    = fftmpiw.o fftmpi_map.o fft3dlib.o fftw3d.o

INCS       =-I$(MKLROOT)/include/fftw

LLIBS      = $(SCALAPACK) $(LAPACK) $(BLAS)


OBJECTS_O1 += fftw3d.o fftmpi.o fftmpiw.o
OBJECTS_O2 += fft3dlib.o

# For what used to be vasp.5.lib
CPP_LIB    = $(CPP)
FC_LIB     = $(FC)
CC_LIB     = icc
CFLAGS_LIB = -O
FFLAGS_LIB = -O1
FREE_LIB   = $(FREE)

OBJECTS_LIB= linpack_double.o getshmem.o

# For the parser library
CXX_PARS   = icpc
LLIBS      += -lstdc++

# Normally no need to change this
SRCDIR     = ../../src
BINDIR     = ../../bin

#================================================
# GPU Stuff

CPP_GPU    = -DCUDA_GPU -DRPROMU_CPROJ_OVERLAP -DUSE_PINNED_MEMORY -DCUFFT_MIN=28 -UscaLAPACK -Ufock_dblbuf

OBJECTS_GPU= fftmpiw.o fftmpi_map.o fft3dlib.o fftw3d_gpu.o fftmpiw_gpu.o

CC         = icc
CXX        = icpc
CFLAGS     = -fPIC -DADD_ -Wall -qopenmp -DMAGMA_WITH_MKL -DMAGMA_SETAFFINITY -DGPUSHMEM=300 -DHAVE_CUBLAS

CUDA_ROOT  ?= /usr/local/cuda/
NVCC       := $(CUDA_ROOT)/bin/nvcc -ccbin=icc -allow-unsupported-compiler
CUDA_LIB   := -L$(CUDA_ROOT)/lib64 -lnvToolsExt -lcudart -lcuda -lcufft -lcublas

GENCODE_ARCH    := -gencode=arch=compute_60,code=\"sm_60,compute_60\" \
                   -gencode=arch=compute_70,code=\"sm_70,compute_70\" \
                   -gencode=arch=compute_72,code=\"sm_72,compute_72\" \
                   -gencode=arch=compute_80,code=\"sm_80,compute_80\"

I_MPI_ROOT = /opt/intel/oneapi/mpi/2021.4.0
MPI_INC    = $(I_MPI_ROOT)/include/
3.1.3 可能遇到的错误
如果出现error: #error directive: -- unsupported ICC configuration! Only ICC 15.0, ICC 16.0, ICC 17.0错误,如图所示,需要在NVCC后加入-allow-unsupported-compiler参数—>(不知道会不会影响计算结果,懂得滴滴我)

4. 测试VASP
将编译好的文件目录添加到~/.bashrc.
export PATH=$PATH:/root/data/vasp/vasp.6.1.0/bin
然后 source ~/.bashrc。
准备好输入文件,运行mpirun -n 4 vasp_gpu, 这个4是显卡的数量。
然后就可以看到计算速度刷刷的。。。cpu计算真的太慢了。

5. 参考链接
-
主要的
VASP 6.1.0 + VTST + intel新OneAPI 安装编译
VASP下的GPU並行編譯安裝
VASP GPU版本安装 -
次要的
Nvidia官网教程
第一次GPU加速的VASP计算
新手linux安装vasp_GPU版本的vasp5.4.4或者vasp6.1.0安装

