MindSDK+yolov5部署及python版图像视频推理实现
一、前言
基于华为云上的MindX SDK + Pytorch yolov5 应用案例:
https://bbs.huaweicloud.com/forum/thread-118598-1-1.html
原帖使用预训练yolov5s.onnx模型进行处理,使用c++进行图像推理,由于原帖python版的实现并不完整,这里对python版图像和视频推理进行实现。
整个实现流程:
1、基础环境:Atlas800-3000、mxManufacture、Ascend-CANN-toolkit、Ascend Driver
2、模型转换:pytorch模型转onnx模型,yolov5s.pt----->yolov5.onnx
3、onnx模型简化,onnx模型转om模型
4、业务流程编排与配置
5、python推理流程代码开发(图像、视频)
二、图像推理流程开发实现。
1、初始化流管理。
streamManagerApi = StreamManagerApi()
ret = streamManagerApi.InitManager()
if ret != 0:
    print("Failed to init Stream manager, ret=%s" % str(ret))
    exit()
with open("../pipeline/yolov5x_example.pipeline", 'rb') as f:
    pipelineStr = f.read()
ret = streamManagerApi.CreateMultipleStreams(pipelineStr)
if ret != 0:
    print("Failed to create Stream, ret=%s" % str(ret))
    exit()
2、加载图像,进行推理。
dataPath = "dog.jpg"
savePath = "dog_result.jpg"
# 获取图像
dataInput = MxDataInput()
with open(dataPath, 'rb') as f:
    dataInput.data = f.read()
streamName = b'classification+detection'
inPluginId = 0
uniqueId = streamManagerApi.SendDataWithUniqueId(streamName, inPluginId, dataInput)
if uniqueId < 0:
    print("Failed to send data to stream.")
    exit()
inferResult = streamManagerApi.GetResultWithUniqueId(streamName, uniqueId, 3000)
if inferResult.errorCode != 0:
    print("GetResultWithUniqueId error. errorCode=%d, errorMsg=%s" % (
        inferResult.errorCode, inferResult.data.decode()))
    exit()
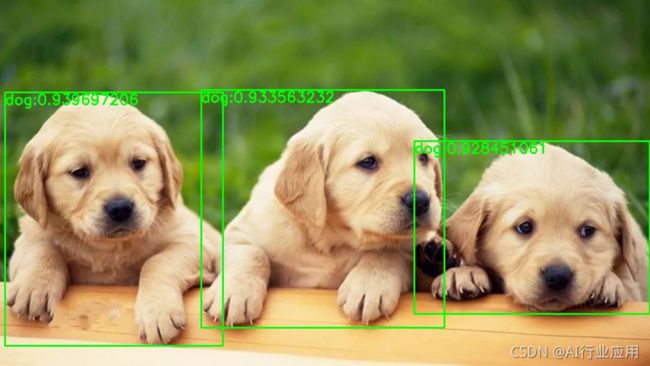
3、解析推理结果,获取推理结果的坐标和置信度,并在图像上进行绘制。这里使用json对结果进行解析生成字典,获取图像目标检测两个角点坐标(x0,y0),(x1,y1),以及置信度confidence,使用OpenCV加载图像绘制检测框和置信度。
infer_results = inferResult.data.decode()
temp_dic = json.loads(infer_results)
img = cv2.imread(dataPath)
if 'MxpiObject' in temp_dic.keys():
    for i in range(len(temp_dic["MxpiObject"])):
        name = temp_dic["MxpiObject"][i]["classVec"][0]["className"]
        confidence = temp_dic["MxpiObject"][i]["classVec"][0]["confidence"]
        text = name + ":" + str(confidence)
        x0 = int(temp_dic["MxpiObject"][i]["x0"])
        y0 = int(temp_dic["MxpiObject"][i]["y0"])
        x1 = int(temp_dic["MxpiObject"][i]["x1"])
        y1 = int(temp_dic["MxpiObject"][i]["y1"])
        img = cv2.rectangle(img, (x0, y0), (x1, y1), (0, 255, 0), 2)
        cv2.putText(img, text, (x0, y0 + 20), cv2.FONT_HERSHEY_SIMPLEX, 0.8, (0, 255, 0), 2, )
    cv2.imwrite(savePath, img)
else:
    cv2.putText(img, 'No object detect !', (0, 20), cv2.FONT_HERSHEY_SIMPLEX, 0.8, (0, 255, 0), 2, )
    cv2.imwrite(savePath, img)
# destroy streams
streamManagerApi.DestroyAllStreams()
结果展示:
三、视频推理实现。
由于这里用来测试的视频为mp4格式,所以采用OpenCV进行视频解码,解析每一帧转换为图像之后再进行推理,所以这里视频的推理本质上与图像推理大致相同。也可以尝试将mp4转换为h264格式,昇腾可以支持h264、h265直接解码。
具体实现:
videoCapture = cv2.VideoCapture(videoPath)
# 获取视频帧率
fps = videoCapture.get(cv2.CAP_PROP_FPS)
# 获取视频宽和高
width = videoCapture.get(cv2.CAP_PROP_FRAME_WIDTH)
height = videoCapture.get(cv2.CAP_PROP_FRAME_HEIGHT)
model_width = 640
model_height = 640
x_scale = width / model_width
y_scale = height / model_width
size = (int(width), int(height))
videoWriter = cv2.VideoWriter(savePath, cv2.VideoWriter_fourcc('X', 'V', 'I', 'D'), fps, size)
count = 0
success, frame = videoCapture.read()
while success:
    img_temp = 'temp.jpg'
    img = cv2.resize(frame, [model_width, model_height], cv2.INTER_LINEAR)
    cv2.imwrite(img_temp, img)
    dataInput = MxDataInput()
    with open(img_temp, 'rb') as f:
        dataInput.data = f.read()
    streamName = b'classification+detection'
    inPluginId = 0
    uniqueId = streamManagerApi.SendDataWithUniqueId(streamName, inPluginId, dataInput)
    if uniqueId < 0:
        print("Failed to send data to stream.")
        exit()

    # Obtain the inference result by specifying streamName and uniqueId.
    inferResult = streamManagerApi.GetResultWithUniqueId(streamName, uniqueId, 3000)
    if inferResult.errorCode != 0:
        print("GetResultWithUniqueId error. errorCode=%d, errorMsg=%s" % (
            inferResult.errorCode, inferResult.data.decode()))
        exit()
    infer_results = inferResult.data.decode()
    temp_dic = json.loads(infer_results)
    #print(infer_results)
    if 'MxpiObject' in temp_dic.keys():
        for i in range(len(temp_dic["MxpiObject"])):
            name = temp_dic["MxpiObject"][i]["classVec"][0]["className"]
            confidence = temp_dic["MxpiObject"][i]["classVec"][0]["confidence"]
            text = name + ":" + str(confidence)
            x0 = int(x_scale * temp_dic["MxpiObject"][i]["x0"])
            y0 = int(y_scale * temp_dic["MxpiObject"][i]["y0"])
            x1 = int(x_scale * temp_dic["MxpiObject"][i]["x1"])
            y1 = int(y_scale * temp_dic["MxpiObject"][i]["y1"])
            img = cv2.rectangle(frame, (x0, y0), (x1, y1), (0, 255, 0), 2)
            cv2.putText(frame, text, (x0, y0 + 20), cv2.FONT_HERSHEY_SIMPLEX, 0.8, (0, 255, 0), 2, )
    videoWriter.write(frame)
    count += 1
    print(count)
    success, frame = videoCapture.read()
# destroy streams
streamManagerApi.DestroyAllStreams()
视频推理效果:
