Google版EfficientDet训练自己的数据集
Ubuntu 20.04,cuda10.1,TensorFlow2.1.0,python3.6.9环境,使用Google版efficientDet训练自己的数据集,预测图片,并将结果写入txt
0.项目地址
https://github.com/google/automl/tree/master/efficientdet
1.项目部署
使用docker部署环境
Ubuntu 20.04,使用TensorFlow官方提供的docker镜像部署
拉取镜像
docker pull tensorflow/tensorflow:2.1.0-gpu-py3
包含cuda10.1,TensorFlow2.1.0,python3.6.9
拉取镜像后建立容器,设置使用宿主机的gpu,并挂载目录
docker run -it --gpus all -v 宿主机目录:容器中的目录 tensorflow/tensorflow:2.1.0-gpu-py3 /bin/bash
下载代码
git clone https://github.com/google/automl.git
安装依赖
项目github页面中写通过pip install -r requirements.txt安装依赖,但博主安装似乎出了点问题,于是手动pip install其中的python依赖包:
absl-py>=0.7.1
matplotlib>=3.0.3
numpy>=1.16.4
Pillow>=6.0.0
PyYAML>=5.1
six>=1.12.0
tensorflow>=2.1.0
tensorflow-addons>=0.9.1
tensorflow-probability>=0.9.0
以及安装coco api的python分支:
安装coco api(https://github.com/cocodataset/cocoapi),在当前环境下编译,并将编译后PythonAPI文件夹中的内容(pycocotools等)拷贝至efficientdet目录下
目录结构为automl-master/efficientdet/pycocotools
2.数据集准备
VOC2007格式数据集
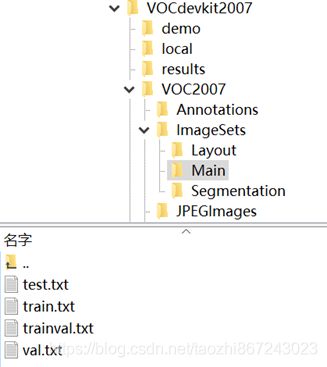
数据集制作成VOC2007格式,目录结构如下
放在efficientdet目录下,目录结构为automl-master/efficientdet/VOCdevkit2007

数据集转换为tfrecord格式
*制作tfrecord格式的数据集前,先在dataset/create_pascal_tfrecord.py中,将pascal_label_map_dict修改为自己的类名
制作tfrecord格式数据集
PYTHONPATH=".:$PYTHONPATH"  python dataset/create_pascal_tfrecord.py \
--data_dir=VOCdevkit2007 \
--year=VOC2007  \
--output_path=mytfrecord/pascal  \
--set=trainval
制作完成后,在文件夹下生成100个tfrecord文件和1个json文件
3.预训练模型准备
下载预训练模型,解压到efficientdet目录下
博主使用efficientdet-d2模型,目录结构形如automl-master/efficientdet/efficientdet-d2
4.训练
训练
python main.py \
--mode=train_and_eval \
--training_file_pattern=mytfrecord/*.tfrecord \
--validation_file_pattern=mytfrecord/*.tfrecord \
--val_json_file=mytfrecord/json_pascal.json \
--model_name=efficientdet-d2 \
--model_dir=tmp/efficientdet-d2  \
--ckpt=efficientdet-d2  \
--train_batch_size=4 \
--eval_batch_size=1 \
--eval_samples=512 \
--hparams="num_classes=3 "
其中num_classes为自己数据集的类数+1,model_name等根据自己使用的模型修改
训练生成的模型存放在automl-master/efficientdet/tmp/efficientdet-d2下
5.预测
计算AP
制作test集的tfrecord文件
生成的文件在mytfrecord_test文件夹下
PYTHONPATH=".:$PYTHONPATH"  python dataset/create_pascal_tfrecord.py \
--data_dir=VOCdevkit2007 \
--year=VOC2007  \
--output_path=mytfrecord_test/pascal  \
--set=test
计算AP
python main.py --mode=eval  \
--model_name=efficientdet-d2   --model_dir=tmp/efficientdet-d2  \
--validation_file_pattern=mytfrecord_test/pascal*  \
--testdev_dir='testdev_output'  \
--hparams="num_classes=3 "
num_classes为自己数据集类数+1
预测自己的图片
*预测前,先将inference.py中的coco_id_mapping修改为自己数据集的类名
预测
python model_inspect.py \
--runmode=infer \
--model_name=efficientdet-d2 \
--max_boxes_to_draw=100  \
--min_score_thresh=0.7  \
--ckpt_path=tmp/efficientdet-d2  \
--input_image=VOCdevkit2007/demo/*.jpg \
--output_image_dir=res_img \
--hparams="num_classes=3 "
其中input_image为待检测图片存放路径,output_image_dir为检测结果图片输出路径,num_classes为自己数据集类数+1
远程查看tensorboard
cd至tmp/efficientdet-d2目录下
打开tensorboard
tensorboard --logdir=. --port=6006
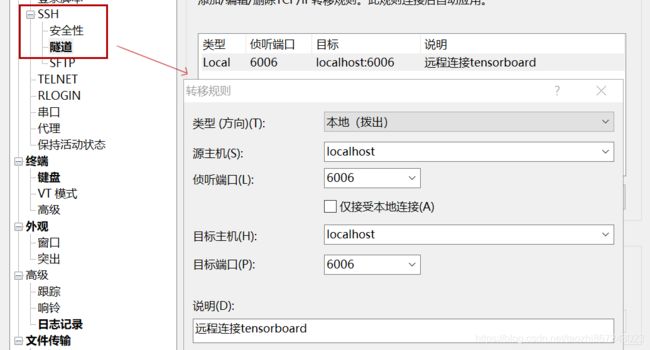
由于博主是在远程服务器上训练,要在本地查看远程服务器上的tensorboard,可以在Xshell中进行如下的ssh隧道设置

设置后,重新连接并启动tensorboard,即可在本地浏览器用http://127.0.1.1:6006/访问服务器上的tensorboard
预测结果写入txt
百度网盘链接:https://pan.baidu.com/s/1NjjIr9n63n65enF5rTWhZA
提取码:icgg
↑提供博主修改的一个可以将检测结果按类别写入txt的inference.py文件,写入的格式为每一行:文件名 置信度 xmin ymin xmax ymax
如:000174 0.967 278 337 327 358
使用时直接替换原inference.py,并将coco_id_mapping修改为自己数据集的类名,使用和上面相同的预测命令可以同时输出预测后的图片和txt
输出的txt存放在efficientdet目录下,文件名为类别
6.可能出现的问题
1)预测时,出现形如这样的错误↓
tensorflow.python.framework.errors_impl.InvalidArgumentError: 2 root error(s) found.
  (0) Invalid argument: Input to reshape is a tensor with 884736 values, but the requested shape requires a multiple of 90
	 [[{
     {
     node Reshape}}]]
	 [[cond_88/while/Identity/_7860]]
  (1) Invalid argument: Input to reshape is a tensor with 884736 values, but the requested shape requires a multiple of 90
	 [[{
     {
     node Reshape}}]]
0 successful operations.
0 derived errors ignored.
在issues218中翻到类似问题,说是在预测时加上参数--enable_ema=False解决,但尝试后发现目前版本(2020.08.04)的代码中没有这个参数,于是加上--hparams="num_classes=自己数据集的类别数+1 ",发现可以解决问题
2)计算ap时,出现形如这样的错误(issues552)↓
Invalid argument: Incompatible shapes: [32,810,128,128] vs. [32,9,128,128]
也可以尝试通过指定num_classes解决
参考链接
https://blog.csdn.net/jy1023408440/article/details/105638482