前言
如果想达到同样效果,请跟本文代码保持一致,逻辑并不复杂,效果完成就可以按照自己的想法,来进行修改,本文代码实现为主,肯定是有些情况没有处理的。
起因
在日常开发中经常用到一个叫Spring的JAVA框架,只要加一个注解就可以注册为bean交给框架管理,在使用注册为bean的类时就不用new来创建对象,而可以加上@Autowired来完成自动注入。
1.交给框架管理那管理了什么?
答:先不做解答2.自动注入又是怎么可以不用new就能使用的呢?
答:根据java的基础知识,这应该是通过反射赋的值。思路为通过反射拿到字段上的注解如果有@Autowired就进行赋值。开始实现
鉴于大多数使用的JDK是1.8,那么此次代码则是在JDK1.8上进行开发,开发工具则使用IDEA。顺便说明一下,此非重复造轮子,而是满足好奇心,顺便练习一下注解,反射的知识。
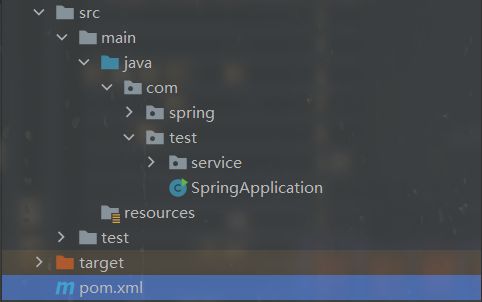
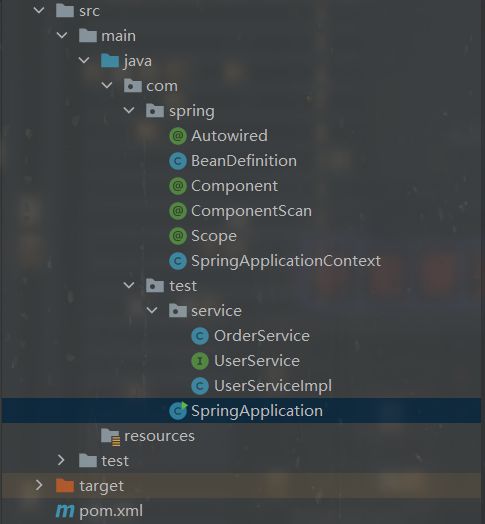
1. 新建Maven项目,目录结构
2. 我们先在spring包下新建一个类SpringApplicationContext,待会启动时就是运行这个类里面的代码。
3. 仿照Springboot工程写个启动类那么就必须在我们刚刚写的类里加个静态run方法。
启动类
public class SpringApplication {
    public static void main(String[] args) {
        //把Class作为参数方便反射
        SpringApplicationContext.run(SpringApplication.class);
    }
}
SpringApplicationContext类
public static void run(Class configClass){

}
4. 准备工作完毕
//添加一个注解,来指定需要spring管理的包路径
import java.lang.annotation.ElementType;
import java.lang.annotation.Retention;
import java.lang.annotation.RetentionPolicy;
import java.lang.annotation.Target;

@Retention(RetentionPolicy.RUNTIME)
@Target(ElementType.TYPE)
public @interface ComponentScan {
    String value();
}
import java.lang.annotation.ElementType;
import java.lang.annotation.Retention;
import java.lang.annotation.RetentionPolicy;
import java.lang.annotation.Target;
//组件注解
@Retention(RetentionPolicy.RUNTIME)
@Target(ElementType.TYPE)
public @interface Component {
String value() default "";
}import java.lang.annotation.ElementType;
import java.lang.annotation.Retention;
import java.lang.annotation.RetentionPolicy;
import java.lang.annotation.Target;
//描述bean是否为单例
@Retention(RetentionPolicy.RUNTIME)
@Target(ElementType.TYPE)
public @interface Scope {
String value();
}import java.lang.annotation.ElementType;
import java.lang.annotation.Retention;
import java.lang.annotation.RetentionPolicy;
import java.lang.annotation.Target;
//标识该字段需要自动注入
@Retention(RetentionPolicy.RUNTIME)
@Target({ElementType.METHOD,ElementType.FIELD})
public @interface Autowired {
String value() default "";
}//描述Bean的对象
public class BeanDefinition {
private Class clazz;
private String scope;
public Class getClazz() {
return clazz;
}
public void setClazz(Class clazz) {
this.clazz = clazz;
}
public String getScope() {
return scope;
}
public void setScope(String scope) {
this.scope = scope;
}
}import com.spring.ComponentScan;
import com.spring.SpringApplicationContext;
import com.test.service.UserService;
@ComponentScan("com.test.service")
public class SpringApplication {
public static void main(String[] args) {
SpringApplicationContext.run(SpringApplication.class);
UserService userService = (UserService) SpringApplicationContext.getBean("userService");
userService.test();
}
}//在run里添加一个方法scan,异常可以先不写编写scan时按idea提示抛出或捕获
public class SpringApplicationContext {
//下文扫描时用来缓存我们遍历的信息
private static ConcurrentHashMap beanDefinitionMap = new ConcurrentHashMap<>();
//存储扫描到的单例对象
private static ConcurrentHashMap singleObjects = new ConcurrentHashMap<>();
public static void run(Class configClass){
//扫描启动类注解
try {
scan(configClass);
} catch (IOException | URISyntaxException e) {
e.printStackTrace();
}
} /**
* 扫描class文件,我们需要把准备条件做好,例如文件路径
*/
private static void scan(Class configClass) throws IOException, URISyntaxException {
//获取注解对象
ComponentScan componentScan = (ComponentScan) configClass.getDeclaredAnnotation(ComponentScan.class);
//获取注解中的值
String path = componentScan.value();
//将注解路径转换为文件路径
path = path.replace(".", File.separator);
//获取类加载器,来加载扫描出来的类。(ps:类加载器也是有很多可以了解的)
ClassLoader classLoader = SpringApplicationContext.class.getClassLoader();
//获取编译后的资源路径
URL resource = classLoader.getResource(path);
//转换为URI即之后的入参
URI resourceUri = resource.toURI();
//判断是否是个文件夹,再遍历
if(Files.isDirectory(Paths.get(resourceUri))){
//直接调用JDK提供的遍历文件方法
Files.walkFileTree(Paths.get(resourceUri),new SimpleFileVisitor(){
//重写正在遍历的方法
@Override
public FileVisitResult visitFile(Path file, BasicFileAttributes attrs) throws IOException {
//如果正在遍历的是文件则开始进行管理的操作
if(!Files.isDirectory(file)){
//获取文件全路径
String fileName = file.toAbsolutePath().toString();
//将其转换为可以当作入参的格式
String className = fileName.replace(File.separator,".").substring(fileName.indexOf("com"),fileName.indexOf(".class"));
//如果文件是.class的字节码文件,这正是我们编译的
if(fileName.endsWith(".class")){
//开始获取Class对象
Class clazz = null;
try {
//获取到Class对象
clazz = classLoader.loadClass(className);
} catch (ClassNotFoundException e) {
e.printStackTrace();
}
//开始反射操作,来判断类上有无注解Component
if(clazz.isAnnotationPresent(Component.class)){
//有注解表示这是一个Bean,需要进行管理
Component componentAnnotation = clazz.getDeclaredAnnotation(Component.class);
//这里bean名字是我们手动写的,为了方便。
String beanName = componentAnnotation.value();
//需要一个对象来描述Bean(如是否是单例)
BeanDefinition beanDefinition = new BeanDefinition();
//将clazz信息存入描述Bean的对象中
beanDefinition.setClazz(clazz);
//如果该对象上有Scope注解,则需要进一步判断
if(clazz.isAnnotationPresent(Scope.class)){
//获取注解对象
Scope scopeAnnotation = clazz.getDeclaredAnnotation(Scope.class);
beanDefinition.setScope(scopeAnnotation.value());
}else {
//没有加注解默认为单例
beanDefinition.setScope("singleton");
}
//通过一个并发包下的Map来把我们获取到的信息缓存起来
beanDefinitionMap.put(beanName,beanDefinition);
}
}
}
return FileVisitResult.CONTINUE;
}
});
}
} //回到run方法继续编写
public static void run(Class configClass){
//扫描启动类注解
try {
scan(configClass);
} catch (IOException | URISyntaxException e) {
e.printStackTrace();
}
//扫描完字节码文件,开始进行字段注入等管理的操作,遍历缓存好的信息
for(Map.Entry entry : beanDefinitionMap.entrySet()){
String beanName = entry.getKey();
BeanDefinition beanDefinition = entry.getValue();
if("singleton".equals(beanDefinition.getScope())){
//防止代码臃肿,将对bean生成的操作独立为一个方法
Object bean = createBean(beanName,beanDefinition);
//把生成的对象存入单例池
singleObjects.put(beanName,bean);
}
}
} //生成bean,将字段里面需要自动注入的先赋值
private static Object createBean(String beanName,BeanDefinition beanDefinition){
//从描述bean对象上获取Class对象
Class clazz = beanDefinition.getClazz();
try{
//通过反射实例化
Object instance = clazz.getDeclaredConstructor().newInstance();
//遍历Class上的字段
for(Field declaredFiled : clazz.getDeclaredFields()){
//如果遍历的某个字段有Autowired注解则进行赋值
if(declaredFiled.isAnnotationPresent(Autowired.class)){
//获取字段名,从缓存中取出bean赋值,单独写一个方法
Object bean = getBean(declaredFiled.getName());
declaredFiled.setAccessible(true);
declaredFiled.set(instance,bean);
}
}
return instance;
} catch (InvocationTargetException e) {
e.printStackTrace();
} catch (InstantiationException e) {
e.printStackTrace();
} catch (IllegalAccessException e) {
e.printStackTrace();
} catch (NoSuchMethodException e) {
e.printStackTrace();
}
return null;
} //获取Bean的方法
public static Object getBean(String beanName){
//判断是否有这个bean
if(beanDefinitionMap.containsKey(beanName)){
BeanDefinition beanDefinition = beanDefinitionMap.get(beanName);
//如果是单例则从单例池中取出
if("singleton".equals(beanDefinition.getScope())){
Object singleObject = singleObjects.get(beanName);
return singleObject;
}else {
Object bean = createBean(beanName,beanDefinition);
return bean;
}
}else {
throw new NullPointerException();
}
}5. 根据日常编码来测试是否有用
- 在service包下模拟业务代码
import com.spring.Component;

@Component("orderService")
public class OrderService {
}
public interface UserService {
void test();
}import com.spring.Autowired;
import com.spring.Component;
@Component("userService")
public class UserServiceImpl implements UserService{
@Autowired
private OrderService orderService;
//自动注入失败就会打印null
@Override
public void test() {
System.out.println("test方法:"+orderService);
}
}import com.spring.ComponentScan;
import com.spring.SpringApplicationContext;
import com.test.service.UserService;
//启动类获取缓存的bean,并调用其test方法,看是否打印出对象
@ComponentScan("com.test.service")
public class SpringApplication {
public static void main(String[] args) {
SpringApplicationContext.run(SpringApplication.class);
UserService userService = (UserService) SpringApplicationContext.getBean("userService");
userService.test();
}
}小结
还有些代码仍需补充,当然自动注入已经写完了。Spring框架是不是这么做的呢,我点开Spring源码发现10分钟看不完,还层层嵌套就懒得细究了,最近上分要紧。工作中还需要很好的信息搜集筛选能力,如使用好搜索引擎。
思考解决一下:
- 循环依赖怎么解决
- controller的实现(关键词:DispacterServlet、springmvc)

