本文是本人在SpringBoot中使用Redis的笔记,若有误还请指正。
本文目录
1、配置
2、Redis读写字符串
3、Redis读写对象
4、设置数据的序列化
5、使用 JedisConnectionFactory 连接
6、本地缓存与redis的比较
1、配置
1)在 pom.xml 添加配置:
  org.springframework.boot
  spring-boot-starter-data-redis
此时的 dependencies 如下
            org.springframework.boot
            spring-boot-starter-web


            org.springframework.boot
            spring-boot-starter-test
            test


            org.springframework.boot
            spring-boot-starter-data-redis
2) 修改 application.yml 配置文件,添加redis配置
spring:
  redis:
    # Redis数据库索引(默认为0)
    database: 0
    # Redis服务器地址
    host: localhost
    # Redis服务器连接端口
    port: 6379
    # Redis服务器连接密码(默认为空)
    password:
    # 连接超时时间(毫秒)
    timeout: 1000
    jedis:
      # 设置连接池
      pool:
        # 连接池最大连接数(使用负值表示没有限制)
        max-active: 10
        # 连接池中的最大空闲连接
        max-idle: 8
        # 连接池中的最小空闲连接
        min-idle: 2
        # 连接池最大阻塞等待时间(使用负值表示没有限制)
        max-wait: 100
2、Redis读写字符串
package com.example.demo;

import org.junit.Test;
import org.junit.runner.RunWith;
import org.springframework.beans.factory.annotation.Autowired;
import org.springframework.boot.test.context.SpringBootTest;
import org.springframework.data.redis.core.RedisTemplate;
import org.springframework.test.context.junit4.*;
import com.example.springredis.Application;

@RunWith(SpringJUnit4ClassRunner.class)
@SpringBootTest(classes=Application.class)
public class StringTester
{
    @Autowired
    private RedisTemplate redisTemplate;

    @Test
    public void test()
    {
        this.redisTemplate.opsForValue().set("study", "java");
        System.out.println(this.redisTemplate.opsForValue().get("study"));
    }
}
此时测试输出 “java”则表示成功。
如果用RedisClient查看数据库,则可看到key为study的数据
3、Redis读写对象
1)新建如下User
package com.example.springredis.modal;

import java.io.Serializable;

public class User implements Serializable {
    private static final long serialVersionUID = 1L;

    private int id;
    private String no;
    private String name;

    public int getId() {
        return id;
    }

    public void setId(int id) {
        this.id = id;
    }

    public String getNo() {
        return no;
    }

    public void setNo(String no) {
        this.no = no;
    }

    public String getName() {
        return name;
    }

    public void setName(String name) {
        this.name = name;
    }

    @Override
    public String toString() {
        return "User{" +
                "id=" + id +
                ", no='" + no + '\'' +
                ", name='" + name + '\'' +
                '}';
    }
}
新建测试类 UserTester
package com.example.demo;

import javax.annotation.Resource;

import org.junit.Test;
import org.junit.runner.RunWith;
import org.springframework.beans.factory.annotation.Autowired;
import org.springframework.boot.test.context.SpringBootTest;
import org.springframework.data.redis.core.RedisTemplate;
import org.springframework.test.context.junit4.*;
import org.springframework.test.context.web.WebAppConfiguration;

import com.example.springredis.Application;
import com.example.springredis.modal.User;

@RunWith(SpringJUnit4ClassRunner.class)
@SpringBootTest(classes=Application.class)
public class UserTester
{
    @Resource
    private RedisTemplate redisTemplate;

    @Test
    public void test()
    {
        User user = new User();
        user.setId(1);
        user.setName("jsf");
        user.setNo("11");
        redisTemplate.opsForHash().put("jsf", "user1", user);

        User readUser = (User)redisTemplate.opsForHash().get("jsf", "user1");
        System.out.println(readUser.toString());
    }
}
此时控制台输出如下表示成功
User{id=1, no='11', name='jsf'}
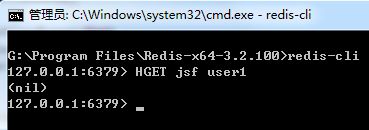
虽然成功读写,但如果用RedisClient查看,则出现乱码现象
在控制台亦看不到数据
为解决这个问题,需要设置数据的序列化方式
4、设置数据的序列化
1)简介
当保存一条数据的时候,key和value都要被序列化成json数据,取出来的时候被序列化成对象,key和value都会使用序列化器进行序列化,spring data redis提供多个序列化器
- GenericToStringSerializer:使用Spring转换服务进行序列化;
- JacksonJsonRedisSerializer:使用Jackson 1,将对象序列化为JSON;
- Jackson2JsonRedisSerializer:使用Jackson 2,将对象序列化为JSON;
- JdkSerializationRedisSerializer:使用Java序列化;
- OxmSerializer:使用Spring O/X映射的编排器和解排器(marshaler和unmarshaler)实现序列化,用于XML序列化;
- StringRedisSerializer:序列化String类型的key和value。
RedisTemplate会默认使用JdkSerializationRedisSerializer,这意味着key和value都会通过Java进行序列化。StringRedisTemplate默认会使用StringRedisSerializer。
这里按如下使用
2)添加依赖
            com.fasterxml.jackson.core
            jackson-databind
            2.9.5
3)添加如下配置类
package com.example.springredis.config;

import org.springframework.context.annotation.Bean;
import org.springframework.context.annotation.Configuration;
import org.springframework.data.redis.connection.RedisConnectionFactory;
import org.springframework.data.redis.connection.jedis.JedisConnectionFactory;
import org.springframework.data.redis.core.RedisTemplate;
import org.springframework.data.redis.serializer.GenericJackson2JsonRedisSerializer;
import org.springframework.data.redis.serializer.StringRedisSerializer;

@Configuration
public class RedisConfig
{
    @Bean
    public RedisTemplate redisTemplate(RedisConnectionFactory redisConnection) {
        RedisTemplate redisTemplate = new RedisTemplate<>();
        redisTemplate.setConnectionFactory(redisConnection);
        redisTemplate.setDefaultSerializer(new GenericJackson2JsonRedisSerializer());
        StringRedisSerializer stringRedisSerializer = new StringRedisSerializer();
        redisTemplate.setKeySerializer(stringRedisSerializer);
        redisTemplate.setHashKeySerializer(stringRedisSerializer);
        return redisTemplate;
    }
}
4)修改测试类
注意:配置类RedisConfig注入的配置是
RedisTemplate
但原有测试类是使用
RedisTemplate
修改后的测试类如下
package com.example.demo;

import javax.annotation.Resource;

import org.junit.Test;
import org.junit.runner.RunWith;
import org.springframework.beans.factory.annotation.Autowired;
import org.springframework.boot.test.context.SpringBootTest;
import org.springframework.data.redis.core.RedisTemplate;
import org.springframework.test.context.junit4.*;
import org.springframework.test.context.web.WebAppConfiguration;

import com.example.springredis.Application;
import com.example.springredis.modal.User;

@RunWith(SpringJUnit4ClassRunner.class)
@SpringBootTest(classes=Application.class)
public class UserTester
{
    @Resource
    private RedisTemplate redisTemplate;

    @Test
    public void test()
    {
        User user = new User();
        user.setId(1);
        user.setName("jsf");
        user.setNo("11");
        redisTemplate.opsForHash().put("jsf", "user1", user);

        User readUser = (User)redisTemplate.opsForHash().get("jsf", "user1");
        System.out.println(readUser.toString());
    }
}
此时亦输出
User{id=1, no='11', name='jsf'}
在RedisClient和控制台均可查看到数据
5、使用 JedisConnectionFactory 连接
我们可以改变连接方式,使用JedisConnectionFactory。
在RedisConfig添加如下即可
    @Bean
    public RedisConnectionFactory redisConnection()
    {
        return new JedisConnectionFactory();
    }
如果使用JedisConnectionFactory进行连接,则application.yml中的Redis配置无效,如果修改了Redis的默认配置,则需要在代码中进行配置,如下等。。
@Bean
    public RedisConnectionFactory redisConnection()
    {
        JedisConnectionFactory _Connection = new JedisConnectionFactory();
        _Connection.setPort(1234);
        return _Connection;
    }
6、本地缓存与redis的比较
再谈缓存和Redis
使用本地缓存快还是使用redis缓存好?
Redis是一个远程数据结构服务器。它肯定比将数据存储在本地内存中要慢(因为它涉及套接字往返存取数据)。但是,它也带来了一些有趣的属性:
Redis可以被应用程序的所有进程访问,可能运行在多个节点上(本地内存无法实现)。
Redis内存存储非常高效,并在单独的过程中完成。如果应用程序在内存被垃圾收集的平台上运行(node.js,java等),它允许处理更大的内存缓存/存储。在实践中,非常大的堆用垃圾收集语言表现不佳。
如果需要,Redis可以将数据保存在磁盘上。
Redis不仅仅是一个简单的缓存:它提供了各种数据结构,各种项目驱逐策略,阻塞队列,pub / sub,原子性,Lua脚本等等。
Redis可以使用主/从机制来复制其活动,以实现高可用性。
基本上,如果需要你的应用程序在共享相同数据的多个节点上进行扩展,则需要类似Redis(或任何其他远程键/值存储)。


