1. why
考虑以下类:
namespace AutoMapperTest
{
    public class Author
    {
        public string Name { get; set; }
    }
    public class Book
    {
        public string Title { get; set; }
        public Author Author { get; set; }
    }
    public class BookViewModel
    {
        public string Title { get; set; }
        public string Author { get; set; }
    }
}
如果想得到一个理想中的BookViewModel, 不借助任何类的帮助,我们可能会这样写:
BookViewModel model = new BookViewModel
{
    Title = book.Title,
    Author = book.Author.Name
}
嗯,看起来还好...
但如果BookViewModel类有20个字段呢?40个?写这样的代码可以直接写吐。不能忍。这时候有请AutoMapper上场。
2. how
- 安装
或者install-package automapper - 基本使用
Mapper.Initialize(cfg => cfg.CreateMap());
//或者
//var config = new MapperConfiguration(cfg => cfg.CreateMap());
//config.CreateMapper();
然后就可以使用Mapper了:
Book book = new Book { Author = new Author { Name = "Angeladaddy" }, Title = "Java两周从入门到放弃" };
var model = Mapper.Map(book);
此时运行程序不会报错,但是mapper结果不正确:
原因大家都能看到,mapper并不能自动识别不符合concention约定的字段定义,Author属性是个对象,我们必须告诉mapper该怎么样映射这个对象。
//修改map定义,将Book.Author.Name 映射到 BookViewModel的Author
 Mapper.Initialize(
                cfg => cfg.CreateMap()
                    .ForMember(dest => dest.Author,
                    opts => opts.MapFrom(src => src.Author.Name))
                );
that's all, 有关automapper知道这么多就基本能用了。需要注意的一点是,mapper定义必须越早越好。
2.1 在asp.net 中使用Automapper
其实我们使用automapper最常见的场景应该是在web开发中,由于前端模型定义和后端往往不一致,为了建立两者间的映射,我们不得不手动映射。有了automapper,这一切都方便了很多。
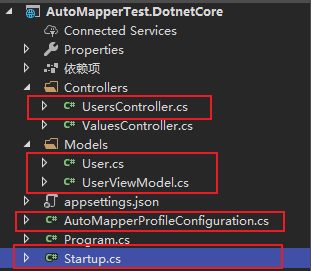
建立一个asp.net core 的api项目作为演示:
- Models中,我们定义最常见的用户模型,方便起见,我们不引入数据库。
    public class User
    {
        [Key]
        public int Id { get; set; }
        public string Name { get; set; }
        public string Email { get; set; }
        public string Password { get; set; }
        public DateTime CreatedOn { get; set; } = DateTime.UtcNow;
    }

    public class UserViewModel
    {
        [Required]
        public string Name { get; set; }
        [Required, DataType(DataType.EmailAddress)]
        public string Email { get; set; }
        [Required, DataType(DataType.Password)]
        public string Password { get; set; }
        [Required, DataType(DataType.Password), Compare("Password")]
        public string ConfirmPassword { get; set; }
        [Required]
        public bool AgreedToTerms { get; set; }
    }
前端传进来的模型中多了ConfirmPassword 字段和AgreedToTerms 字段,这些字段我们不希望存入数据库,所以我们要建立UserViewModel→User(数据库类)的映射。
用Automapper我们的映射应该是这个样子:
var config = new AutoMapper.MapperConfiguration(cfg =>
{
    cfg.CreateMap();
});
var mapper = config.CreateMapper();
但是这段代码我们应该放在那里呢?这是一个web应用,我们的映射定义应该放在尽可能早的地方。那放在Startup.cs文件中的ConfigureServices方法中最合适不过:
 public void ConfigureServices(IServiceCollection services)
{
            var config = new AutoMapper.MapperConfiguration(cfg =>
            {
                cfg.CreateMap();
            });
            var mapper = config.CreateMapper();
            services.AddMvc().SetCompatibilityVersion(CompatibilityVersion.Version_2_2);
}
但如果我们的映射类较多,这里就会显得很臃肿。而且这个map我想在所有地方可用,那最好是定一个service进行注入。
比较好的做法是建立一个profile,统一放置。新建AutoMapperProfileConfiguration.cs文件,在其中定义所有映射:
    public class AutoMapperProfileConfiguration : Profile
    {
         public AutoMapperProfileConfiguration() : this("MyProfile") { }

        protected AutoMapperProfileConfiguration(string profileName):base(profileName)
        {
            CreateMap();
        }
    }
然后在Startup中进行实例化并注册单例:
        public void ConfigureServices(IServiceCollection services)
        {
            var config = new AutoMapper.MapperConfiguration(cfg => {
                cfg.AddProfile(new AutoMapperProfileConfiguration());
            });
            var mapper = config.CreateMapper();
            services.AddSingleton(mapper);
            services.AddMvc().SetCompatibilityVersion(CompatibilityVersion.Version_2_2);
        }
一切就绪,我们新建UsersController测试:
    [Route("api/[controller]")]
    [ApiController]
    public class UsersController : ControllerBase
    {
        private readonly IMapper _mapper;
        public UsersController(IMapper mapper)
        {
            _mapper = mapper;
        }
        [HttpPost]
        public JsonResult Index(UserViewModel uservm)
        {
            var user = _mapper.Map(uservm);
            return new JsonResult(user) ;
        }

    }


