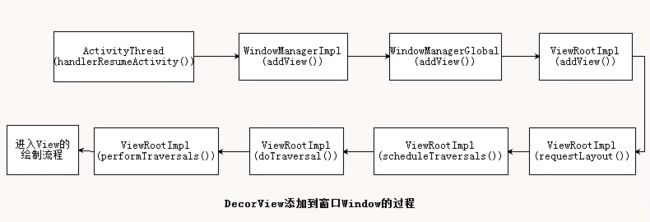
View的绘制流程
1. 绘制入口
ActivityThread.handleResumeActivity
--> WindowManagerImpl.addView(decorView, layoutParams)
--> WindowManagerGlobal.addView()
2. 绘制的类及方法
ViewRootImpl.setView(decorView, layoutParams, parentView)
--> ViewRootImpl.requestLayout()
--> scheduleTraversals()
--> doTraversal()
--> performTraversals()
3. 绘制三大步骤
测量:ViewRootImpl.performMeasure
布局:ViewRootImpl.performLayout
绘制:ViewRootImpl.performDraw
让我们从头开始,先来看ActivityThread中的handleResumeActivity方法
    @Override
    public void handleResumeActivity(IBinder token, boolean finalStateRequest, boolean isForward,
            String reason) {
        ...

        if (r.window == null && !a.mFinished && willBeVisible) {
            r.window = r.activity.getWindow();
            View decor = r.window.getDecorView();
            decor.setVisibility(View.INVISIBLE);
//ViewManager是个接口,
            ViewManager wm = a.getWindowManager();
//初始化窗口布局属性对象
            WindowManager.LayoutParams l = r.window.getAttributes();
            a.mDecor = decor;
            l.type = WindowManager.LayoutParams.TYPE_BASE_APPLICATION;
            l.softInputMode |= forwardBit;
            if (r.mPreserveWindow) {
                a.mWindowAdded = true;
                r.mPreserveWindow = false;
                // Normally the ViewRoot sets up callbacks with the Activity
                // in addView->ViewRootImpl#setView. If we are instead reusing
                // the decor view we have to notify the view root that the
                // callbacks may have changed.
                ViewRootImpl impl = decor.getViewRootImpl();
                if (impl != null) {
                    impl.notifyChildRebuilt();
                }
            }
            if (a.mVisibleFromClient) {
                if (!a.mWindowAdded) {
                    a.mWindowAdded = true;
//将布局加入WindowManager
                    wm.addView(decor, l);
                } else {
                    // The activity will get a callback for this {@link LayoutParams} change
                    // earlier. However, at that time the decor will not be set (this is set
                    // in this method), so no action will be taken. This call ensures the
                    // callback occurs with the decor set.
                    a.onWindowAttributesChanged(l);
                }
            }

            // If the window has already been added, but during resume
            // we started another activity, then don't yet make the
            // window visible.
        } else if (!willBeVisible) {
            if (localLOGV) Slog.v(TAG, "Launch " + r + " mStartedActivity set");
            r.hideForNow = true;
        }
        ...
    }
我们看到此方法在判断window为空之后,获取了一个ViewManager,追踪a.getWindowManager方法,可发现返回的是Activity中的成员变量mWindowManager,然后再寻找此mWindowManager是如何被赋值的,发现是Activity.class中的attach方法中:
 final void attach(Context context, ActivityThread aThread,
            Instrumentation instr, IBinder token, int ident,
            Application application, Intent intent, ActivityInfo info,
            CharSequence title, Activity parent, String id,
            NonConfigurationInstances lastNonConfigurationInstances,
            Configuration config, String referrer, IVoiceInteractor voiceInteractor,
            Window window, ActivityConfigCallback activityConfigCallback) {
  ...
  mWindowManager = mWindow.getWindowManager();
  ...
}
再次追踪getWindowManager方法,发现返回的是Window.class类中的成员变量mWindowManager,继续寻找mWindowManager的赋值处,发现是在Window.class中的setWindowManager方法中:
 public void setWindowManager(WindowManager wm, IBinder appToken, String appName,
            boolean hardwareAccelerated) {
        mAppToken = appToken;
        mAppName = appName;
        mHardwareAccelerated = hardwareAccelerated
                || SystemProperties.getBoolean(PROPERTY_HARDWARE_UI, false);
        if (wm == null) {
            wm = (WindowManager)mContext.getSystemService(Context.WINDOW_SERVICE);
        }
        mWindowManager = ((WindowManagerImpl)wm).createLocalWindowManager(this);
    }
你会发现,返回的是WindowManagerImpl类型,而WindowManagerImpl是WindowManager接口的一个实现类,所以开始的
handleResumeActivity方法中的wm.addView(decor, l);方法,我们就要去WindowManagerImpl中找找addView这个方法的实现,来一探究竟了。
    @Override
    public void addView(@NonNull View view, @NonNull ViewGroup.LayoutParams params) {
        applyDefaultToken(params);
        mGlobal.addView(view, params, mContext.getDisplay(), mParentWindow);
    }
结果还要往下找一层,mGlobal是一个WindowManagerGlobal对象,再去WindowManagerGlobal这个类里看看addView方法是怎么添加View的,
public void addView(View view, ViewGroup.LayoutParams params,
            Display display, Window parentWindow) {
        ...

        ViewRootImpl root;
        View panelParentView = null;

        synchronized (mLock) {
            // Start watching for system property changes.
            if (mSystemPropertyUpdater == null) {
                mSystemPropertyUpdater = new Runnable() {
                    @Override public void run() {
                        synchronized (mLock) {
                            for (int i = mRoots.size() - 1; i >= 0; --i) {
                                mRoots.get(i).loadSystemProperties();
                            }
                        }
                    }
                };
                SystemProperties.addChangeCallback(mSystemPropertyUpdater);
            }

            int index = findViewLocked(view, false);
            if (index >= 0) {
                if (mDyingViews.contains(view)) {
                    // Don't wait for MSG_DIE to make it's way through root's queue.
                    mRoots.get(index).doDie();
                } else {
                    throw new IllegalStateException("View " + view
                            + " has already been added to the window manager.");
                }
                // The previous removeView() had not completed executing. Now it has.
            }

            // If this is a panel window, then find the window it is being
            // attached to for future reference.
            if (wparams.type >= WindowManager.LayoutParams.FIRST_SUB_WINDOW &&
                    wparams.type <= WindowManager.LayoutParams.LAST_SUB_WINDOW) {
                final int count = mViews.size();
                for (int i = 0; i < count; i++) {
                    if (mRoots.get(i).mWindow.asBinder() == wparams.token) {
                        panelParentView = mViews.get(i);
                    }
                }
            }
//实例化ViewRootImpl
            root = new ViewRootImpl(view.getContext(), display);
//并设置layoutParams
            view.setLayoutParams(wparams);
//添加到对应集合里
            mViews.add(view);
            mRoots.add(root);
            mParams.add(wparams);

            // do this last because it fires off messages to start doing things
            try {
//通过setView将view wparams panelParentView进行关联
                root.setView(view, wparams, panelParentView);
            } catch (RuntimeException e) {
                // BadTokenException or InvalidDisplayException, clean up.
                if (index >= 0) {
                    removeViewLocked(index, true);
                }
                throw e;
            }
        }
    }
看来root.setView比较关键了,记住这个方法传入的view和params就是顶层的decorView和他的布局参数,然后我们继续去ViewRootImpl中查看setView方法:
public void setView(View view, WindowManager.LayoutParams attrs, View panelParentView) {
  ...
  requestLayout();
  ...
}

@Override
public void requestLayout() {
    if (!mHandlingLayoutInLayoutRequest) {
        checkThread();
        mLayoutRequested = true;
        scheduleTraversals();
    }
}

void scheduleTraversals() {
    if (!mTraversalScheduled) {
        mTraversalScheduled = true;
        mTraversalBarrier = mHandler.getLooper().getQueue().postSyncBarrier();
        mChoreographer.postCallback(
                Choreographer.CALLBACK_TRAVERSAL, mTraversalRunnable, null);
        if (!mUnbufferedInputDispatch) {
            scheduleConsumeBatchedInput();
        }
        notifyRendererOfFramePending();
        pokeDrawLockIfNeeded();
    }
}


final class TraversalRunnable implements Runnable {
        @Override
        public void run() {
            doTraversal();
        }
}
final TraversalRunnable mTraversalRunnable = new TraversalRunnable();


void doTraversal() {
        ...
        performTraversals();
        ...
}

//View绘制流程三大步就在此!!!
private void performTraversals() {
    ...
    performMeasure(childWidthMeasureSpec, childHeightMeasureSpec);
    ...
    performLayout(lp, mWidth, mHeight);
    ...
    performDraw();
    ...
}
已经来到比较熟悉常见的几个方法了,checkThread()很好理解,就是检查是否在主线程。而scheduleTraversals() 则是通过
mChoreographer.postCallback(
                Choreographer.CALLBACK_TRAVERSAL, mTraversalRunnable, null);
//注:【Traversals英文意思为遍历】【choreographer英文意思为编舞者】
传入的mTraversalRunnable,在run方法里执行doTraversal(),然后是调用performTraversals(),而performTraversals()则是那个进行View绘制流程三大步的最重要方法。
总结