一切的一切从最初的代码开始
 LGPerson *p1 = [LGPerson alloc];
 LGPerson *p2 = [p1 init];
 LGPerson *p3 = [p1 init];

 NSLog(@"%@ - %p - %p",p1,p1,&p1);
 NSLog(@"%@ - %p - %p",p2,p2,&p2);
 NSLog(@"%@ - %p - %p",p3,p3,&p3);
输出结果为:
  - 0x6000018981b0 - 0x7ffeea86f178
  - 0x6000018981b0 - 0x7ffeea86f170
  - 0x6000018981b0 - 0x7ffeea86f168
从上得到的结论:3个对象是同一块内存空间 ,但指向对象的3个指针是不一样的 。
为什么是这样?这就是本文需要探索的内容,alloc做了什么?init做了什么?
准备工作:
- 下载 objc4-781 源码
- 编译源码,可参考这篇文章
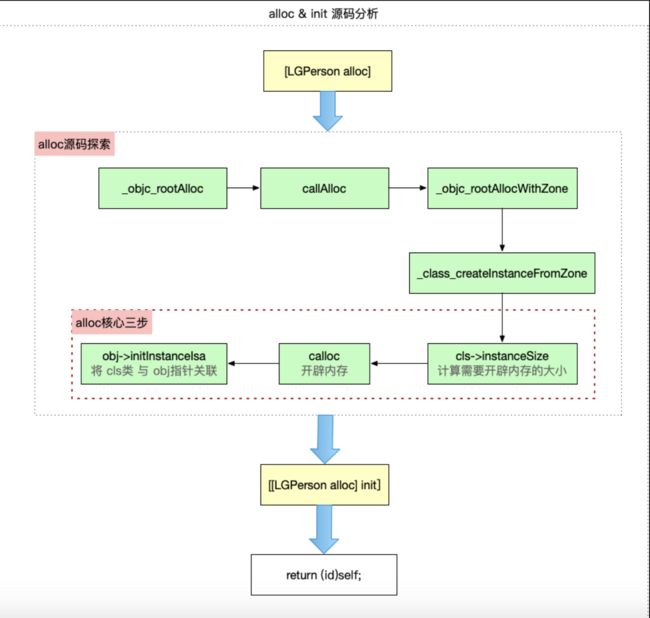
alloc
1.通过断点进入 alloc:
+ (id)alloc {
    return _objc_rootAlloc(self);
}
2.进入 _objc_rootAlloc:
id _objc_rootAlloc(Class cls) {
    return callAlloc(cls, false/*checkNil*/, true/*allocWithZone*/);
}
3.进入 callAlloc
static ALWAYS_INLINE id
callAlloc(Class cls, bool checkNil, bool allocWithZone=false) {
#if __OBJC2__
    // checkNil 为false,!cls 也为false ,不会返回nil
    if (slowpath(checkNil && !cls)) return nil;
    // 是否有自定义的 +allocWithZone 实现
    if (fastpath(!cls->ISA()->hasCustomAWZ())) {
        return _objc_rootAllocWithZone(cls, nil);
    }
#endif
    // No shortcuts available.
    if (allocWithZone) {
        return ((id(*)(id, SEL, struct _NSZone *))objc_msgSend)(cls, @selector(allocWithZone:), nil);
    }
    return ((id(*)(id, SEL))objc_msgSend)(cls, @selector(alloc));
}
slowpath & fastpath
其中关于slowpath和fastpath这里需要简要说明下,这两个都是objc源码中定义的宏,其定义如下
//x很可能为真, fastpath 可以简称为 真值判断
#define fastpath(x) (__builtin_expect(bool(x), 1))
//x很可能为假,slowpath 可以简称为 假值判断
#define slowpath(x) (__builtin_expect(bool(x), 0))
其中的__builtin_expect指令是由gcc引入的,
1、目的:编译器可以对代码进行优化,以减少指令跳转带来的性能下降。即性能优化。
2、作用:允许程序员将最有可能执行的分支告诉编译器。
3、指令的写法为:__builtin_expect(EXP, N)。表示 EXP==N的概率很大。
4、fastpath定义中__builtin_expect((x),1)表示 x 的值为真的可能性更大;即 执行if里面语句的机会更大
5、slowpath定义中的__builtin_expect((x),0)表示x 的值为假的可能性更大。即执行else 里面语句的机会更大
cls->ISA()->hasCustomAWZ()
其中fastpath中的cls->ISA()->hasCustomAWZ() 表示判断一个类是否有自定义的+allocWithZone实现,这里通过断点调试,是没有自定义的实现,所以会执行到if里面的代码,即走到_objc_rootAllocWithZone
4.进入 _objc_rootAllocWithZone
id _objc_rootAllocWithZone(Class cls, malloc_zone_t *zone __unused) {
    // allocWithZone under __OBJC2__ ignores the zone parameter
    return _class_createInstanceFromZone(cls, 0, nil,
                                         OBJECT_CONSTRUCT_CALL_BADALLOC);
}
5.进入 _class_createInstanceFromZone
static ALWAYS_INLINE id
_class_createInstanceFromZone(Class cls, size_t extraBytes, void *zone,
                              int construct_flags = OBJECT_CONSTRUCT_NONE,
                              bool cxxConstruct = true,
                              size_t *outAllocatedSize = nil)// alloc 源码 第五步
{
    ASSERT(cls->isRealized());

    // Read class's info bits all at once for performance
    bool hasCxxCtor = cxxConstruct && cls->hasCxxCtor();
    bool hasCxxDtor = cls->hasCxxDtor();
    bool fast = cls->canAllocNonpointer();
    size_t size;

    // 1. 计算需要开辟的内存大小
    size = cls->instanceSize(extraBytes);
    if (outAllocatedSize) *outAllocatedSize = size;

    id obj;
    if (zone) {
        obj = (id)malloc_zone_calloc((malloc_zone_t *)zone, 1, size);
    } else {
        // 2. 申请内存
        obj = (id)calloc(1, size);
    }
    if (slowpath(!obj)) {
        if (construct_flags & OBJECT_CONSTRUCT_CALL_BADALLOC) {
            return _objc_callBadAllocHandler(cls);
        }
        return nil;
    }

    if (!zone && fast) {
        // 3. 设置isa
        obj->initInstanceIsa(cls, hasCxxDtor);
    } else {
        // Use raw pointer isa on the assumption that they might be
        // doing something weird with the zone or RR.
        obj->initIsa(cls);
    }

    if (fastpath(!hasCxxCtor)) {
        return obj;
    }

    construct_flags |= OBJECT_CONSTRUCT_FREE_ONFAILURE;
    return object_cxxConstructFromClass(obj, cls, construct_flags);
}
核心3步:
// 1. 计算需要开辟的内存大小
size = cls->instanceSize(extraBytes);
// 2. 申请内存
obj = (id)calloc(1, size);
// 3. 设置isa
obj->initInstanceIsa(cls, hasCxxDtor);
instanceSize 的实现,根据断点会执行以下几步:
size_t instanceSize(size_t extraBytes) const {
    if (fastpath(cache.hasFastInstanceSize(extraBytes))) {
        return cache.fastInstanceSize(extraBytes);
    }
    size_t size = alignedInstanceSize() + extraBytes;
    // CF requires all objects be at least 16 bytes.
    if (size < 16) size = 16;
    return size;
}

size_t fastInstanceSize(size_t extra) const {
    ASSERT(hasFastInstanceSize(extra));
    // __builtin_constant_p 用于判断一个值是否为编译时常数
    if (__builtin_constant_p(extra) && extra == 0) {
        return _flags & FAST_CACHE_ALLOC_MASK16;
    } else {
        size_t size = _flags & FAST_CACHE_ALLOC_MASK;
        // remove the FAST_CACHE_ALLOC_DELTA16 that was added
        // by setFastInstanceSize
        // FAST_CACHE_ALLOC_DELTA16 8个字节
        return align16(size + extra - FAST_CACHE_ALLOC_DELTA16);
    }
}
// 16字节对齐算法
static inline size_t align16(size_t x) {
    return (x + size_t(15)) & ~size_t(15);
}
内存字节对齐原则
在解释为什么需要16字节对齐之前,首先需要了解内存字节对齐的原则,主要有以下三点
-
数据成员对齐规则:struct或者union的数据成员,第一个数据成员放在offset为0的地方,以后每个数据成员存储的起始位置要从该成员大小或者成员的子成员大小(只要该成员有子成员,比如数据、结构体等)的整数倍开始(例如int在32位中是4字节,则要从4的整数倍地址开始存储) -
数据成员为结构体:如果一个结构里有某些结构体成员,则结构体成员要从其内部最大元素大小的整数倍地址开始存储(例如:struct a里面存有struct b,b里面有char、int、double等元素,则b应该从8的整数倍开始存储) -
结构体的整体对齐规则:结构体的总大小,即sizeof的结果,必须是其内部做大成员的整数倍,不足的要补齐
为什么需要16字节对齐的原因,有以下几点:
- 通常内存是由一个个字节组成的,
cpu在存取数据时,并不是以字节为单位存储,而是以块为单位存取,块的大小为内存存取力度。频繁存取字节未对齐的数据,会极大降低cpu的性能,所以可以通过减少存取次数来降低cpu的开销 - 16字节对齐,是由于在一个对象中,第一个属性
isa占8字节,当然一个对象肯定还有其他属性,当无属性时,会预留8字节,即16字节对齐,如果不预留,相当于这个对象的isa和其他对象的isa紧挨着,容易造成访问混乱 - 16字节对齐后,可以
加快CPU读取速度,同时使访问更安全,不会产生访问混乱的情况 。
字节对齐-总结
- 在字节对齐算法中,对齐的主要是
对象,而对象的本质则是一个struct objc_object的结构体。 - 结构体在内存中是
连续存放的,所以可以利用这点对结构体进行强转。 - 苹果早期是
8字节对齐,现在是16字节对齐。
alloc总结:
- 通过对
alloc源码的分析,可以得知alloc的主要目的就是开辟内存,而且开辟的内存需要使用16字节对齐算法,现在开辟的内存的大小基本上都是16的整数倍 - 开辟内存的核心步骤有3步:
计算 -- 申请 -- 关联
init
alloc源码探索完了,接下来探索init源码,通过源码可知,init的源码实现有以下两种
类方法 init
+ (id)init {
    return (id)self;
}
这里的init是一个构造方法 ,是通过工厂设计(工厂方法模式),主要是用于给用户提供构造方法入口。这里能使用id强转的原因,主要还是因为 内存字节对齐后,可以使用类型强转为你所需的类型。
实例方法 init
//实例方法 init
LGPerson *objc = [[LGPerson alloc] init];

//init的源码实现
- (id)init {
    return _objc_rootInit(self);
}

//_objc_rootInit的源码实现
id
_objc_rootInit(id obj)
{
    // In practice, it will be hard to rely on this function.
    // Many classes do not properly chain -init calls.
    return obj;
}
通过上述可知:返回的是传入的self本身
alloc + init 整体源码的探索流程图
new
初始化除了init,还可以使用new,两者本质上并没有什么区别,以下是objc中new的源码实现
+ (id)new {
    return [callAlloc(self, false/*checkNil*/) init];
}
通过源码可以得知,new函数中直接调用了callAlloc函数,且调用了init函数,所以可以得出new 其实就等价于 [alloc init]。
但是一般开发中并不建议使用new,主要是因为有时会重写init方法做一些自定义的操作,用new初始化可能会无法走到自定义的部分。