Vue CLI
什么是CLI?
Command-Line Interface 命令行界面,俗称脚手架
vue-cli 可以快速搭建Vue开发环境以及对应的webpack配置
- 脚手架依赖webpack,而webpack运行需要node,所以要安装NodeJs
- NPM : Node Package Manager 为node的包管理工具
安装全局的Webpack
npm install webpack -g
安装Vue CLI
npm install @vue/cli -g
Vue CLI3 初始化
vue create 项目名
Vue Router
- vue-router 基本使用
- vue-router 嵌套路由
- vue-router 参数传递
- vue-router 导航守卫
- keep-alive
- https://router.vuejs.org/zh/
vue-router 基本使用
安装vue-router
npm install vue-router --save在模块工程中使用它
2.1 导入路由对象,并调用Vue.use(VueRouter)
2.2 创建路由实例,传入路由映射配置
2.3 在Vue实例中挂载创建的路由实例
使用vue-router的步骤
3.1 创建路由组件
3.2 配置路由映射(组件和路径映射关系)
3.3 使用路由(router-link,router-view)
/* src/router/index.js */
import Vue from 'vue'
import VueRouter from 'vue-router'
// 懒加载
const Home = () => import('../components/home')
const About = () => import('../components/about')
// 1.注入插件
Vue.use(VueRouter)
// 2.定义路由
const routes = [
{
path:'/',
redirect:'/home'
},
{
path:'/home',
component:Home
},
{
path:'/about',
component:About
}
]
// 3.创建router实例,默认使用URL的hash
const router = new VueRouter({
routes,
mode:'history', // 使用HTML5的history模式 (localhost:8080/home)
linkActiveClass:'active' // 修改路由激活添加的类名
})
// 4.导出router实例
export default router
/* src/main.js */
import Vue from 'vue'
import App from './App'
import router from './router'
new Vue({
el:'#app',
router, // 挂载到Vue实例中
render:h=>h(App)
})
/* src/components/home.vue */
// 创建路由组件
home
/* src/App.vue */
App start
home
about
router-link 补充
to:指定跳转路径
tag:指定渲染成什么元素
replace:replace不会留下history记录,所以在指定replace的情况下,后退键返回不能返回到上一个页面中
active-class:当 router-link对应的路由配对成功,会自动给当前元素设置一个router-link-active的class,设置active-class可以修改默认的名称
通过代码跳转路由
/* src/App.vue */App starthomeabout
动态路由
/* src/router/index.js */
{
    path: '/user/:aid',
    component: User
}


/* src/App.vue */
user


/* src/components/user.vue */
{{$route.params.aid}}    /* abc */
嵌套路由
/* src/components/new1.vue */
new1
/* src/components/new2.vue */
new2
/* src/router/index.js */
const New1 = () => import('../components/new1')
const New2 = () => import('../components/new2')
{
path:'/home',
component:Home,
children:[
{
path:'',
redirect:'new1'
},
{
path:'new1',
component:New1
},
{
path:'new2',
component:New2
}
]
},
/* src/components/home.vue */
Home start
new1
new2
传递参数
params:(/router/abc)
配置路由的格式:/router/:id
传递的方式:在path后面跟上对应的值
query:(/router/id=123)
配置路由的格式:/router
传递的方式:query的key作为传递方式
/* src/App.vue */
// 两种传参方式
App start
home
about
获取参数
- 使用了vue-router的应用中,路由对象会被注入到每个组件中,赋值为this.$route,并且当路由切换时,路由对象会被更新
/* src/components/home.vue */


        params:{{$route.params}}     // params:{"id":"abc"}
        query:{{$route.query}}       // query:{"name":"kevin","age":18}
导航守卫
vue-router 提供的导航守卫用于监听路由的进入和离开
全局守卫(钩子函数)
beforeEach:路由即将改变前触发(前置钩子)
afterEach:路由改变后触发(后置钩子)
https://router.vuejs.org/zh/guide/advanced/navigation-guards.html#%E8%B7%AF%E7%94%B1%E7%8B%AC%E4%BA%AB%E7%9A%84%E5%AE%88%E5%8D%AB
/* 使用beforeEach修改标题 */
/* src/router/index.js */
const routes = [
    {
        path:'/home',
        compontent:Home,
        meta:{
            title:'首页'
        }
    },
    {
        path:'/about',
        compontent:About,
        meta:{
            title:'关于'
        }
    }
]

const router = new VueRouter({...})

/**
 * to:即将要进入的目标对象
 * from:当前导航即将要离开的路由对象
 * next:调用该方法,才能进入下一个钩子,
 * afterEach不需要调用next方法
 */
router.beforeEach((to,from,next)=>{
    window.document.title = to.meta.title
    next()
})
补充
keep-alive 是 Vue 内置组件,可以使被包含的组件保留状态,或避免重新渲染
include:字符串/正则表达式,只有匹配的组件会被缓存
exclude:字符串/正则表达式,匹配的组件不会被缓存
Vuex
Vuex 是一个专为 Vue.js 应用程序开发的状态管理模式
单页面的状态管理
State:状态数据集合
View:视图层,针对State的变化,显示不同的信息
Actions:提交数据,更改State
/* src/store/index.js */

import Vuex from 'vuex'
import Vue from 'vue'

Vue.use(Vuex)

const store = new Vuex.Store({
    state:{
        publicData:{name:'liang',age:18}
    },
    mutations:{
        showData(state){
            console.log(state.publicData)
        }
    }
})

export default store


/* main.js */

import store from './store'

new Vue({
    el: '#app',
    store,
    render: h => h(App)
})
- 其他组件,通过 this.store.commit('mutation中方法') 来修改状态
- 注意:我们通过提交mutation的方式,而非直接改变store.state.count。这样Vuex可以更准确的追踪状态的变化,所以不要直接改变store.state.count的值。
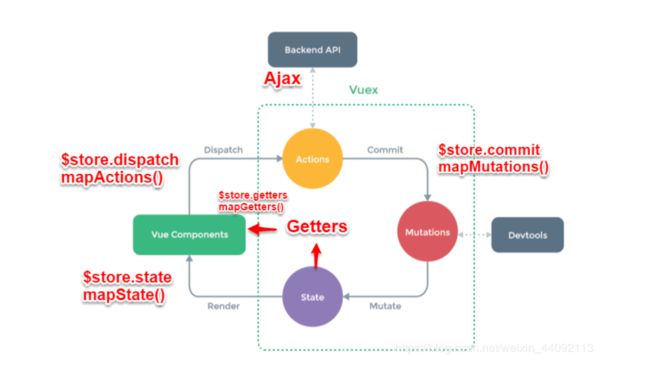
- state:存储状态
- getters:可以理解为state的计算属性,在组件中使用$sotre.getters.fun()
- mutations:修改状态,同步的,在组件中使用$store.commit('fname',params),和自定义事件类似。
- actions:异步操作。在组件中使用是$store.dispath('')
- modules:store的子模块,方便状态管理而使用的。用起来和上面的一样。
Getters
const store = mew Vue.Store({
    state:{
        numArr = [1,2,3,4,5,6,7,8,9]
    },
    getters:{
        getany: state => {
            return state.numArr.filter(num=>num > 3)
       }
    }
})


// 利用callback传递参数
getters:{
    getany: state => {
        return (a,b) =>{
            state.numArr.filter(num=>(num + a) * b)
        }
    }
}
Mutation
注意:只能通过 提交Mutation 来更新store的状态
Mutation 不建议使用异步方法: (如果异步,devtools将不能很好的追踪这个操作什么时候会被完成)
const store = mew Vue.Store({
    state:{
        numArr = [1,2,3,4,5,6,7,8,9]
    },
    mutations:{
        // 1. 定义函数
        change(state){
            state.numArr = ['a','b','c','d','e']
        }
    }
})


// 2. 其他组件, 提交函数
changArr(){
    this.$store.commit('change')
}


/*------------------传递参数(payload)------------------*/
mutations:{
    // 1. 定义函数
    change(state,payload){
        console.log(payload)
        state.numArr = ['a','b','c','d','e']
    }
}

// 2. 其他组件, 提交函数
changArr(){
    // 1.提交方式1
    this.$store.commit('change',something)
    // 2.提交方式2
    this.$store.commit({
        type: 'change',
        key: value
    })
}


/*------------------store添加新属性------------------*/
// 1.使用 Vue.set(obj,'addKey',value)
// 2.用新对象给旧对象重新赋值
const store = new Vue.Store({
    state:{
        numArr = [1,2,3,4,5,6,7,8,9],
        info:{
            name: 'zhangsan',
            age: '18'
        }
    },
    mutations:{
        addInfo(state,payload){
            //0.错误的赋值方法(使用该方法页面做不到响应式)
            // state.info['hobby'] = payload.hobby    错误
            //1.使用 Vue.set(obj,'addKey',value)
            Vue.set(state.info,'hobby',payload.hobby)
            // 2.用新对象给旧对象重新赋值
            state.info = {...state.info,'hobby': payload.hobby}
        }
    }
})
Action
用于Vuex 处理异步操作,类似 Mutation
其他组件通过 dispatch 提交 action,也支持payload
使用 Promise 进行异步操作
const store = mew Vue.Store({
    state:{
        numArr = [1,2,3,4,5,6,7,8,9],
        info:{
            name: 'zhangsan',
            age: '18'
        }
    },
    mutations:{
        addInfo(state,payload){
            //0.错误的赋值方法(使用该方法页面做不到响应式)
            // state.info['hobby'] = payload.hobby    错误
            //1.使用 Vue.set(obj,'addKey',value)
            Vue.set(state.info,'hobby',payload.hobby)
            // 2.用新对象给旧对象重新赋值
            state.info = {...state.info,'hobby': payload.hobby}
        }
    },
    actions:{
        /* add(context.payload){
            // context 是和 store对象具有相同方法和属性的对象
            setTimeout(()=>{
                context.commit('change',payload)
            },2000)
        }*/
        add(content){
            return new Promise((resolve,reject) => {
                setTimeout(()=>{
                    context.commit('change',payload)
                    resolve()
                },2000)
            })
        }
    }
})


// 其他组件
addInfo(){
    // this.$store.dispatch('add',{'hobby' : "coding"})
    this.$store.dispatch('add',{'hobby' : "coding"}).then(res =>{
        console.log("更新成功")
    }).catch(err =>{
        console.log(err)
    })
}
Module
使用 Module 来管理store(将store分成几个模块进行管理)
const moduleA = {
    state:{...},
    getters:{...},
    mutations:{...},
    actions:{...}
}

const moduleB = {
    state:{...},
    getters:{...},
    mutations:{...},
    actions:{...}
}

const store = new Vuex.Store({
    modules:{
        a:moduleA,
        b:moduleB
    }
})


// 参数

const moduleA = {
    actions:{
        add({state,getters,rootState},payload){
            console.log(state,getters,rootState)
            console.log(payload)
        }
    }
}

