BiLSTM-Attention文本分类
概述
上一篇中使用BiLSTM-Attention模型进行关系抽取,因为只放出了较为核心的代码,所以看上去比较混乱。这篇以简单的文本分类为demo,基于pytorch,全面解读BiLSTM-Attention。
文本分类实战
整体构建
首先,我们导入需要的包,包括模型,优化器,梯度求导等,将数据类型全部转化成tensor类型
import numpy as np
import torch
import torch.nn as nn
import torch.optim as optim
from torch.autograd import Variable
import torch.nn.functional as F
import matplotlib.pyplot as plt

dtype = torch.FloatTensor
接下来我们确定一些基本的参数,并且简单地构造一个数据,实现情感的二分类。数据集中三个句子,一半正,一半负。label中1是好的情感,0是不好的情感。
embedding_dim = 3
n_hidden = 5
num_classes = 2  # 0 or 1
sentences = ["i love you", "he loves me", "she likes baseball", "i hate you", "sorry for that", "this is awful"]
labels = [1, 1, 1, 0, 0, 0]
接着,我们需要构建词表,把数据集中出现过的词拿出来并给它一个编号:
word_list = " ".join(sentences).split()
word_list = list(set(word_list))
word_dict = {w: i for i, w in enumerate(word_list)}
vocab_size = len(word_dict)
然后我们定义输入输出,输入其实是每个句子中的每个单词对应在词表中的id,将输入输出变成Variable,以便于求导:
inputs = []
for sen in sentences:
    inputs.append(np.asarray([word_dict[n] for n in sen.split()]))
targets = []
for out in labels:
    targets.append(out)
input_batch = Variable(torch.LongTensor(inputs))
target_batch = Variable(torch.LongTensor(targets))
接下来构造模型:
class BiLSTM_Attention(nn.Module):
    def __init__(self):
        super(BiLSTM_Attention, self).__init__()
        self.embedding = nn.Embedding(vocab_size, embedding_dim)
        self.lstm = nn.LSTM(embedding_dim, n_hidden, bidirectional=True)
        self.out = nn.Linear(n_hidden * 2, num_classes)
    def attention_net(self, lstm_output, final_state):
        hidden = final_state.view(-1, n_hidden * 2, 1)
        attn_weights = torch.bmm(lstm_output, hidden).squeeze(2)
        soft_attn_weights = F.softmax(attn_weights, 1)
        context = torch.bmm(lstm_output.transpose(1, 2), soft_attn_weights.unsqueeze(2)).squeeze(2)
        return context, soft_attn_weights.data.numpy()

    def forward(self, X):
        input = self.embedding(X)
        input = input.permute(1, 0, 2)
        hidden_state = Variable(torch.zeros(1*2, len(X), n_hidden))
        cell_state = Variable(torch.zeros(1*2, len(X), n_hidden))
        output, (final_hidden_state, final_cell_state) = self.lstm(input, (hidden_state, cell_state))
        output = output.permute(1, 0, 2)
        attn_output, attention = self.attention_net(output, final_hidden_state)
        return self.out(attn_output), attention
首先embedding中需要传入词表,以及嵌入的维度。有一个双向LSTM层,还有一个线性层以获取LSTM中的隐层参数。
这里详细说一下attention层的操作,首先hidden 的维度是 [batch_size, n_hidden * num_directions(=2), 1(=n_layer)],接下来确定attention矩阵,将LSTM输出与hidden相乘,去掉第三个维度。attn_weights的维度是[batch_size, n_step] ,两个矩阵相乘后的维度,[batch_size, n_hidden * num_directions(=2), n_step] * [batch_size, n_step, 1] = [batch_size, n_hidden * num_directions(=2), 1],然后去掉了第三个维度的1。这样再经过softmax函数。再将权重函数与LSTM输出相乘得到context。最终context的维度就是 [batch_size, n_hidden * num_directions(=2)] 。
最后在forward方法中操作各个层,进行层的各种操作,获得输出和attention矩阵。
接下来就是将模型实例化,并确定损失函数,优化器:
model = BiLSTM_Attention()
criterion = nn.CrossEntropyLoss()
optimizer = optim.Adam(model.parameters(), lr=0.001)
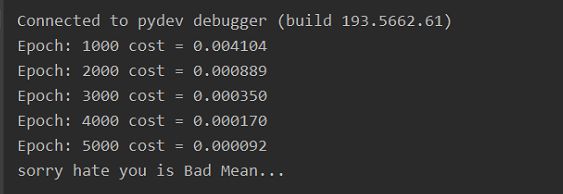
最后训练并测试:
# Training
for epoch in range(5000):
    optimizer.zero_grad()
    output, attention = model(input_batch)
    loss = criterion(output, target_batch)
    if (epoch + 1) % 1000 == 0:
        print('Epoch:', '%04d' % (epoch + 1), 'cost =', '{:.6f}'.format(loss))
    loss.backward()
    optimizer.step()
# Test
test_text = 'sorry hate you'
tests = [np.asarray([word_dict[n] for n in test_text.split()])]
test_batch = Variable(torch.LongTensor(tests))
# Predict
predict, _ = model(test_batch)
predict = predict.data.max(1, keepdim=True)[1]
if predict[0][0] == 0:
    print(test_text,"is Bad Mean...")
else:
    print(test_text,"is Good Mean!!")
最终我们画图看下attention中结果:
fig = plt.figure(figsize=(6, 3)) # [batch_size, n_step]
ax = fig.add_subplot(1, 1, 1)
ax.matshow(attention, cmap='viridis')
ax.set_xticklabels(['']+['first_word', 'second_word', 'third_word'], fontdict={'fontsize': 14}, rotation=90)
ax.set_yticklabels(['']+['batch_1', 'batch_2', 'batch_3', 'batch_4', 'batch_5', 'batch_6'], fontdict={'fontsize': 14})
plt.show()
调试
读取数据:
 转换文本后的输入输出:

接下来跑完整个循环,看到结果,测试集中的这个句子分类为负:

Attention矩阵:
